

Appspace is a web-based system for employees to view published corporate content, make workspace reservations, and reserve building passes.
Focused on employee communications and space reservations, the Employee View improves the traditional information sharing workflow across an organization, making it easy for employees to access information or make reservations from their computers, tablets, or mobile devices, regardless of where they are. We’ve also made it really easy for publishers to add content to any channel they have access to, directly from the portal, without the need to navigate back to the console.
Administrators may also brand the Employee View for their own organization by changing the theme color, logo, and home banner, with a myriad of options.
This topic provides illustrations on navigating the Employee View in Appspace, allowing employees to make reservations, and access corporate content that has been published to them either via the Appspace console, or directly from an enterprise messaging app, such as Slack, Webex Teams, and Microsoft Teams.
This topic consists of 6 articles, please be sure to view each article.
Places
The Places tab includes three sub-tabs: Workspaces (default selected), Building Pass, and At The Office.
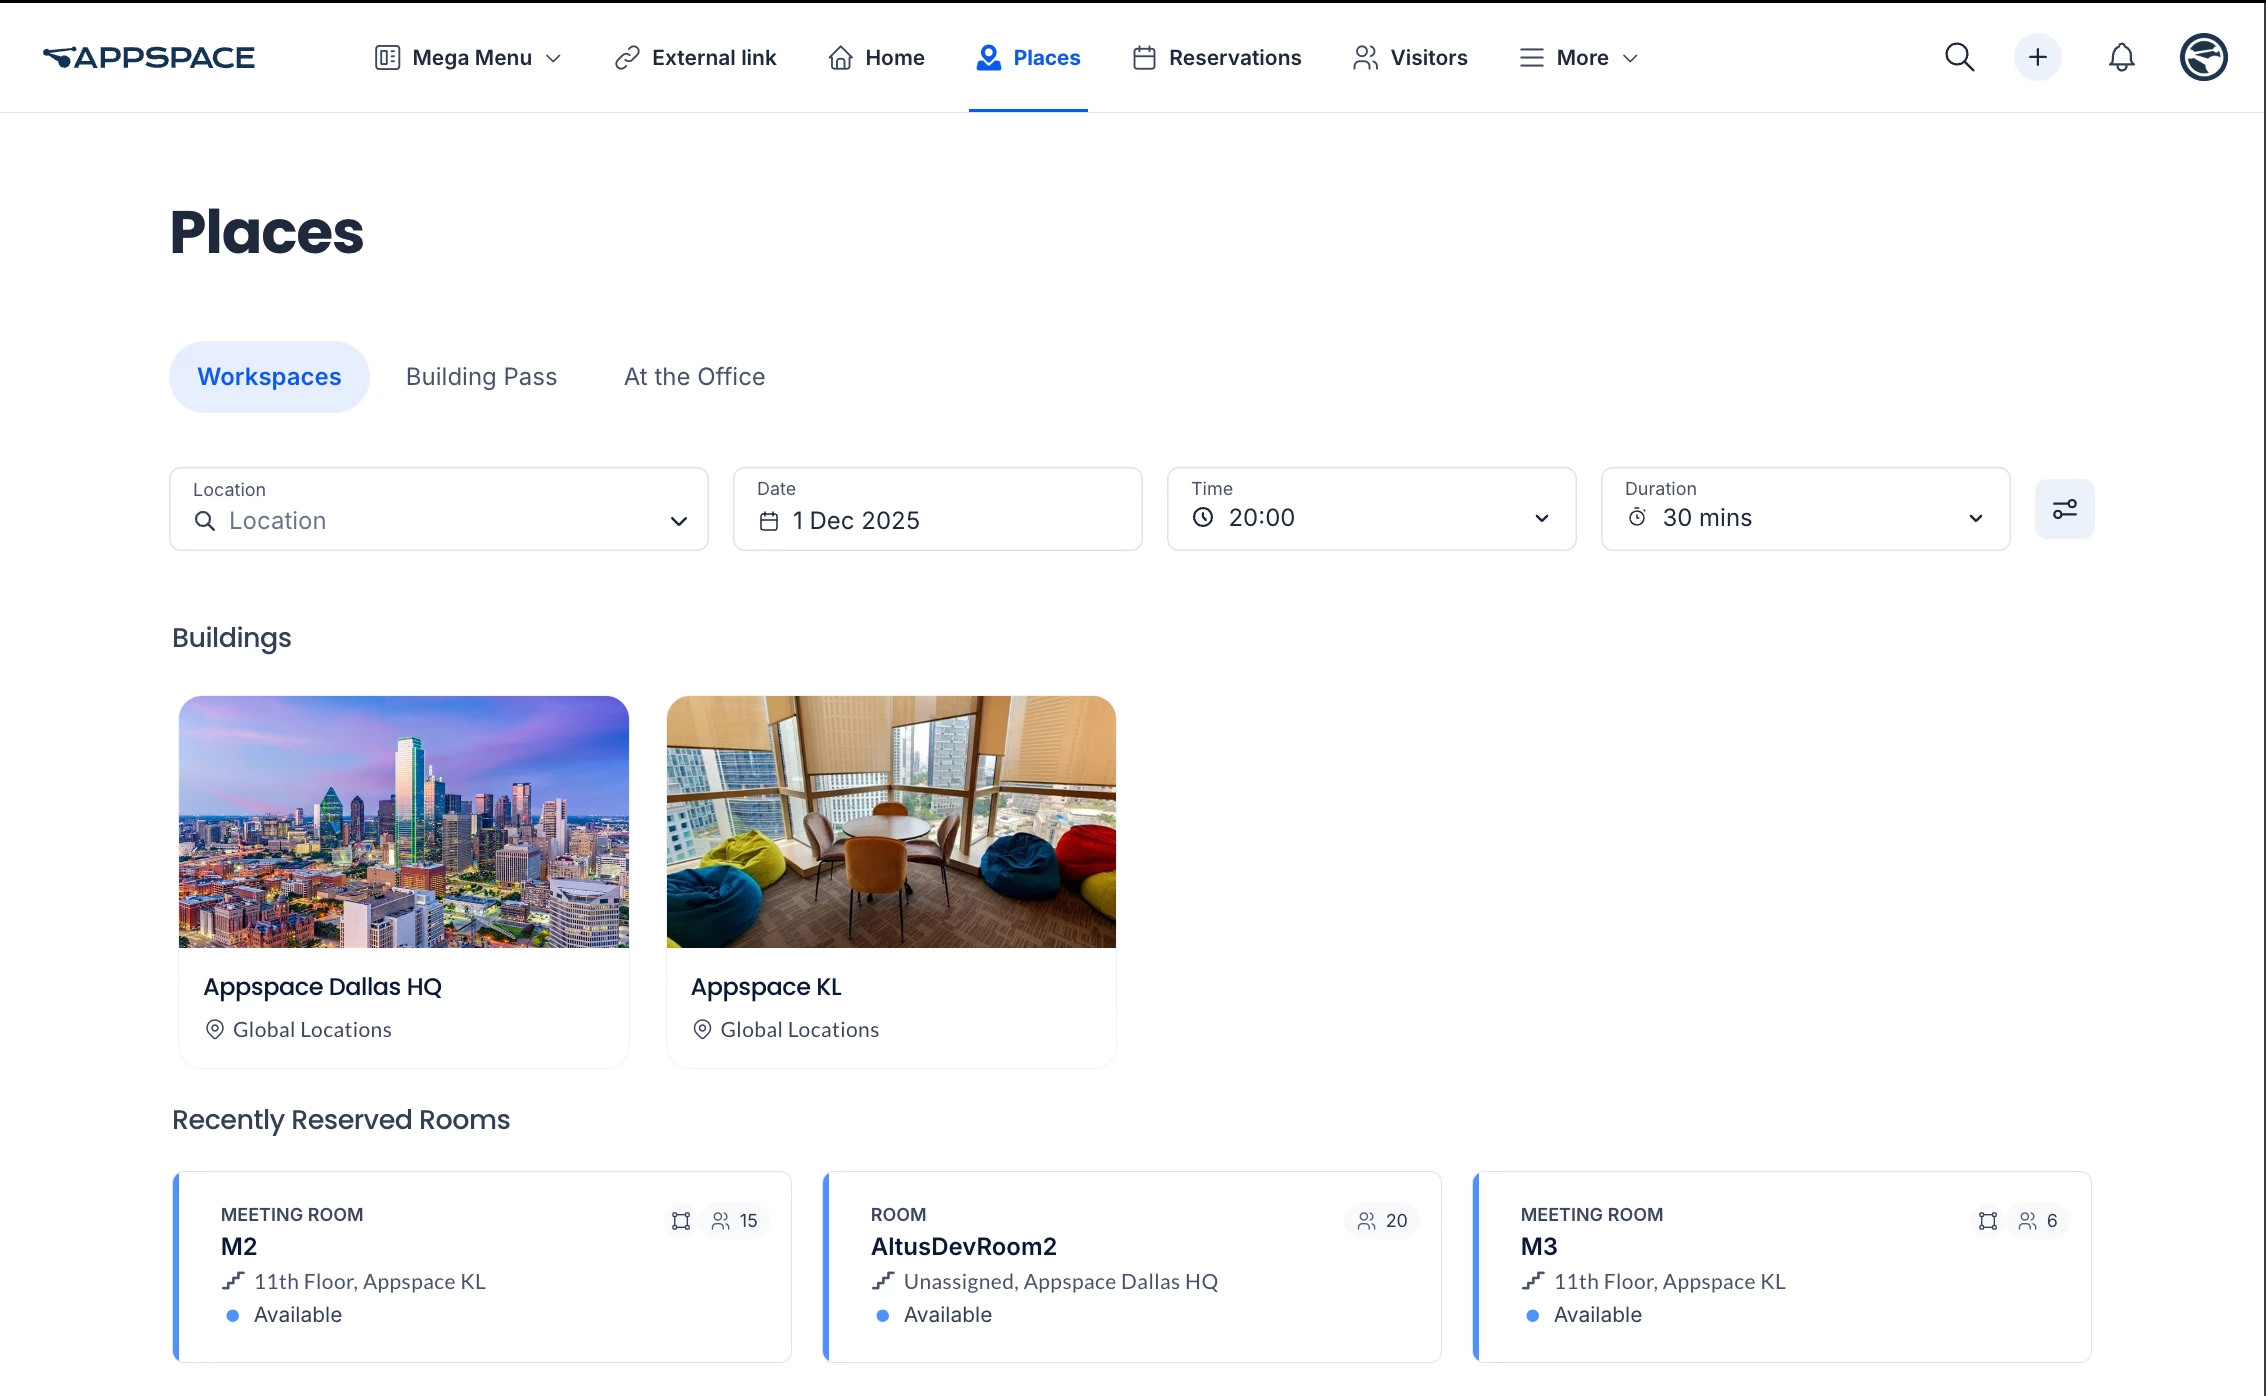
Workspaces
The Workspaces tab will list your most recent building and workspace reservations/bookings, for easy access and quick reservations.
This section may be empty on first use if no reservations have been made thus far. However, if your home location has buildings with bookable resources, these buildings will always be listed at the top, regardless of reservation history.
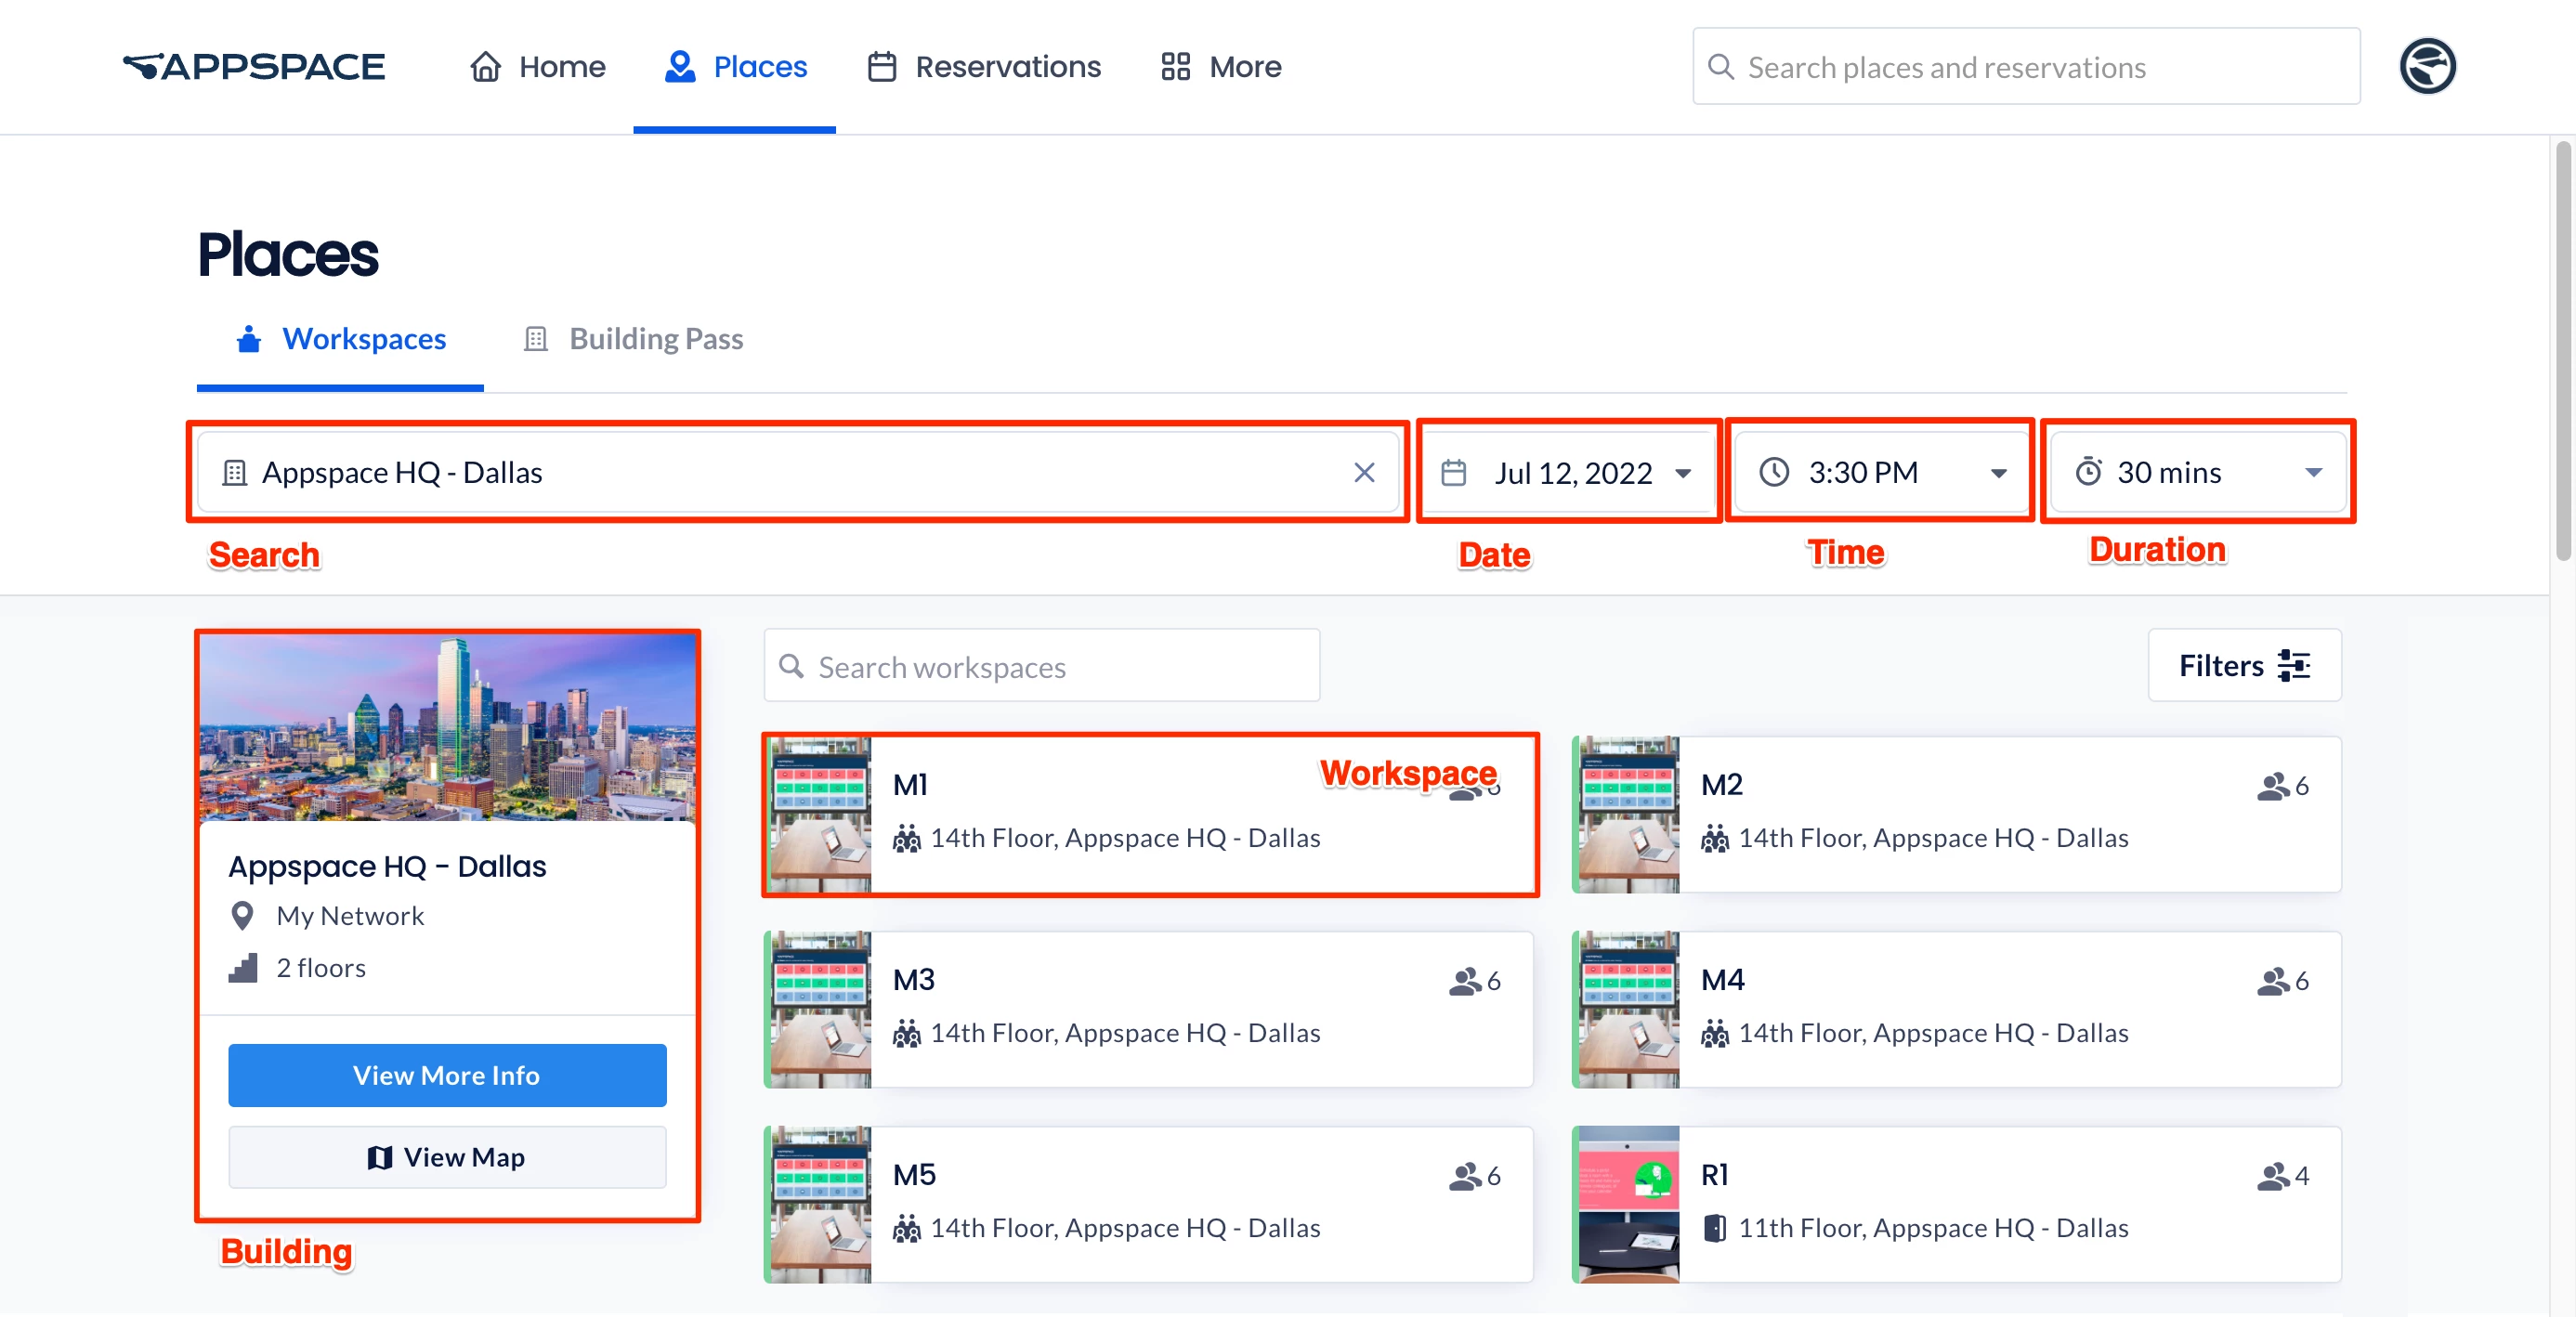
- Search – The search bar on the top menu bar is now localized to this Workspaces tab. Type in a letter or keyword to search for available buildings or resources. The search results will display all reservable and non-reservable resources, such as Rooms, Spaces, and even Points of Interest.
- Building – Type in a letter or keyword, and select a building from the drop-down menu. Use the Date, Time, and Duration filters to narrow down your search for buildings. If your home location has buildings with bookable resources, these buildings will always be listed at the top.
Once you select a building, the building is displayed on the left, and all workspaces in that building are displayed on the right.
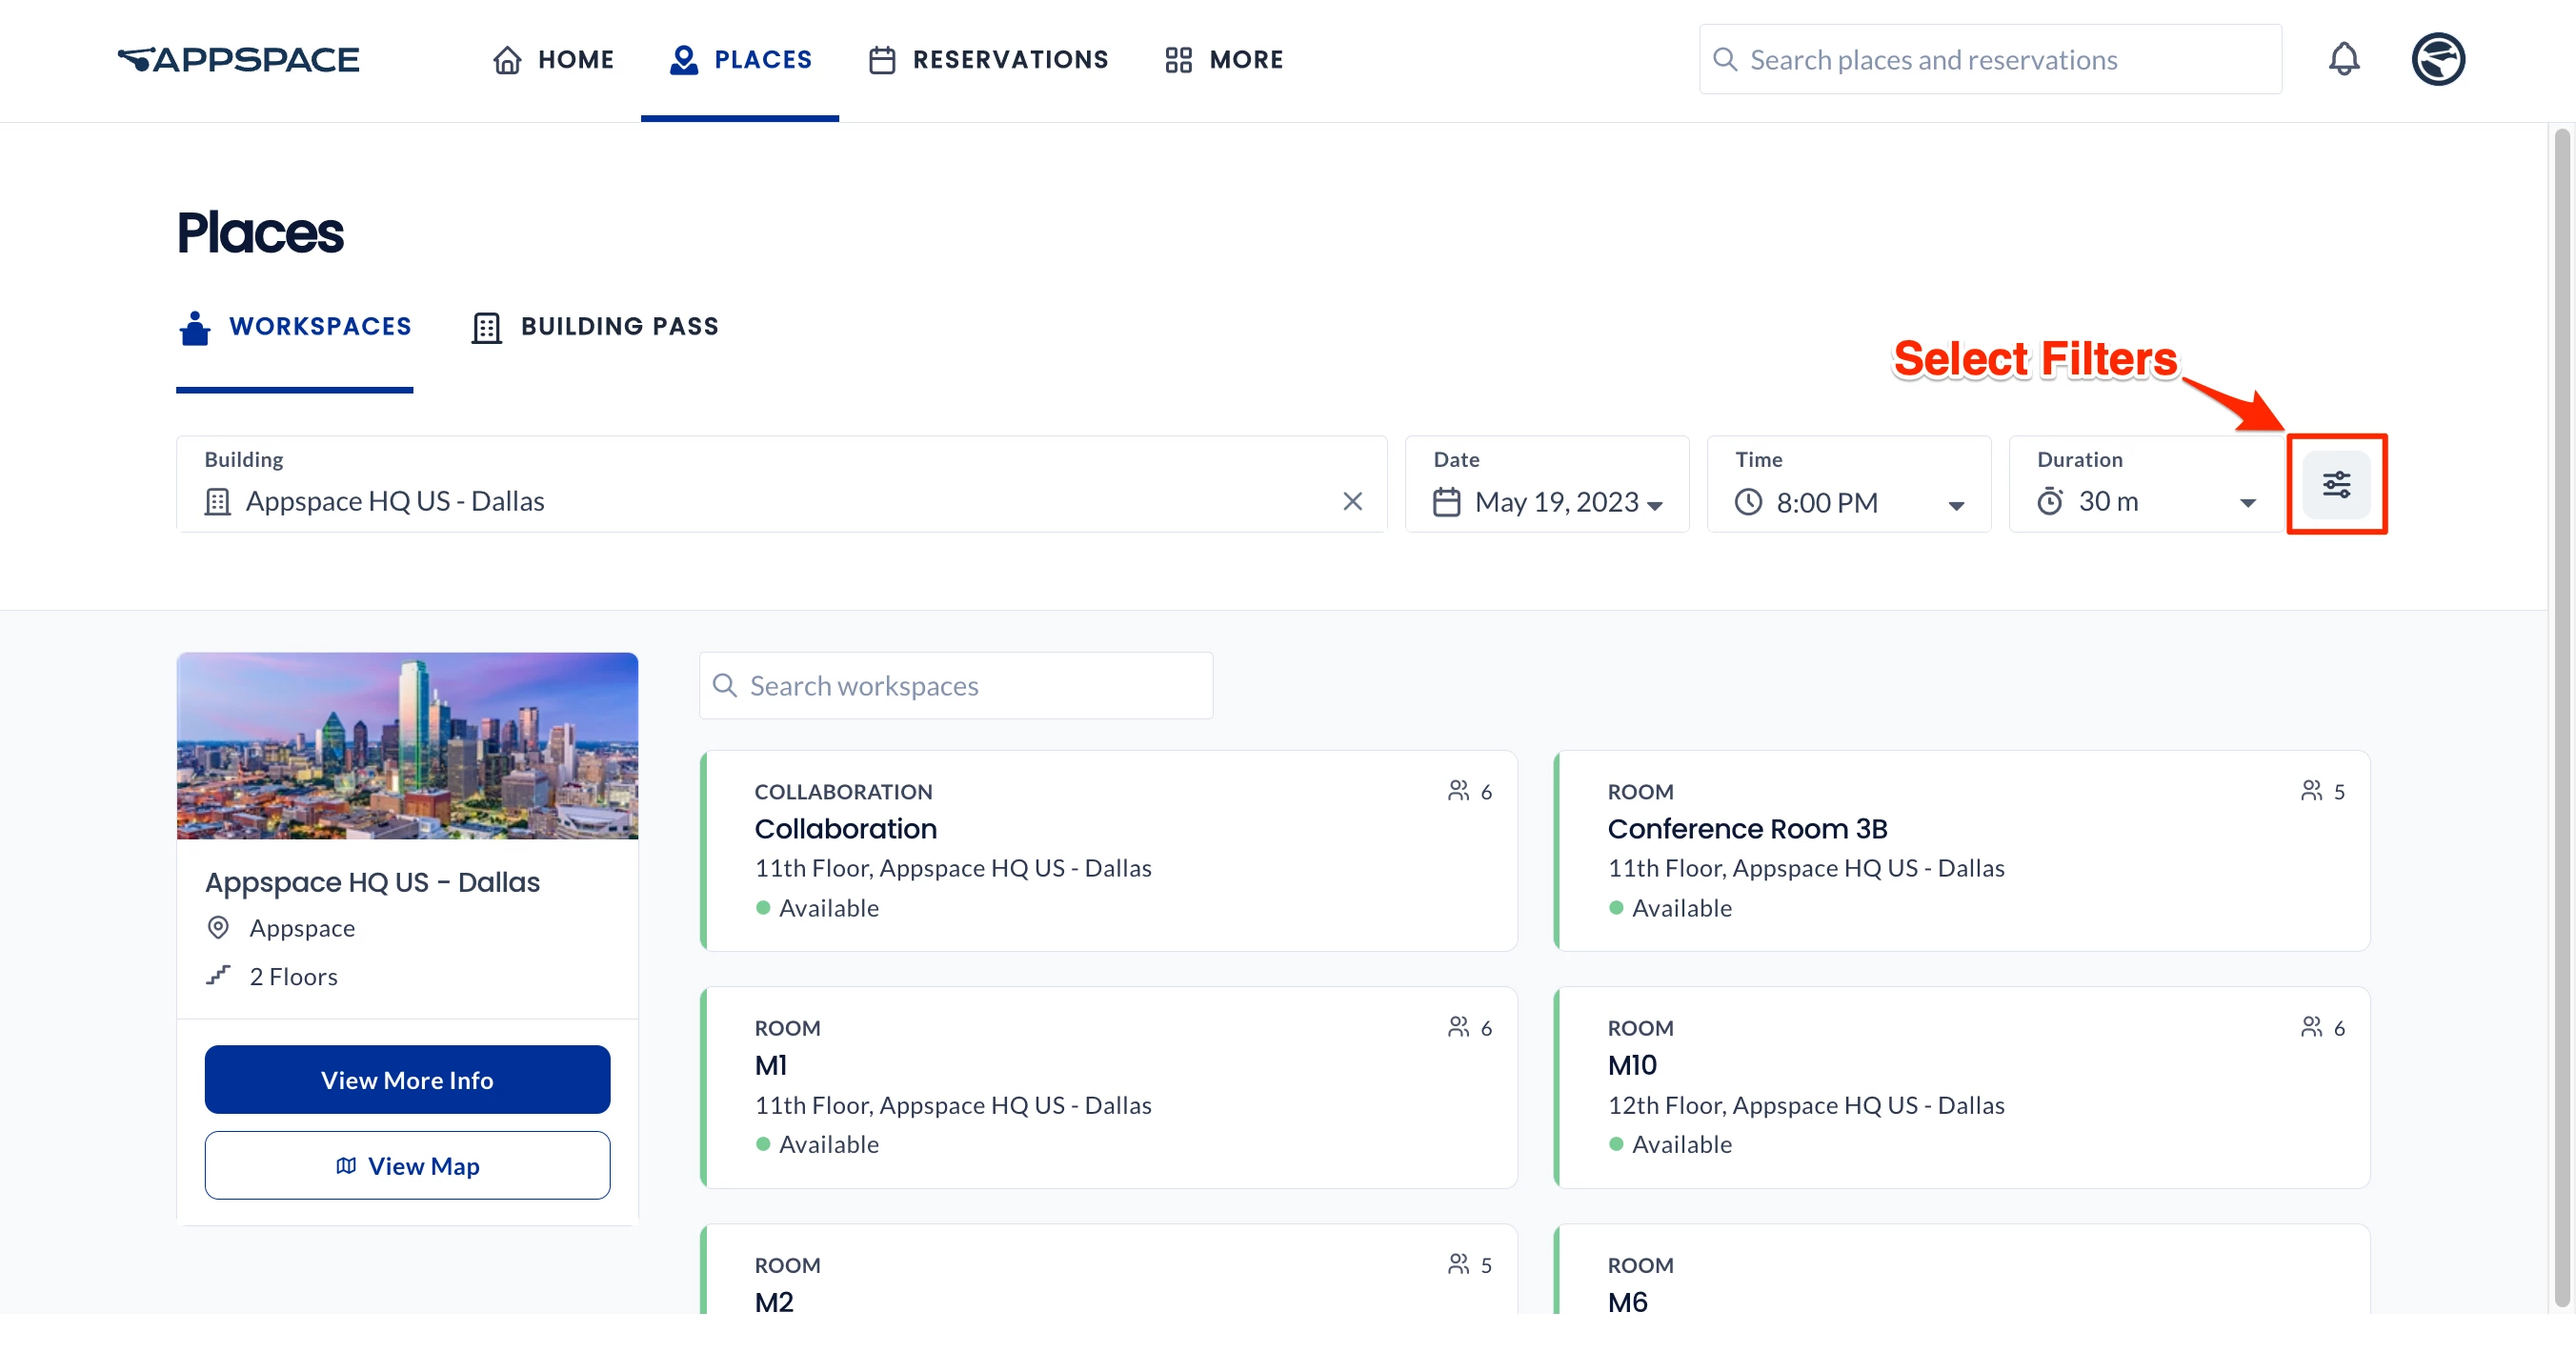
- Filters – Narrow down the resources in your selected building based on the floor, zone, workspace type, resource status (Available/Unavailable), capacity, and facilities available in the resource.
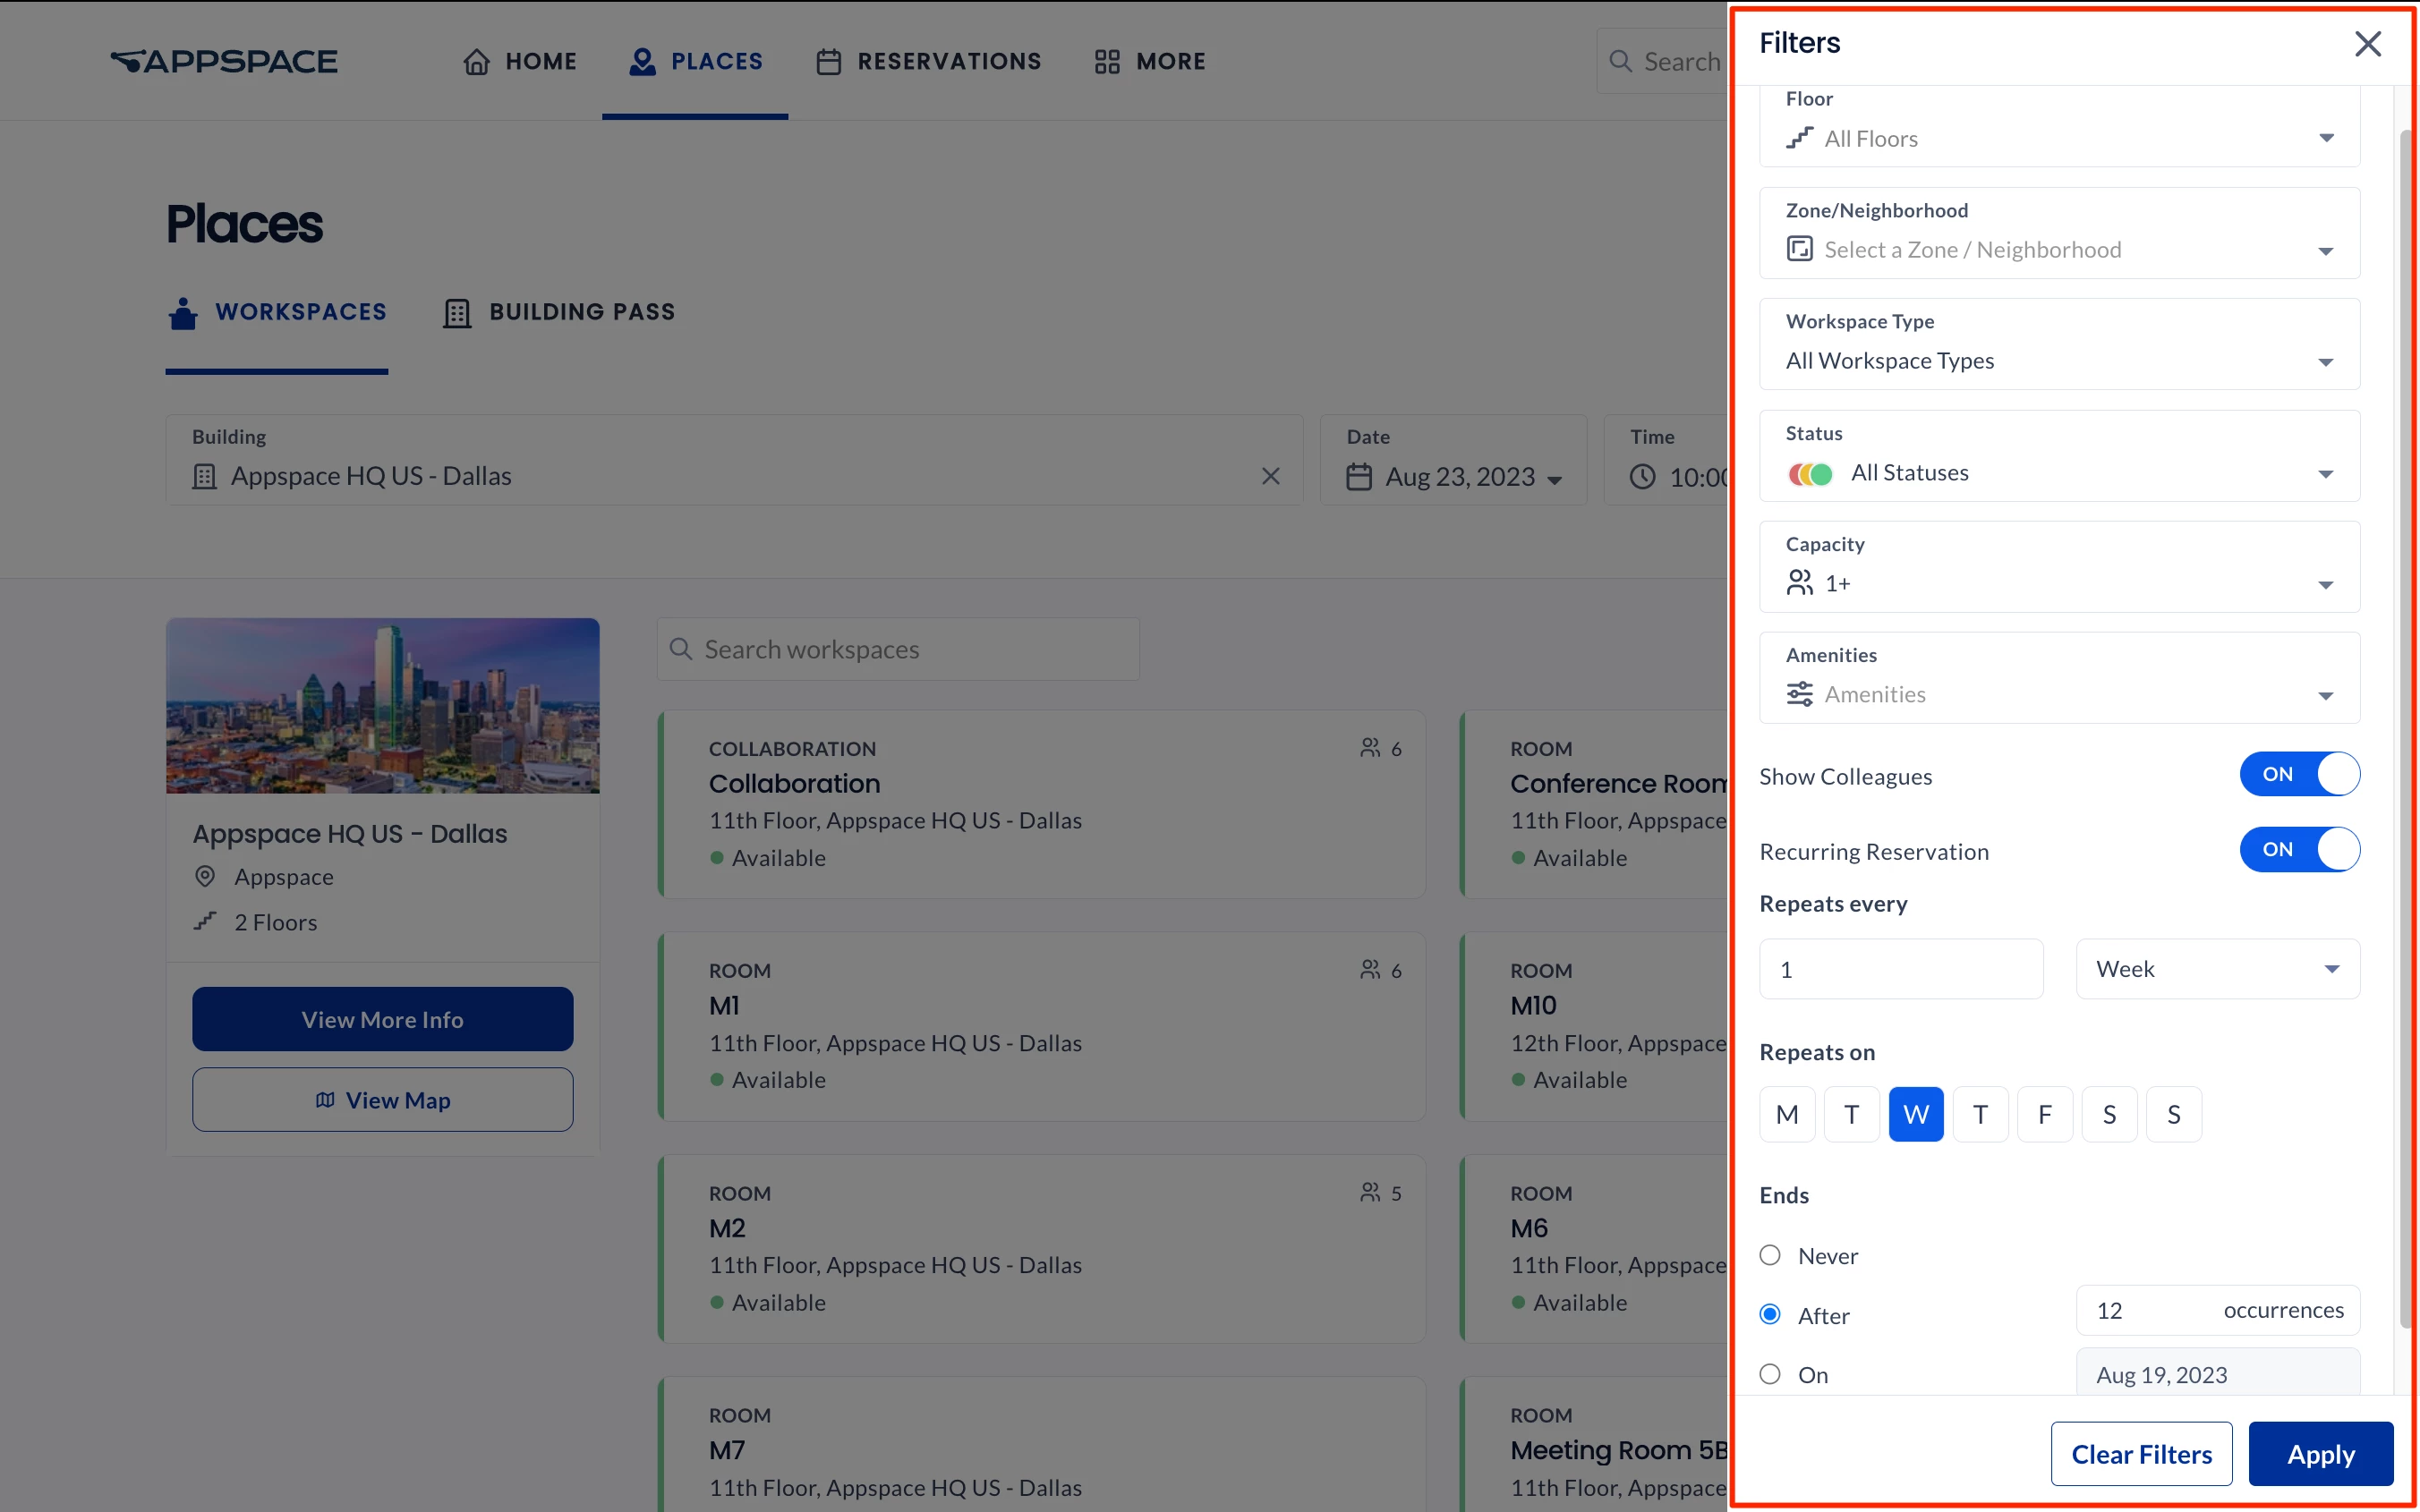
- Show Colleagues – Turn on this option to see colleagues that are booked with a resource. However, colleagues will remain hidden if their workspace reservation is set to private, unless you are the host or an attendee of the meeting.
- Recurring Reservation – Turn on this option if the reservation would occur periodically. Enter the number of times the reservation occurs in the Repeats every field and drop-down menu:
- Day – The reservation occurs every set number of days.
- Week – The reservation occurs every set number of weeks.
- In the Repeats on drop-down menu, you may select if the reservation is repeated on the day of each week. For example:
-
- Reservation is repeated every Monday, Wednesday, and Friday of each week.
-
- In the Repeats on drop-down menu, you may select if the reservation is repeated on the day of each week. For example:
- Month – The reservation occurs every set number of months.
- In the Repeats on drop-down menu, you may select if the reservation is repeated on the date, or day of each month. For example:
- Day 6 – 6th of each month.
- The first Sunday of each month.
- In the Repeats on drop-down menu, you may select if the reservation is repeated on the date, or day of each month. For example:
- Year – The reservation occurs every set number of years.
- In the Repeats on drop-down menu, you may select if the reservation is repeated on the date, or day of each year. For example:
- 6 June – 6th of June each year.
- The first Sunday of June each year.
- In the Repeats on drop-down menu, you may select if the reservation is repeated on the date, or day of each year. For example:
- Select when the reservation Ends:
- Never – The recurring reservation never ends.
Note
When set to Never Ends, the maximum recurring reservations will be determined by the reservations provider:
- Appspace Provider: Maximum of 730 meeting instances, or meeting instances until the year 2100, whichever comes first.
- After – The recurring reservation ends after the set number of occurrences.
- On – the recurring reservation ends after the set date.
- Never – The recurring reservation never ends.
- View More Info – Click this button to display more information about the building, such as capacity, number of floors, and any applied restrictions. You may also directly reserve a building pass to this building.
- View Map – Click this button to display the floorplan in map view. The floorplan will display all available workspaces and resources on the selected floor (if applicable).
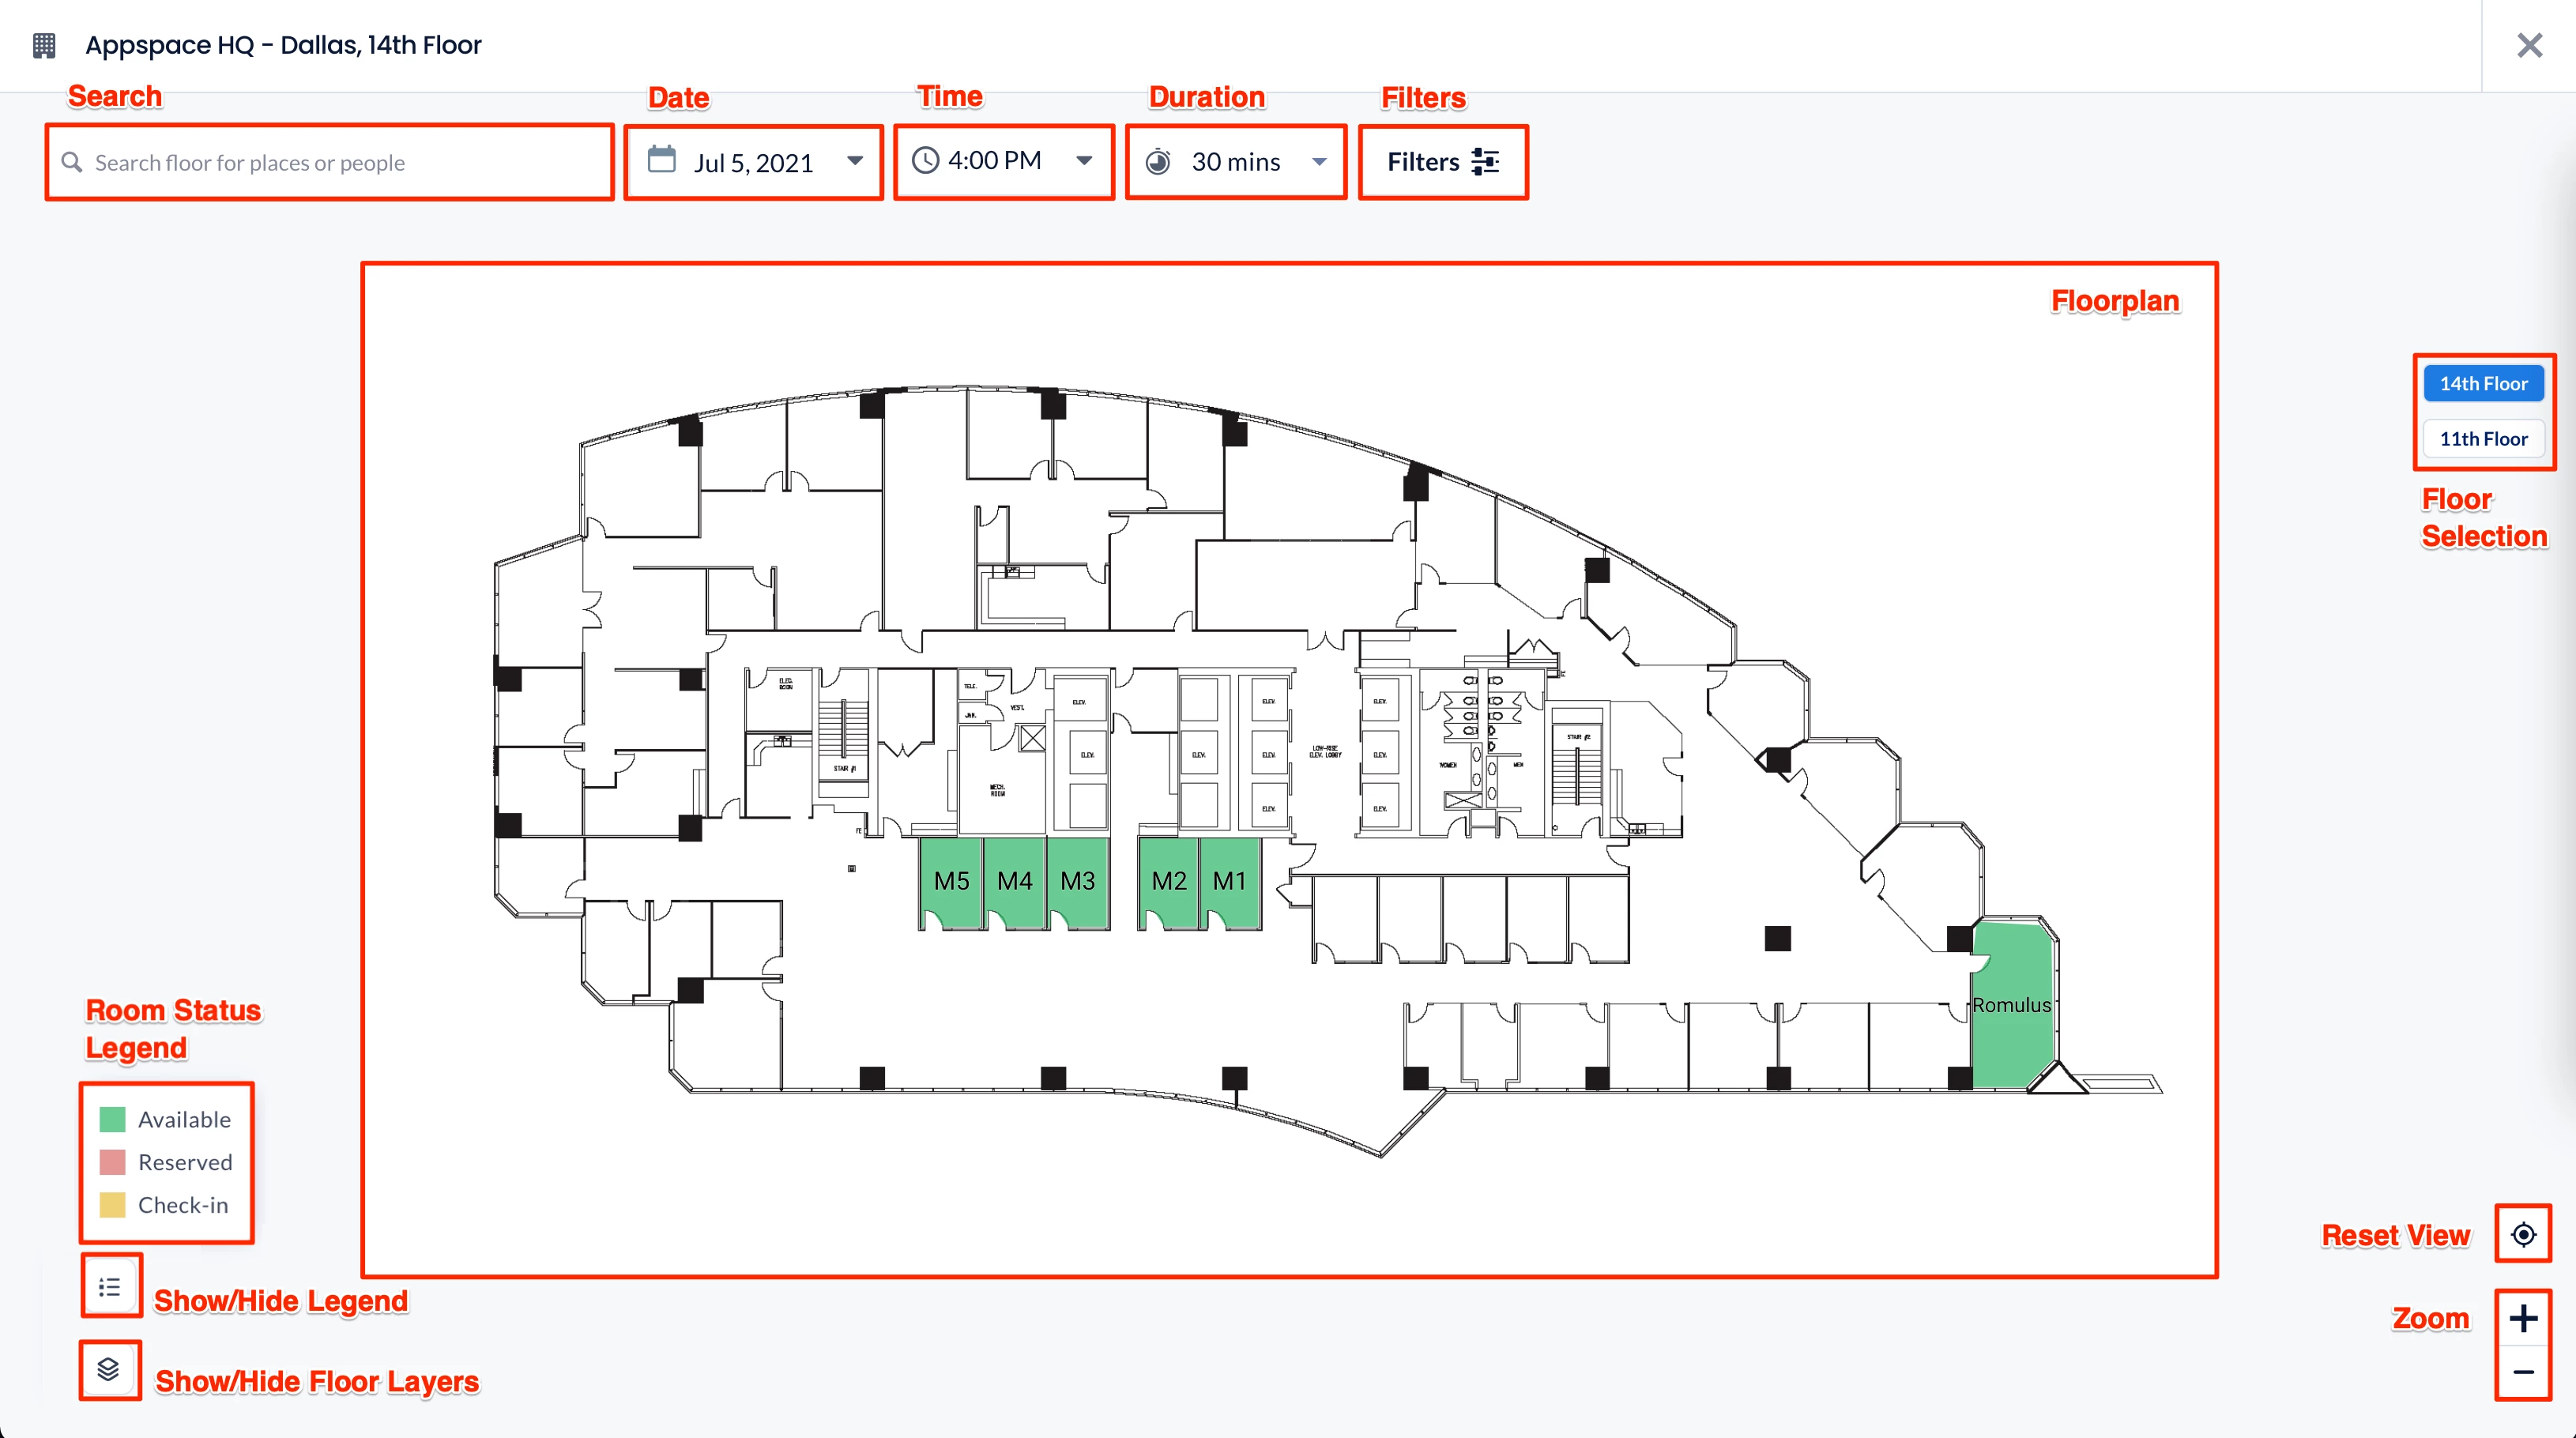
On this floorplan view, you may do the following:- Search – Type in a letter or keyword to search for and display floors, workspaces, or people (colleagues) in this building. Use the Date, Time, and Duration filters to narrow down your search. Workspaces and people (colleagues) who are on a different floor from the one currently shown will also be displayed in the search result. However, people in workspace reservations that are set to private will not appear in the results.
- Filters – Use the Filters button to narrow down the search based on the floor, zone, workspace type, resource status (Available/Unavailable), capacity, and facilities available in this building.
- Floor Selection – Select an available floor to view the floor plan and all its available resources. If there are no floors in this building, this option will not be available.
- Zoom – Use the + or – buttons to zoom in or out.
- Reset View – Reset to the default floorplan view.
- Room Status Legend – indicates the colors for room status. These colors may be customized by an administrator to follow your organization’s preferences. The legend will only display colors and room statuses that are being used and hide those that are not being used.
- Select Layer – Select a floor layer to display on the floor plan. -new

Making a Reservation
Once you’ve found the desired resource either in normal view or the map view, you may reserve the resource. Refer to the Reserve a Workspace, Desk, or Room – Employees article for detailed instructions.
Pathfinding
(New) Pathfinding allows users to quickly find directions between resource locations, such as rooms, workspaces, and points of interest (POIs), by defining a start and end location in the system. The system displays the route on the map, offering straightforward point-to-point directions without needing to capture the user’s position, providing a seamless navigation experience for employees and visitors. It also includes accessibility features that help users find routes that bypass obstacles, such as stairs.
Perform the following steps to use the pathfinding feature to display directions to a resource, such as rooms, workspaces, and points of interest (POI), on the floor map of a building.
- Log in to your Employee App with your Appspace Premium User credentials.
- Click Places from the menu, and click the Workspaces tab.
- Select a building or type a building name in the Building drop-down menu.
- After you have selected the building, click View Map.
- The map layout view of the default floor is displayed. Select a different floor from the right column if required.
- Use one of the following methods to select available resources, such as rooms, workspaces, and points of interest (POIs).
- Method 1 – To get directions starting from the Building Starting Point:
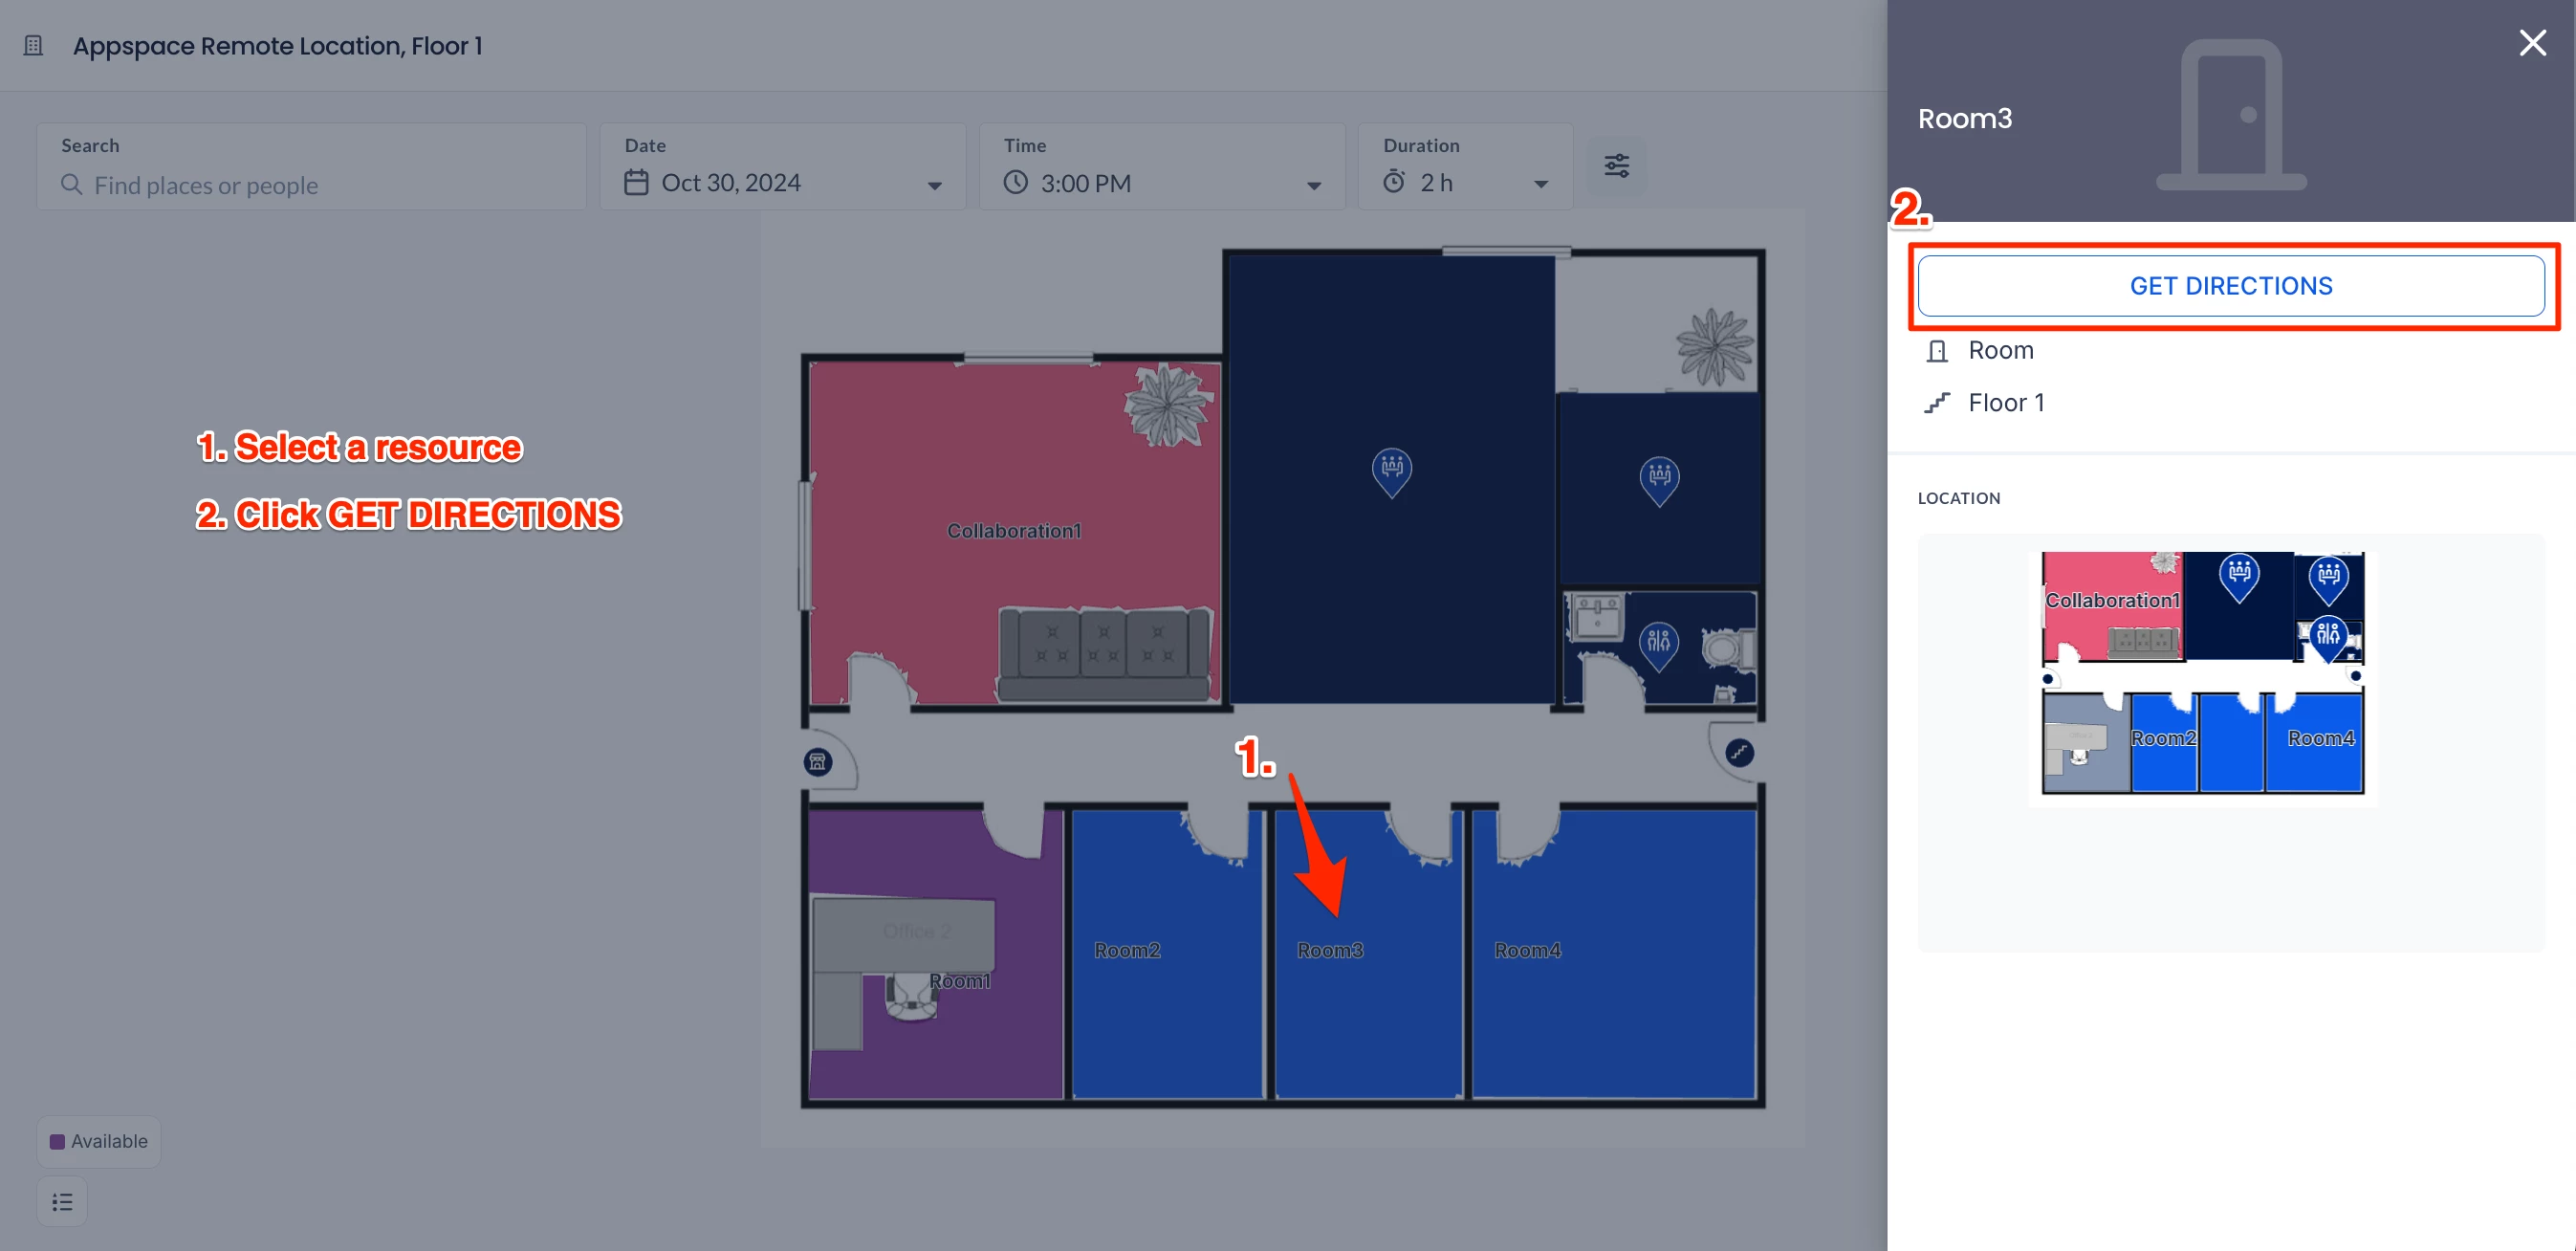
- On the map layout, click on the desired resource (room, workspace, or POI) and click Get Directions.
- Under the Pathfinding section, click the first field to set the starting point.
- The directions from the Building Starting Point to the selected resource will be displayed.
- Method 2 – To get directions from a starting point other than the Building Starting Point:
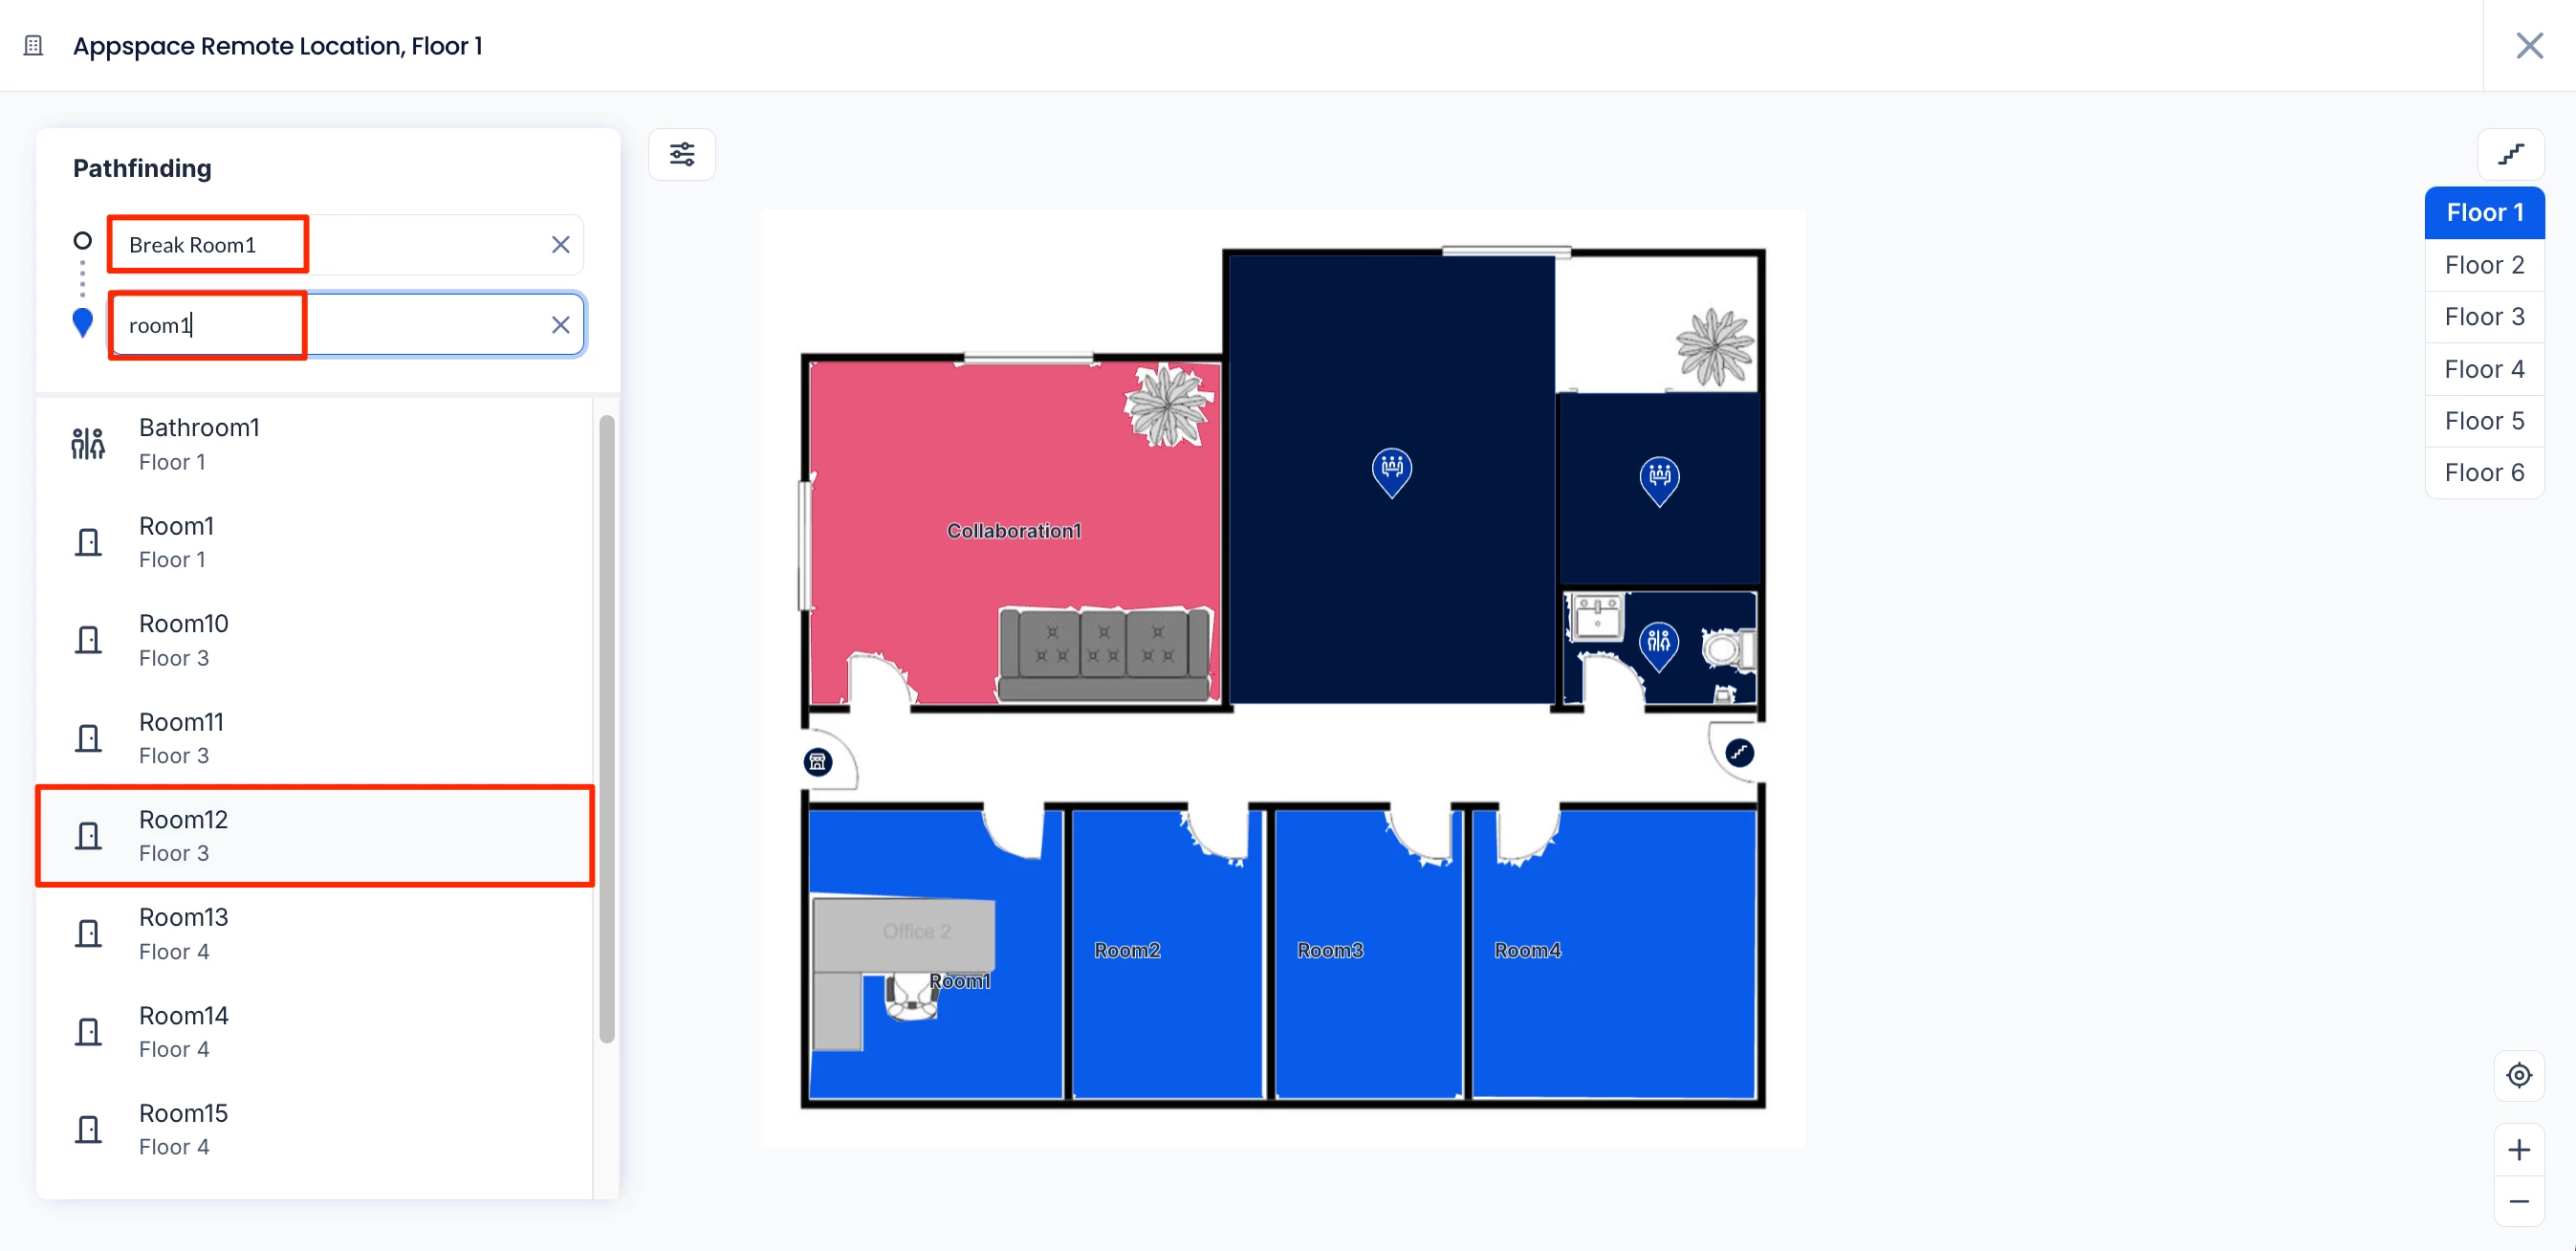
- On the map layout, click on the desired resource (room, workspace, or POI) and click Get Directions.
- Under the Pathfinding section, click the first field to set the starting point.
- With the field selected, type in the name of the resource (room, workspace, or POI), or click on the desired resource on the map layout.
- Click on the second field to set your destination. You can either type the name of the destination resource and select it from the drop-down list or, if it’s on the same floor as the starting point, select it from the map layout.
- The directions from the starting resource to the destination resource will be displayed.
- Method 1 – To get directions starting from the Building Starting Point:
- If the pathfinding involves multiple floors, use the left and right arrows to switch between the starting and destination floors.
- The starting floor will display directions from the starting point to the nearest available staircase, escalator, or elevator.
- The destination floor will display directions from the staircase, escalator, or elevator to the destination resource.
- Handicapped users who wish to use an elevator or wheelchair access can click the Options icon and select Avoid stairs.
Building Pass
The Building Pass tab will list all the buildings available in your location. Each building block indicates the building name, location, and its status (Available, Unavailable, Restrictions).
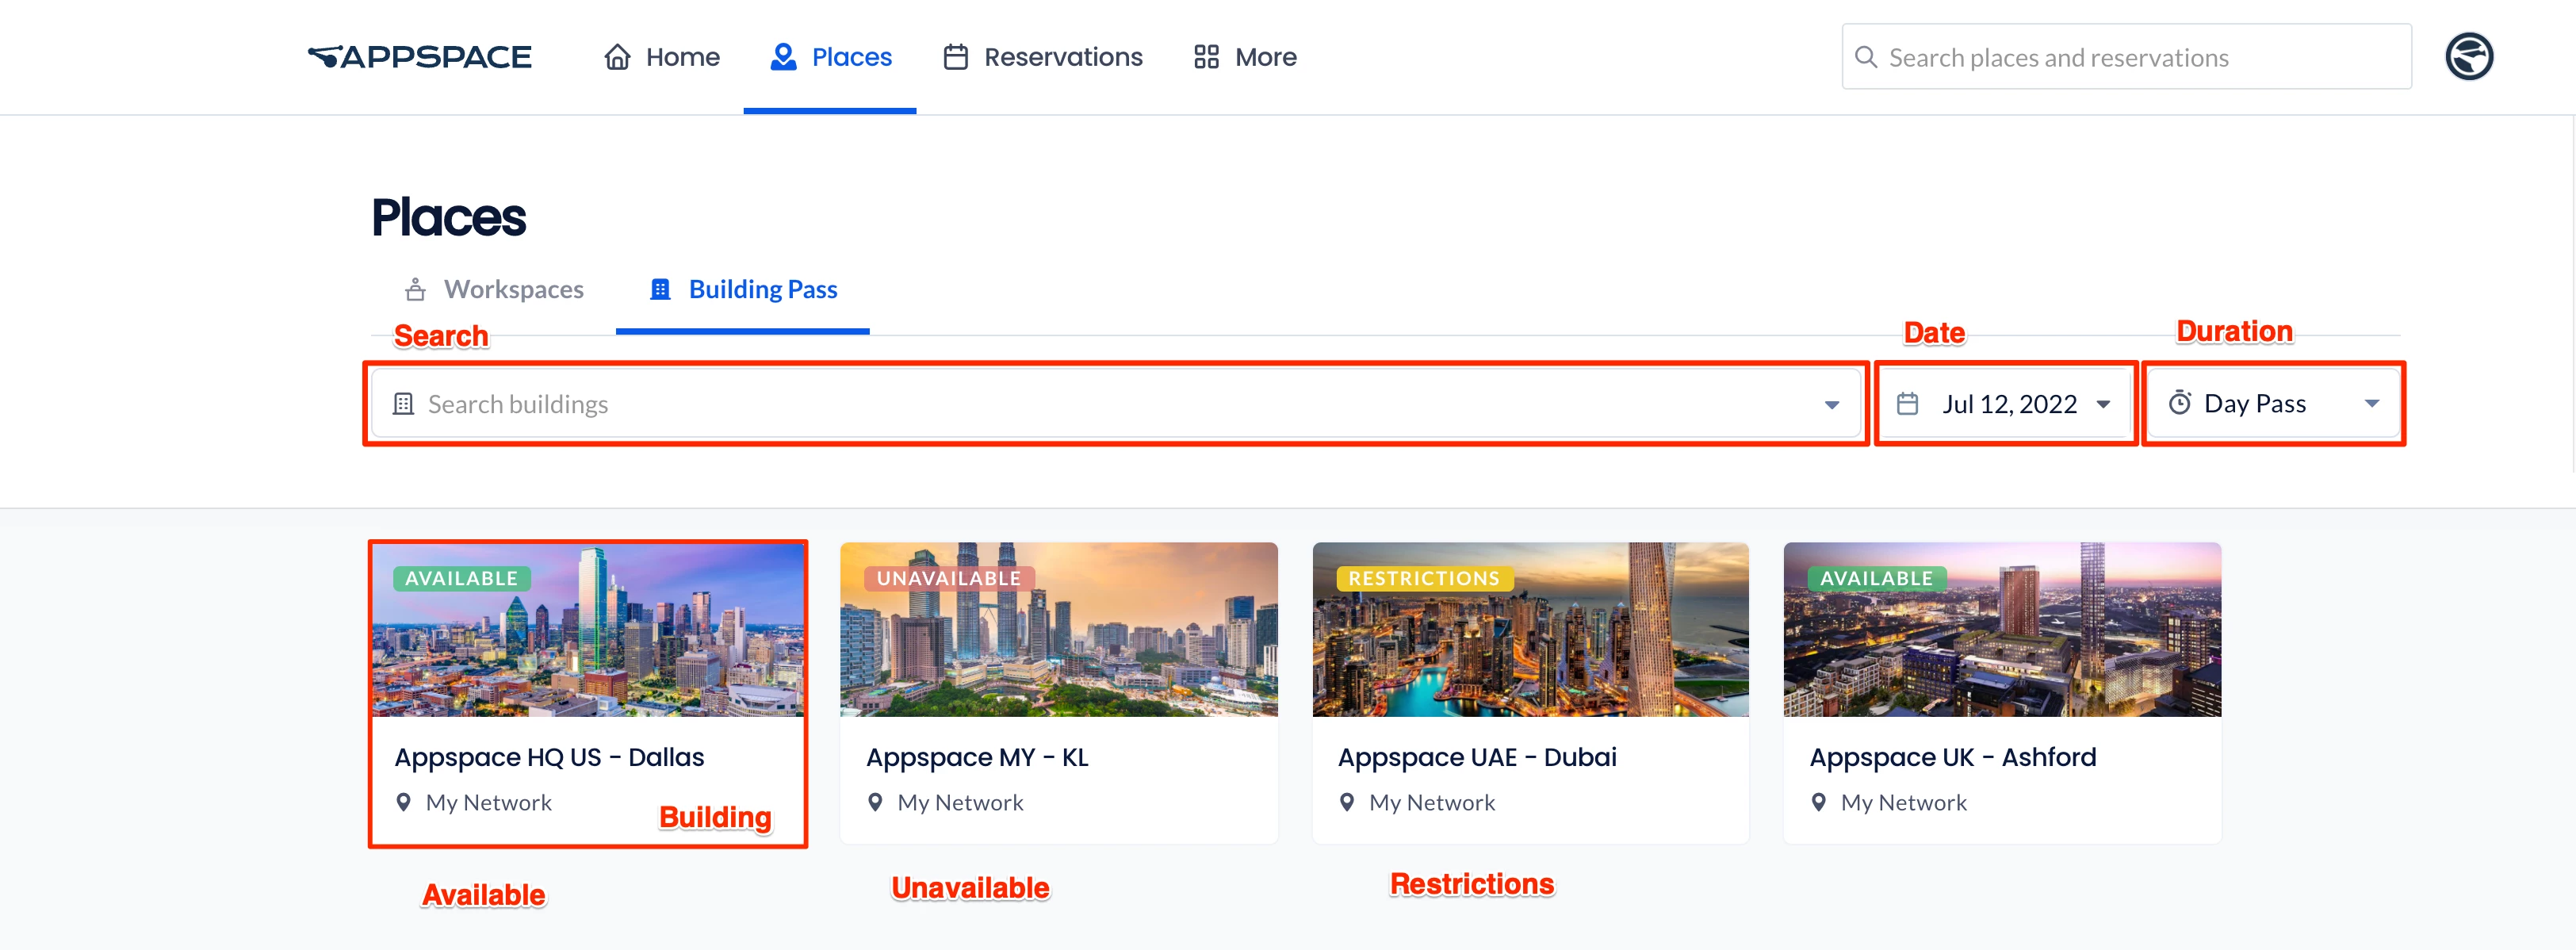
You may search for a building with a letter or keyword, and select a building from the drop-down menu. Use the Date and Duration (Pass type) filters to narrow down your search for buildings. If your home location has a building with bookable resources, the building will always be listed at the top, regardless of reservation history.
Select any building to view more information and booking restrictions (if any), and directly book a building pass. Refer to the Reserve A Building Pass – Employees article for more information.
At The Office
The At The Office tab displays a weekly view of people (including yourself) who are attending workplace reservations or building passes in the current building. This allows you to quickly check when you and your colleagues will be in the office on the days of any given week.
Important
The current building must be set to reservable for the At The Office tab to be available.
Note
People you have marked as favorites who are attending reservations will be displayed first on each day card.
You can also view information on your reservations within the building for the week and book a building pass.

Reservations at your current location and the current week are displayed by default. You may select select the following filters:
(New) Select a different building from the Location drop-down list, change the current week to the next or previous week, and select to view Everyone or only people who have been added to your Favorites.
The I’m in option will be available on the days that have a reservation that you are attending for that week, while the Join Office option is displayed on the days you do not have a reservation.
(New) The option on the day card will be auto-set to I’m in if you perform one of the following:
-
You create a reservation or building pass for yourself for that day.
-
You accept an in-person invitation for that day.
- Click I’m in to view information on the reservations that you will be attending for that day. If you have more than one reservation, select the reservation or building pass that you wish to manage. Refer to the Manage Workplace Reservations and Manage Building Pass Reservation articles for more information.
- Click Join Office to directly book a building pass for the selected building in Location and on the date in the day card. This works similarly to the steps in Reserve A Building Pass – Employees, but it attempts to book the pass immediately without opening the sidebar. A notification will inform you if the pass is successfully created (or not), and the option will update to I’m in once confirmed. (New)
- + Find Workspace (This option only appears when you move your mouse above I’m in / Join Office). – Click to open the Resource Finder in the sidebar to select a resource(s) and create a reservation. (New)
Click on the day card to view information about the building, such as the number of resources, capacity, number of floors, and any applied restrictions. You may select one of the following options:
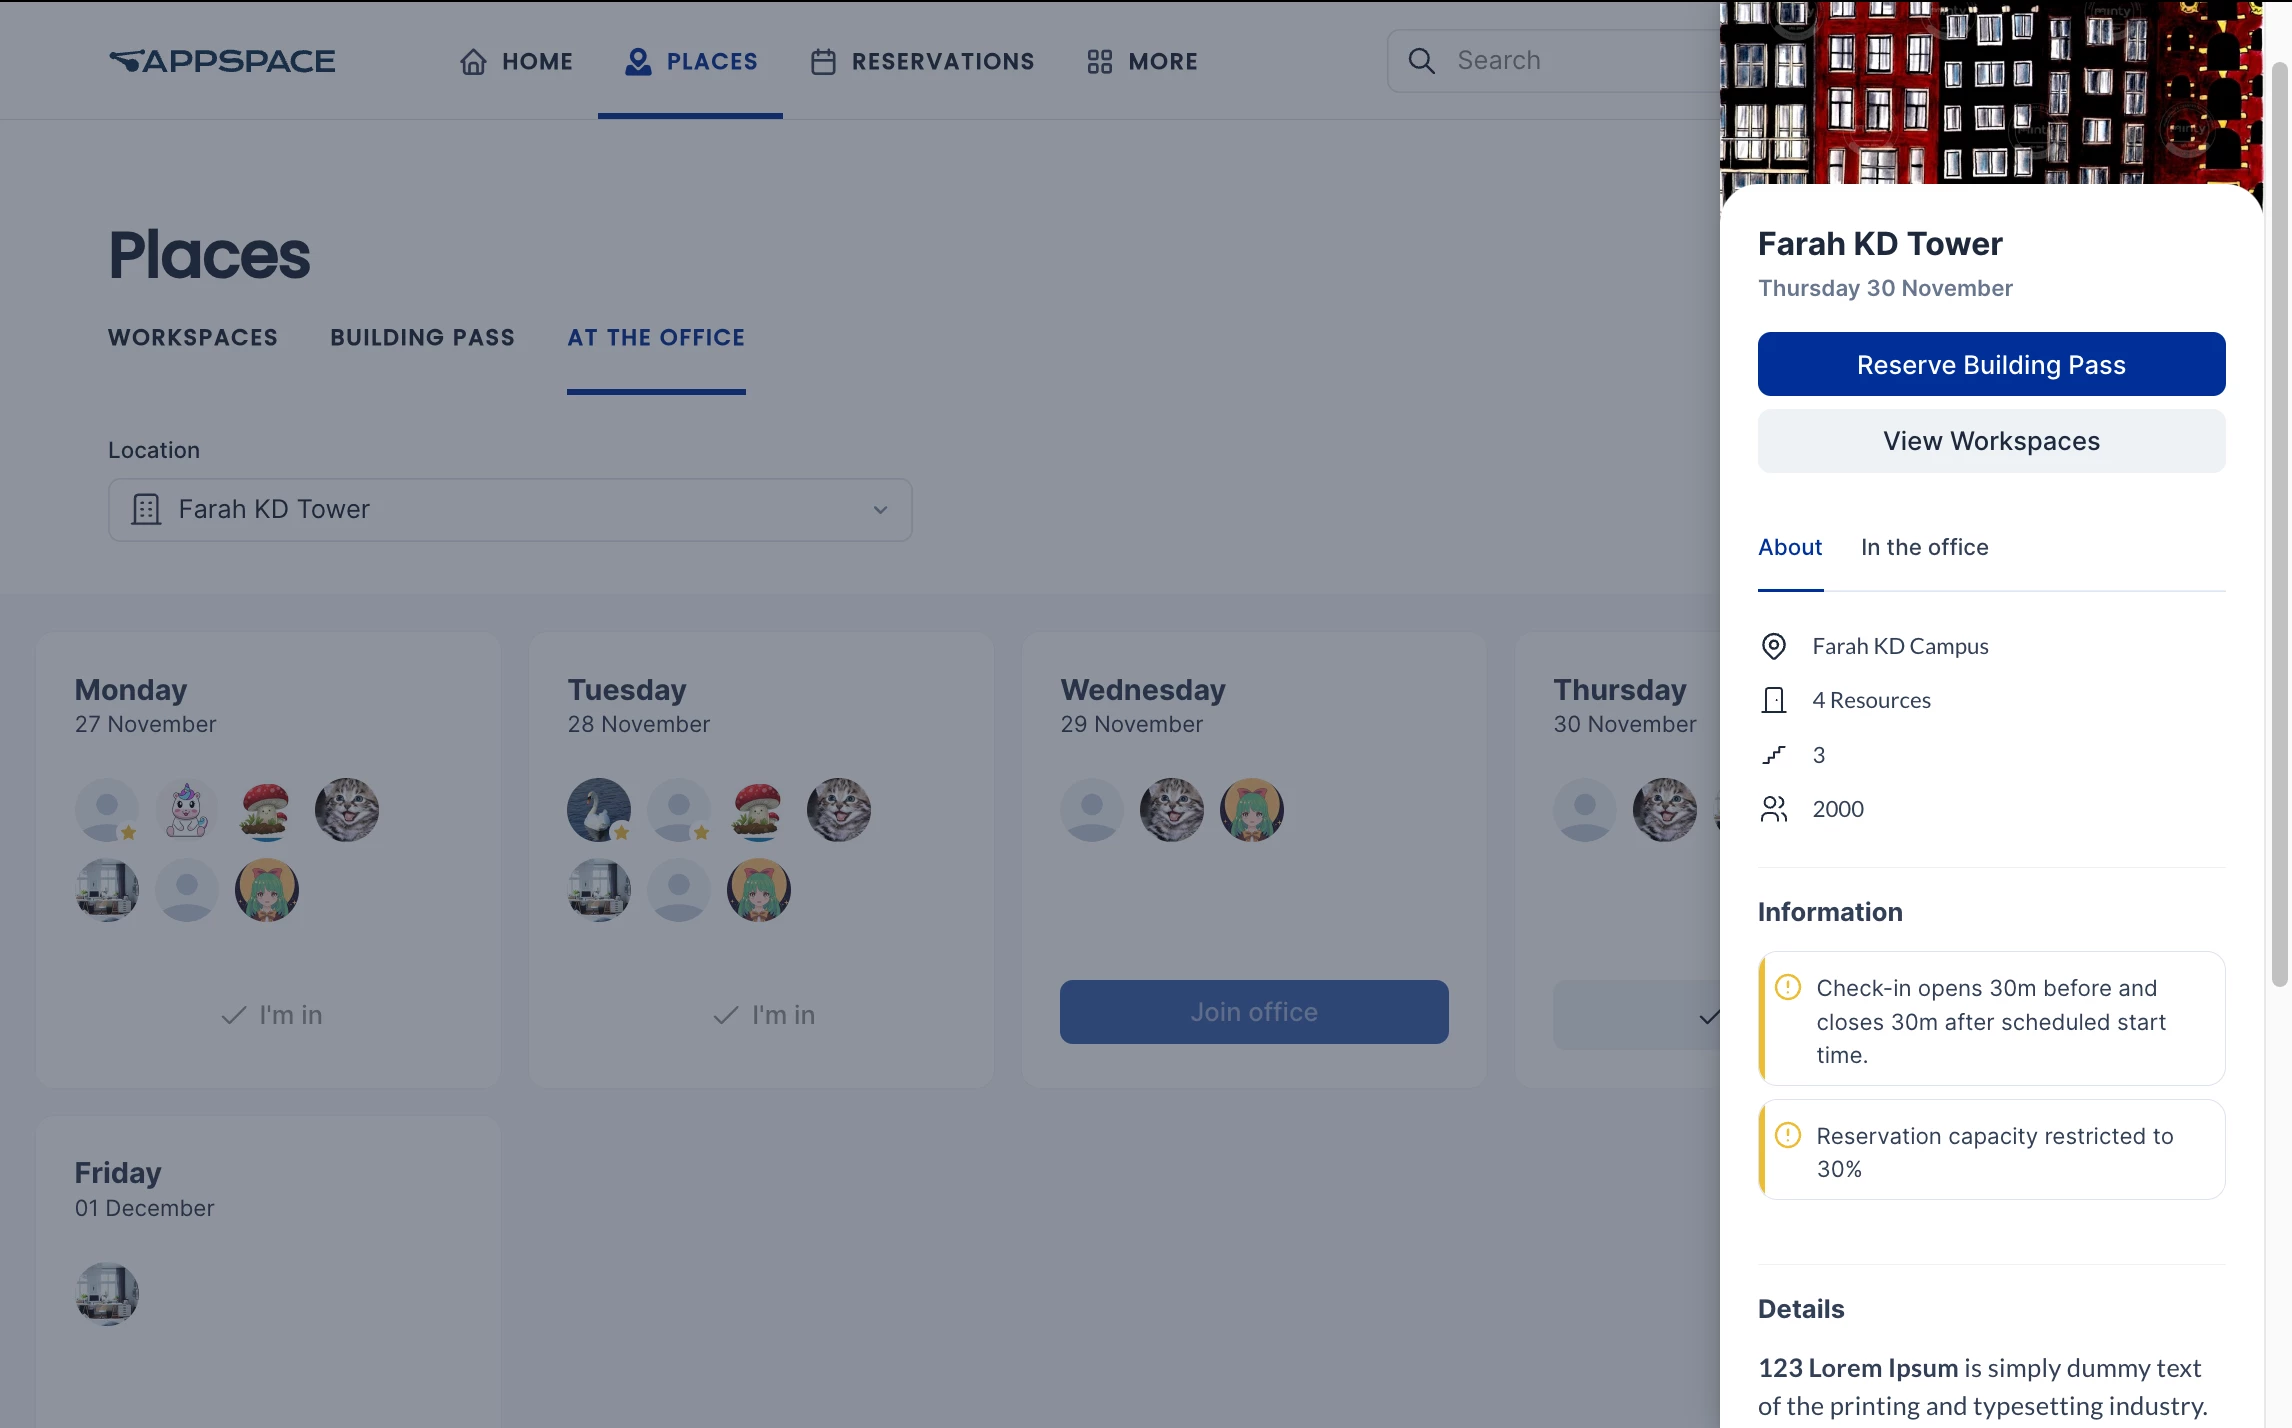
- Click Reserve Building Pass to directly reserve a building pass to this building. Refer to the Reserve A Building Pass – Employees article for more information.
- Click View Workspaces to search and view available workspaces inside the building and create a workspace reservation. Refer to the Reserve Workspace article for more information.
- Click the In the Office tab to list the people who will be attending workplace reservations or building passes in the building on that day. People who you have set as favorites will be listed first. However, people in workspace reservations set to private will not be shown. You may click on a person to view the person’s profile.
Note
The In the office tab will be hidden if none of your favorite colleagues are in the building on that day when the Show my favourites option is selected.
Reservations
On the top menu, click More and select Reservations.
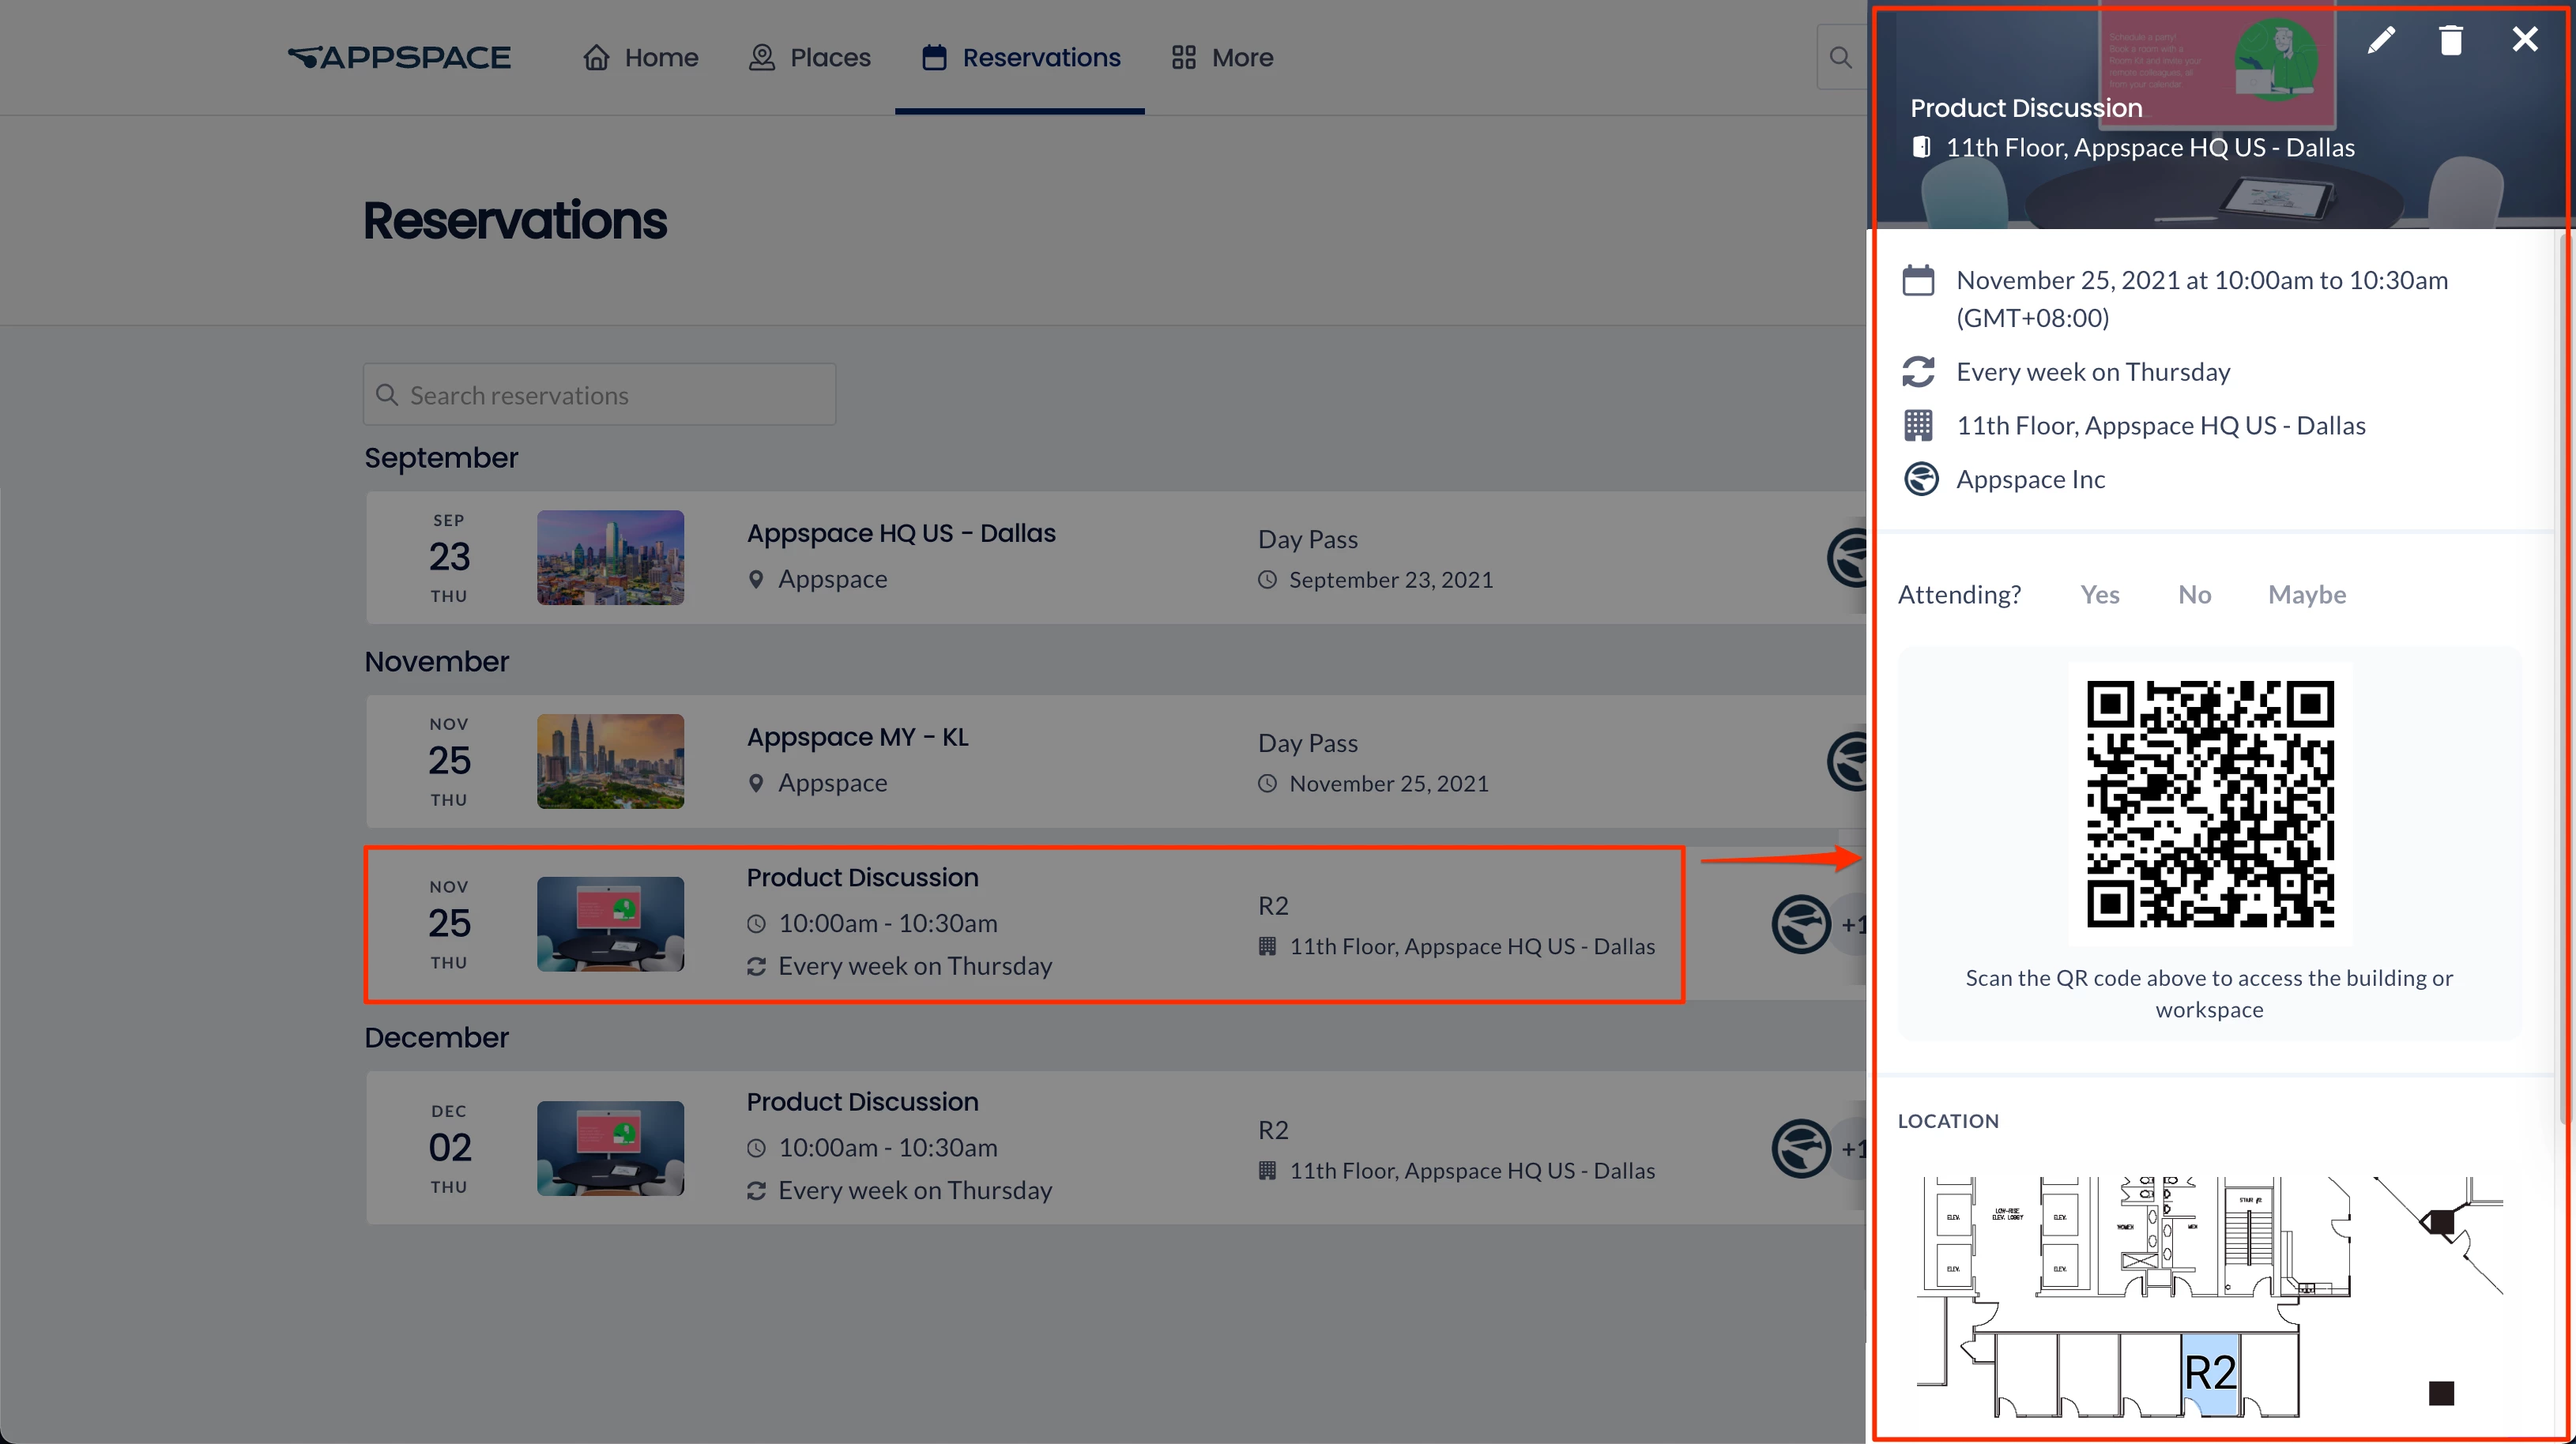
The Reservations tab lists all the reservations and building passes you have personally booked, or meetings that you have been invited to.
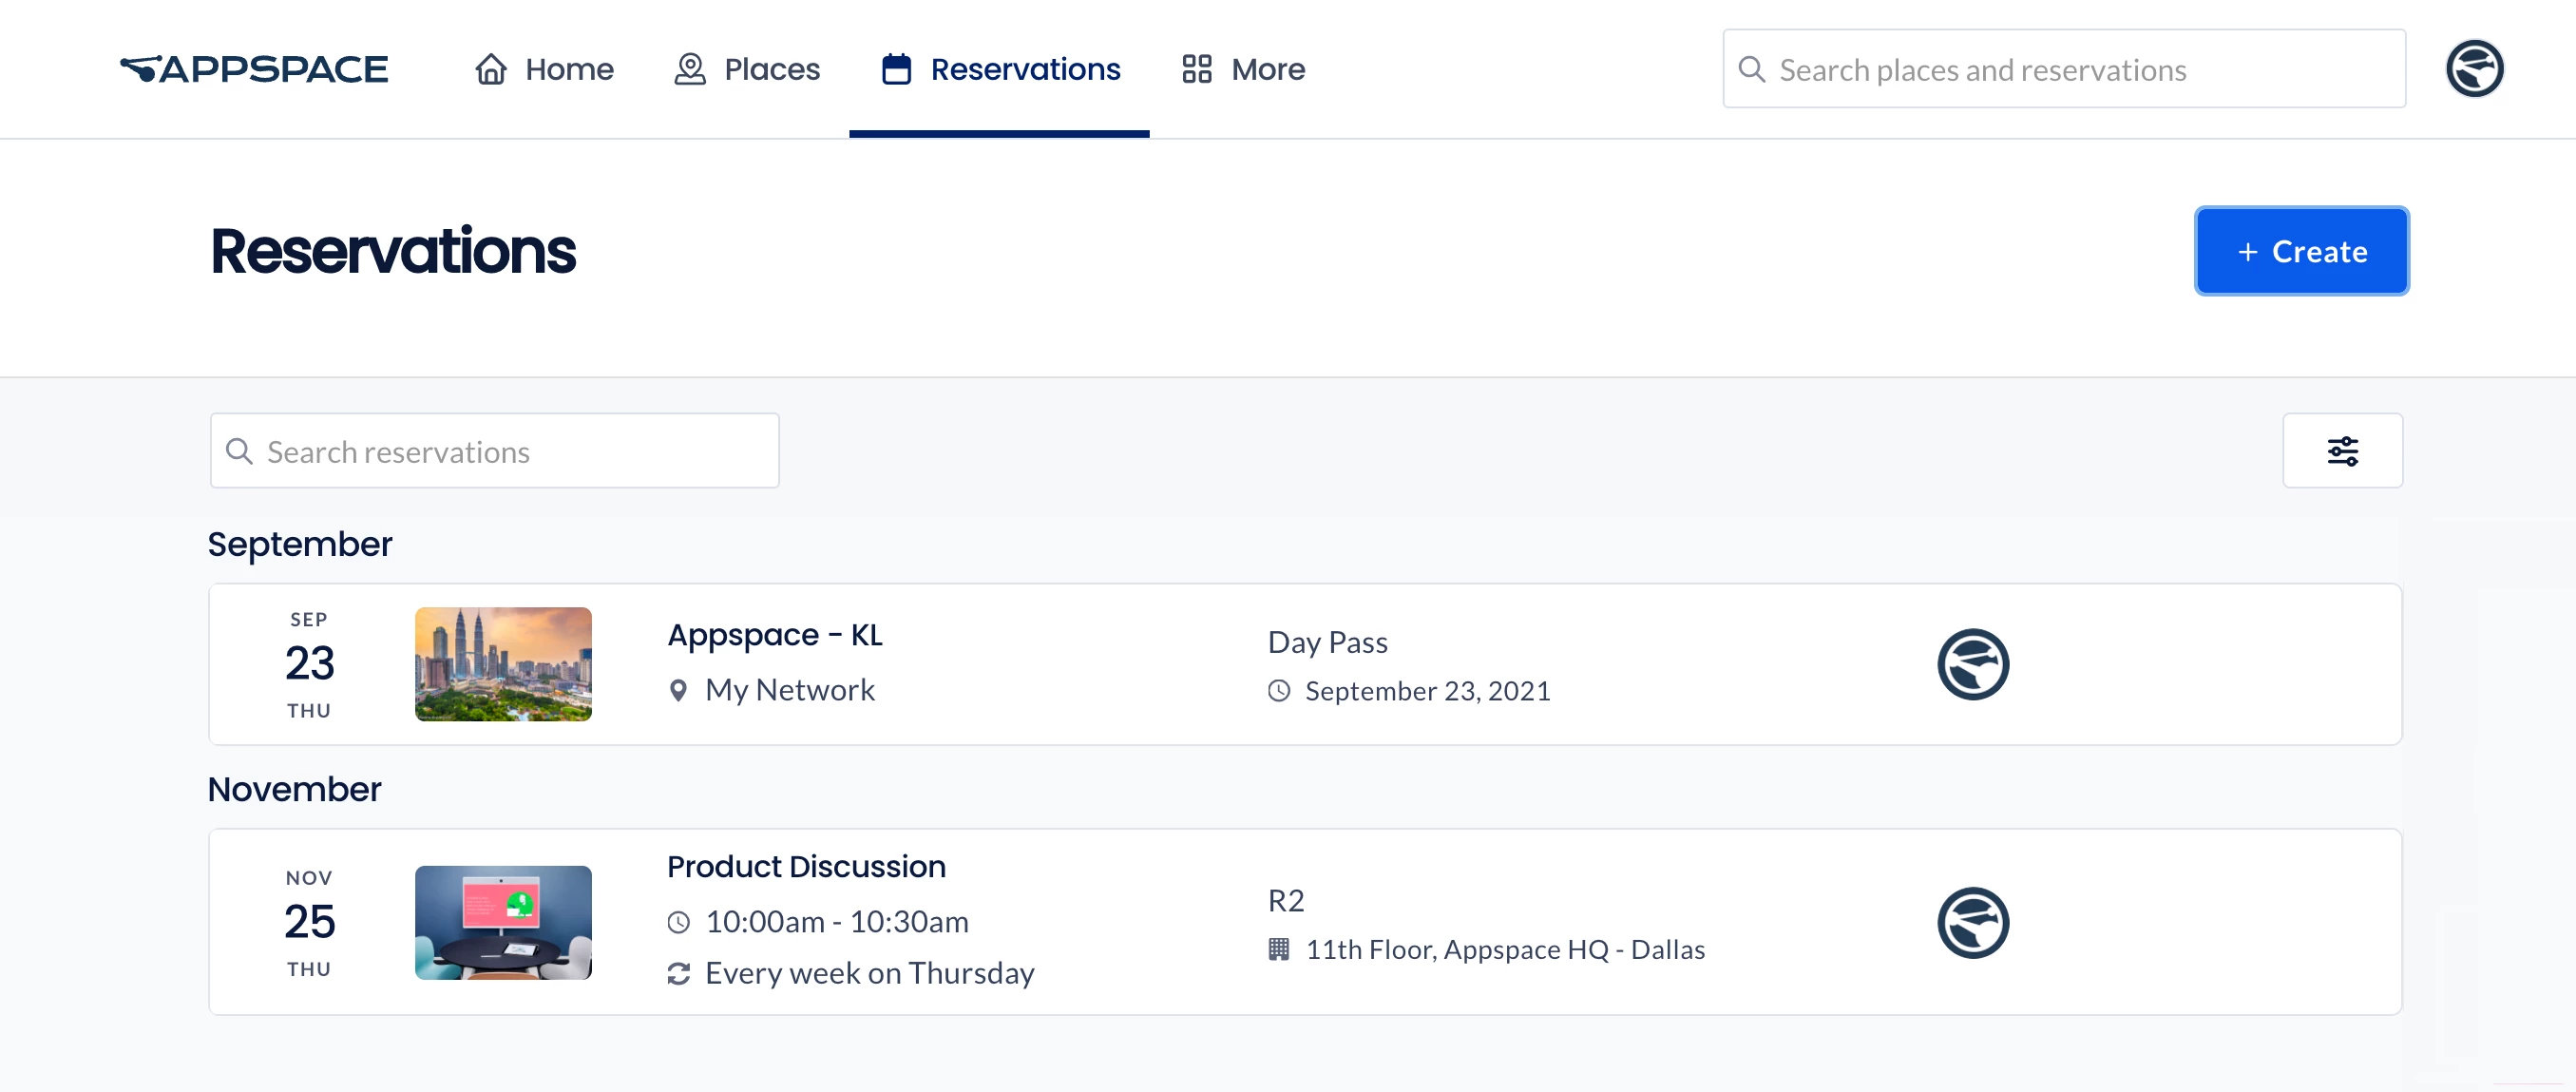
You can check, extend, or even cancel your reservations. Administrators are also able to make and manage reservations on behalf of someone else.
When you select a building pass or workspace reservation, you may view the resource details, booking details, and the resource’s location on a map (if available). If you are assigned as an approver for a resource (such as location, building, workplace, or room) you are also able to view pending reservations and approve or decline them.
You may also confirm the reservation by clicking Yes or scanning the QR code to check in. You may also extend or cancel the booking.
For more information, refer to either one of these articles:
- Reserve a Workspace, Desk, or Room – Employees
- Reserve A Building Pass – Employees
- Approve a Reservation – Approvers
Concierge
On the top menu, click More and select Concierge.
The Concierge dashboard provides employees assigned with concierge permissions a calendar view of all reservations under their purview. Employees with concierge permissions are also able to view and manage reservations of workspaces in locations they have been assigned to.
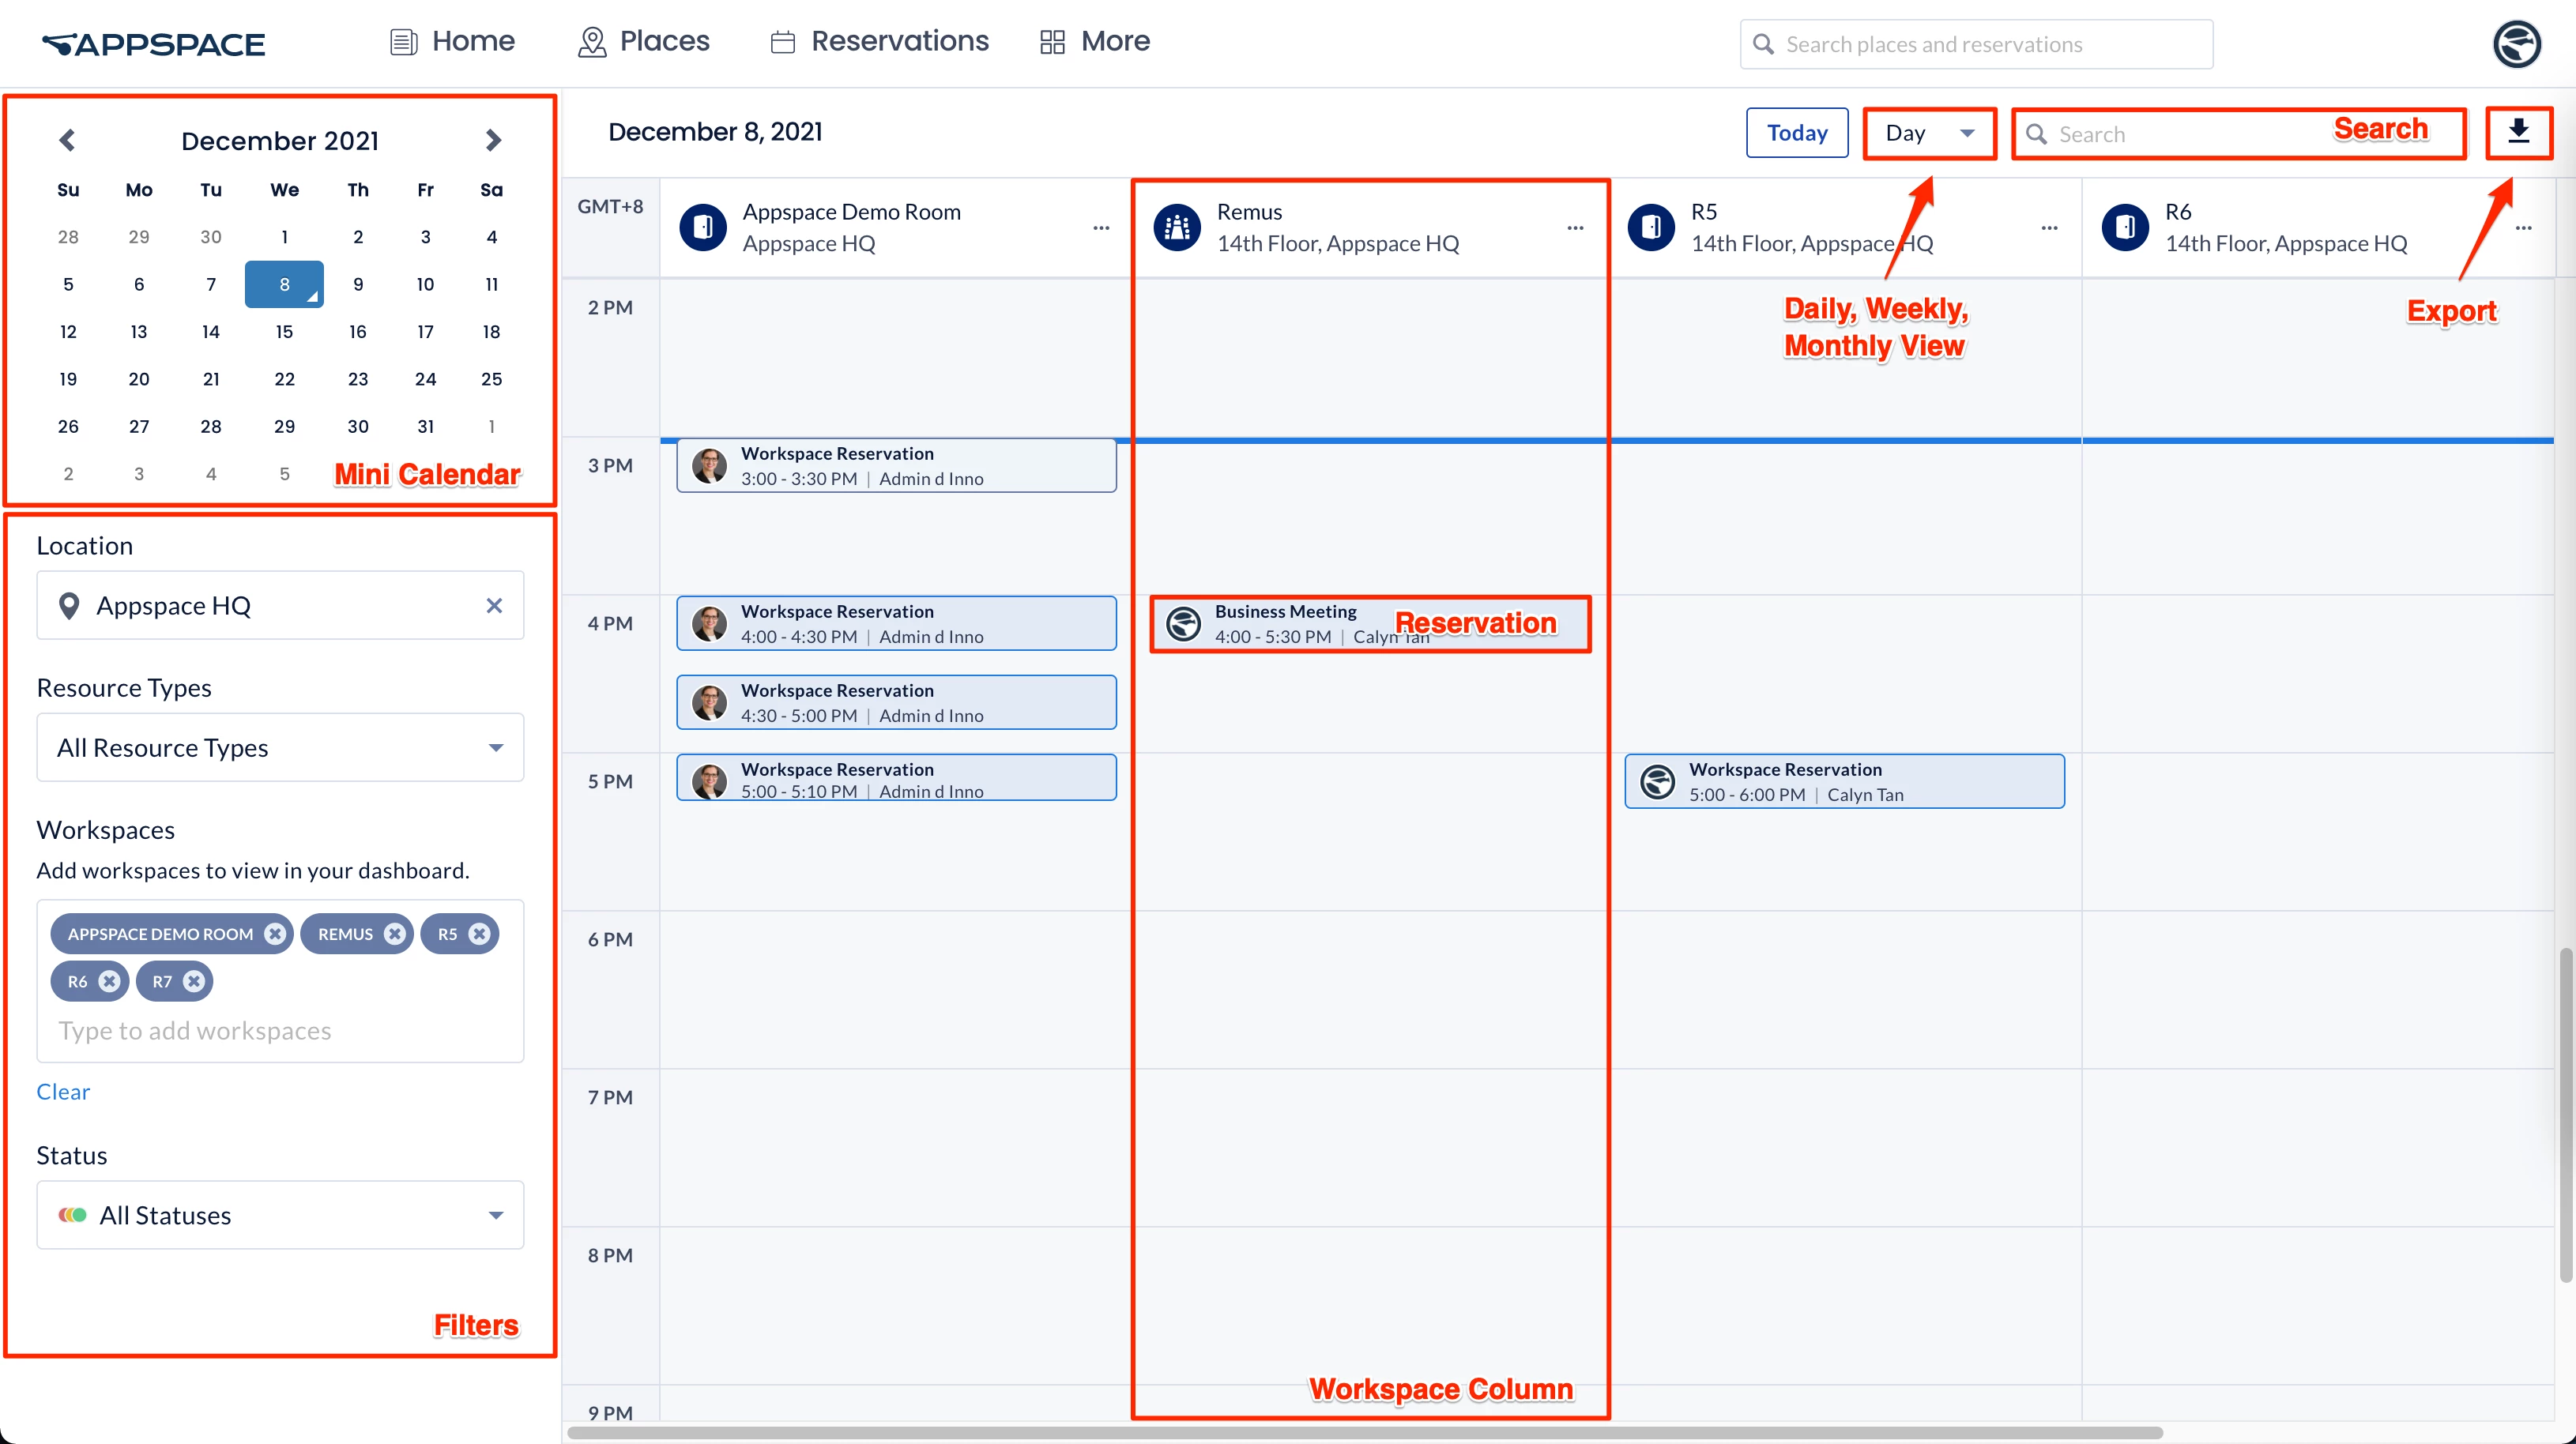
- Today – Click this button to bring back the calendar focus to the current time and date.
- Day / Week / List – Select one of the following options from the drop-down menu to display the calendar in the daily, weekly, or list view format.
- Search – Type in a letter or keyword to search for a workspace or reservation.
- If a workspace is selected, it will be added automatically to the calendar view if it wasn’t already.
- If a reservation is selected, the reservation edit window will be displayed for viewing or editing.
- Export – Click the Export icon to export reservation records into an .xlsx format.
- Reservation – Click a selected reservation to view additional reservation details, such as the organizer, attendees, and other additional information.
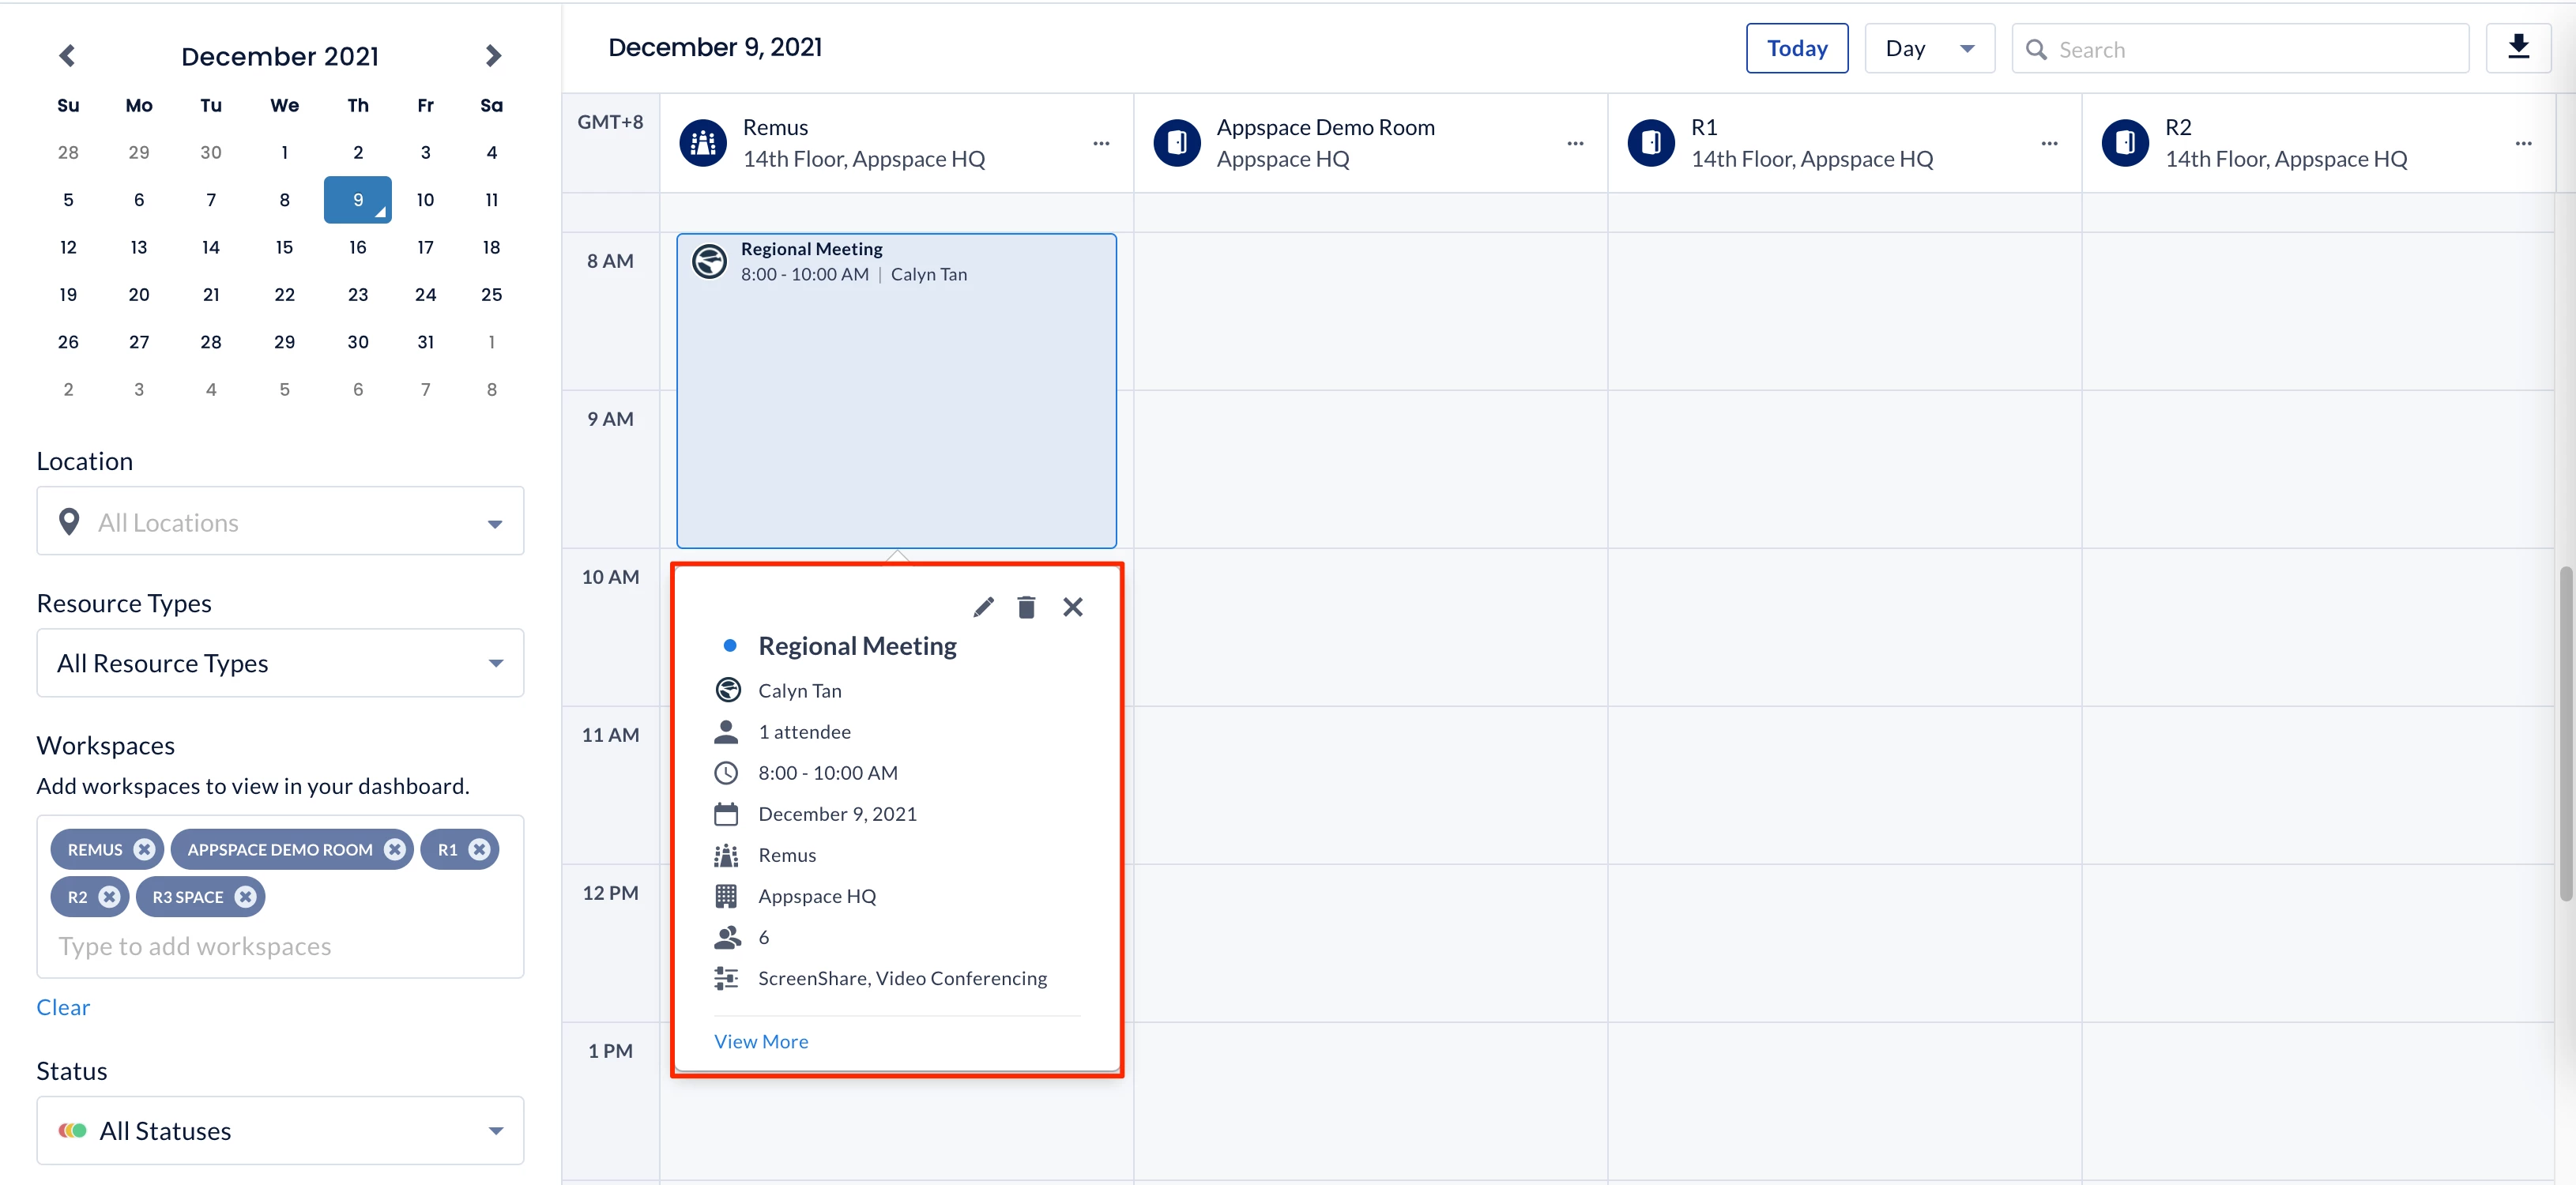
When viewing the reservation details, you may do the following:- Edit icon or View More link – Edits the workspace reservation.
- Delete icon – Deletes the workspace reservation.
For more information, refer to the articles below:
- Manage Workspace, Desk, or Room Reservations – Concierge
- Configure Concierge Permissions in Reservations
Visitor
On the top menu, click More and select Visitor.
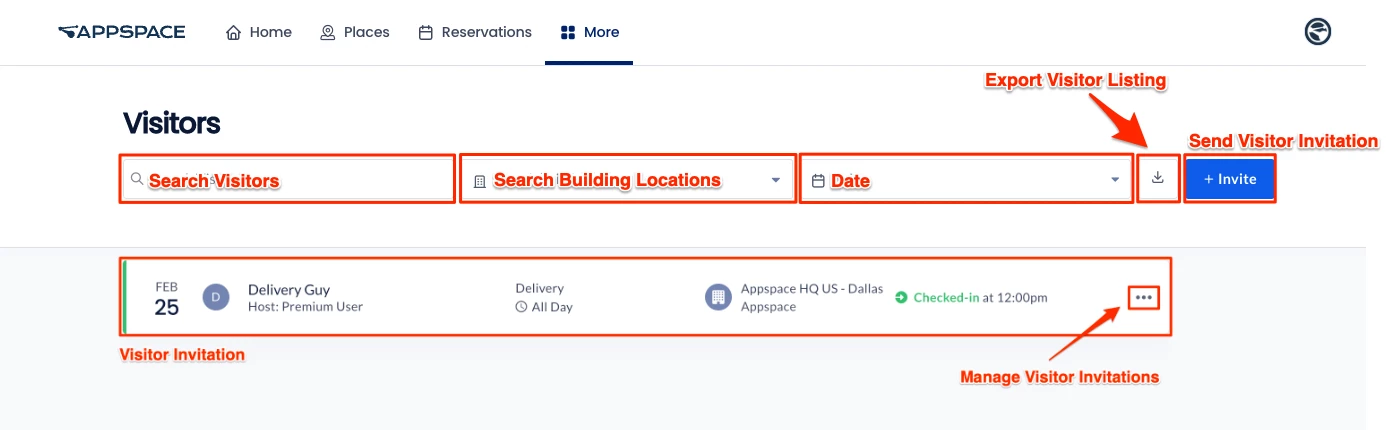
The Visitor dashboard displays the Visitor Management system used to invite external users (visitors) to a meeting or event held at your company. These visitors could be an employee from another facility, division, or subsidiary within your company or other corporate entities from outside the company. Event Hosts and Facilitators may do the following:
- send an invitation to a prospective visitor.
- check-in to a desired visitor invitation.
Refer to the following articles for more information: