


Note: This article explains the Widgets section of Employee Experience themes. For instructions for adding and editing Employee Experience Themes, refer to this article.
Widgets allow administrators to customize the content, tools, and information displayed on the Home page of the Appspace Employee Experience. Widgets can be added to individual columns within an Employee Experience theme and configured to provide employees with access to content, workplace information, reservations, applications, and other commonly used features.
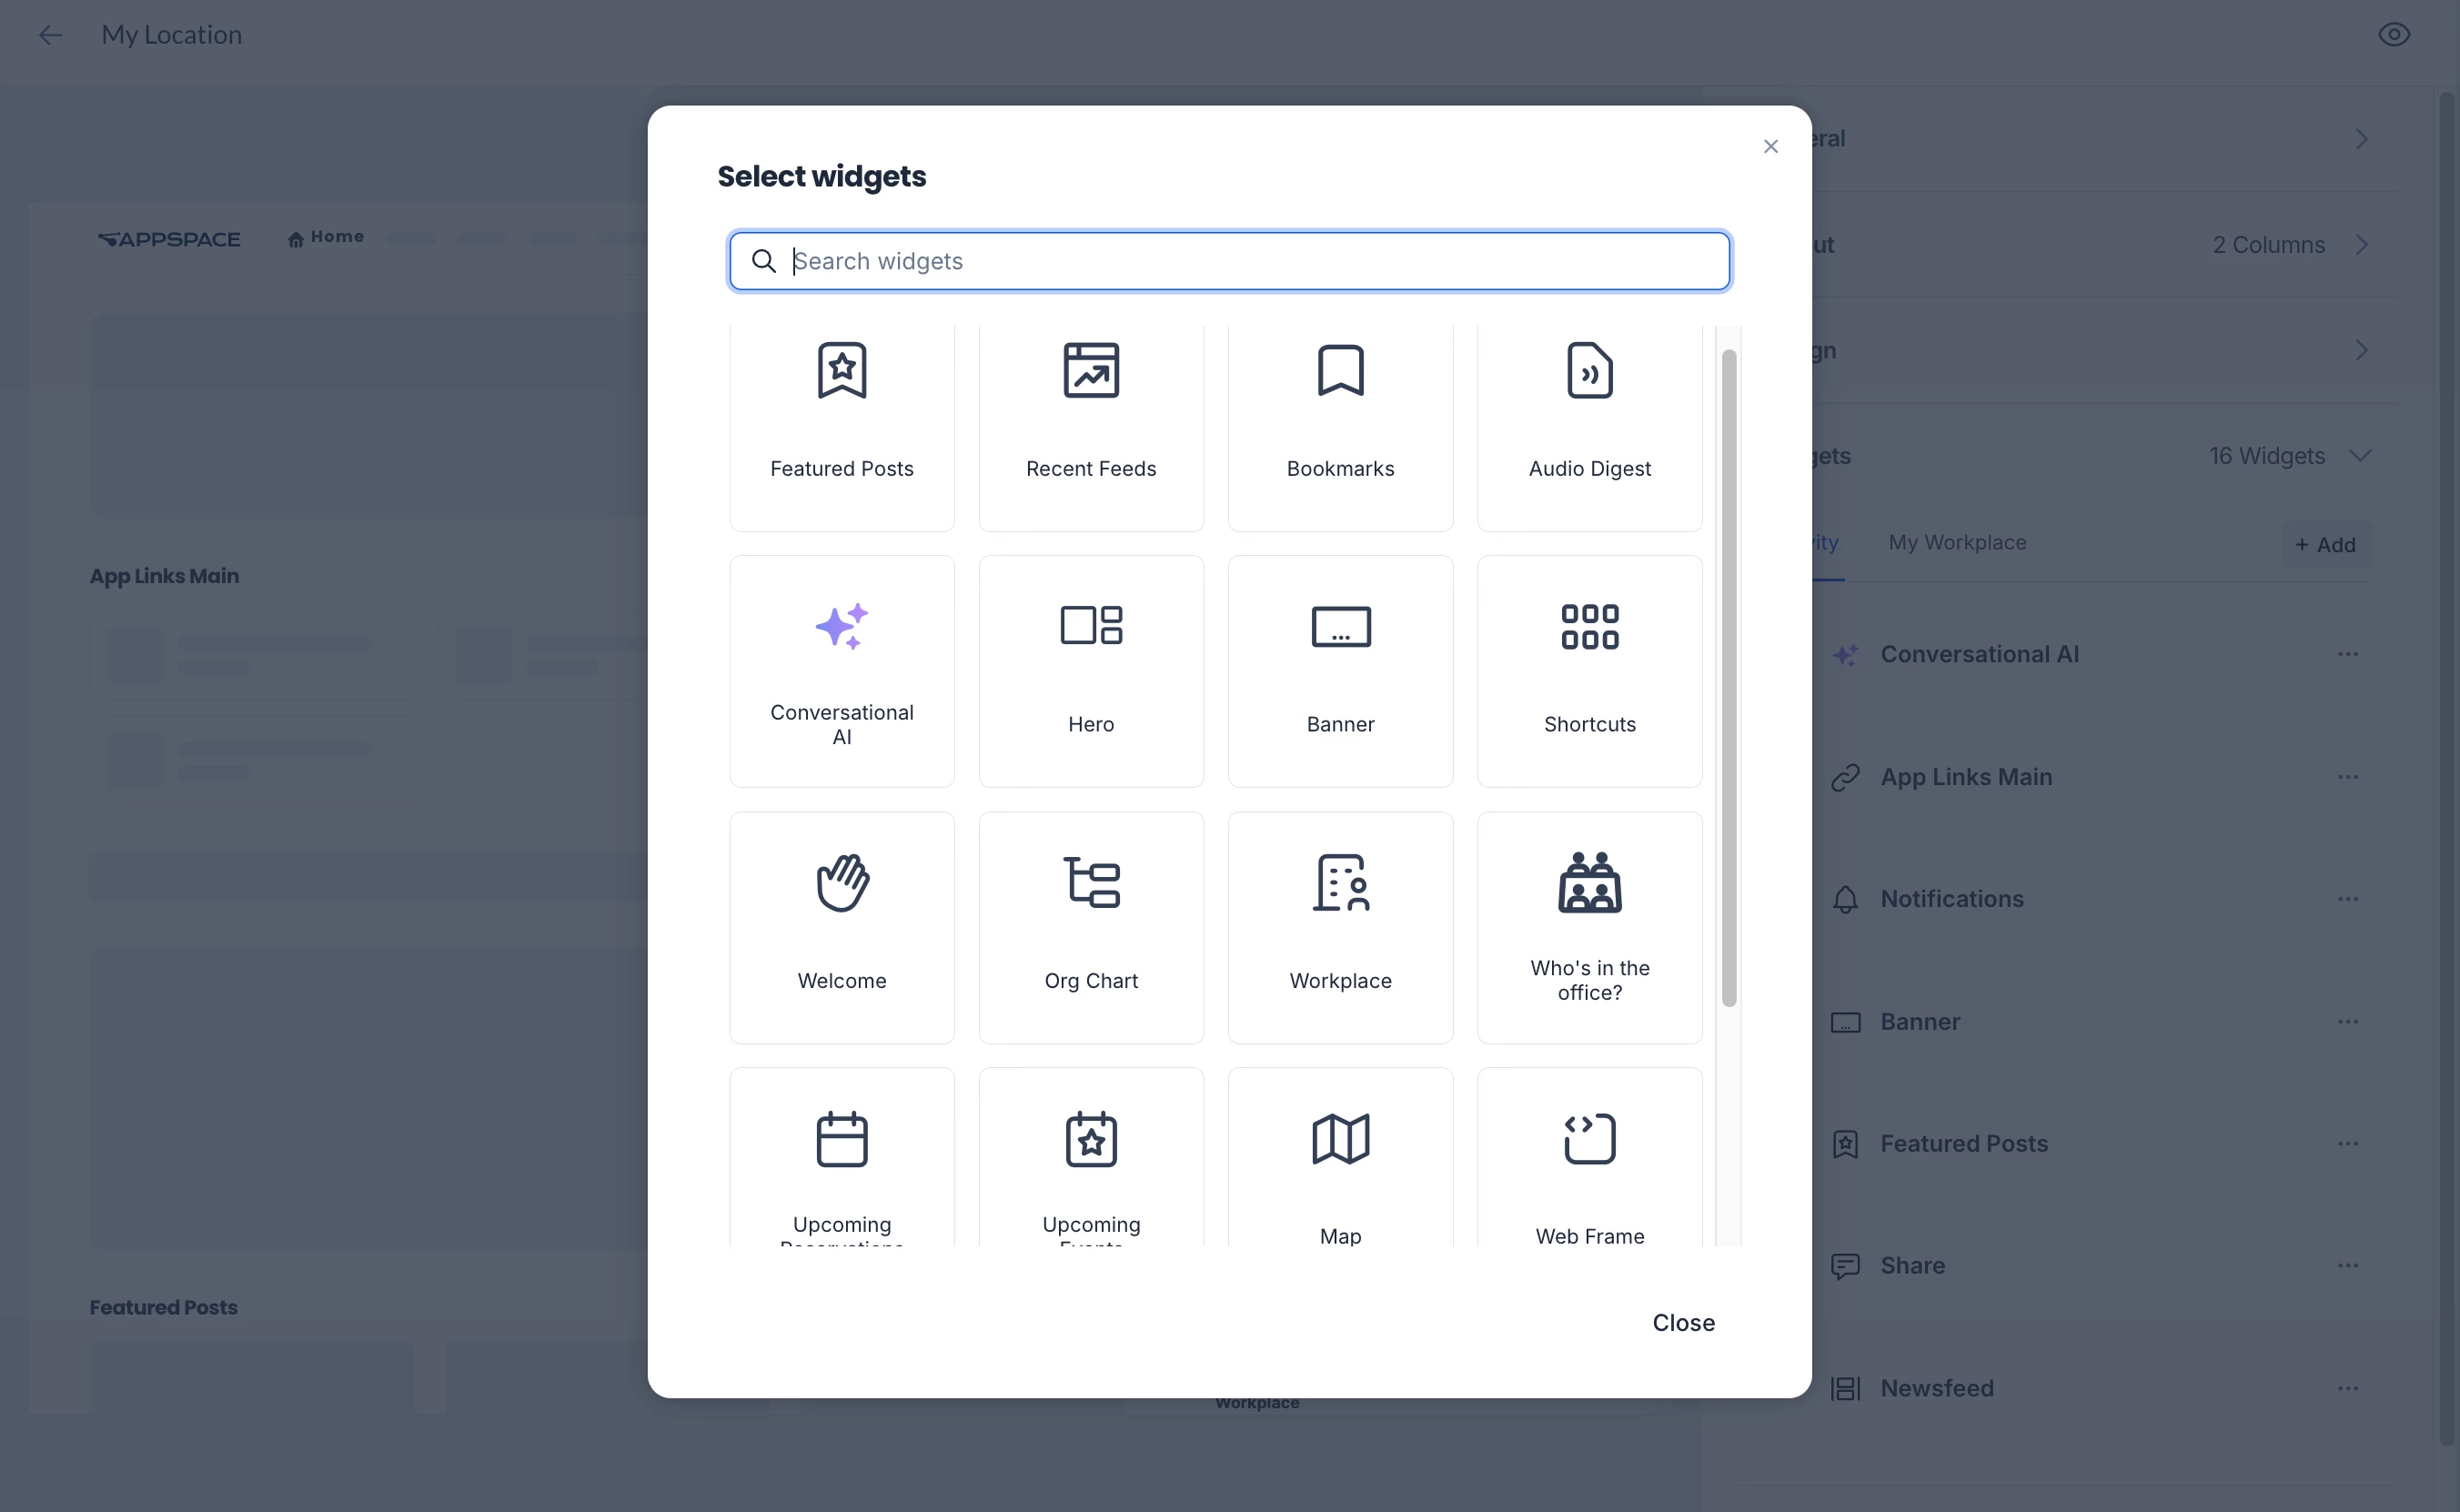
The widgets available for a theme include content-focused widgets such as Newsfeed, Featured Posts, and Content Index; workplace widgets such as Workplace, Map, Quick Reservation, and Upcoming Reservations; and additional widgets for applications, navigation, communications, and other employee experiences.
This article provides administrators with instructions to add, configure, arrange, edit, and remove widgets within an Employee Experience theme.
Contents:
Prerequisites
Before configuring widgets for an Employee Experience theme, ensure that you have one of the following user roles with a Platform User license assigned:
- Account Owner
- Location Admin
- Publisher (Location) for Employee Experience themes
Configure Widgets for an Employee Experience Theme
The Widgets section of an Employee Experience theme determines the widgets displayed on the Home page and the columns in which they appear. Administrators can add multiple widgets, configure each widget independently, and arrange their display order within each column.
- Log in to the Appspace console.
- Click the ☰ Appspace menu, and click Settings > Configuration.
- Click the Employee Experience tab, and click Themes from the side panel menu.
- Expand the Widgets section on the right.
Note
-
Widget configuration – Each widget provides different configuration options. The following options are commonly available across widgets:
-
Column – Select the column in which the widget is displayed.
-
Widget Title – Enable this option and enter a title to display above the widget.
-
Language – Use the language drop-down menu next to supported text fields, such as Widget Title, to provide translated text. Refer to Configure Translation Languages for more information.
-
Mobile Layout – Select how widget items are displayed in the Appspace Mobile App. Select Carousel to display items horizontally, List to display items vertically, or Auto to use the default carousel layout.
-
-
Theme assignment – Widgets are configured as part of an Employee Experience theme. A theme assigned to a location is also applied to its sublocations unless a sublocation has its own theme.
-
Multiple widget instances – The same widget type can be added more than once to a theme, with each instance configured independently.
-
- Use the following options to manage the widgets configured for each column:
- To reorder a widget, select a column, then click and drag the arrange icon at the left of the widget.
- To edit or delete a widget, select a column, then click the ellipsis (…) at the right of a widget.
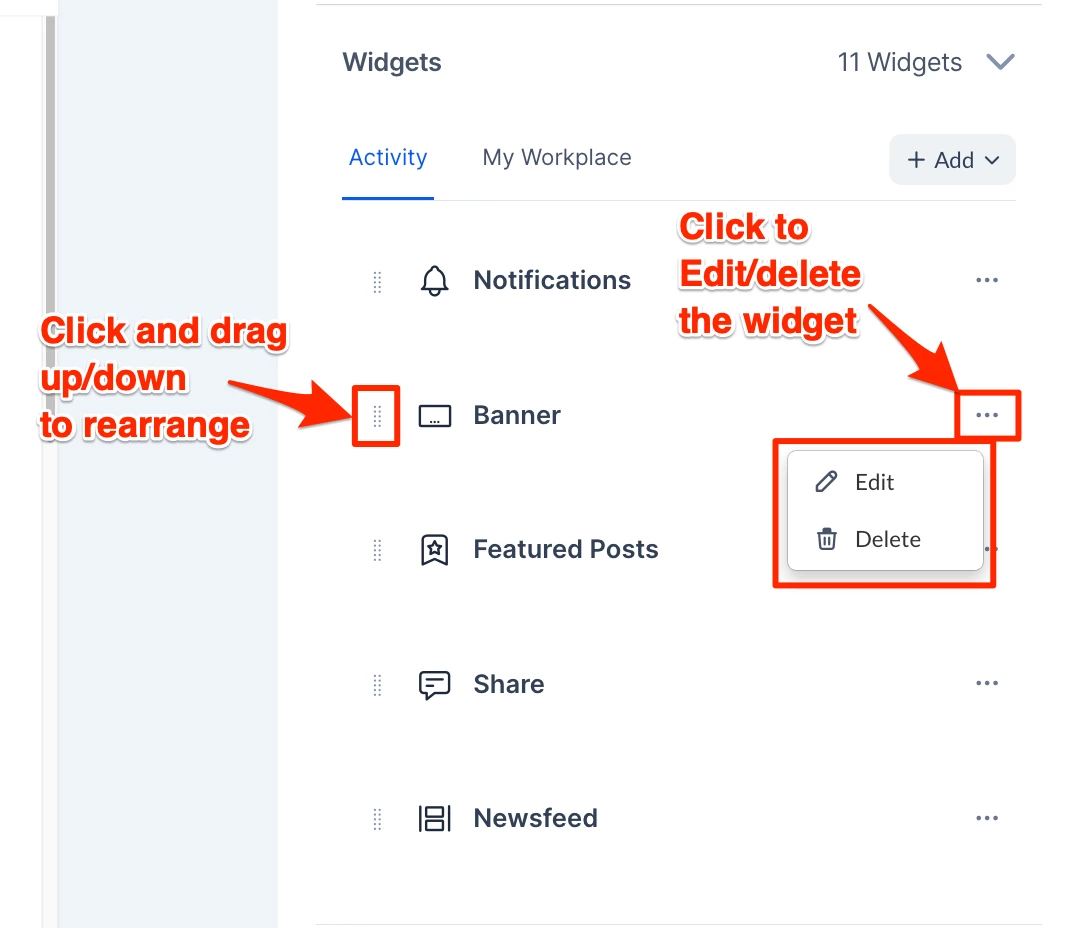
- To add a widget to a column, select the column, click +Add, and select one of the following widgets. Refer to the section below. You may add each type more than once.
- At the upper-right corner, click Save to save your changes.
Widget Types
Employee Experience provides a range of widgets for displaying content, workplace services, applications, navigation options, employee information, and other interactive features on the Home page. Each widget type provides configuration options specific to its purpose, in addition to the common widget settings described above.
The following widget types under these groups can be added and configured within an Employee Experience theme:
Text and Media
- Welcome – Sets a welcome message to the current user. Leave it blank to have the default message (Salutation, FirstName). You may use identifiers such as {Salutation}, {FirstName}, and {LastName} together with fixed text.
- Banner – Displays a banner with one of the following options:
- Default – Follows the content type set in the Configure Banner section above on this page.
- Media – Drag and upload a media file to display as the banner. You can specify the height of the banner for web and mobile.
- Web page – Enter a URL to display the web page in the banner.
- Feed – Enter a feed to be displayed in the banner. You can customize options similar to the Newsfeed widget above.
- Featured Posts – Displays the latest content posted as featured to the Employee Experience. You can customize options similar to the Newsfeed widget above.
- Hero – Displays a banner made out of several blocks (similar to the Hero banner) with the following options:
- Block – Select a block (Block 1, Block 2, etc.) or click + to add a new block.
- Content Type – Select one of the content types for the block. Each option will display sub-options for you to set.
- Media – Display media content on the block by selecting or uploading the content from the Library.
- Web Frame – Display web content on the block by entering a URL or a web snippet.
- Feeds – Enter a feed to be displayed on the block. You can customize options similar to the Newsfeed widget above.
- Features Posts – Displays the latest content posted as featured to the Employee Experience. You can customize options similar to the Newsfeed widget above.
- Block Title – Type in a title for the block, or leave blank for the default title (Block 1, Block 2, etc.)
- Icon – Select an icon to be displayed on the block.
- Shortcuts – Displays a set of URL links. You can set the following options:
- Mobile Layout – Set to Carousel to scroll shortcuts horizontally in the Appspace Mobile App, or List to display the shortcuts in a grid layout. Auto sets it to carousel by default.
- External Link Target – This setting only applies to links on the Appspace Mobile App but may be overridden when the Disable In-App Browser setting is set to ON. Set to System Browser for the shortcuts to open in a new browser window or In-app Browser for the shortcut to open in the same window. Leave it as Default to follow the device setting.
- Small column count – Select the amount of shortcuts that will be displayed per row in the grid layout. You can set for 1, 2, or 3 shortcut items to be displayed for each row in the widget. This only applies if the widget is not set as the main column on the web, and on the Appspace Mobile App if the widget is set to List for Mobile Layout.
- Shortcuts – Set the link text, URL, and icon in the widget. Click +Add link to create additional shortcuts.
- Audio Digest – Displays an audio playlist (including a skip to next feature) of articles read aloud by AI. You can select to play the latest articles, content from specific feeds, or from a list of curated posts.
- Source – Sets the source of the audio playlist:
- Recent posts – Plays the most recent articles.
- Feeds – Specify the Feeds to play content from. For Max Posts, specify the maximum number of posts for the entire playlist.
- Curated posts – Specify the Posts to play content from.
- Post Types – Choose to include User Posts, Events, Stories, and Pages in the audio playlist.
- Source – Sets the source of the audio playlist:
- App Links – Displays links to third-party applications within the Employee Experience that apply to the employee’s needs. You can customize the following options:
- Mobile Layout – Set to Carousel to scroll links horizontally in the Appspace Mobile App, or List to list links vertically. Auto sets it to carousel by default.
- Max Links – Set the maximum number of links to be displayed.
News and Feeds
- Newsfeed – Displays the latest posts, stories, and pages published to you or your user group. You can customize the following options:
- Pagination – Set as Virtual Scrolling to continuously load posts as you scroll down the feed, or On Demand to show a limited number of posts with an option to show more.
- Membership Status – Include users who have joined and/or not joined the Communities.
- Subscription Status – Include users who are following and/or not following the Topics or Channels.
- Feeds – Select the feeds to be included. You can select more than one feed, or leave the field blank to select all feeds.
- Feed Types – Choose to include Communities, Topics, and Channels.
- Post Types – Choose to include User Posts, Questions, Polls, Praises, Events, Stories, and Pages as posts in the feed.
- Max Posts – Set the maximum number of posts displayed in the newsfeed.
- Featured Posts – Displays quick posts, event posts, stories, or pages that are set as featured and published in the Appspace Employee Experience. You can customize options similar to the Newsfeed widget above.
- Recent Feeds – Displays channels, topics, and communities that contain the latest posts. You can customize the following options:
- Mobile Layout – Set to Carousel to scroll feeds horizontally in the Employee Experience for Mobile, or List to list feeds vertically. Auto sets it to carousel by default.
- Feed Types – Choose to include Communities, Topics, and Channels.
- Max Feeds – Set the maximum number of feeds to be displayed.
- Bookmarks – Displays posts, stories, and pages that you have bookmarked.
- Content Index – Allows employees to browse Page content from a Topic or Community using alphabetical, chronological, popularity, tag, or sitemap organization. A Content Index Widget can be placed in the Employee App on the Main column or Sidebar, and multiple Content Index Widgets can be configured independently on the Home page.
To add and configure a Content Index Widget, refer to the Add the Content Index widget to a Home theme article.
Workplace
- Workplace – Displays information about the building set as the employee’s location, such as temperature and colleagues in the office. Colleagues who have been set as favourites will be listed first. The widget will display the following options on the Employee Experience:
- Open building panel – This is displayed as a launch icon next to the building's name. Clicking this icon will open the building panel in the sidebar, similar to selecting a building under Places > Building Pass, displaying the option to Reserve a building pass or View available workspaces.
- Join Office – Click to directly book a building pass for the current building for the current day. This works similarly to the steps in Reserve A Building Pass – Employees, but it attempts to book the pass immediately without opening the sidebar. A notification will inform you if the pass is successfully created (or not), and the option will update to I’m in once confirmed.
- + Find Workspace – Click to open the Resource Finder in the sidebar to select a resource(s) and create a reservation.
- Map – Displays a map of the location of the theme (such as Location, Campus, or Building) if it is configured under Locations. You can specify the height of the map for web and mobile. This widget will be hidden if there is no map configured.
- Quick Reservation – Allows employees to quickly reserve workspace resources directly from the Employee Experience > Home page. Depending on the widget configuration, employees can reserve Desks, Rooms, and Parking resources, select the reservation date, time, and duration, and apply supported filters without opening the full reservation workflow. For instructions on configuring the widget, refer to the Configure the Quick Reservation Widget article.
- Upcoming Reservations – Displays current and upcoming building passes and workspace reservations.
- Who’s in the Office – Lists the days of the current week with colleagues who will be within your current building location. Colleagues who have been set as favourites will be listed first. You can set the following options:
- Show only Favorites – Enable to set the widget to display only colleagues who have been set as favorites.
- (New) Reservations Calendar – Displays reservations across selected workspace resources in Timeline or Calendar layouts. Concierge users can view and manage reservations based on their assigned permissions. For more information, see Use the Reservations Calendar Widget.
People and Events
- Upcoming Events – Displays events and updates announced via posts on your Employee Experience.
Advanced
- Web Frame – Displays an external website or web snippet in a container frame. You can specify the URL or web snippet to display in the widget and the height of the web frame for web and mobile.
- Conversational AI – Display an AI banner widget that lets users enter AI prompts or queries.
- Banner Color – Set the color of the banner.
- Background Image – Browse and select a background image for the banner.
- Web Height and Mobile Height – Set the height of the widget for web and mobile versions of the Employee experience.
- Actions – Enable the Find content and Find user options to display the Search Content and Search User prompt options in the widget.
- Organizational Chart – Displays the organizational hierarchy of you, your manager, and any assigned secondary managers. For instructions on setting managers or secondary managers, see the Add Users, Send User Invitations, & Manage Users/User Groups article.
- Notifications – Displays broadcasts that are set as notifications.
- Share – Displays the quick post option, where you can quickly create posts, stories, and pages within the Appspace Employee Experience.
- (New) HRIS – Displays employee HR information from a connected HRIS platform. For configuration instructions, see Configure the HRIS Widget.
-
(New) Ticketing – Displays ServiceNow tickets associated with the signed-in employee. For configuration instructions, see Configure the Ticketing Widget.
Custom Widget
To view these widgets, select the Custom Widget tab.
- Custom Widgets – This feature allows you to add custom widgets. To get started, navigate to Appspace Console > Settings > Widgets and create your custom widget and import your custom widget files in ZIP format. Once created, your custom widgets will be listed here and available for use.