

Note
This article is part of a series of articles to help administrators configure the Employee Experience. Please see the part 1 for links to all related articles.
Presence Settings for Employee Experience
(New) The Presence settings listed below allows Admins to manage and configure user visibility and presence across the Employee Experience.
The Presence feature provides administrators with a simple way to configure real-time user visibility and status within an organization. Each user’s status - such as Available, Do Not Disturb, Away, or Offline - is displayed on their user icon throughout the Employee App (such as the user icons displayed for authors of posts, stories, and pages in the news feed), as well as on their People profile page. Users can set their status manually and also personalize their presence by adding an additional custom message and icon, which appear on their own user profile and People profile page.
Administrators can set the presence feature to use the Appspace presence service or to sync with Microsoft Office 365, allowing teams to remain visible and connected in the way that best suits their workflow.
The Apps settings can be accessed via Settings > Configuration > Employee Experience > Presence within the Appspace console.
To configure Presence, select the options below.
- Enable Presence – Select to enable the Presence feature on the Employee Experience.
- Presence Provider – Select either Appspace or an External Provider.
- Passport (This option is only available when External Provider is selected)– Select a Presence passport or create a new one for the integration with the External provider. Currently the Office 365 passport is available.
If Presence is linked to an external provider, the most recent status update from that provider will automatically override any manually set status.
- Click Save or Cancel.
Apps Settings for Employee Experience
The Apps settings listed below contain settings focused on third-party apps for the Employee Experience.
The Apps settings can be accessed via Settings > Configuration > Employee Experience > Apps within the Appspace console.
Configure Third-Party Apps
The Third-Party Apps setting option allows Admins to manage and configure the application links for third-party apps displayed on the Employee Experience. A wide range of apps ranging from enterprise messaging, human resources, business-focused, and even entertainment apps can be selected as per the organization’s requirements. However, if a desired service isn’t listed, Admins have the flexibility to create custom application links, ensuring employees have access to all necessary tools directly from the Employee Experience.
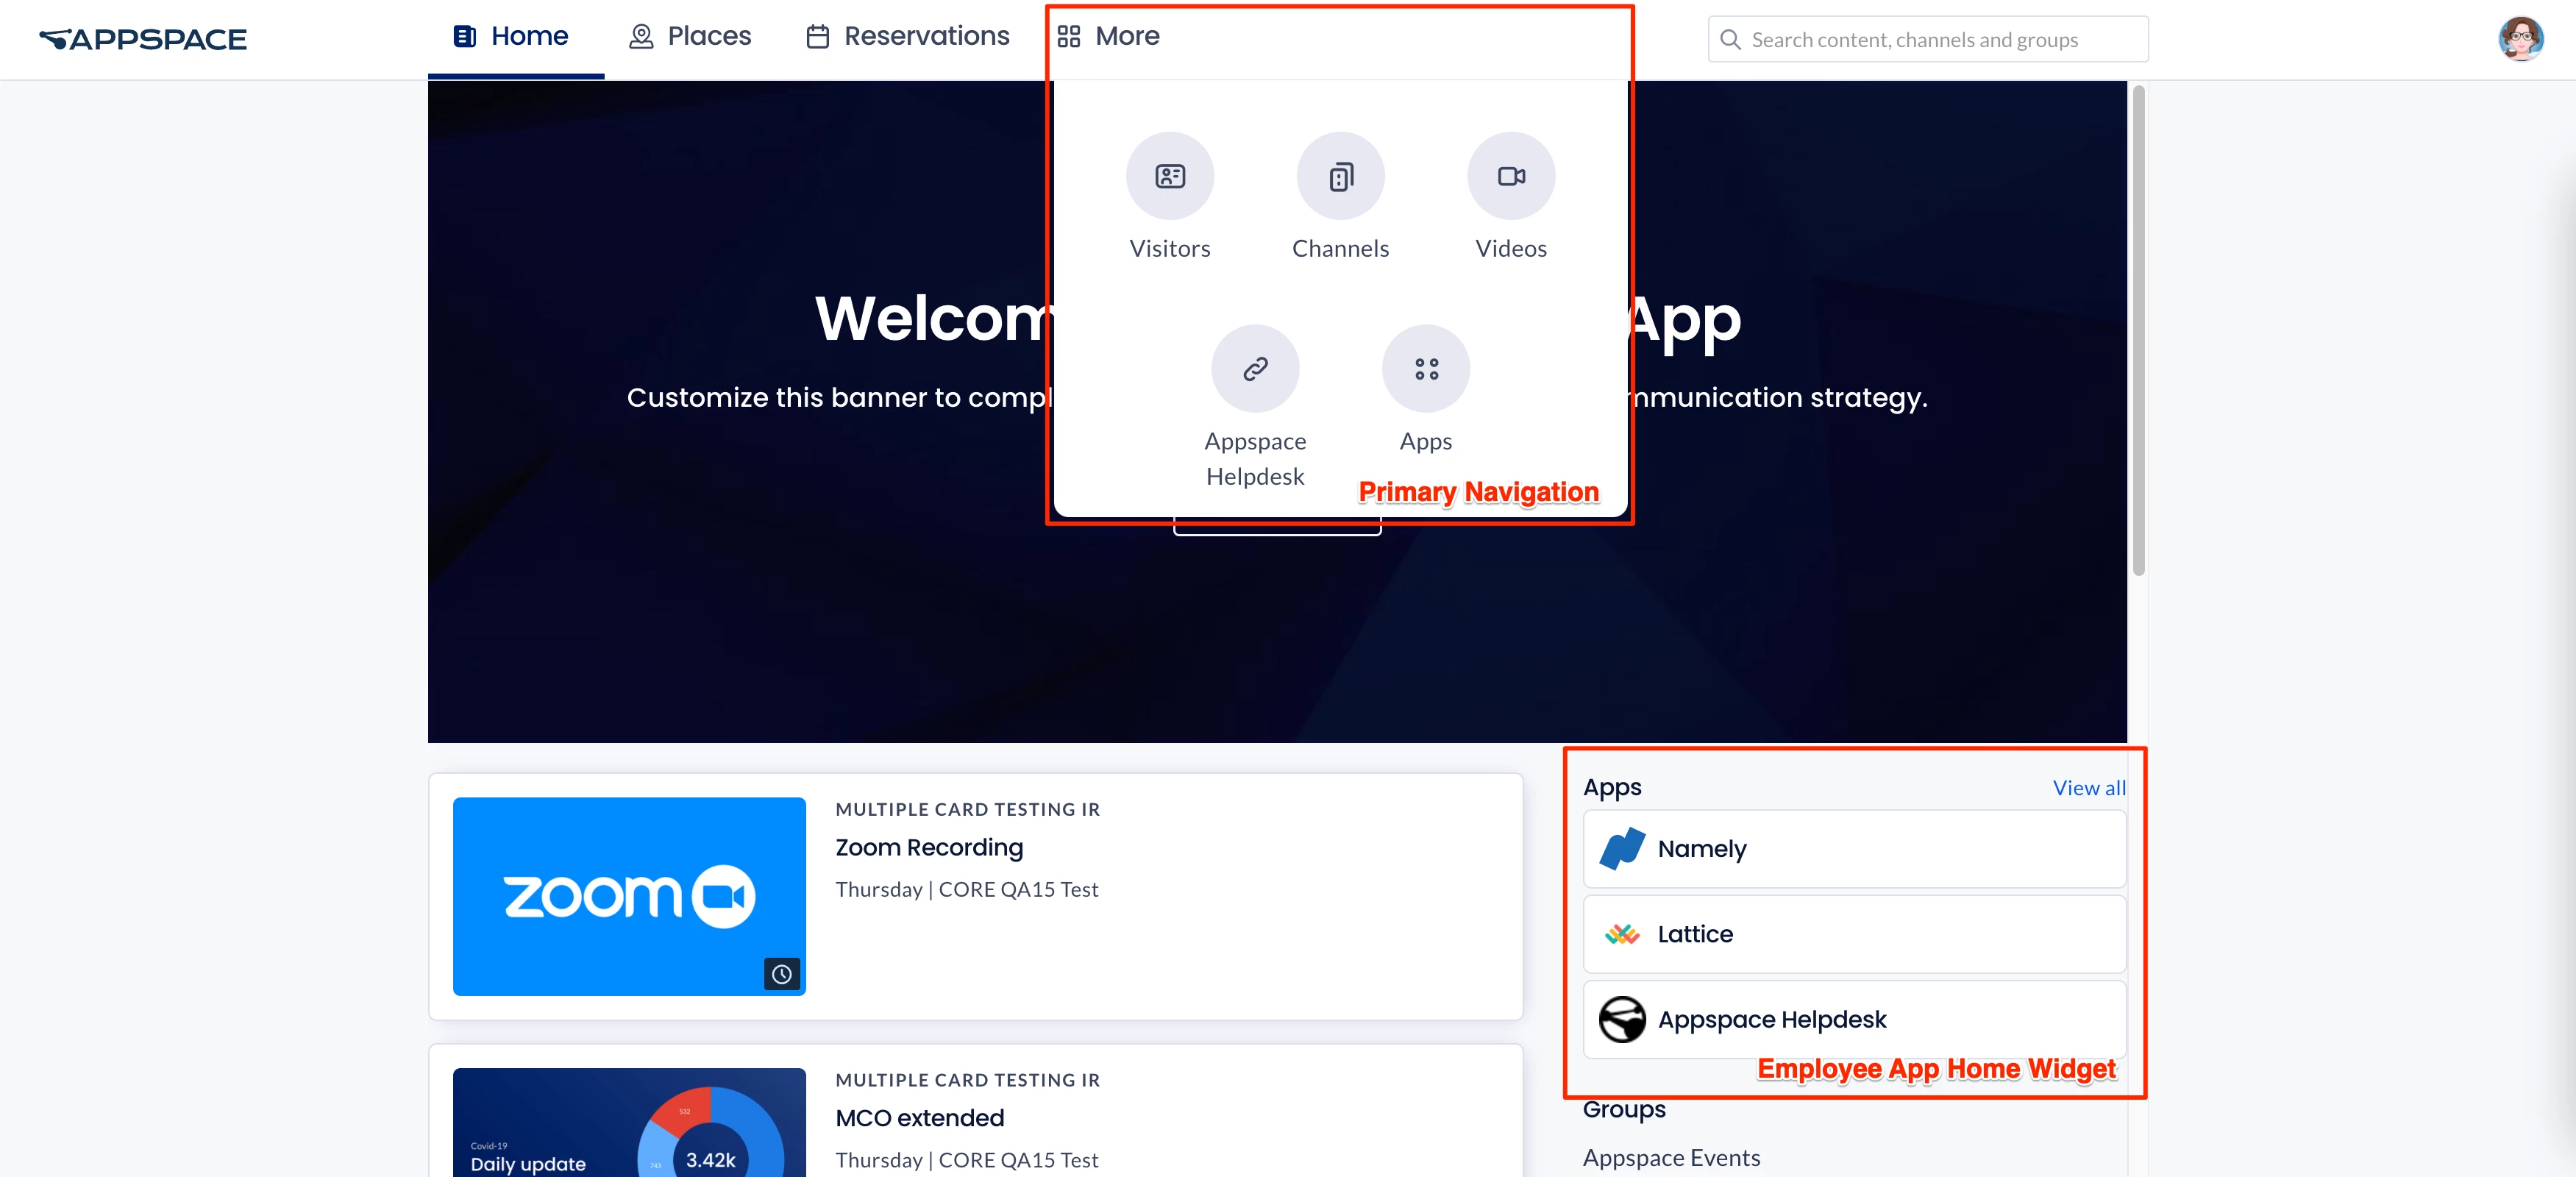
(New) Users can then set their favorite apps on the Apps page, which will then appear in the Favorites tab within the Apps section and in the App Links widget.
Note
Please ensure the Apps section has been enabled on the Employee Experience, in order for the third-party apps to be displayed. For more information, please refer to the Configure Navigation Menu instructions above.
Optionally, you may add the App links widget to the Employee Experience Home page, which will display apps and third-party apps as a widget in the main or side column. Refer to App links under the widgets section on the Configure Employee Experience Themes article to add an App link widget.
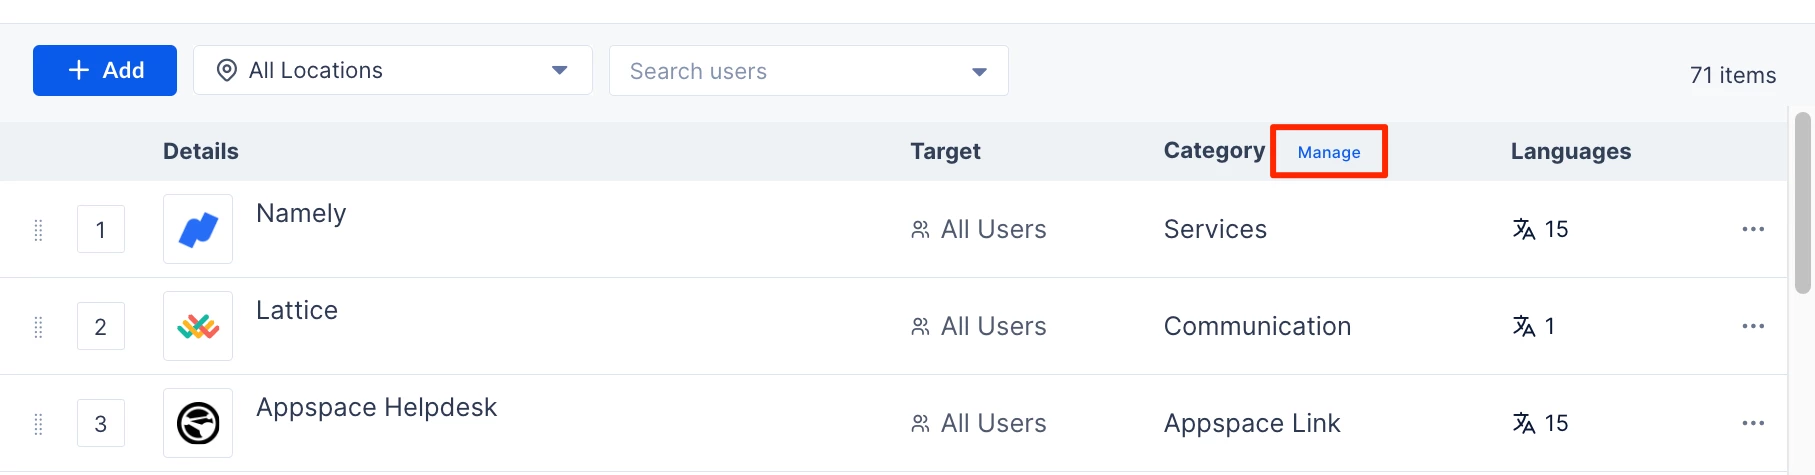
The arrangement of app rows in the Apps tab matches the order in which third-party apps appear in the Apps section of the Employee Experience. Each row displays the App Details, Target users, App Category, Language translations available for each third-party app. You may perform the following actions:
- + Add – Add a Third-Party App link to the Employee Experience.
- Select Location – Displays the apps based on the Location selected.
- Select Users – Select the user or user groups from the drop-down to display apps based on the target audience.
- Sort Apps – Click and drag the Sort (⋮⋮) icon up or down to move the Apps based on your organization’s priority and branding strategies.
- Manage Categories – Click Manage to view and configure the categories for the apps.
- Click the ellipsis (…) at the end of the row to perform the following actions:
- Edit – Configure the Third-party app link.
- Disable / Enable – Enable or disable the Third-party app link.
- Delete – Delete the Third-party app link
To add or configure third-party apps within the Apps section, click the ellipsis of the desired section menu item, and click Edit:
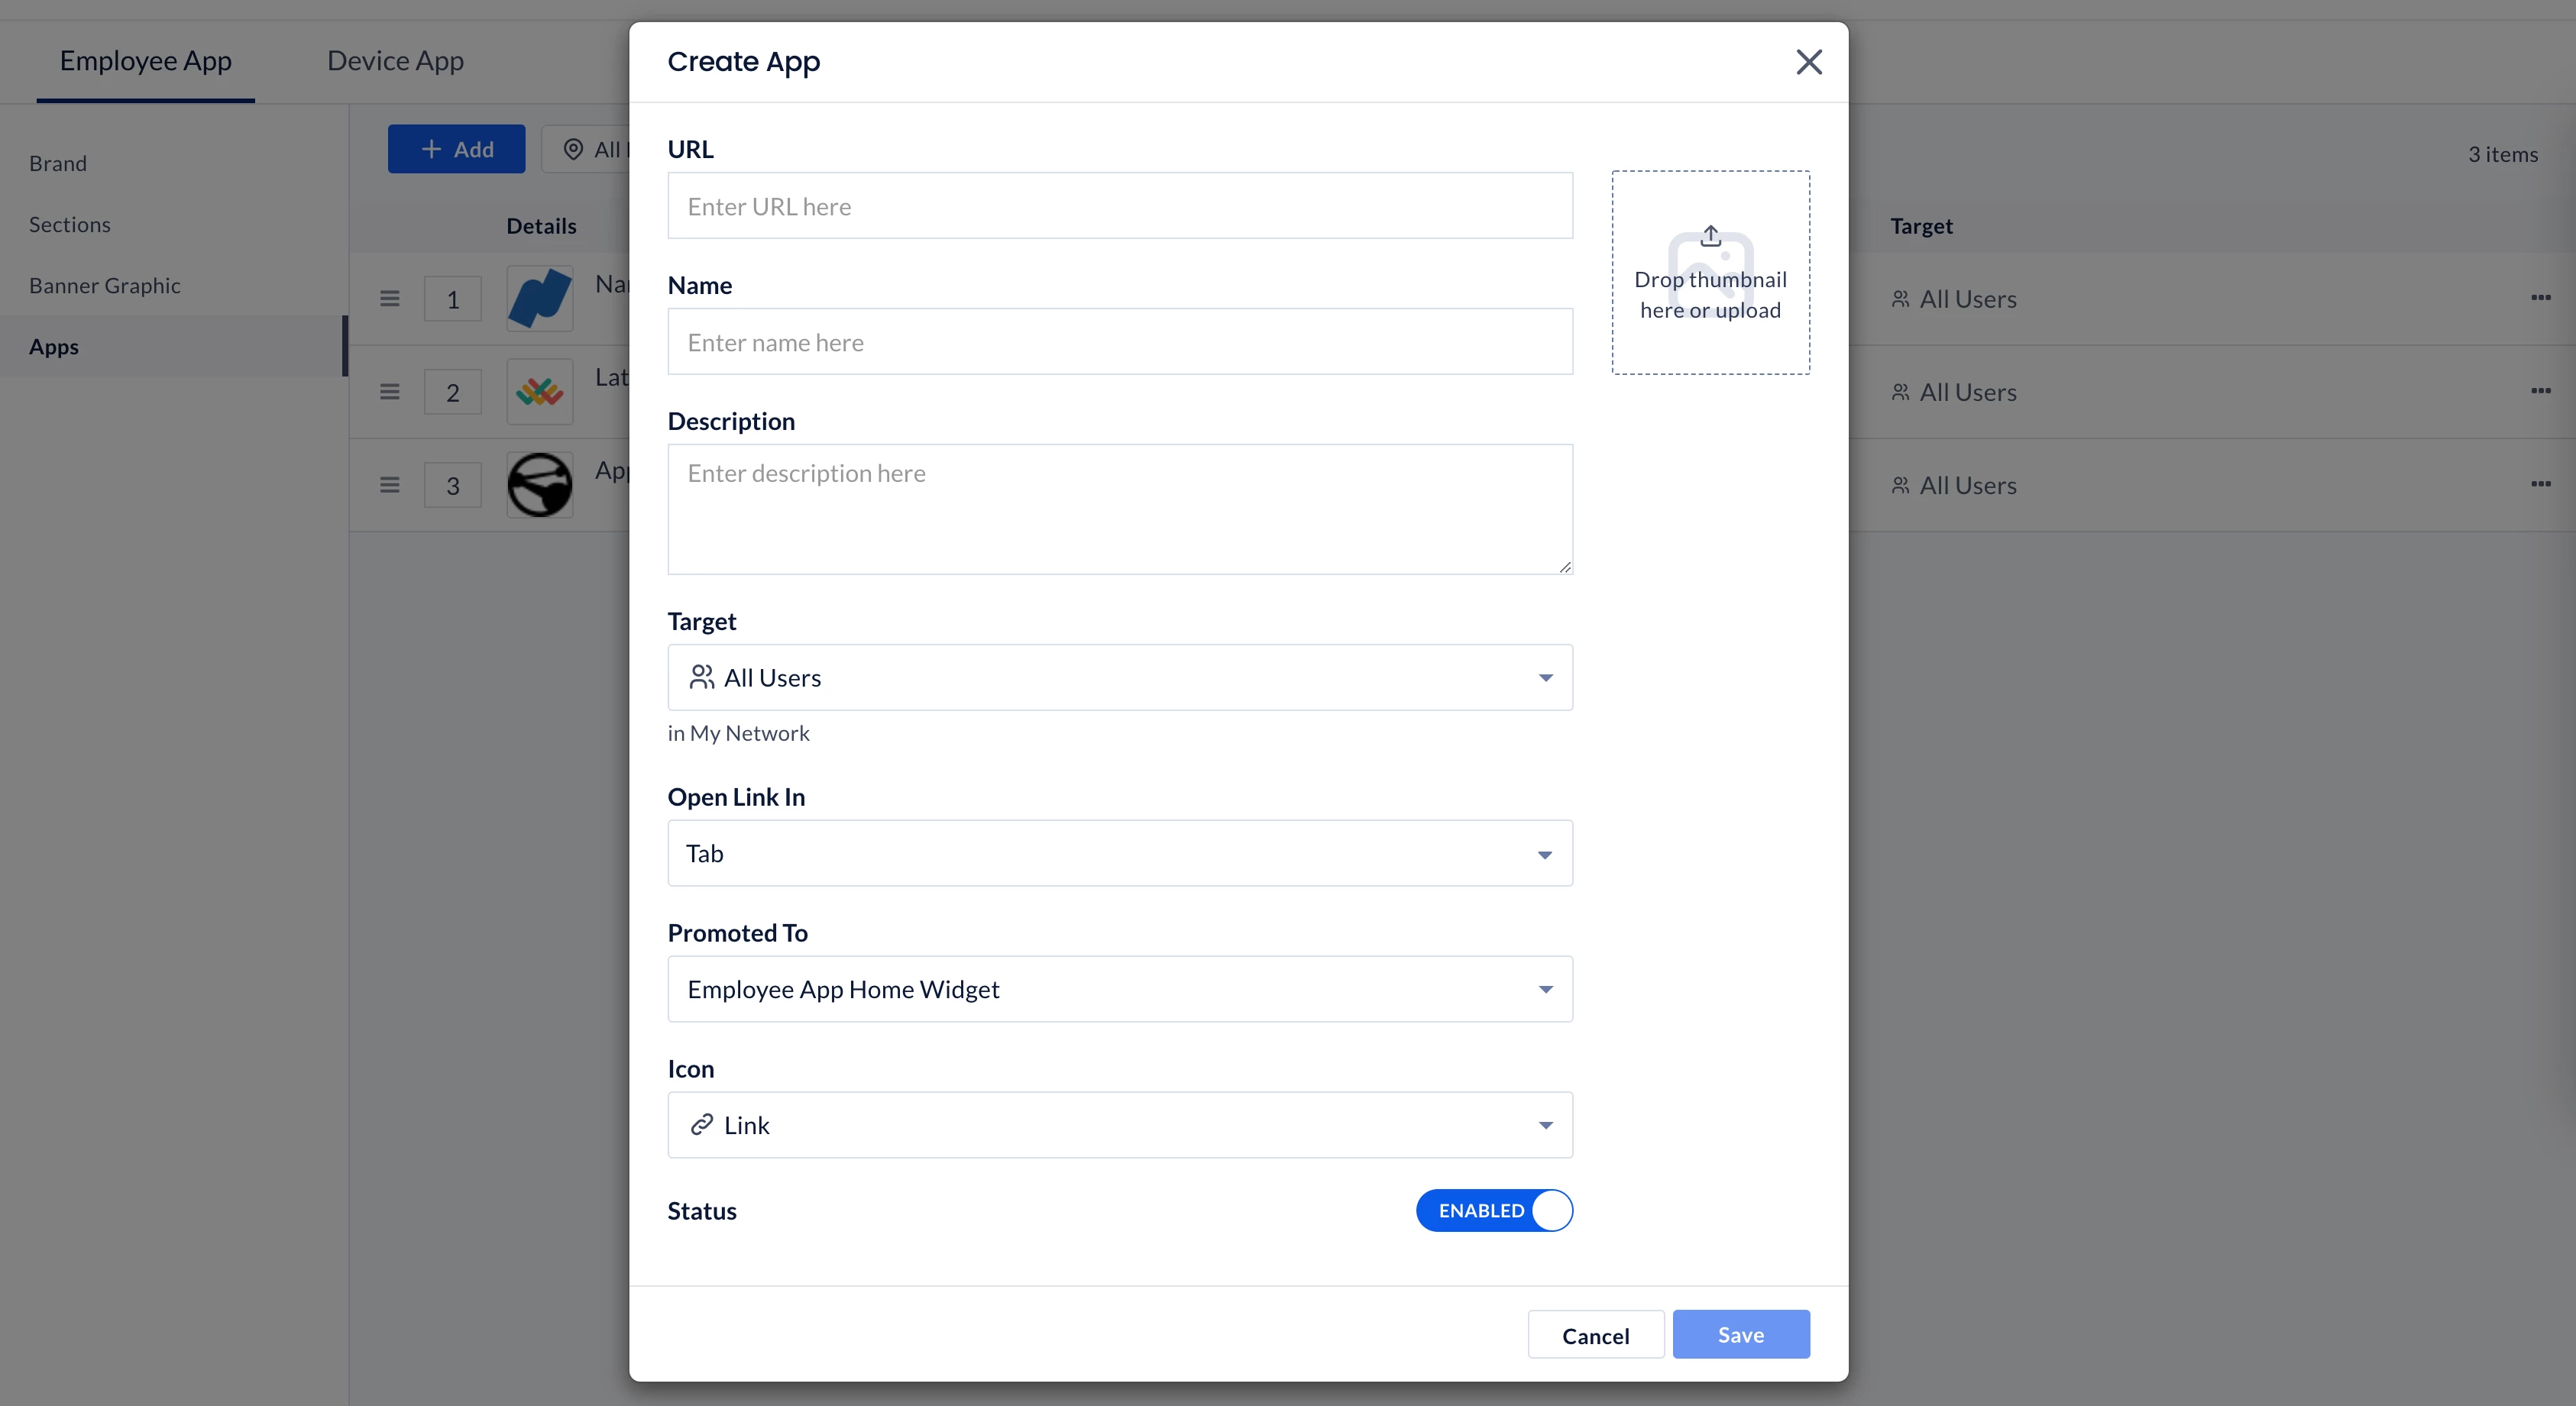
- URL – Enter or edit the third-party app URL link.
- Name – Enter the third-party app name, or rename it to align with your organization’s branding.
- Image – Upload a thumbnail of the third-party app.
- Language – Displays the language of the third-party app, with the option to manually translate, or use AI to translate the selected language, or all languages available.
- Description – Enter or edit the description of the third-party app.
- Category – Select the category for the third-party app from the drop-down.
- Target – Select the target audience of the third-party app from the drop-down, with the option to select “Specific Users, Groups, or Locations” as the target audience of the third-party app. Defaults “All Users” in Appspace.
- Add Users, User Groups, or Locations – Assign the desired users, user groups, or locations as the target audience of the section.
- Inject Query Parameters – Define the user attributes to be parsed along the third-party app via the URL link.
- User Email – Append the user’s email.
- User Name – Append the user’s first and last name (combined).
- User ID – Append the user’s ID.
- User Membership – Append the user’s User Group.
- User Home Location ID – Append the user’s Home Location ID.
- User Home Location Name – Append the user’s Home Location name.
- Signed Identity – If enabled, this feature adds security by sending encoded data (JWT), which can be used by the third-party app to verify the user’s identity.
- Open Link In – Select where the third-party app is launched from the drop-down menu.
- Tab – Launch the third-party app in a new tab within the Employee Experience in-app browser for mobile. (Default)
- Inline App – Launch the third-party app within an iframe, only for supported links.
- Native Browser – Launch the third-party app in the native web browser for mobile.
- Promoted To – Select where the app is displayed on the Employee Experience from the drop-down menu.
- Home Widget – Displays the third-party app on the Home screen.
- Apps Section – Displays the third-party app within the Apps Section on the Home screen.
- Primary Navigation – Displays the third-party app within the Apps navigation menu.
Note
You may select both options allowing the application to be displayed in both locations, or unselect both options, which only displays the application in the Apps dashboard on the Employee Experience.
- Icon – Select an icon for the third-party app from the drop-down menu.
- Color – Select the color for the third-party app by entering the Hex Code or selecting from the color picker.
- Status – Slide the toggle switch to Enable or Disable the third-party app.
Manage Third-Party App Categories
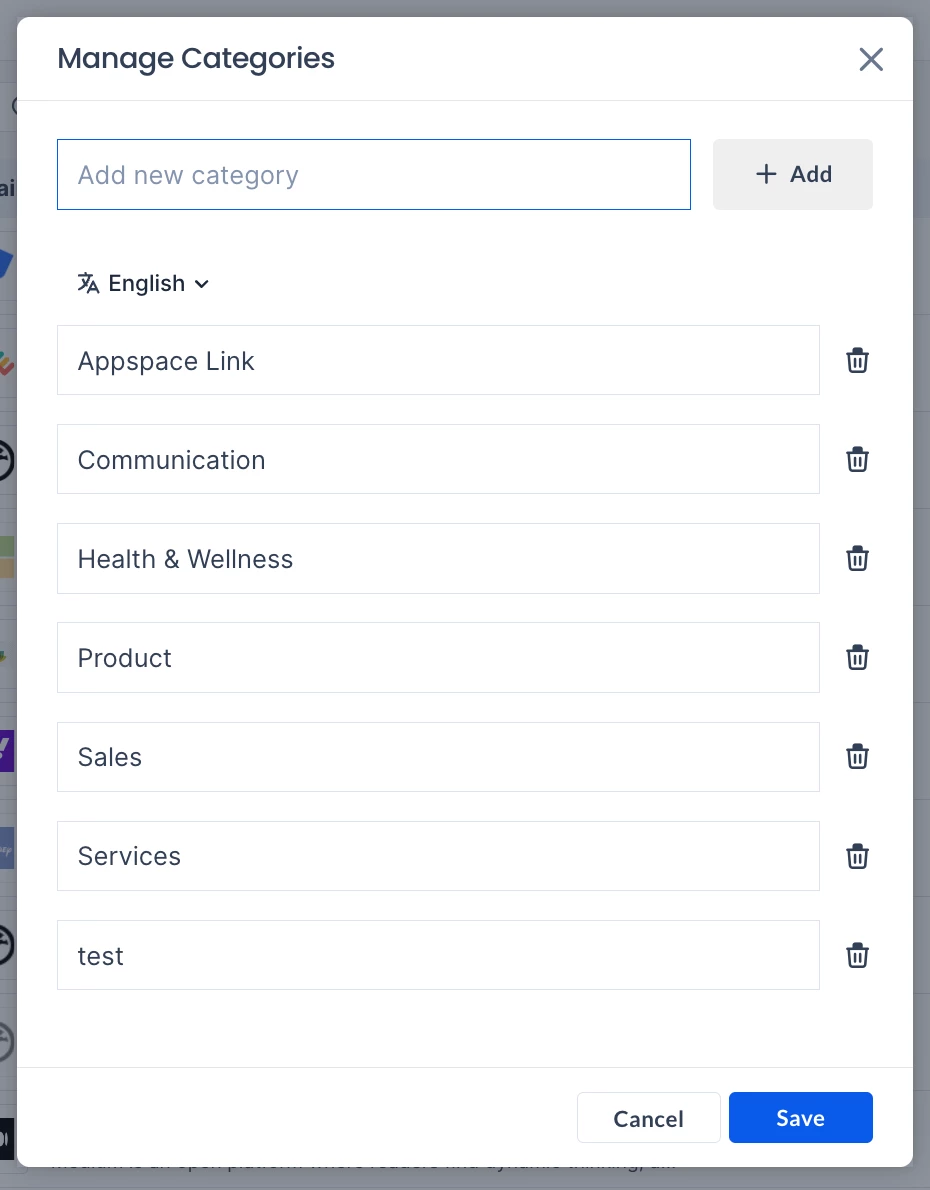
To add and manage categories for third-party apps, click the Manage link in the Categories column, and perform the following actions:
- + Add – Add a new category, by entering the category you wish to include and assign to the third-party apps.
- Language – Translate categories into all languages.
- Rename – Rename a category.
- Delete – Delete a category.
Social Settings for Employee Experience
The Social settings listed below contain settings focused on social features available on the Employee Experience.
For more information on post reactions, comments, and share, refer to the Create Quick Post in Employee Experience.
The Social settings can be accessed via the Settings > Configuration > Employee Experience > Social tab within the Appspace console.
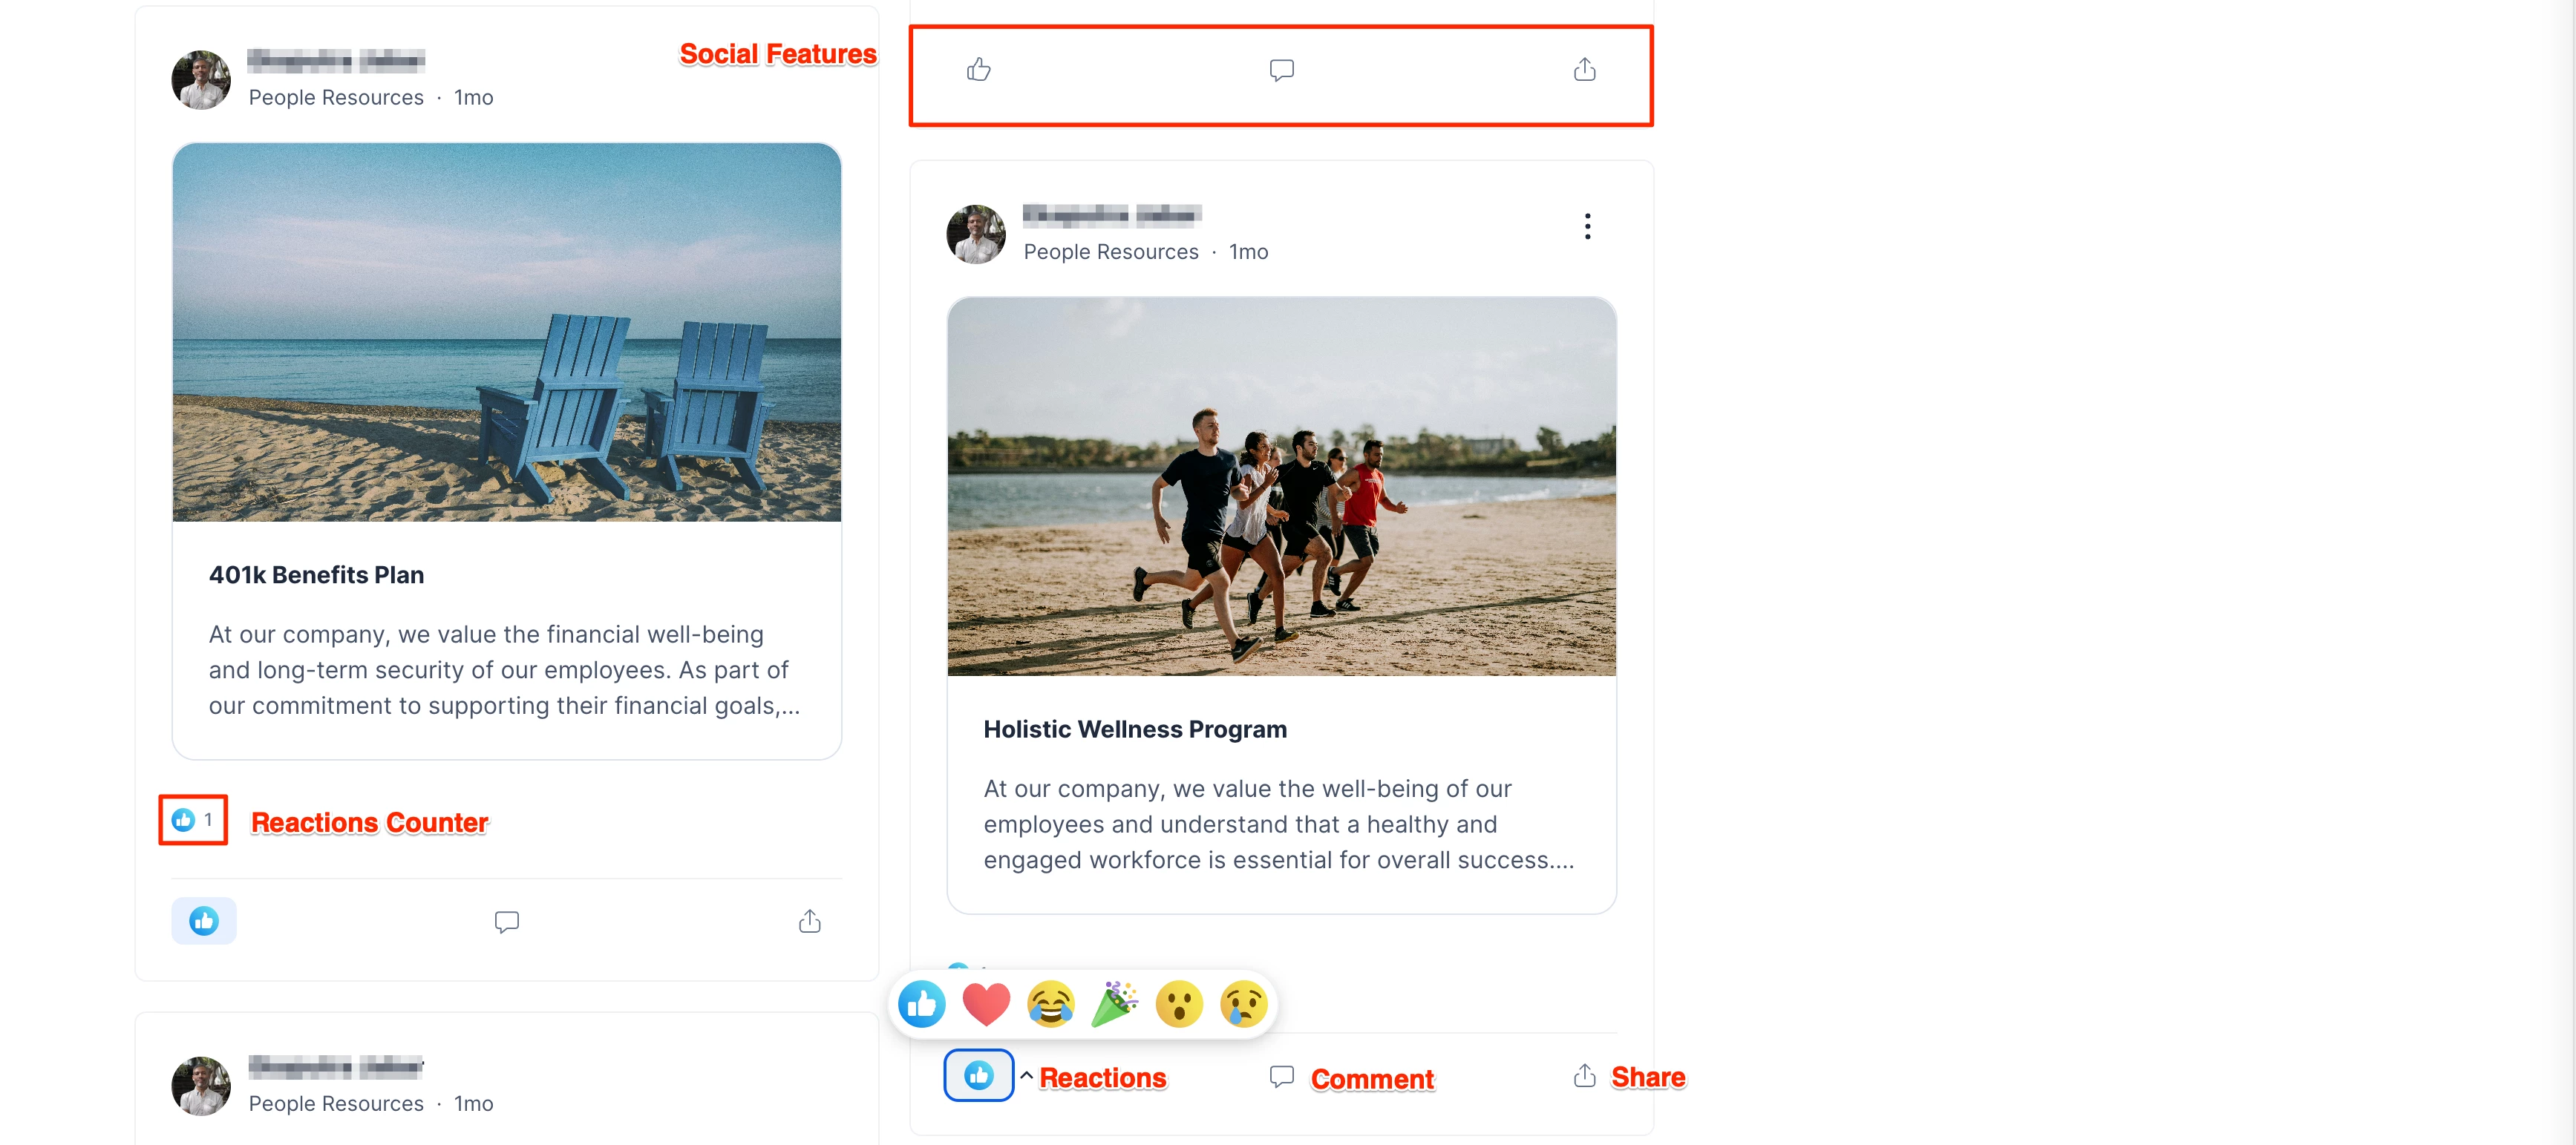
Configure Reactions
The Reactions setting option allows Admins the ability to enable or disable the reaction emojis on posts, stories, and channels, allowing employees to interact quickly with content more expressively.

To configure the Reactions setting, select the desired option from the drop-down menu:
- Default On – Enabled by default on all channels and posts.
- Default Off – Disabled by default, however channel-level settings may be adjusted to configure each channel individually.
- Always On – Always enabled on all posts.
- Always Off – Always disabled on all posts.
Configure Comments
The Comments setting option allows Admins the ability to enable or disable the comments on posts, stories, and channels, allowing employees to engage with content by leaving comments, fostering interaction and discussion.
To configure the Comments setting, select the desired option from the drop-down menu:
- Default On – Enabled by default on all channels and posts.
- Default Off – Disabled by default, however channel-level settings may be adjusted to configure each channel individually.
- Always On – Always enabled on all posts.
- Always Off – Always disabled on all posts.
Configure Share
The Share setting option allows Admins the ability to enable or disable sharing on posts, stories, and channels allowing employees to share content with colleagues, promoting collaboration and broader content distribution across the organization.
To configure the Share setting, select the desired option from the drop-down menu:
- Default On – Enabled by default on all channels and posts.
- Default Off – Disabled by default, however channel-level settings may be adjusted to configure each channel individually.
- Always On – Always enabled on all posts.
- Always Off – Always disabled on all posts.
Configure On-Screen Engagement for Digital Signage
The On-Screen Engagement feature allows Admins the ability to boost engagement between digital signage and employee communications by integrating the capabilities to card content:
- QR Codes – QR codes displayed provide direct access to relevant resources, by utilizing the built-in Referral Link functionality, improving accessibility and user engagement.
- Social Reactions – If content is shared via the Employee Experience, simple social reactions are displayed on-screen, fostering interactivity and real-time feedback. Ensure Reactions is enabled.
To configure the On-Screen Engagement feature, the following device property and value must be configured on the device or device location level.
| Device Property | Value | Example |
| player.social.qrcode.enable | true / false | player.social.qrcode.enable=true |
By default, if on-screen engagement is enabled at the account level and player.social.qrcode.enable is not configured, the on-screen engagement bar with the QR code will be displayed, directing users to the Employee Experience post link. When player.social.qrcode.enable is set to “true,” the on-screen engagement bar with the QR code will be shown, and if set to “false,” the QR code will be hidden.
In scenarios where on-screen engagement is disabled (and the property is set to true) at the account level and a post with a “Referral link” URL is published to devices but not to users (Employee Experience), the playlist channel will show only the Referral QR Code, without on-screen engagement features. When on-screen engagement is enabled (and the property is set to true) and the post is published to both devices and users, the playlist channel will include the QR code, comments, and reactions, directing users to the Employee Experience post link.
Search Settings for Employee Experience
The Search settings contain settings for the Search functions on the Employee Experience.
The Search settings can be accessed via the Settings > Configuration > Employee Experience > Search tab within the Appspace console.
Search Integrations
The Search Integrations tab within the Settings > Search section allows Admins to create search integrations to expand the search capabilities of the Appspace Employee Experience with external providers like SharePoint (Google Drive integration is being developed and will be available eventually).
To configure the Search Integrations, perform the steps below.
- Log in to the Appspace console.
- Click the ☰ Appspace menu, and click Settings > Configuration.
- Click the Employee Experience tab, and click Search from the side panel menu. Select the Search Experience tab.
- Click the +Create button.
- Select SharePoint (Google Drive integration is being developed and will be available eventually). Click Next.
- In the New Integration window, enter the following fields:
- Name – Specify the name or title for the integration.
- Passport – Select a passport. If the one you want is not available, select Create a new passport.
- Passport options – Select to Require users to use the admin passport or Require users to use their own passport.
- Require users to use the admin passport – Select this option if you want all users in your organization to share the same permissions as defined by the selected passport.
- Require users to use their own passport – Select this option if each user will connect using their individual SharePoint passport, with permissions determined by their own credentials.
- SharePoint Site Collection – Select the SharePoint site to make available in search.
- SharePoint Document Libraries Collection – Type in and select the suggestions from the dropdown list to add document libraries from the SharePoint site. You can add multiple items. Leave blank to allow all document libraries in the search.
- Searchable content – Select the types of SharePoint content that will be searchable in the search function of the Employee experience.
- Audiences – Enter the audience that will be able to search and view the search results of the SharePoint content. Leave it blank to allow access to all users
- Click Save.
Search Configuration
(New) The Search Configuration tab within the Settings > Search section allows Admins to configure the search experience for Employee Experience users, such as default search suggestions and determining which content will appear first in the search results for specific keywords.
To set the Search Configuration, perform the steps below.
- Log in to the Appspace console.
- Click the ☰ Appspace menu, and click Settings > Configuration.
- Click the Employee Experience tab, and click Search from the side panel menu. Select the Search Configuration tab.
- In Search Suggestions, type a keyword and press ENTER to add it to the list of default suggestions. You can add up to ten suggestions. These suggestions will automatically appear when a user clicks the Search field in Employee Experience, even before they begin typing.
- Click Save at the bottom of the page.
- For Search Results Promotion, define Keywords that trigger specific Content to appear at the top of search results.
- Keyword – Enter the keyword that will have the promoted result.
- Content – Click the field and type in or select the suggested content (story, page, app, or space) that will be promoted as a search result for the keyword.
- Click Add another to enter the next Keyword and Content.
- Once your list is created, you can reorder the priority by clicking the arrange symbol (⠿) at the beginning of a line and dragging it up or down.
- Click Save.
Search Insights
(New) The Search Insights tab within the Settings > Search section allows Admins to view statistics and gain insights on the search patterns of Employee Experience users.
To view Search Insights, perform the steps below.
- Log in to the Appspace console.
- Click the ☰ Appspace menu, and click Settings > Configuration.
- Click the Employee Experience tab, and click Search from the side panel menu. Select the Search Insights tab.
- In the Search Insights tab, you’ll be able to view statistical data of all the searches that have been made either via the Appspace App for Employee Experience. This tab will initially be empty.
- Click the calendar field and select a date to view the results.
- Last 7 Days
- Last 30 Days
- Last 90 Days
- Last 12 Months
- Last 24 Months
- Current Year
- Previous Year
- Click Filters and set the filters for the results.
- Audiences – Type in to add audiences and filter the search analytics.
- Result Type – Select the type of search results such as App, Channel, Community, etc. You can select more than one type.
- Location – Select a location to filter the result.
- Click View to view the result or Clear all to remove the filters.
- View the results.
Trend Widgets
- Total Searches
- Search Hit Ratio
- Click Through Rate
Widgets
- Top Search Results
- Search Volume Over Time
- Search Activity Trends
- Top Viewed Search Results
- Search Results By Type
- Top Searched Posts
- Top Searched Spaces
- Click Position Trends
Detailed Analytics Pages
Detailed Analytics Pages can be accessed by clicking on Trend Widgets or Widgets, and provide a deeper view with more detailed information.
Each Detailed Analytics page from a Trend Widget displays the Total number along with the up or down trend percentage compared to the previously selected activity period. For example, if you select 30 days for Total Searches, the page will show the total searches for that period and the percentage increase or decrease compared to the 30 days immediately preceding it.
- Total Searches
- Search Hit Ratio
- Click Through Rate
- Top Search Results
- Search Volume Over Time
- Search Activity Trends
- Top Viewed Search Results
- Search Results By Type
- Top Searched Posts
- Top Searched Spaces
- Click Position Trends
Artificial Intelligence Settings for Employee Experience
The Artificial Intelligence settings listed below contain settings focused on artificial intelligence features on the Employee Experience.
The Artificial Intelligence settings can be accessed via the Settings > Configuration > Employee Experience > Appspace Intelligence tab within the Appspace console.
Configure AI Account Control
The AI Account Control setting option allows Admins to enable various artificial intelligence features throughout the Employee Experience.
To configure the AI Account Control setting, slide the toggle switch to the preferred option:
- ON – Enable Artificial Intelligence on the Employee Experience.
- OFF – Disable Artificial Intelligence on the Employee Experience.
Once Enabled, Admins have the ability to enable or disable the following AI features by sliding the toggle switch to the preferred option:
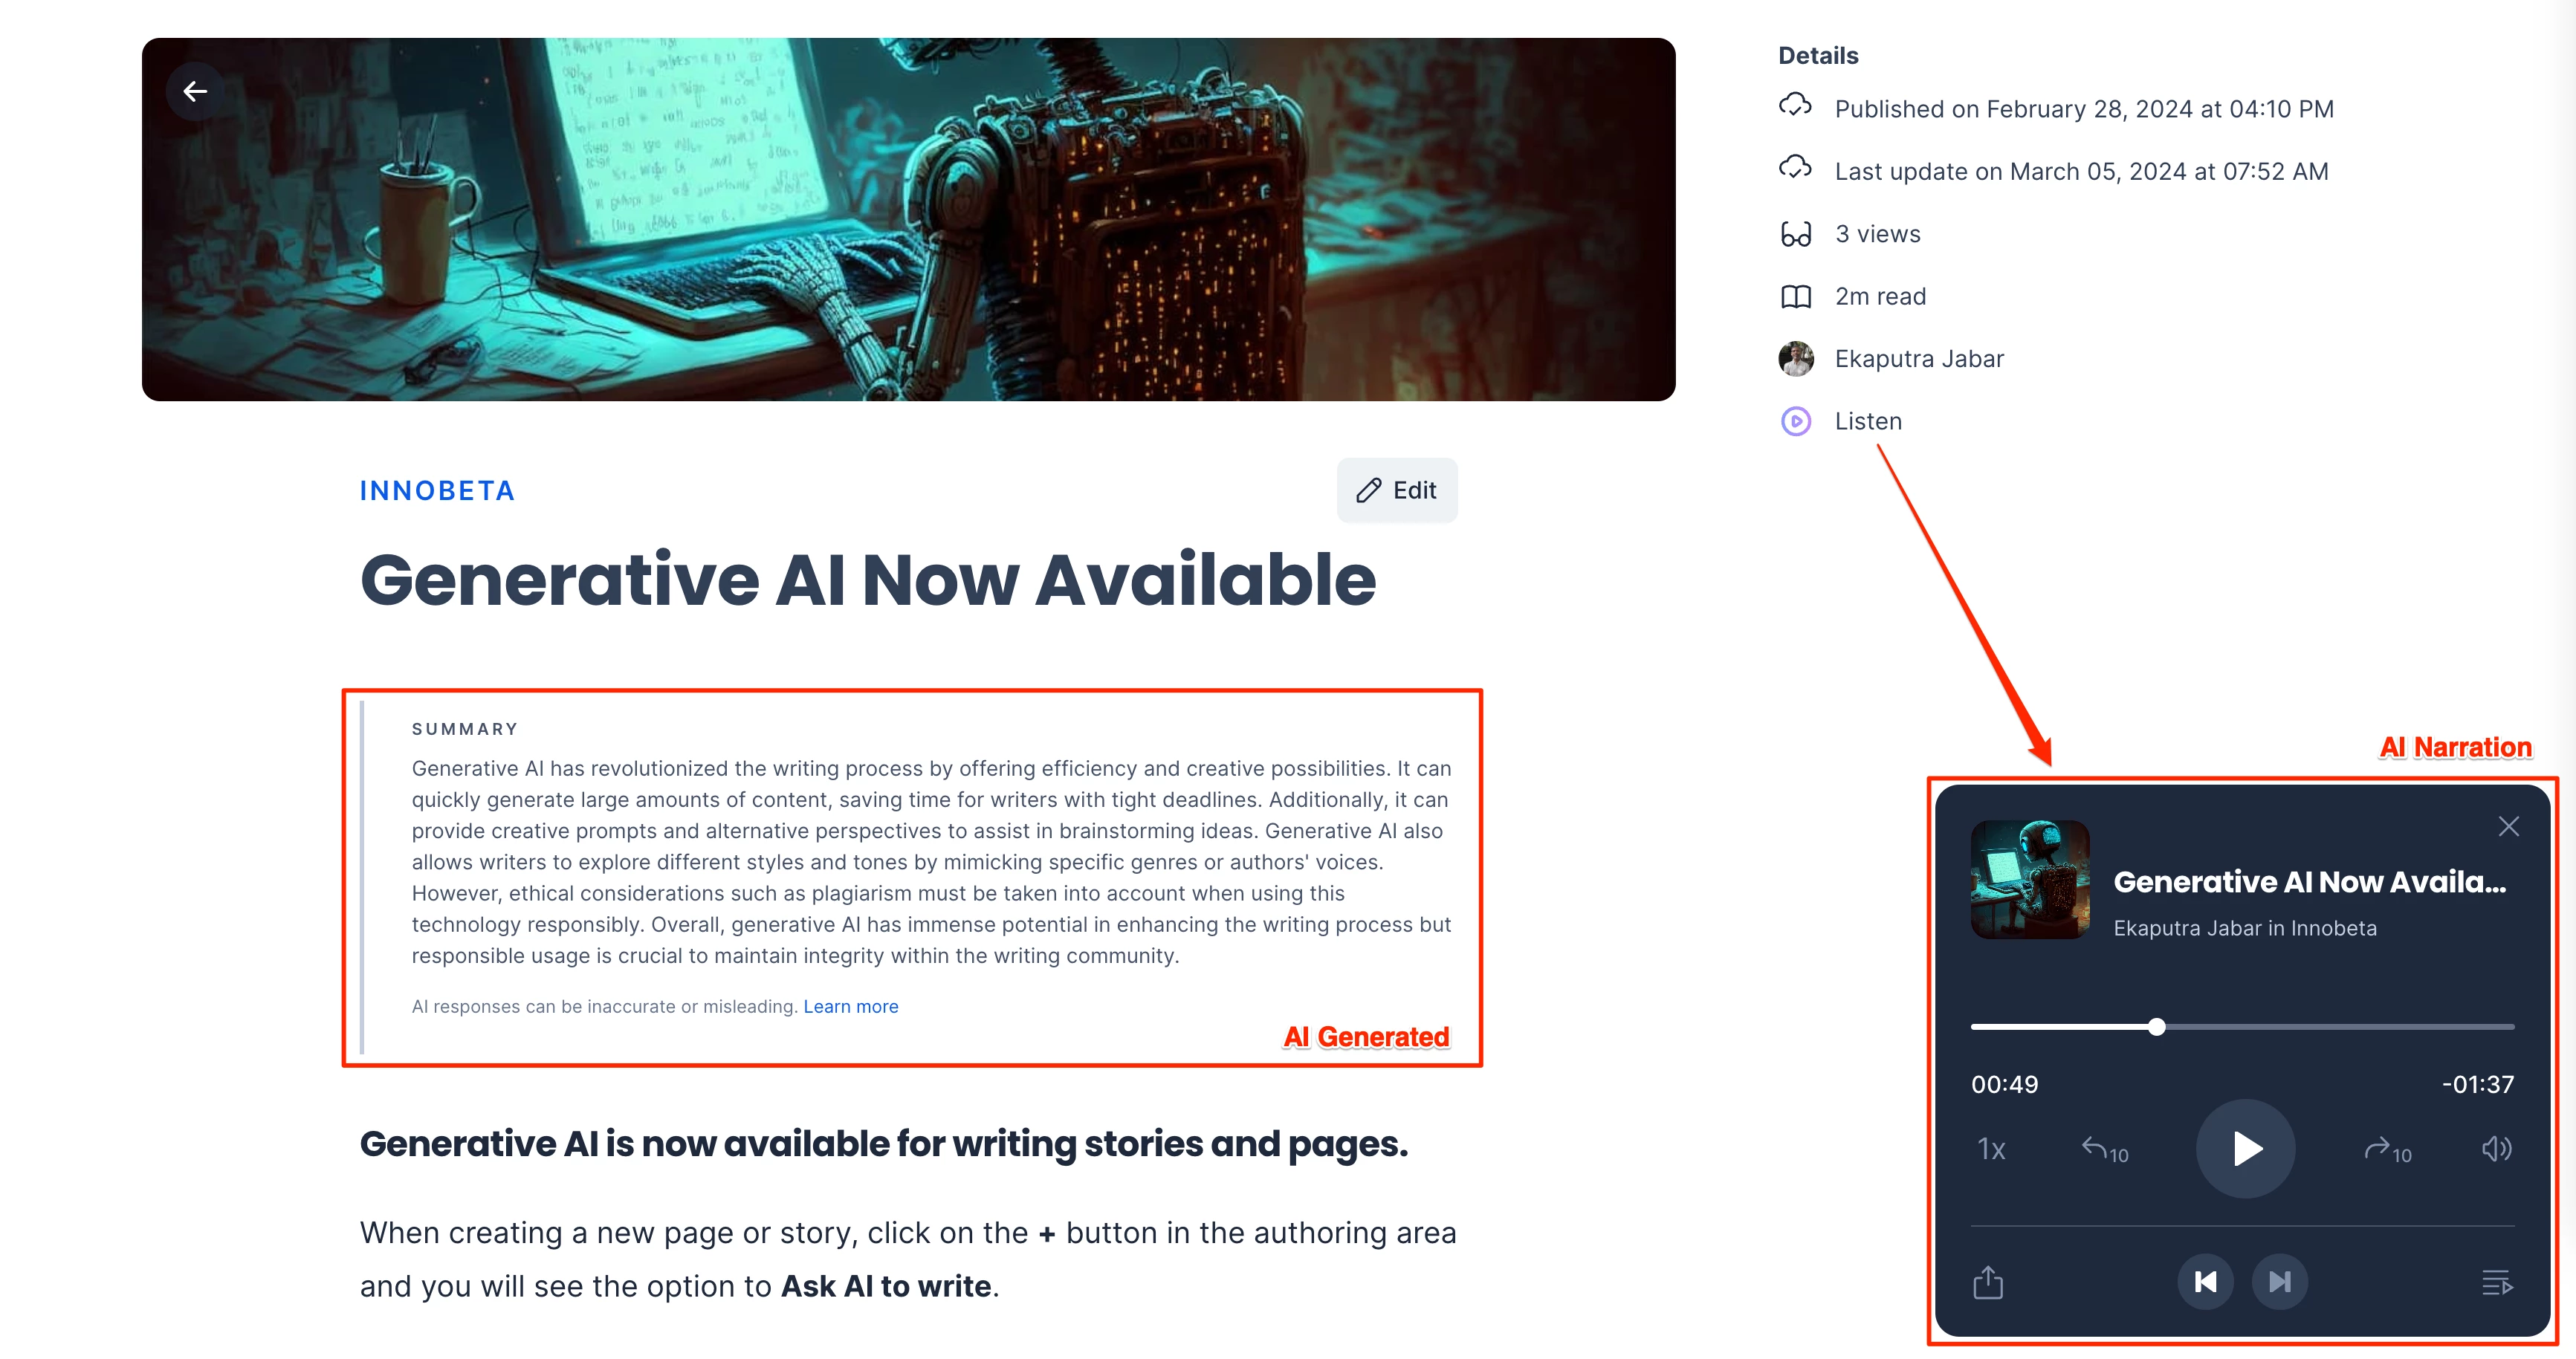
- Enable AI Insights – Utilize AI to enhance content management by automating content tagging, summarization, and captioning by clicking the “AI Sparkle” button.
- ON
- OFF
- Enable AI Narration – Revolutionize how users consume content by transforming written articles, pages, and stories through the “Audio Digest” option on the Employee Experience.
- ON
- OFF
- Enable Generative AI – Eliminate writer’s block by using the “Ask AI to write” option, where users can enter key prompts and customize their writing style to generate curated content for crafting captivating articles.
- ON
- OFF
- Enable AI Translations – Seamlessly translate pages and stories by leveraging AI to understand context and dynamically generate content in multiple languages, ensuring users receive information in the language of their choice.
- ON
- OFF
- Enable Intelligence Conversational – Enable an intuitive chat-like interface in the Employee Experience to provide users with answers, updates, and support with faster and more personalized communication. After enabling this option, you must add and configure the Conversational AI widget. Refer to this article for instructions on how to add widgets to the Employee Experience.
- ON
- OFF
Miscellaneous Settings for Employee Experience
The Settings listed below contain miscellaneous settings for the Employee Experience.
The miscellaneous Settings can be accessed via the Settings > Configuration > Employee Experience > Settings tab within the Appspace console.
Disable In-App Browser for the Employee Experience (Mobile Only)
The Disable In-App Browser for iOS and Android native applications setting option allows Admins to disable the in-app browser to ensure all external links are displayed on the default system browser on iOS and Android devices, for a consistent experience and enhanced security.
To configure the Disable In-App Browser for iOS and Android native applications setting, slide the toggle switch to the preferred option:
- ON – Disable the in-app browser.
- OFF – Enable the in-app browser.
Configure Translation Languages
The Translation Languages setting option allows Admins to configure the available translatable languages in Stories or Pages on the Employee Experience.
To configure the Translation Languages setting, select or deselect the desired languages from the drop-down menu:
- Arabic
- Catalan
- Czech
- Danish
- German
- English (default)
- Spanish
- Finnish
- French
- Canadian French
- Italian
- Japanese
- Korean
- Norwegian
- Dutch
- Polish
- Portuguese
- Romanian
- Slovak
- Swedish
- Thai
- Turkish
- Mandarin