

Note
This article is the first part of a series of articles to help administrators create buildings, floor plans, and zones. You can view the second part of this article here.
To support the expanding digital workplace requirements, we are introducing the maps service to support maps, floor plans, and wayfinding integration for space reservations, visitor management, kiosks, and room scheduling experiences.
The module allows administrators to upload floor plans and group them into a geo location, campus location, or building location. Administrators can also manage locations for zones, rooms and other points of interest, such as restrooms, lifts, exits, and such, on the floor plan.
The maps service integrates with calendar resources, supports room metadata, and links to calendar providers such as Google GSuite, Microsoft Office 365, and the Appspace calendar. The maps service is also designed to work with other IWMS (Integrated Workplace Management System) providers.
This article provides the instructions to add and organize floor plans and zones in Locations.
Prerequisites
- Account Owner or Location Admin permissions required.
- Administrator permissions to a Calendar Provider booking account required.
- Ensure the Calendar Provider booking account has been preconfigured with resources (rooms, buildings).
- Floor plans images should be in the following formats: .jpg, .svg, .bmp, .png, and .gif.
Locations Navigation
The network structure in the Locations module integrates with the user’s location structure created under the Locations tab in Devices, and has the same concept – root network and sub-networks.
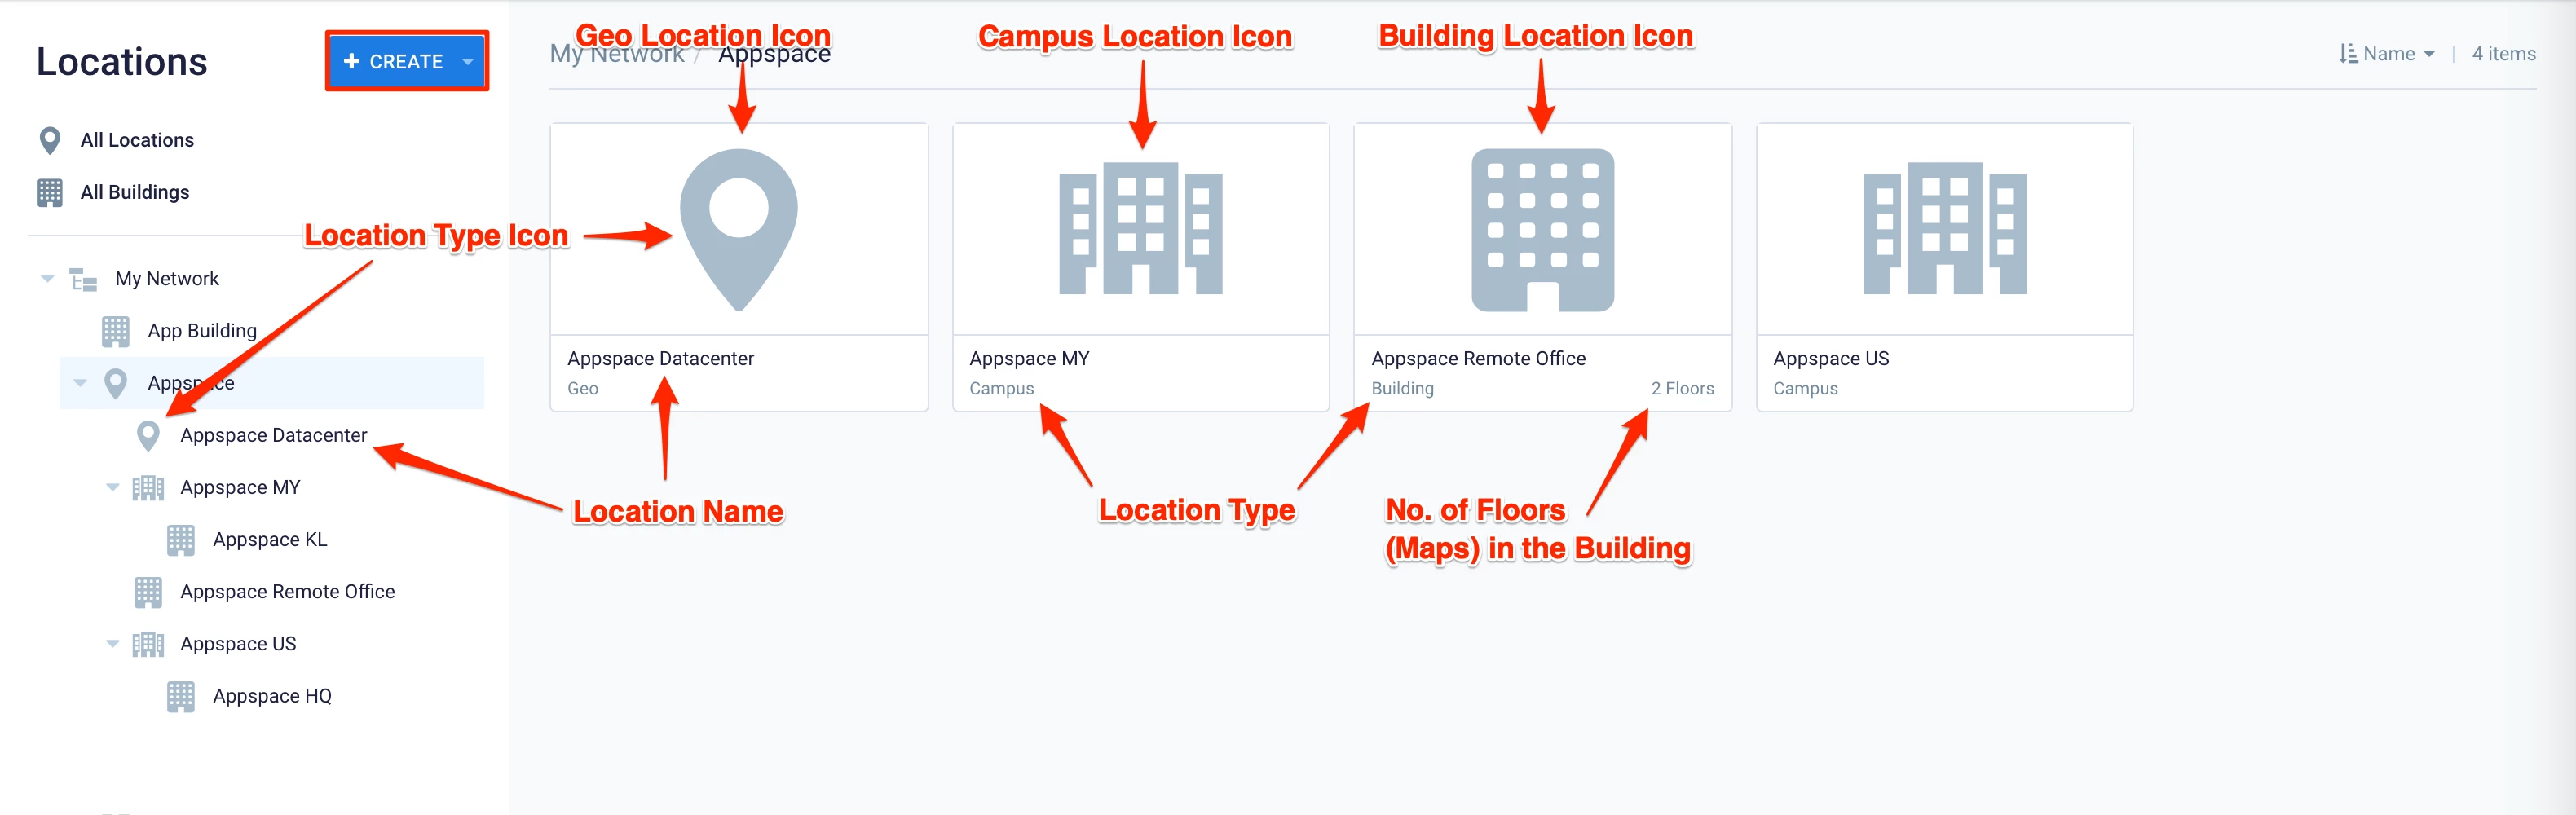
In the Locations module, however, you have the options to create a Geo Location (root location), a Campus Location (sub-location), and a Building (sub-sub-location). Each location type will have its own icon displayed next to its name in the Locations network tree. You can have multiple campus locations in a geo-location, and multiple buildings in a campus, but not vice versa.
Important
In addition to geo, campus, or building locations, Account Owners or Location Admins may also set a floor or zone as the Home Location for a user. They must configure the Home Location in the Users module, for one user or multiple users/user groups.
When a user logs in to the Appspace console or the Appspace Employee App, they will only see content available in their default Home Location. If set to floor or zone, users will still be able to view content and/or resources that are available in the parent location. Users may switch their Home Location from their profile page in the Employee App or the Appspace console.
You may upload floor plans for each building only.
This structure allows organizations with regional offices with a better floor plan and map organization, ideal for room scheduling and wayfinding.
When a geo-location or campus location is created here in the Locations module, the user’s location in the Location tab in Devices is automatically updated. If you’d like to move the location of any campus location or building location you’ve created, to a different geo-location, you must do so in the Locations tab in Devices.
You may set each location (geo-location, campus, building, etc) with a language, which will be the default language displayed in the Employee App to new users. This will be overridden when employees set their language in the Employee App.
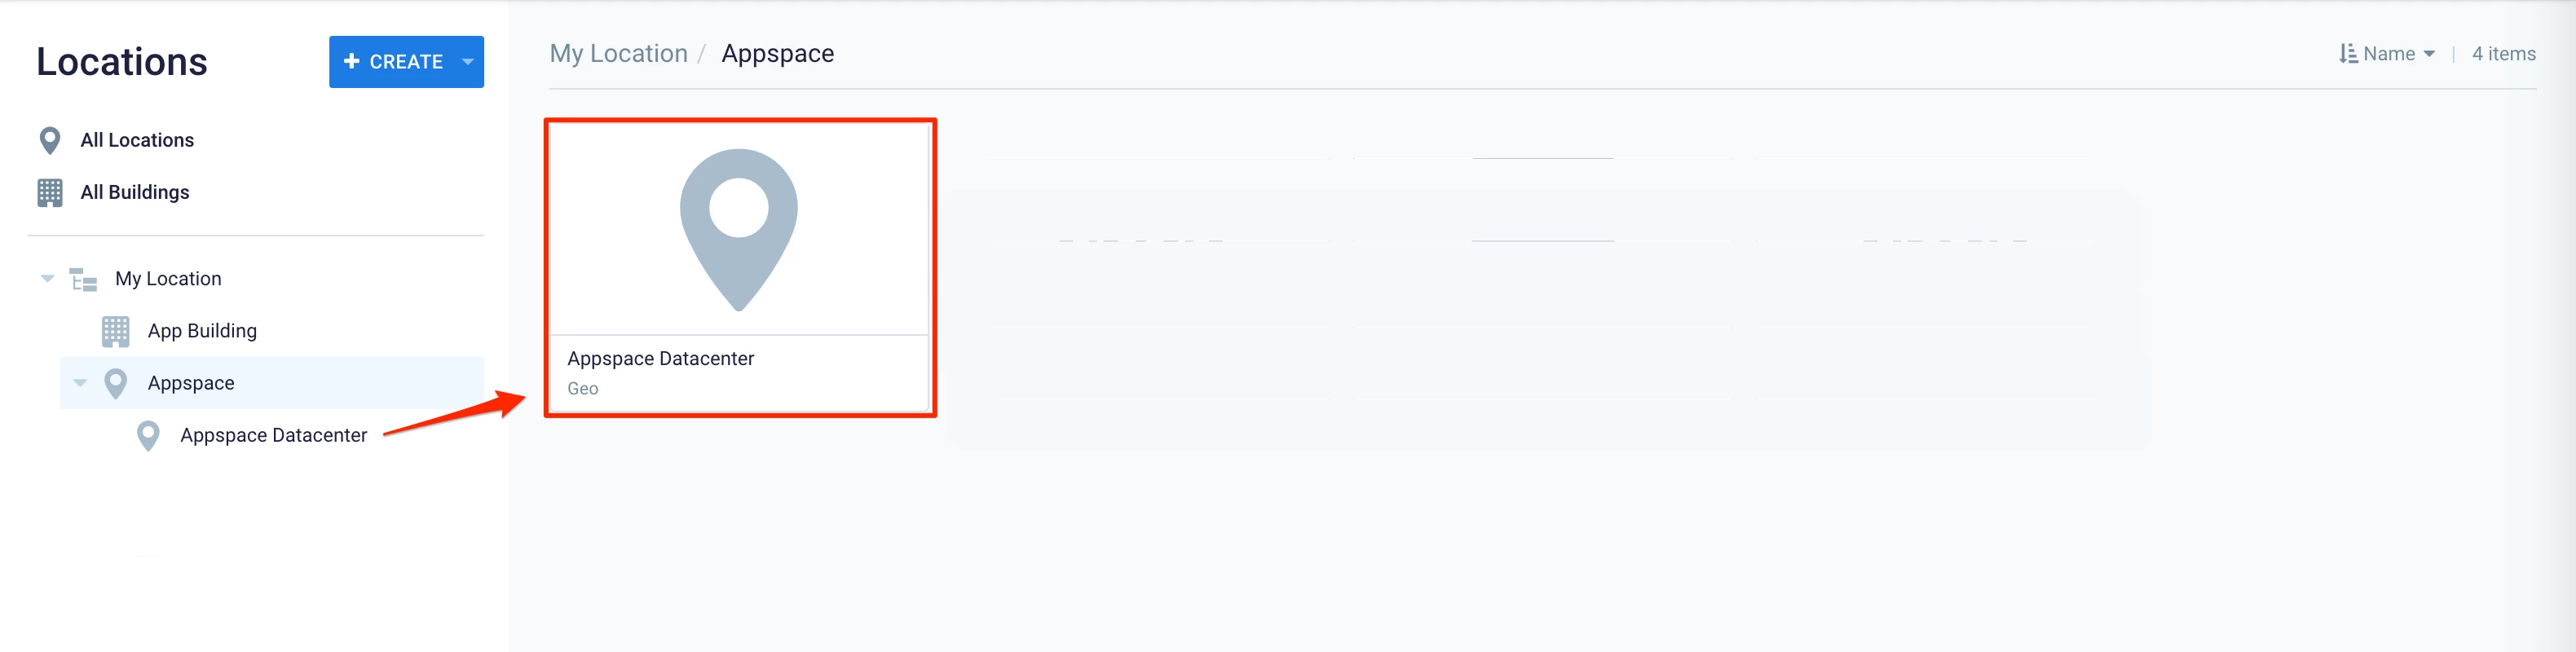
Geo Location
When a Geo Location is selected in the Locations network tree, the dashboard on the right will display all the campus locations and buildings available in its location.
Right-clicking on a Geo Location in the Locations tree or on the dashboard will display these options:
- Edit – Edit the selected location name, type, or language.
- Delete – Delete the selected location.
- Export – Export the selected location.
- Add Geo Location.
- Add Campus Location.
- Add Building Location.
Note
You may add one or multiple Campus Location(s), Building(s), or even another Geo Location in a Geo Location.
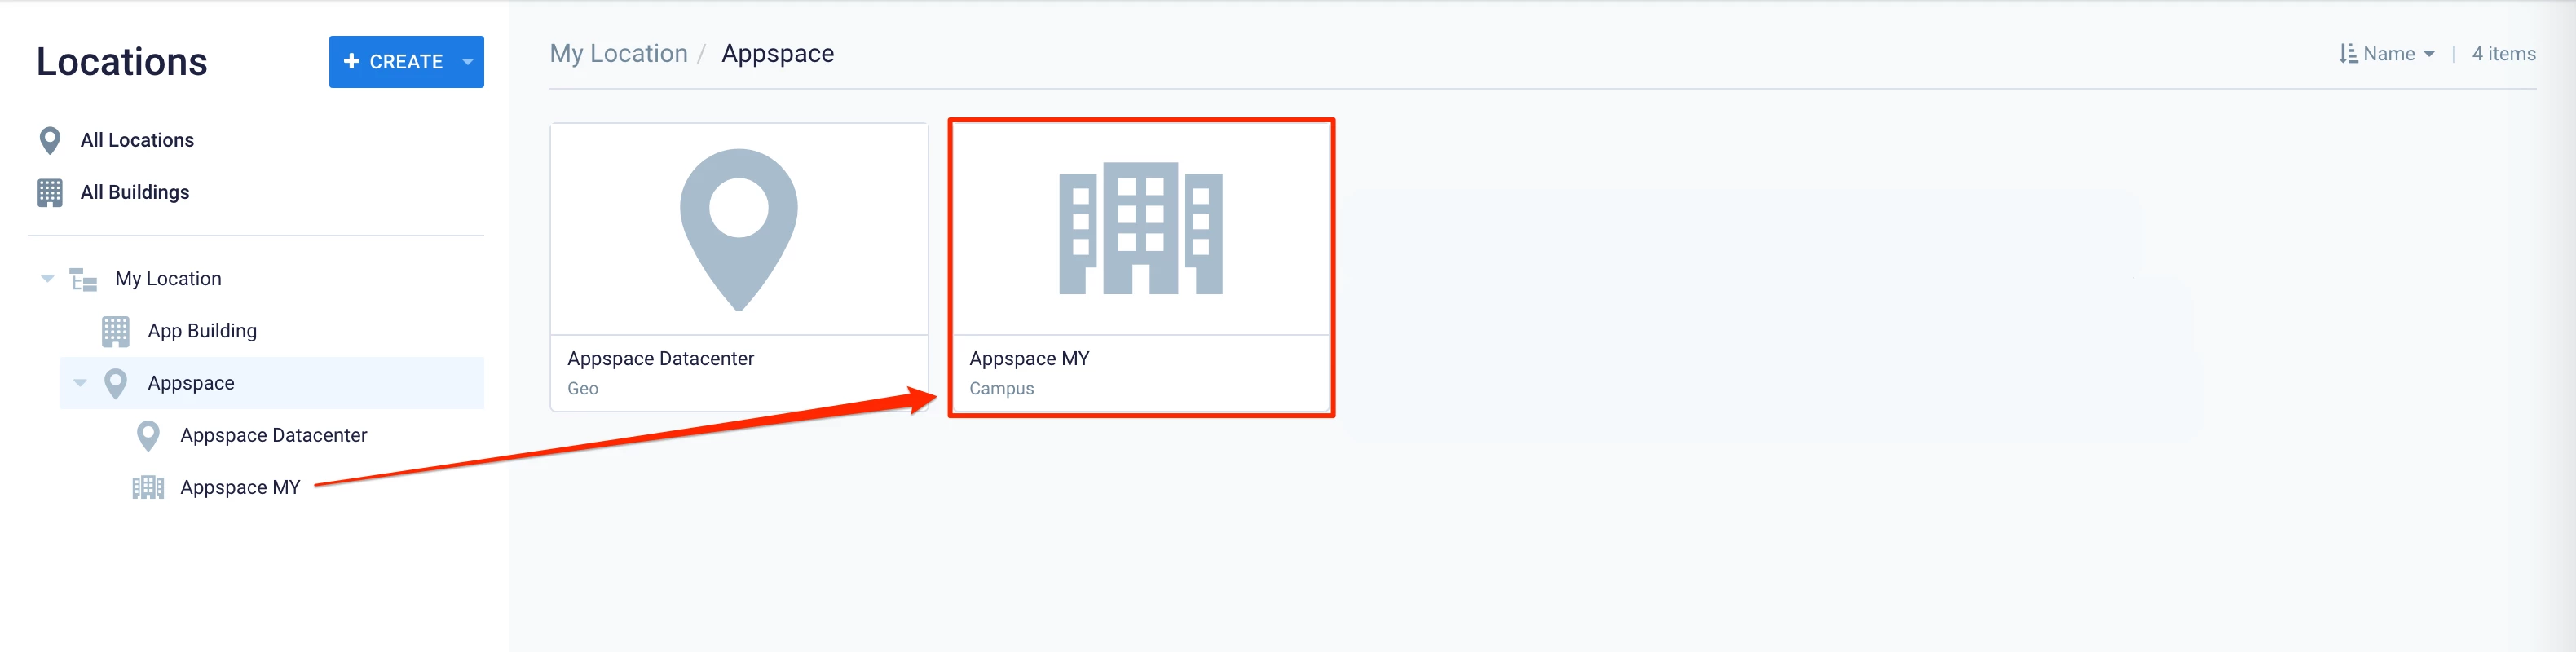
Campus Location
When a Campus Location is selected in the Locations network tree, the dashboard on the right will display all the building locations available in its location, and the number of floors associated with each building.
Right-clicking on a Campus Location in the Locations network tree or on the dashboard will display these options:
- Edit – Edit the selected location name, type, parent location, or language.
- Delete – Delete the selected location.
- Export – Export the selected location.
- Add Building Location
Note
You may only add one or multiple Building(s) in a Campus Location.
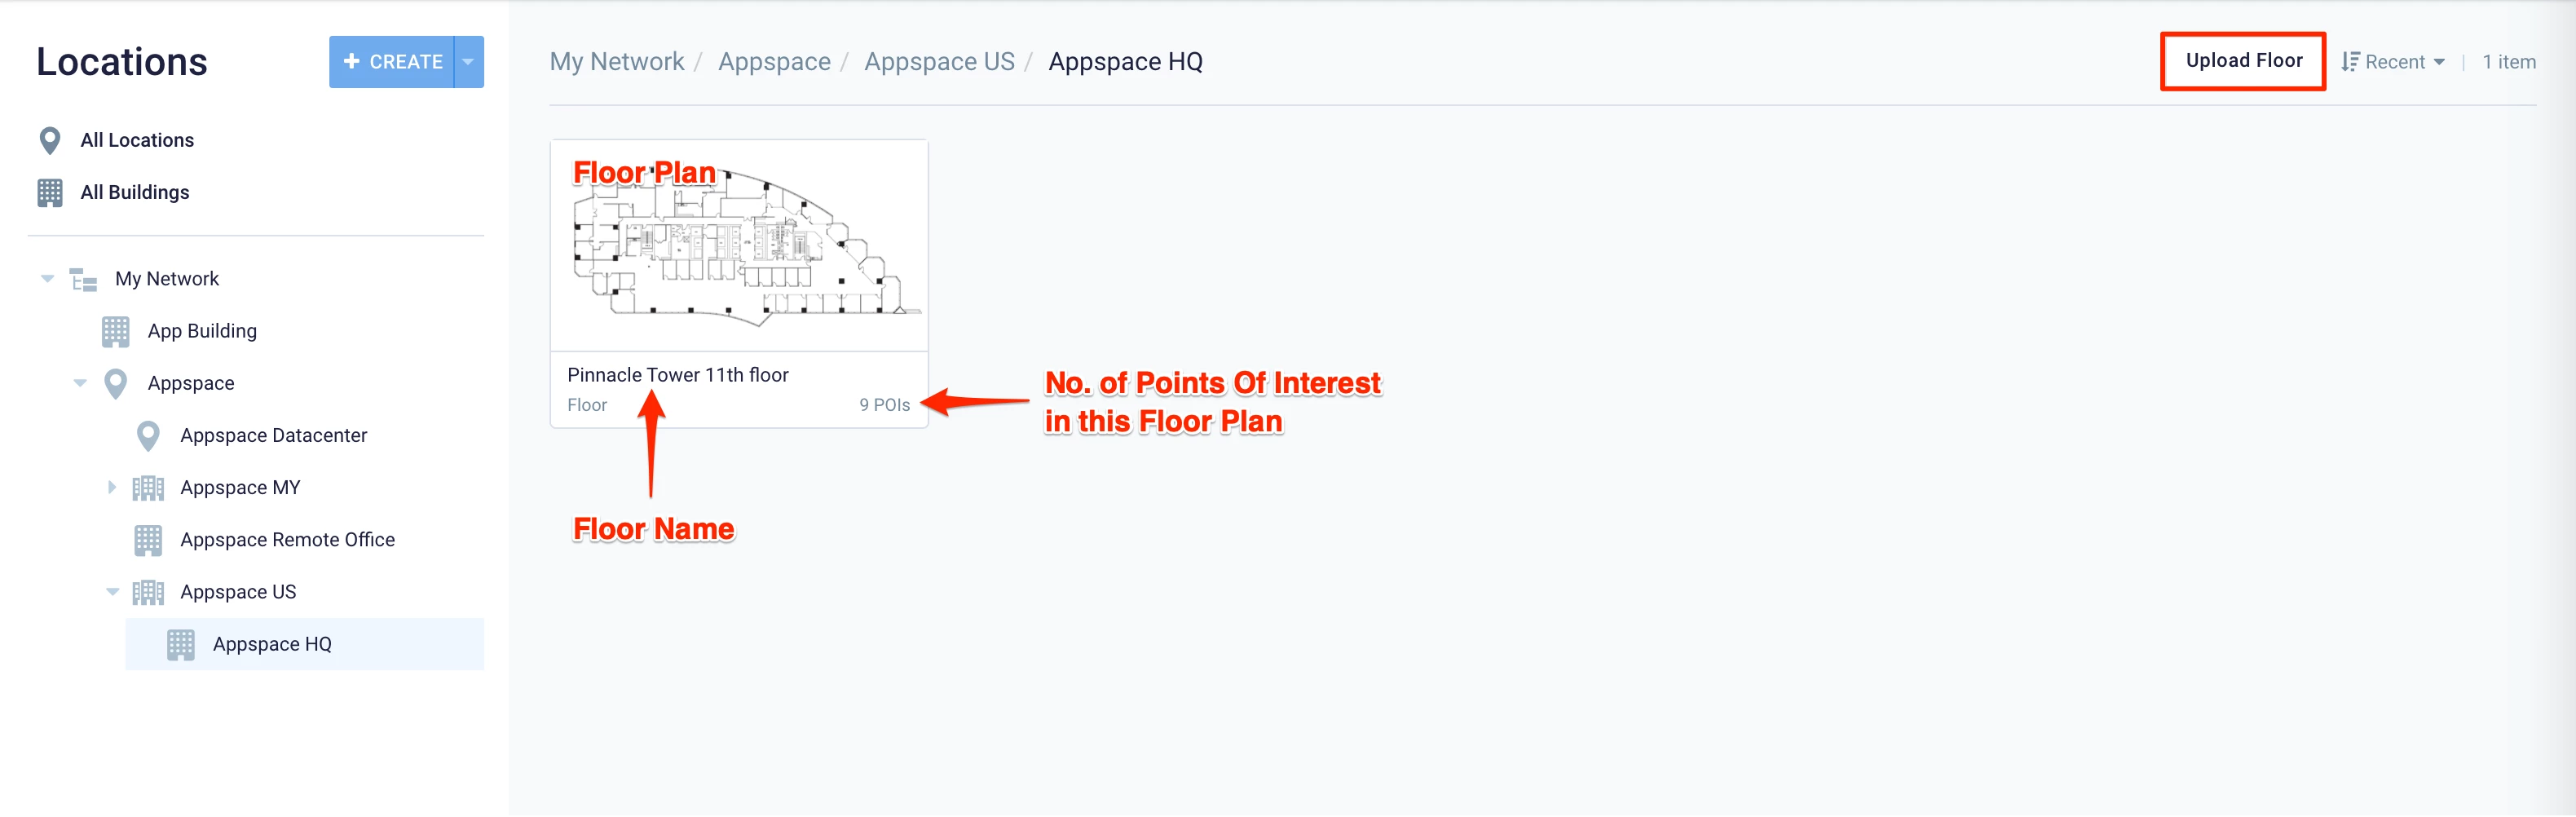
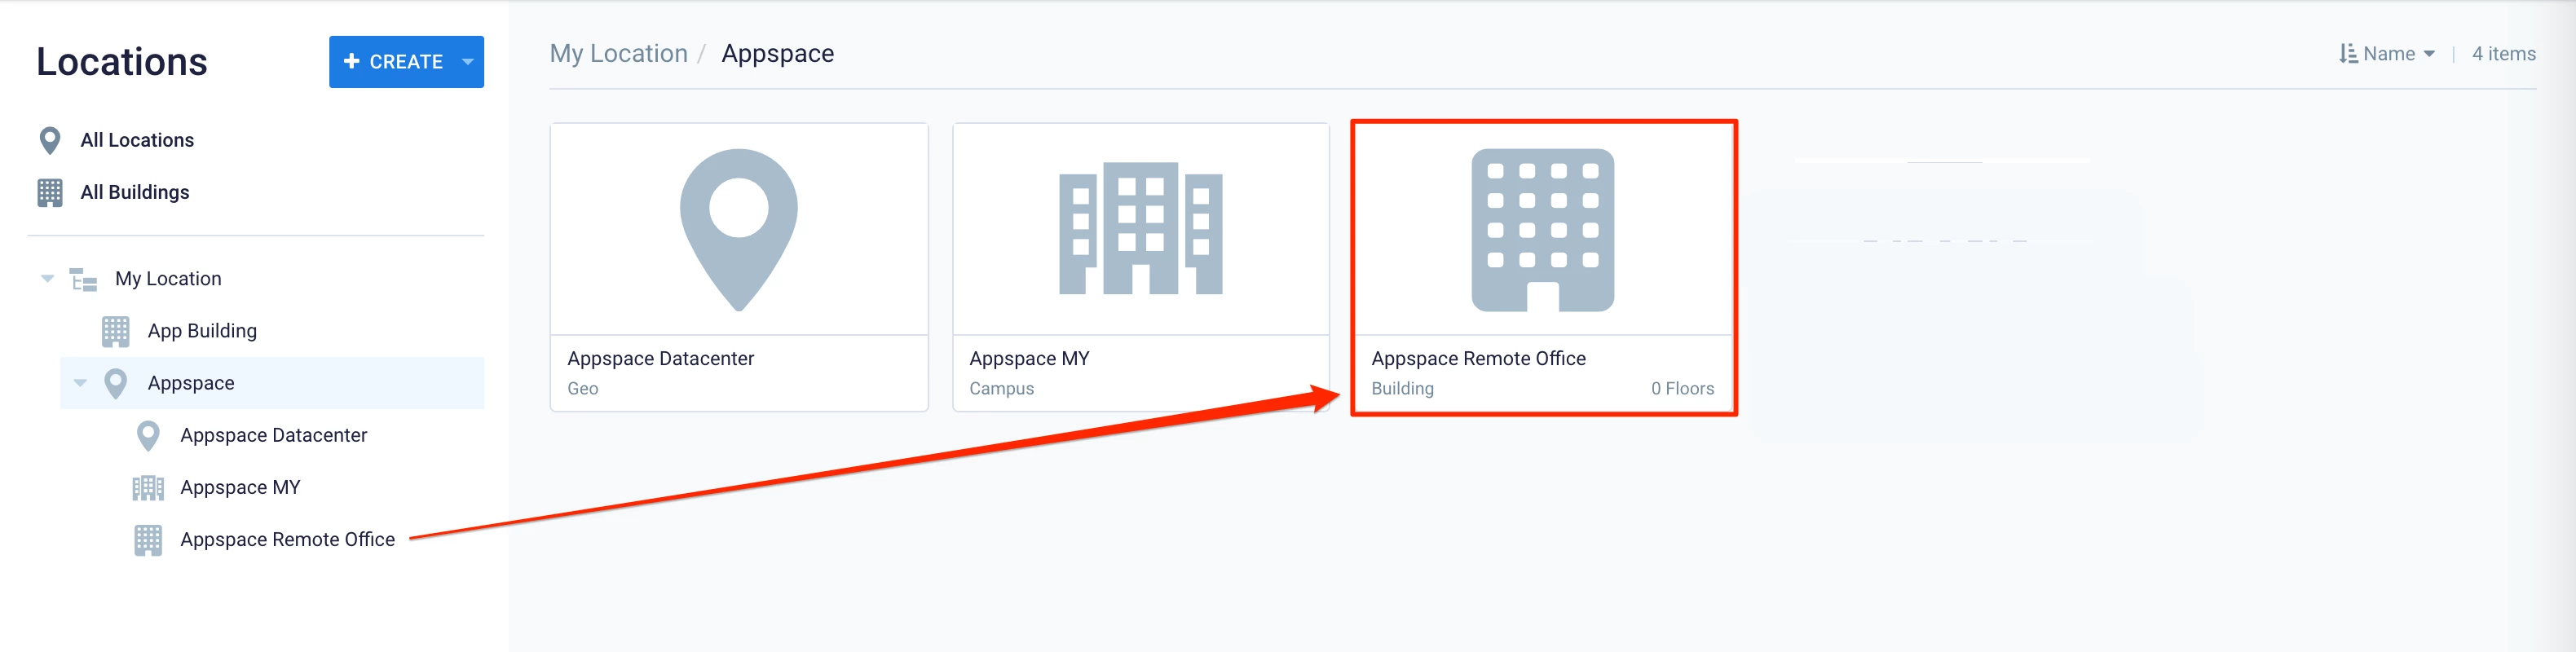
Building Location
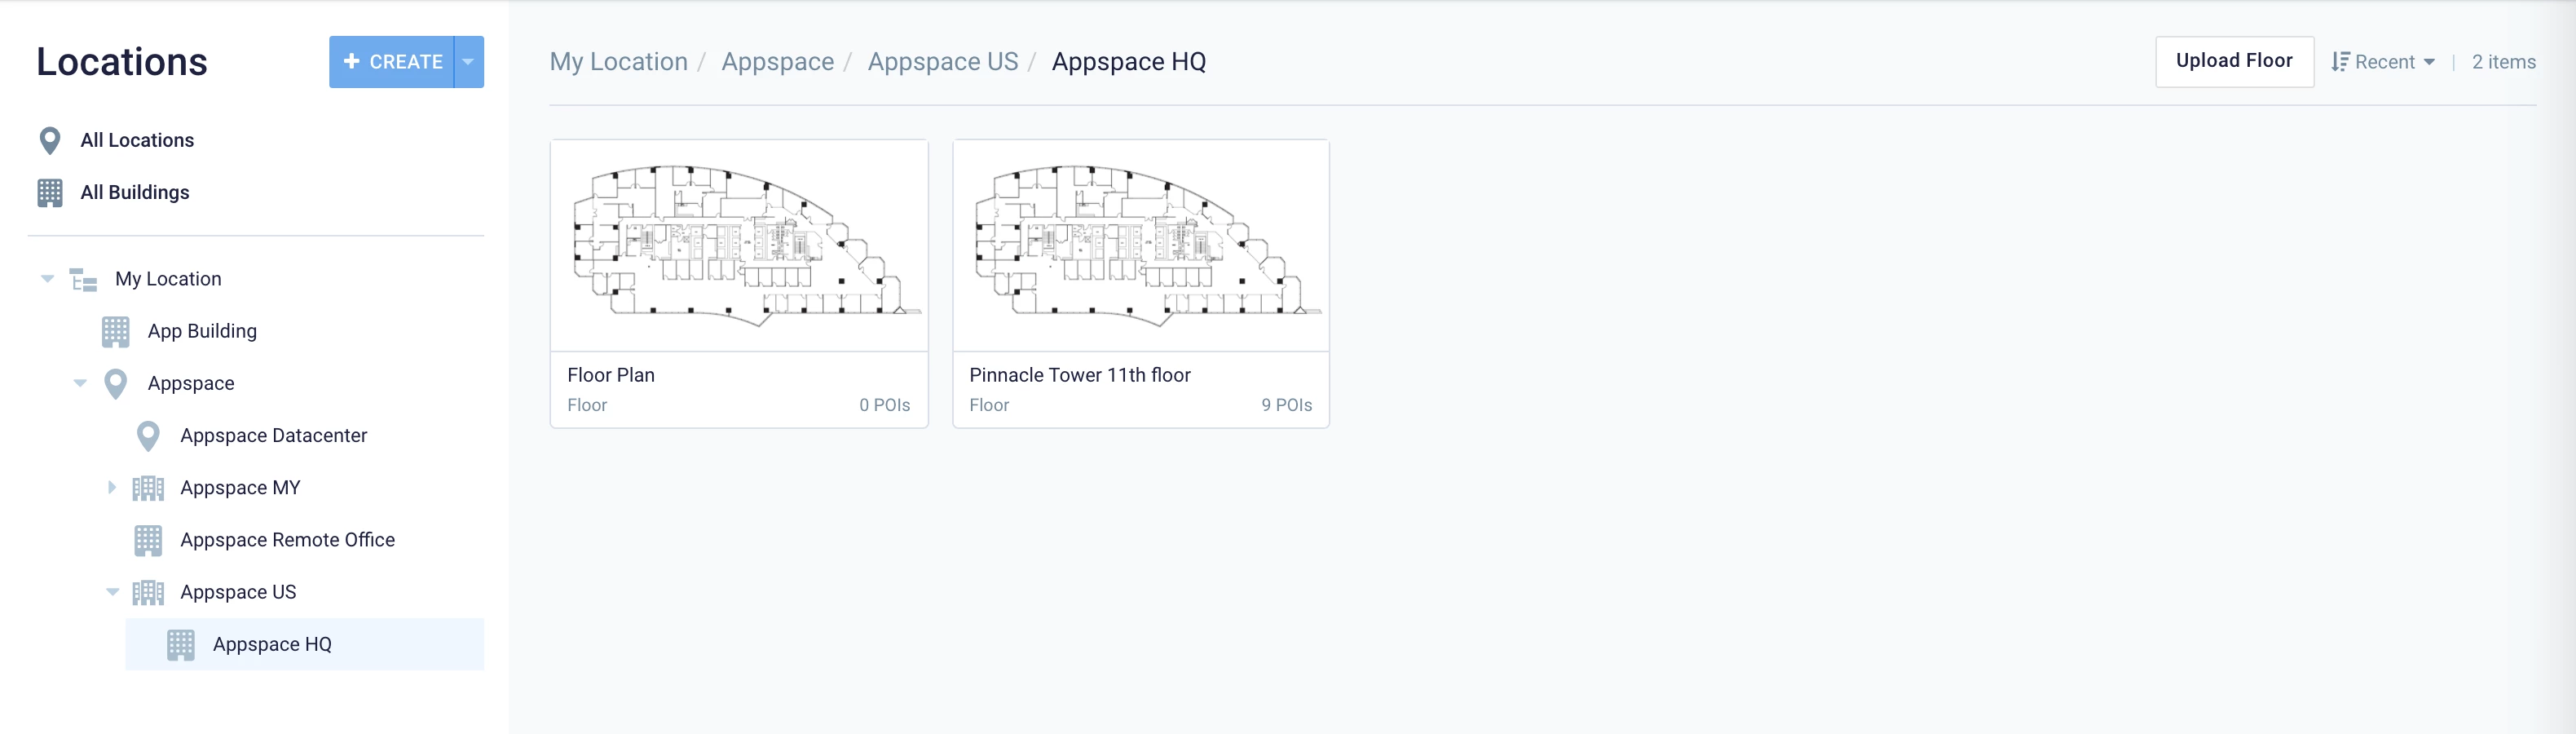
When a building is selected in the Locations network tree, the dashboard on the right will display all the floor plans uploaded for this building, and the number of POIs (points of interest such as boardrooms, meeting rooms, lifts, staircase, restroom, etc.) associated with each building.
Right-clicking on a Building in the Locations network tree or on the dashboard will only display these options:
- Edit – Edit the selected building name, building identifier, parent location, language, or upload a photo of the building.
- Delete – Delete the selected location.
- Export – Export the selected location.
Right-clicking on a floor plan will display these options:
- Quick – Edit the floor name and floor number.
- Delete – Delete the floor plan.
- Export – Export the floor plan.
Note
You may add one or multiple floor plans in a Building.
Configure Map Layers
Map Layers allows administrators to configure the number of map layers visible for the floors of each building in Map View.
These settings enable administrators to set up different views (called layers) for a given floor, allowing users to view each layer individually. For example, one layer might display an accessible map version designed for low-vision users, while another may depict an isometric view of the same floor. The Configure Additional Floor Layers section below will provide instructions on how to add these layers, which comes after creating the location, building, and floor plan. After administrators have added these layers, users (such as employees) can view these layers by clicking View Map after selecting a building in Places > Workspaces in the Employee App, and when viewing or configuring floor plans in Locations in the Administrative Console.
To begin, a universal set of layers must first be set up in Locations > Themes. This pre-configuration is necessary for administrators to add layers to building floors later on.
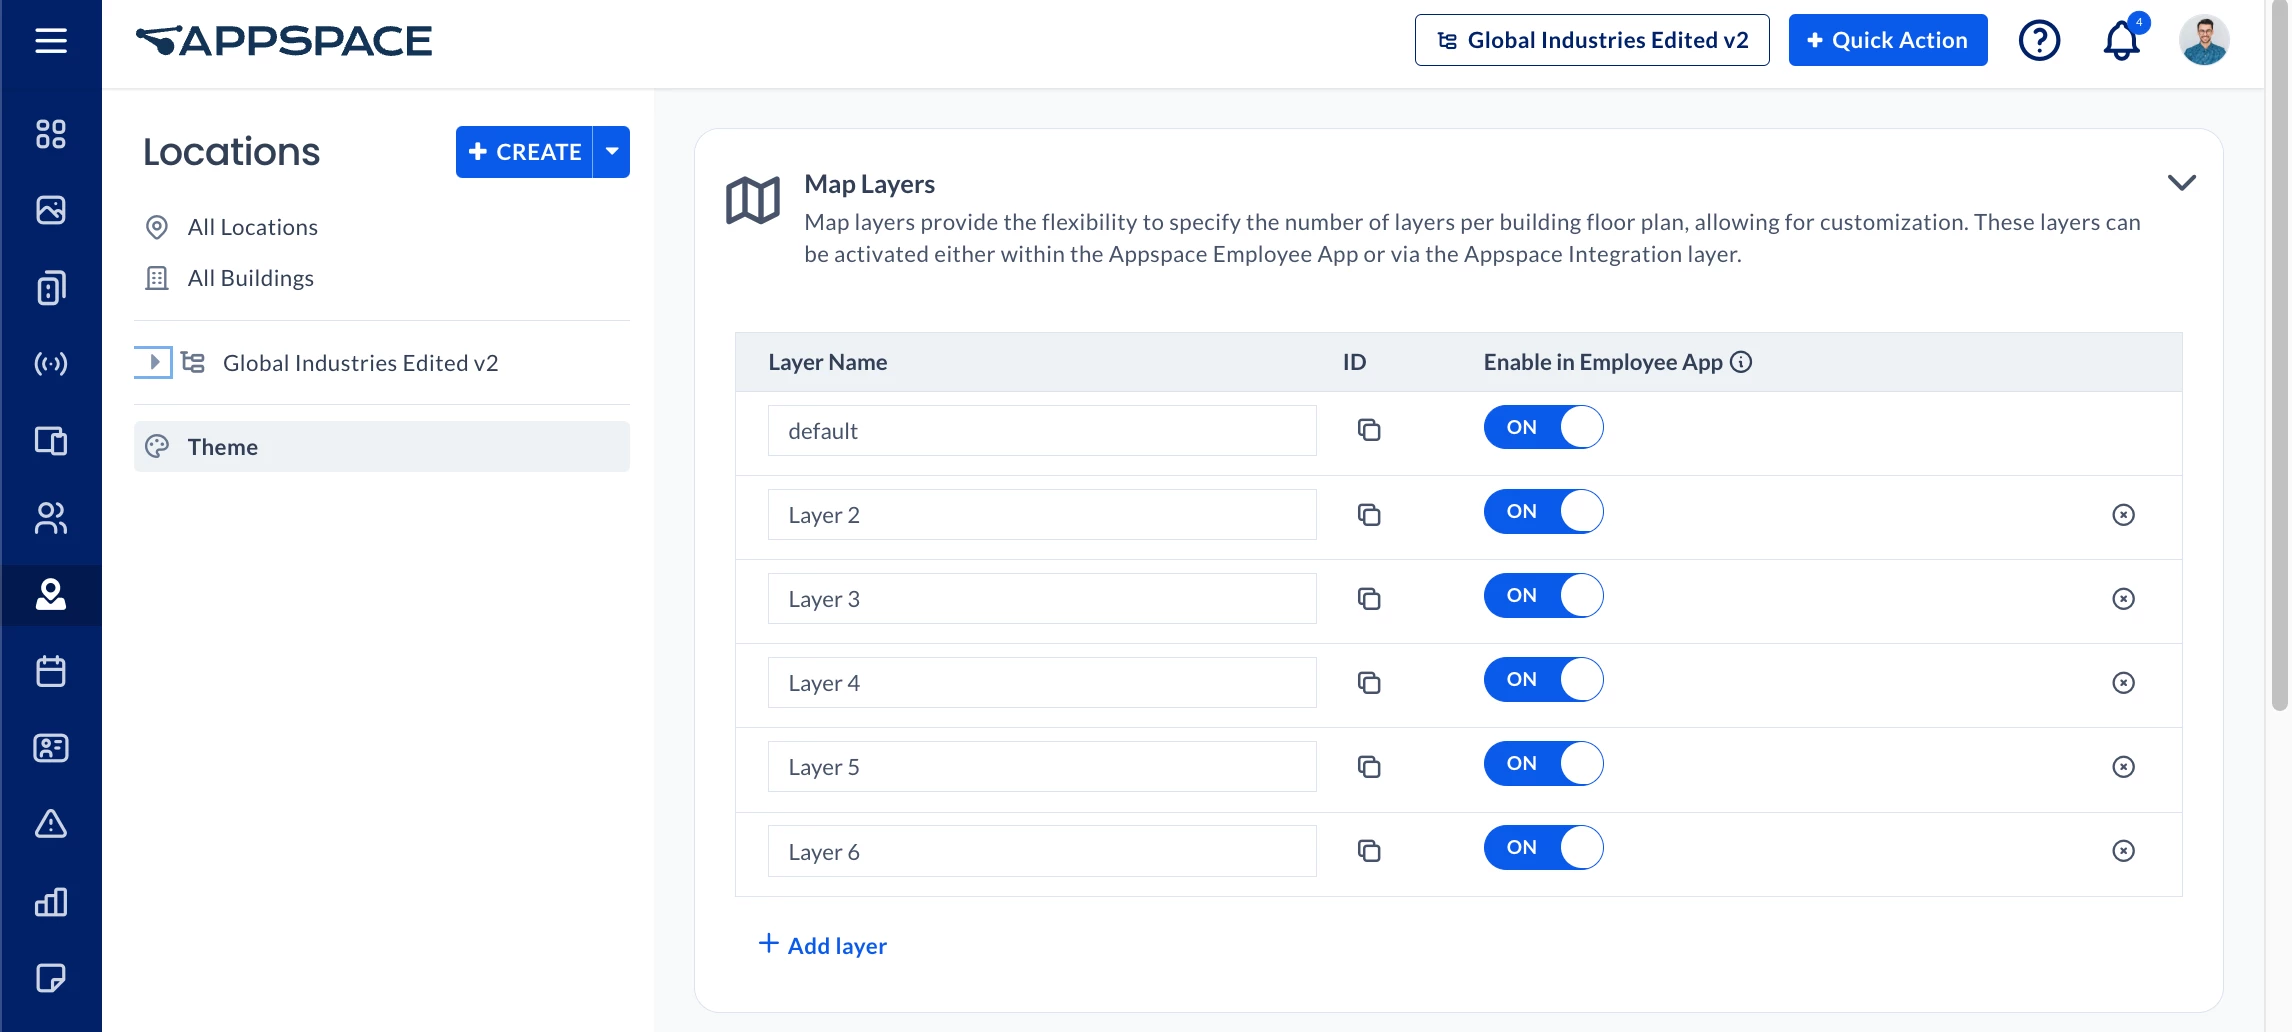
Follow the instructions below to set up the default map layers.
- Log in to the Appspace console.
- Click Locations from the ☰ Appspace menu.
- Click Theme in the side panel.
- At Map Layers, click the Expand button to configure the layers for building floor plans.
- The following layer options are displayed:
-
- Layer Name – Enter the name of the floor layer.
- ID – Click the copy icon to copy the unique layer ID for customized applications.
- Enable in Employee App – Set this to ON to display this layer when viewing floor plans in Map View in Employee App > Places.
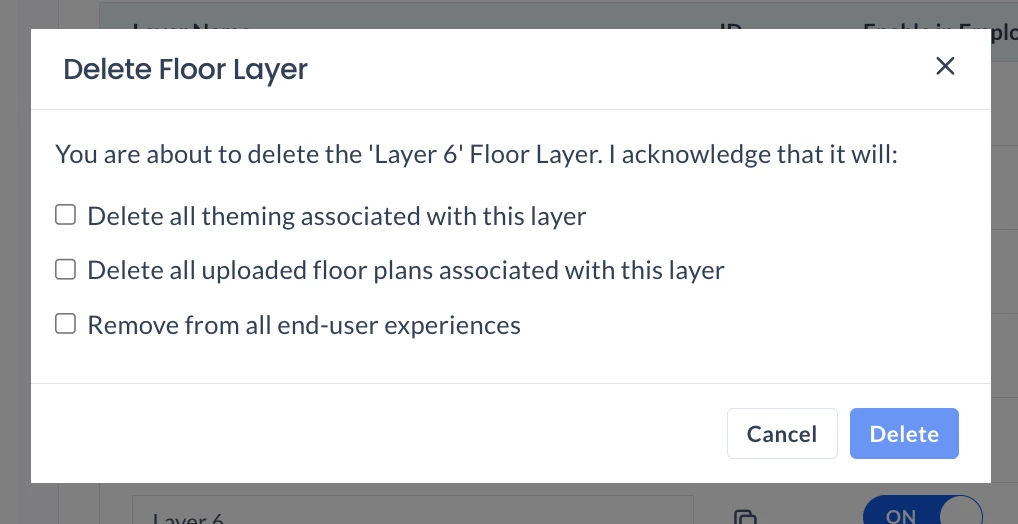
- Delete – Click the x icon at the end of each row to delete the floor layer. You will be asked to confirm the deletion by checking the boxes and clicking Delete.
- Add Layer – Adds a new layer. You will be required to fill in the fields for the layer with the information above.
-
- Once done, click Save.
Configure Location Theme
Administrators may configure the default colors for Rooms, Spaces, Points of Interest, and the Resource Status colors used when mapping the floor plan. These colors will automatically be reflected when viewing the floor plan in Map View in Reservations, or on the Schedule Board card with floor plans configured.
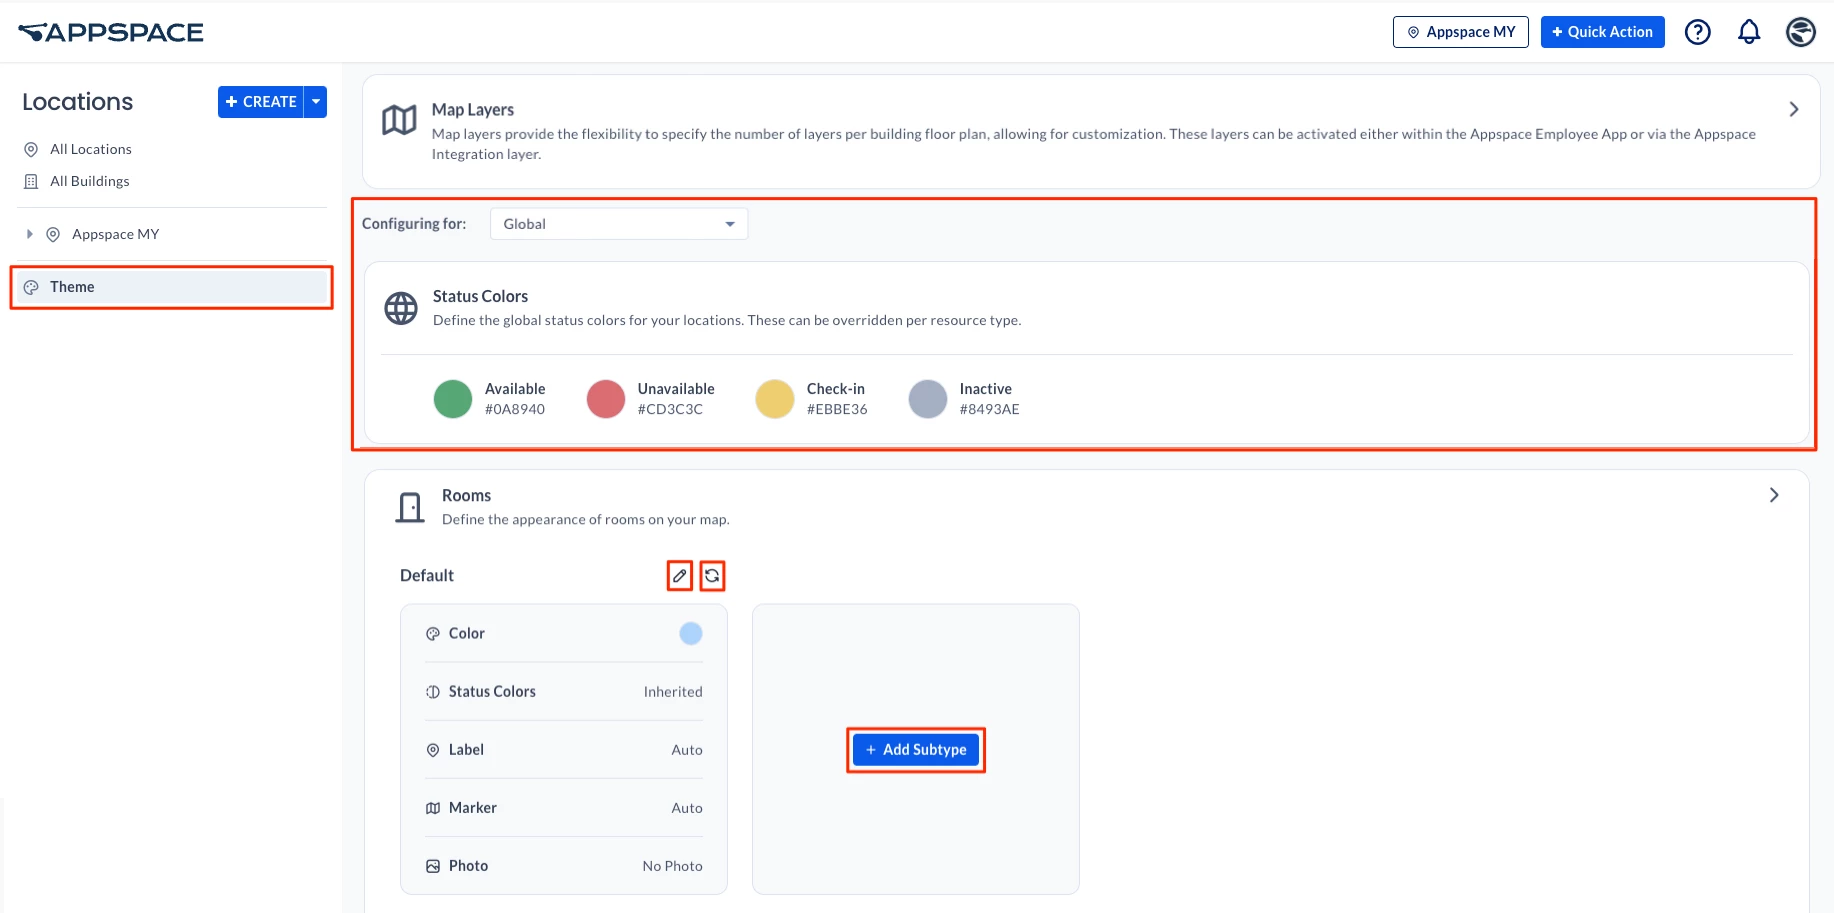
Follow the instructions below to configure the default theme colors.
- Log in to the Appspace console.
- Click Locations from the ☰ Appspace menu.
- Click Theme in the side panel.
- Click the Expand button to configure the default colors of existing Rooms, Spaces, and Points of Interest.
- At Configuring for, you can leave the option as Global to configure the global setting, or select a particular floor layer from the drop-down list to configure its color themes.
- Click the Pencil icon to edit the existing theme for Rooms, Spaces, and Points of Interest and proceed to make the following edits.
- Color – You may choose Default or Custom.
- Status Color – You may choose Default or Custom.
- Label – You may select the following:
- Auto – Adjusts visibility based on the zoom and available space.
- Visible – Always visible, even when it overlaps other map elements.
Note
The resource name rendering is responsive to the resource dimensions; it will adjust or truncate depending on the allocated asset size. - Hidden – Always Hidden
- Marker – You may select the following:
- Auto – Adjusts visibility based on the zoom and available space.
- Visible – Always visible, even when it overlaps other map elements.
- Hidden – Always Hidden
- Photo – Default or Custom
- Once done, click Save.
- To return to the default settings, select the Return to default icon.
- To add a resource category, click the + Add Subtype button. Refer to Step 5 to proceed with theme editing.
Configure Locations
Note
The Upload Floor button will only be enabled when a Building Location is selected.
Create Geo Location
The instructions below show you how to create a geo location.
- Click Locations from the ☰ Appspace menu.
- Click the CREATE drop-down arrow, and select Create Geo Location.

- Enter the name of the geo location, and click SAVE.
- You may continue to create a Campus Location or a Building Location.
Create Campus Location
Follow the instructions below to create a campus location.
- Click Locations from the ☰ Appspace menu.
- Select the desired geo location and click the CREATE drop-down arrow, or right-click on any Geo Location, and select Create Campus Location.

- Enter the name of the campus location, and click SAVE.
- Proceed to Create a Building.
Create Buildings
Follow the instructions below to create a building location.
- Click Locations from the ☰ Appspace menu.
- Select the desired location and click the CREATE drop-down arrow, or right-click on any Campus Location, and select Create Building Location.

- Enter the name of the campus location, and click SAVE.
- Proceed to the Upload a Floor Plan section below.
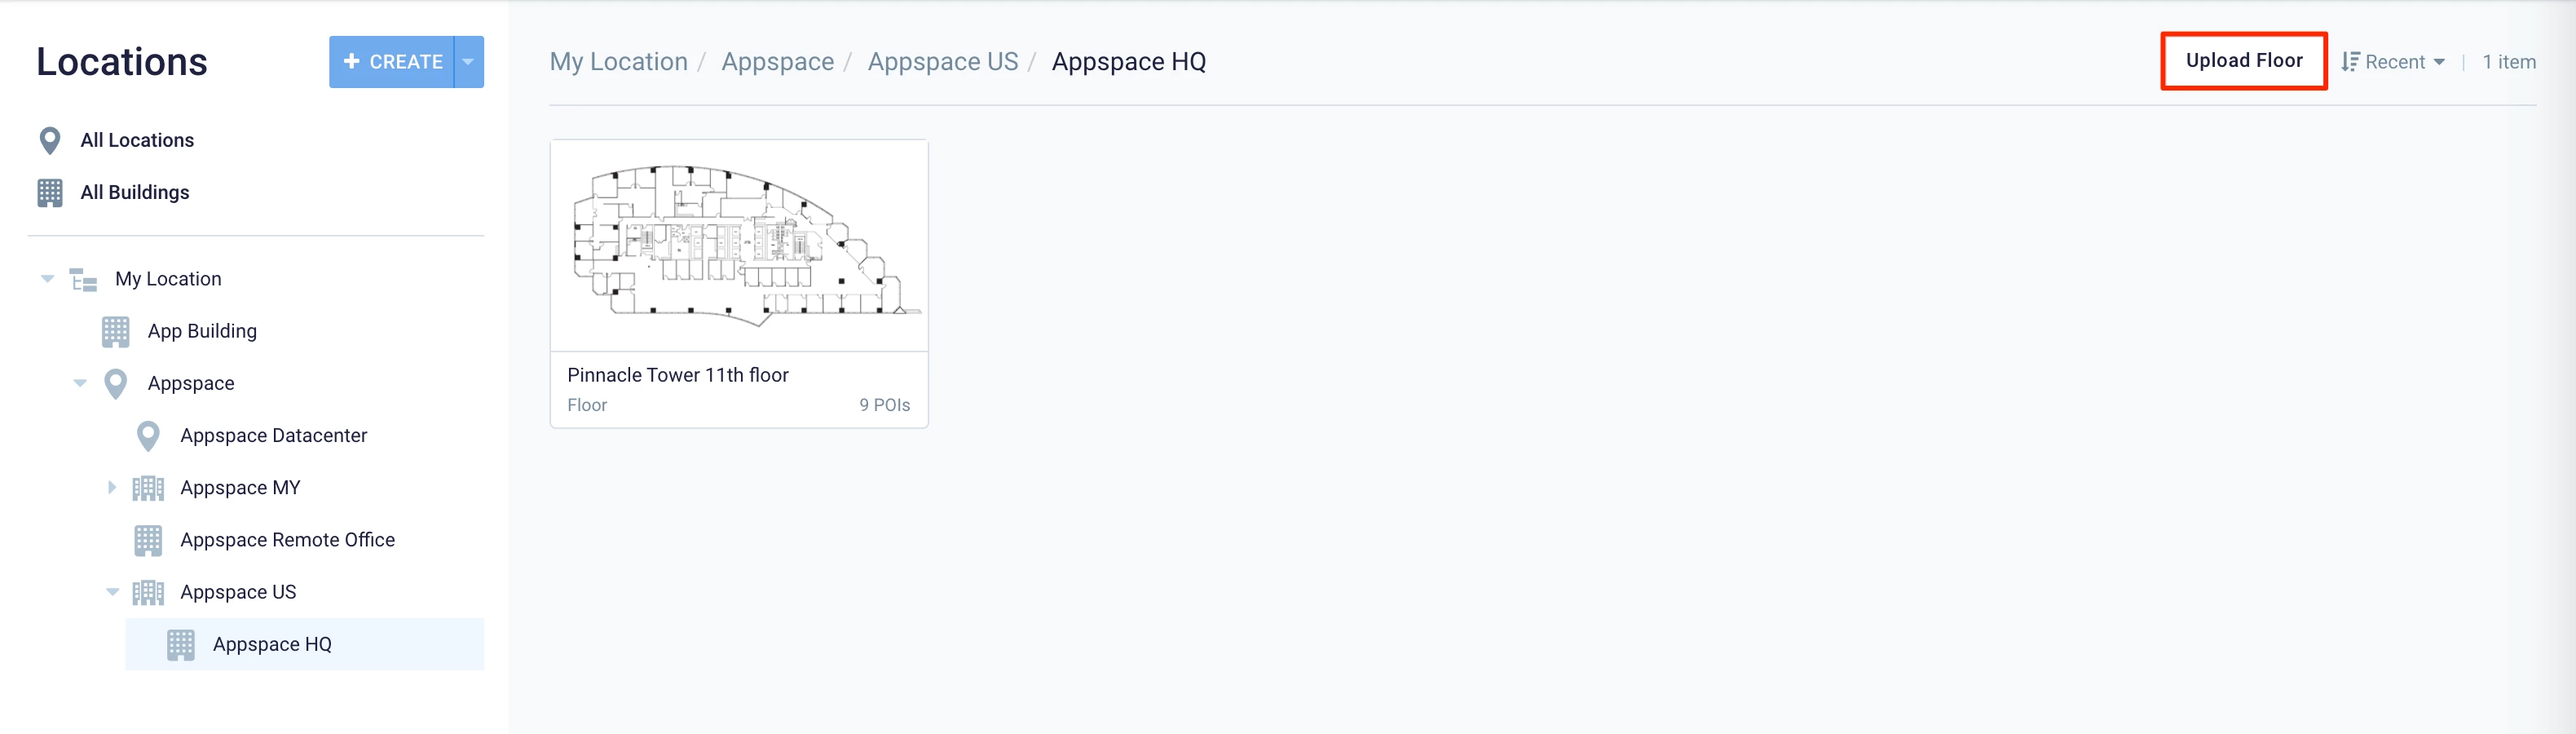
Upload a Floor Plan
Follow the instructions below to upload a floor plan.
- Click Locations from the ☰ Appspace menu.
- Select the building you wish to upload the floor map to.
- Click Upload Floor, and select the floor plan image from your computer.
Note
Locations supports floor plan images in the following formats: .jpg, .svg, .bmp, .png, or .gif
- Once uploaded, click Save, and proceed to Configure the Floor Plan to trace the room and determine the points of interest.
Configure Additional Floor Layers
If multiple floor layers are available, follow the instructions below to configure floor plans for additional floor layers. You must have additional layers configured in Configure Map Layers above.
- Click Locations from the ☰ Appspace menu.
- Navigate to the building containing the floor plan you wish to configure from the Locations tree.
- Click the floor plan and then click the Floor Plan tab. Select the layer that you wish to configure under Floor Layers.
- To add a floor plan to the layer, click the section that displays the Drag or click to upload a new floor plan message and select the floor plan image from your computer.
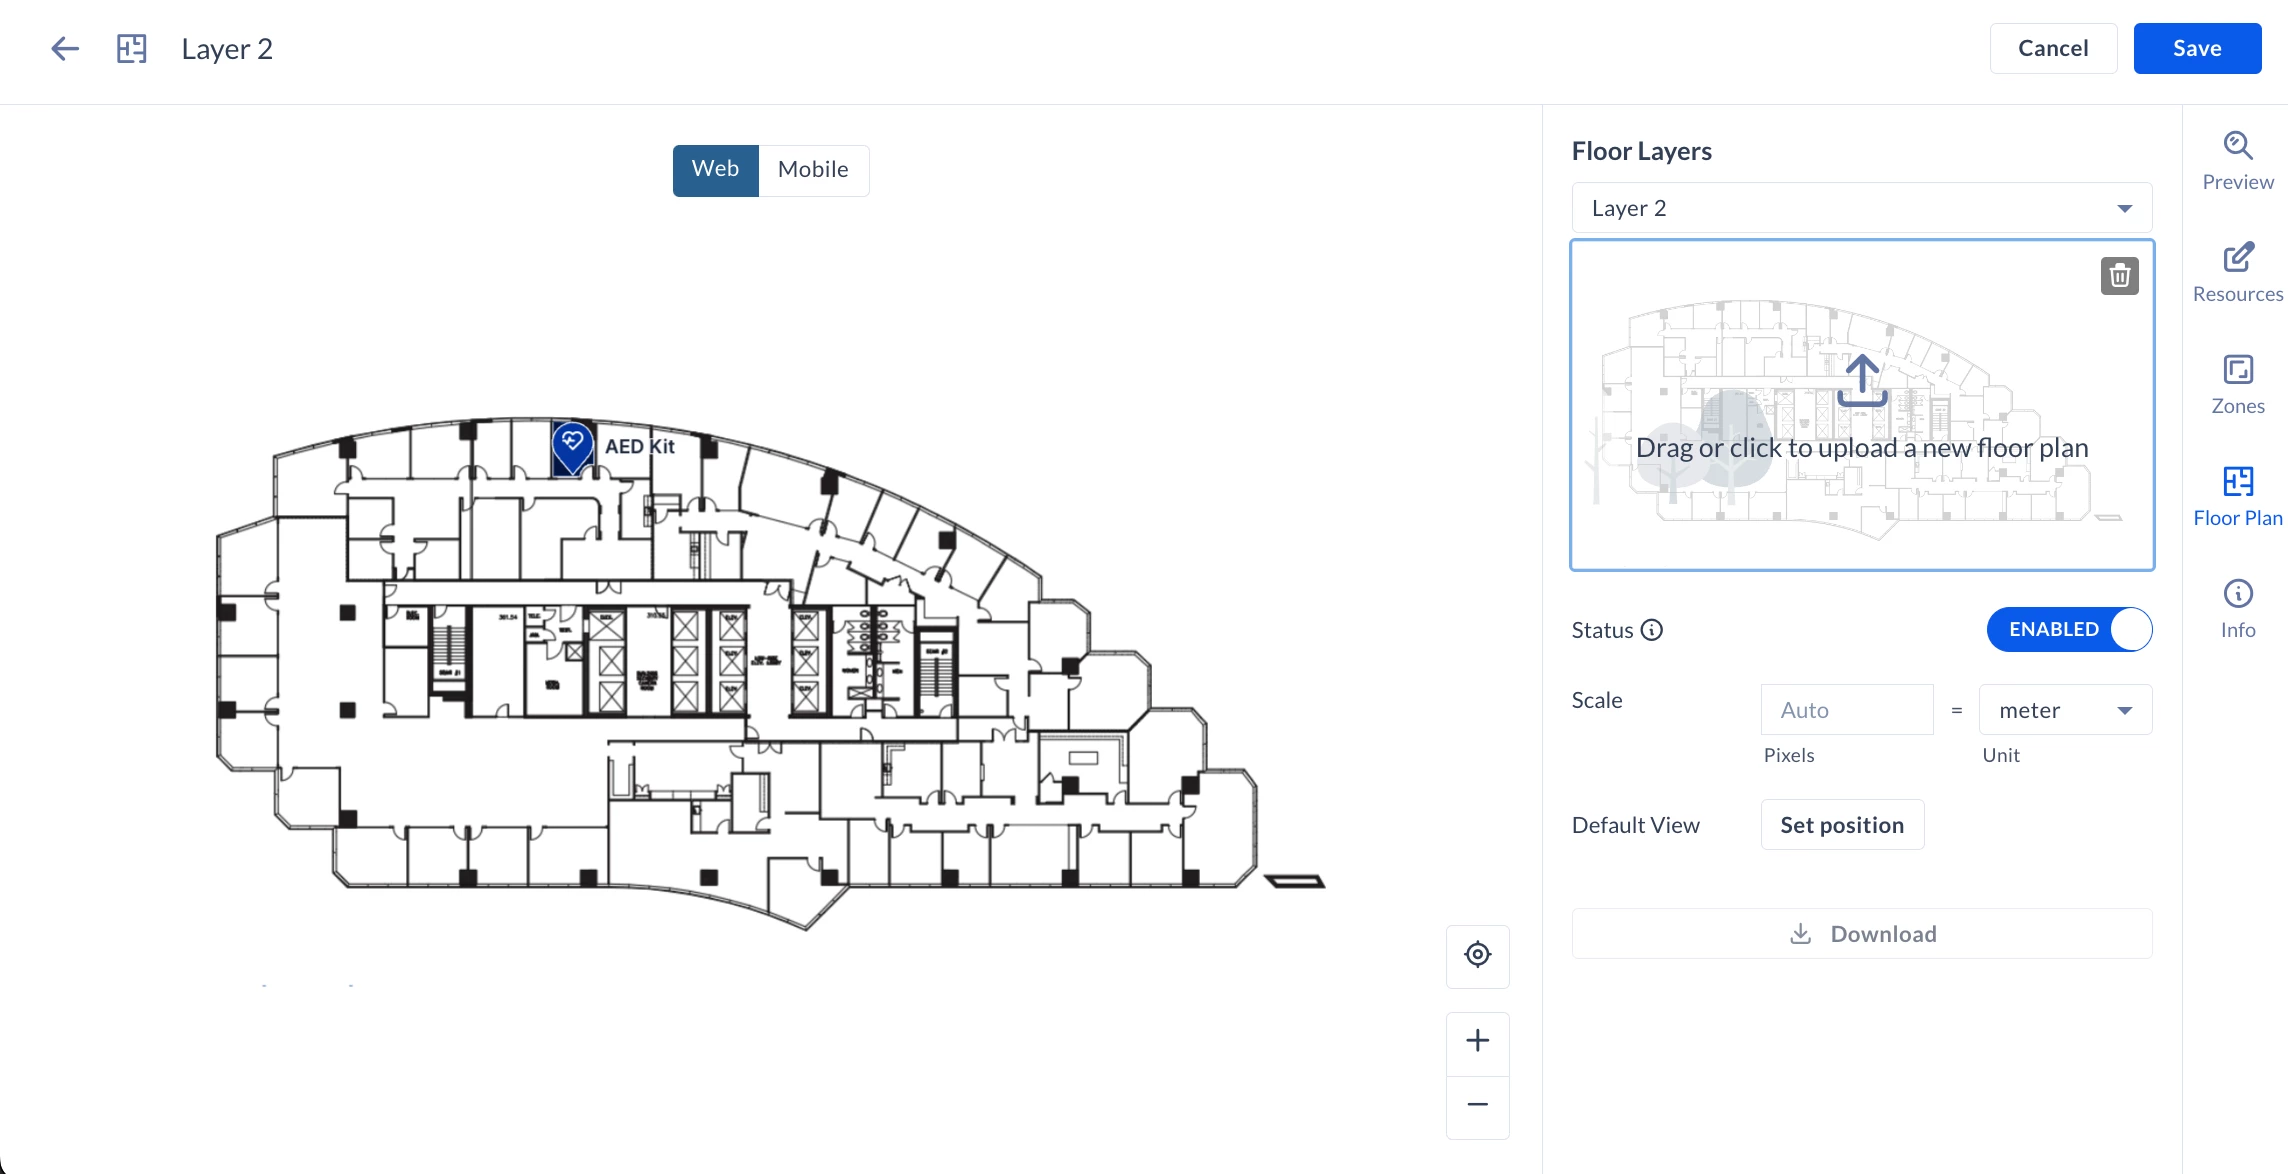
- Once uploaded, click Save, and proceed to the following steps:
- Set the Status to Enabled for the floor layer to be displayed in Map View in the Places section on the Employee App.
- Proceed to Configure the Floor Plan to trace the room and determine the points of interest.
- You may also proceed to Configure Floor Plan with Zones (Neighborhoods) below.
Each layer will have the same resources (rooms, points of interest) and zones, which can be mapped in different sizes, shapes, and arrangements to fit the floor layer.
Configure Floor Plan
Follow the instructions below to configure and map the room or points of interest to the floor plan.
- Click Locations from the ☰ Appspace menu.
- Navigate to the building containing the floor plan you wish to configure from the Locations tree.
- Click the floor plan to configure and click the Resources tab. If multiple floor layers are available, select the layer that you wish to configure under Floor Layers. The Preview tab allows you to view the floor plan, and resources once it has been configured.
- Click ADD, and select one of the map tracing options:
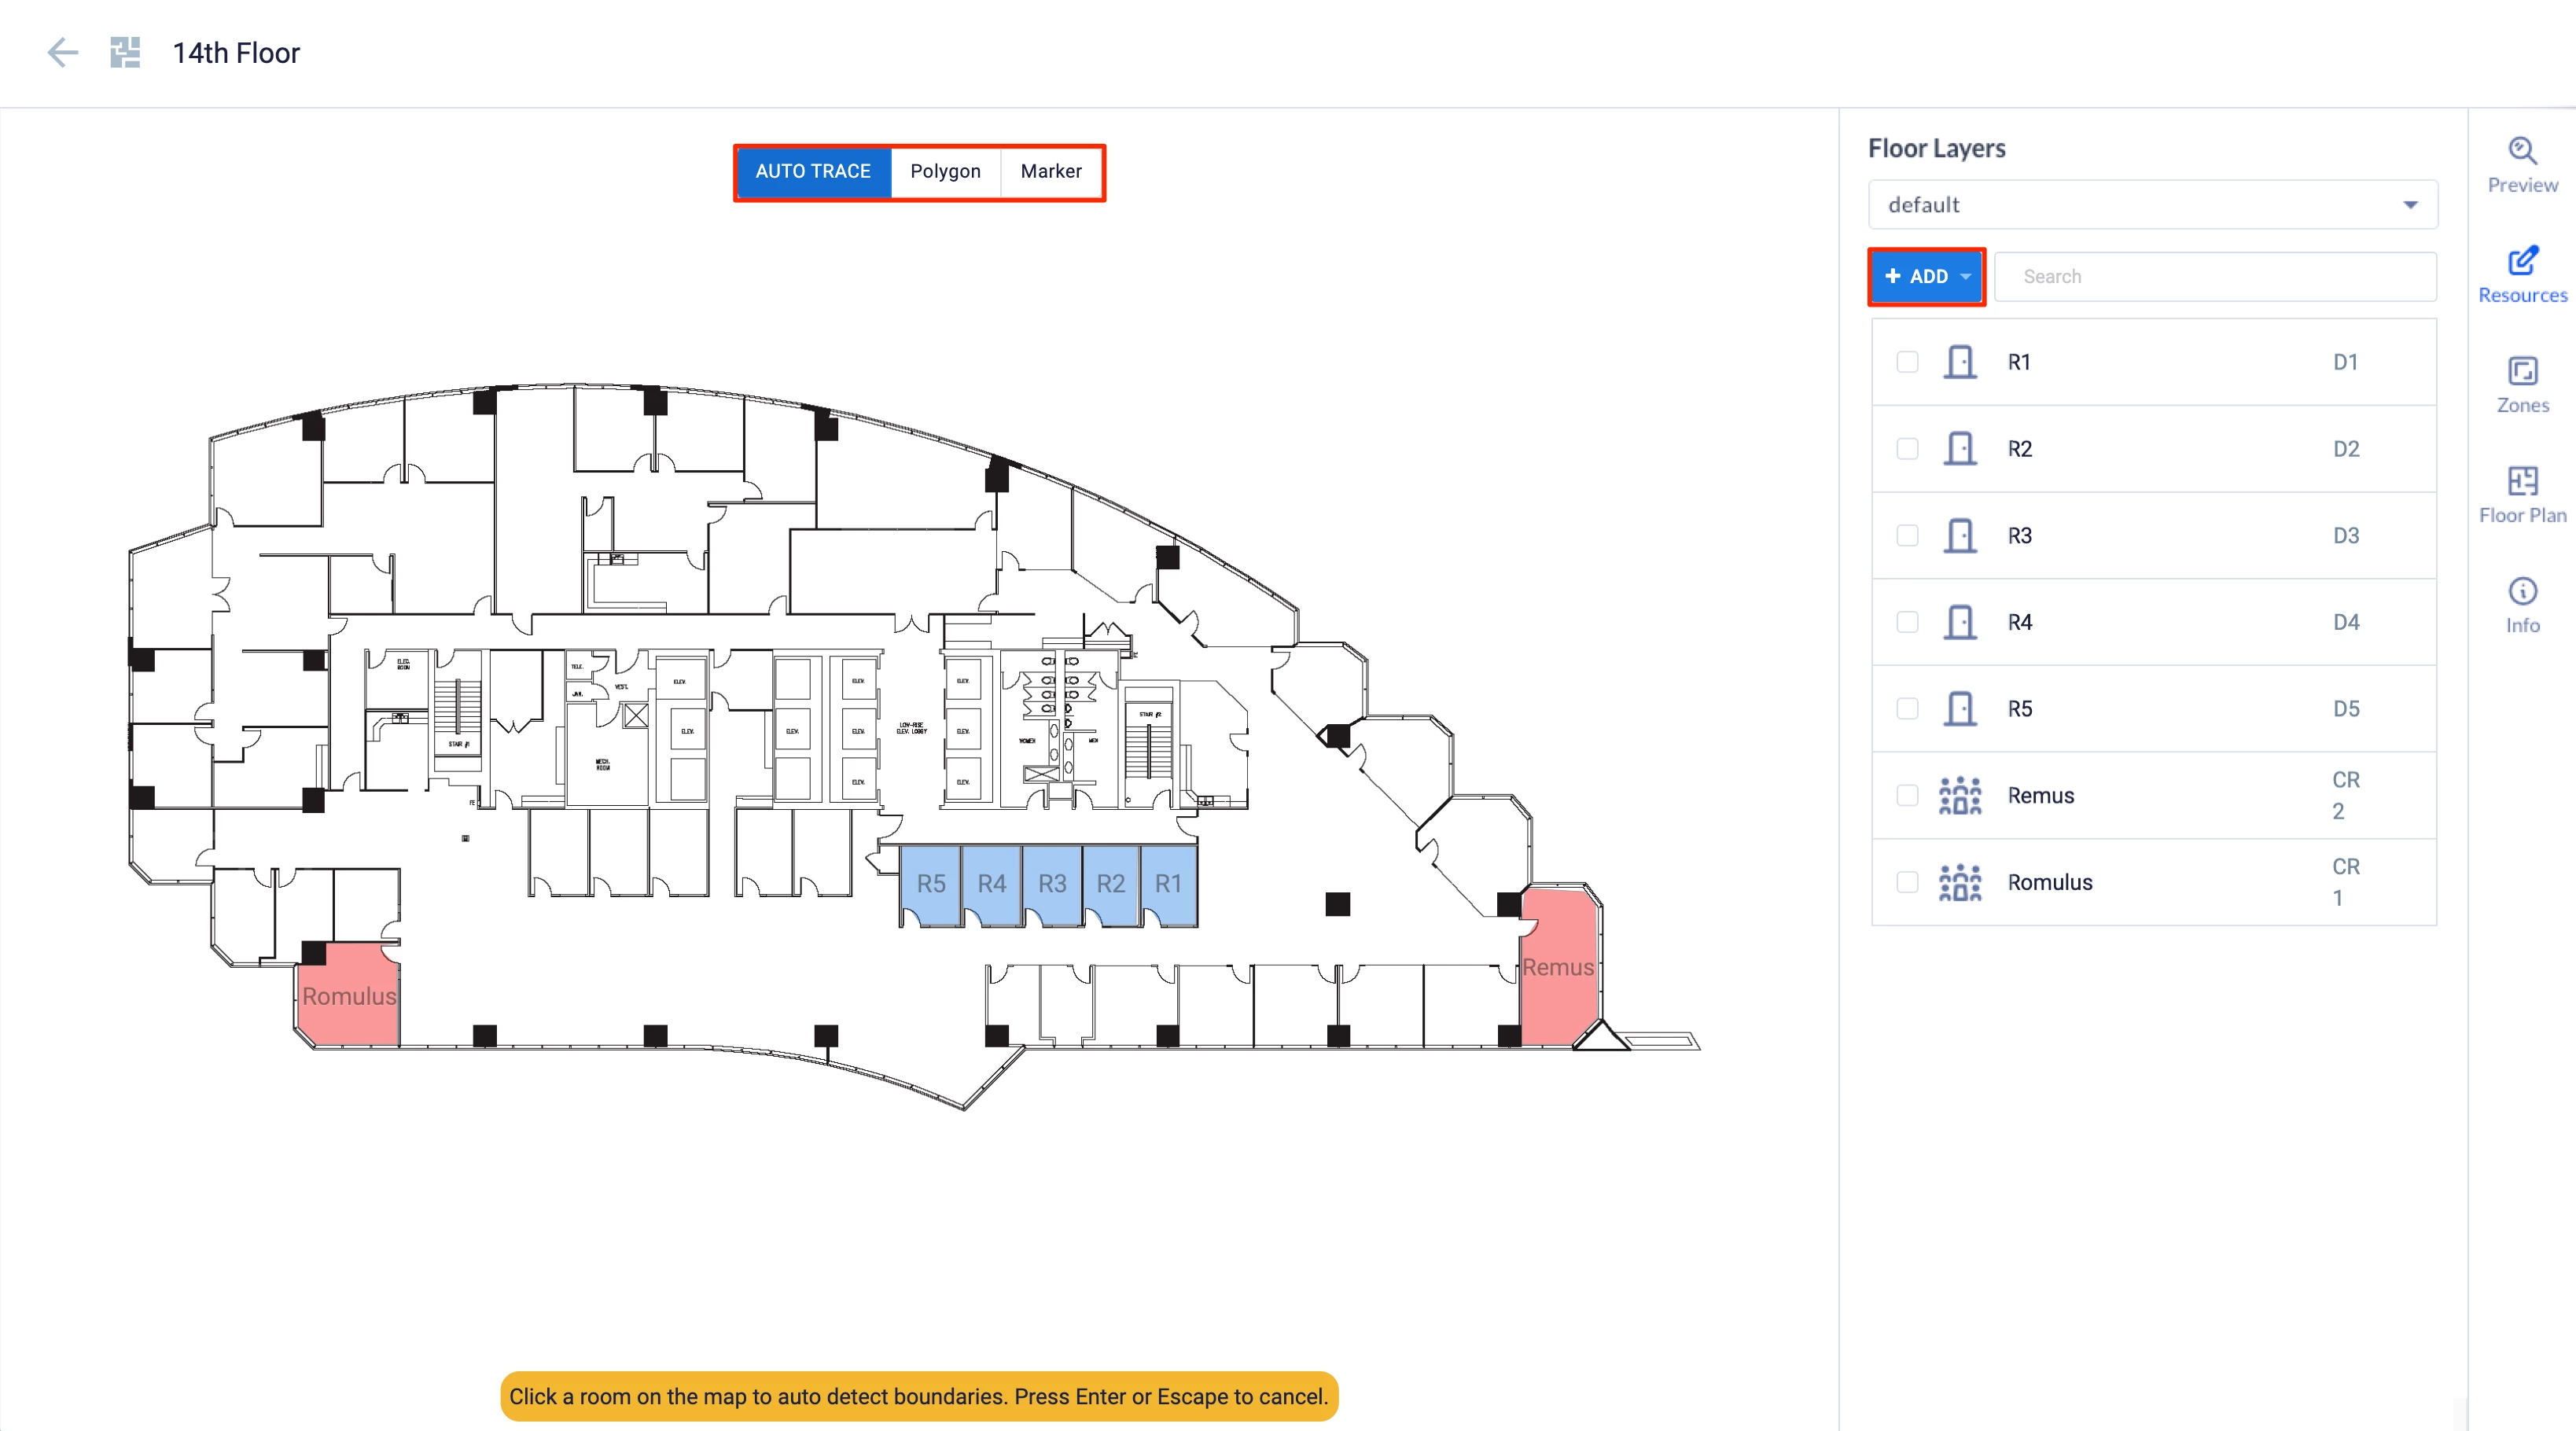
- AUTO TRACE – Automatically traces the borders of the room.
- Polygon – Manually trace the borders of the room using your mouse pointer.
- Marker – Manually hotspot a location.
- Click and map the room, space, or point of interest on the floor plan to complete the action, then click Save at the upper right corner.
- Click the new mapped room, space, or point of interest, and configure the following fields:
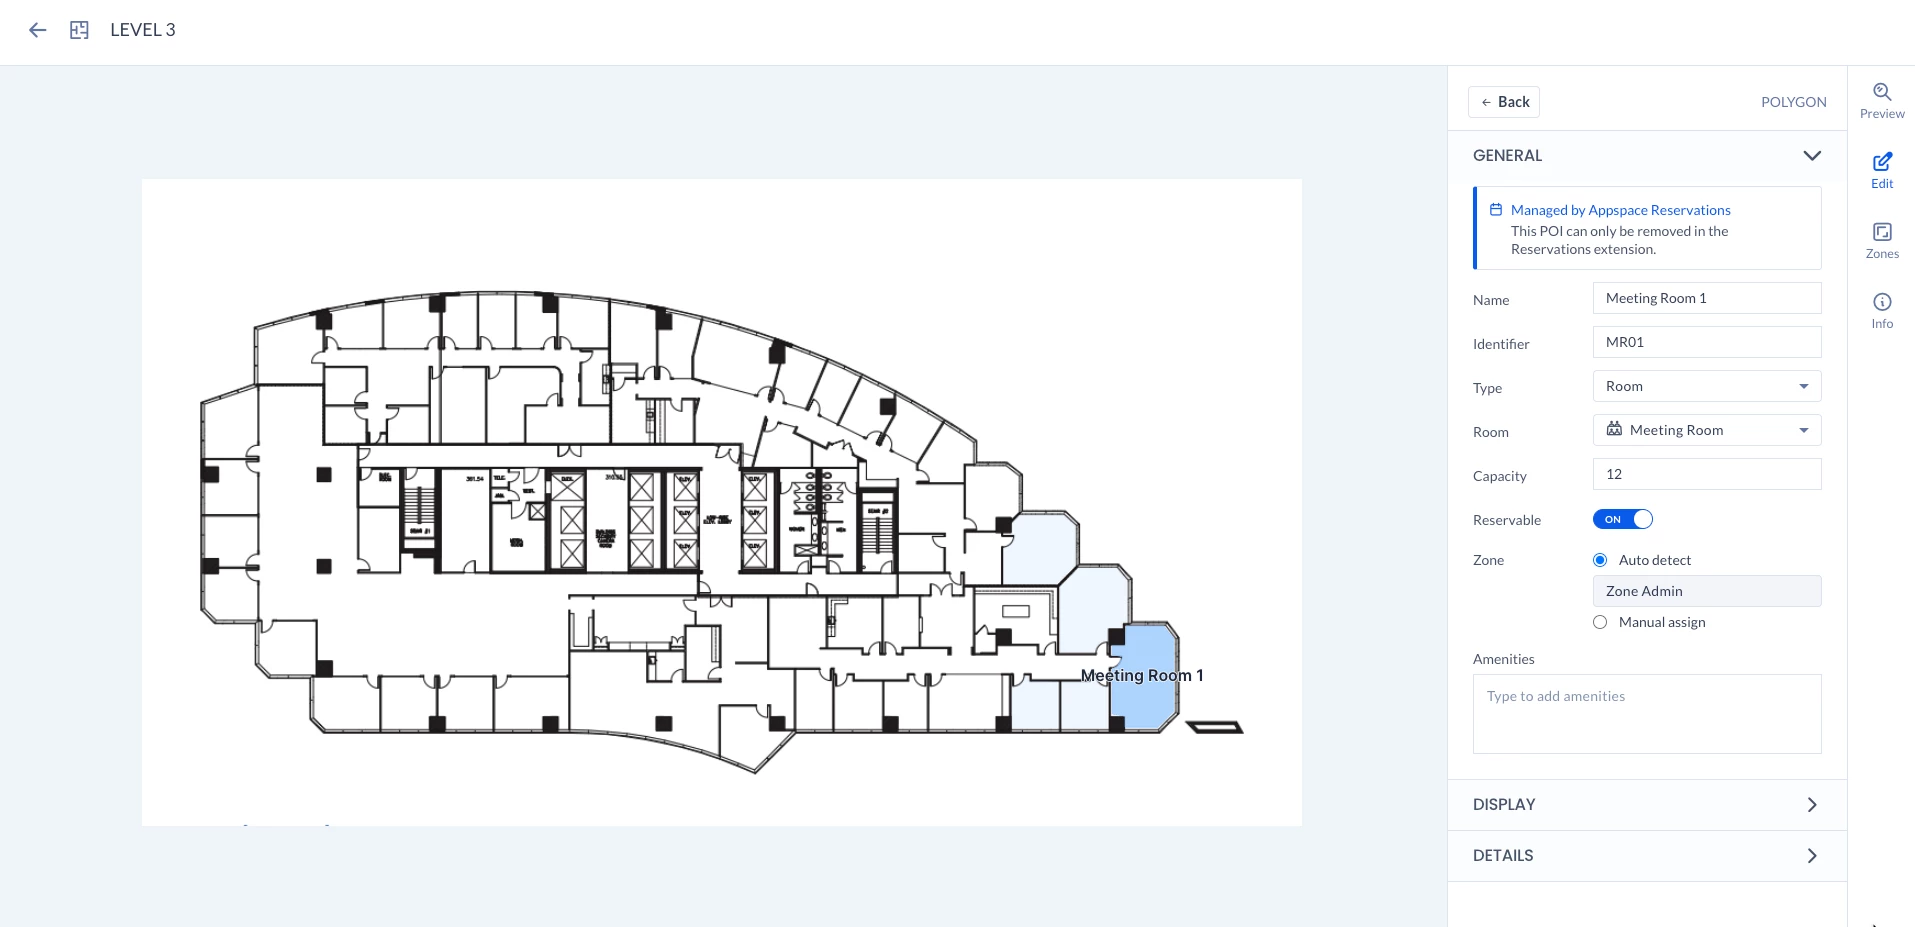
- In the GENERAL section, click to expand:
- Link to Managed Resource – Select where the resource is managed from the drop-down menu.
- Appspace Reservations – Resource is managed by the Reservations module. If this option is selected, the resource will be automatically created and linked with the Reservations module.
- External Calendar Passport – Resource is managed by an external calendar provider, such as Google Calendar or Office 365. If this option is selected, proceed to select the calendar passport, and enter the resource to be linked.
- None – Resource is not managed.
- Name – Enter the name of the room or point of interest, if not auto-filled by the calendar resource.
- Identifier – Enter the room number or specific location of the area.
- Type – Select the type of mapping.
- Room – To define rooms in the floor plan, such as offices, conference rooms, auditoriums, etc.
- Space – To define spaces in the floor plan, such as training areas, social areas, huddle spaces, etc.
- Point of Interest – To define points of interest in the floor plan, such as sanitization stations, elevators, bathrooms, etc.
- Room / Space / Point of Interest – Select the type of room, space, or point of interest. For a list of complete options that are available, refer to the Rooms, Spaces, and Points Of Interest Options section below.
- Capacity – Enter the capacity of the room.
- Zone – Select if the resource is assigned to a zone.
- Auto detect – Select this for the system to automatically determine if the mapped resource is within a Zone by its boundaries.
- Manual assign – Select this to manually assign the resource to a Zone. Select the zone from the drop-down list or select None.
- Reservable – To enable reservation functionality in the Employee App, please slide the slider to “YES.” When enabled, users will be able to view the resource on the map and make reservations for it. It’s important to note that this feature is deactivated by default for Appspace Reservations.
- Amenities – Add the amenities available in the room.
- Link to Managed Resource – Select where the resource is managed from the drop-down menu.
- In the DISPLAY section, click to expand:
- Coordinates – Enter the coordinates of the room to the floor plan.
- Edit Shape – To edit the shape of the resources by selecting the point of the resources on the map.
- Show Label – Displays a label for the resource.
- Fill Color – Customize the resource color.
- Label Color – Customize the resource label color.
- In the DETAILS section, click to expand:
- Notes – You may enter any notes to the resource.
- Photo – Add a photo of the room.
- Delete – Delete the room or point of interest.
- In the GENERAL section, click to expand:
- Once done, click SAVE.
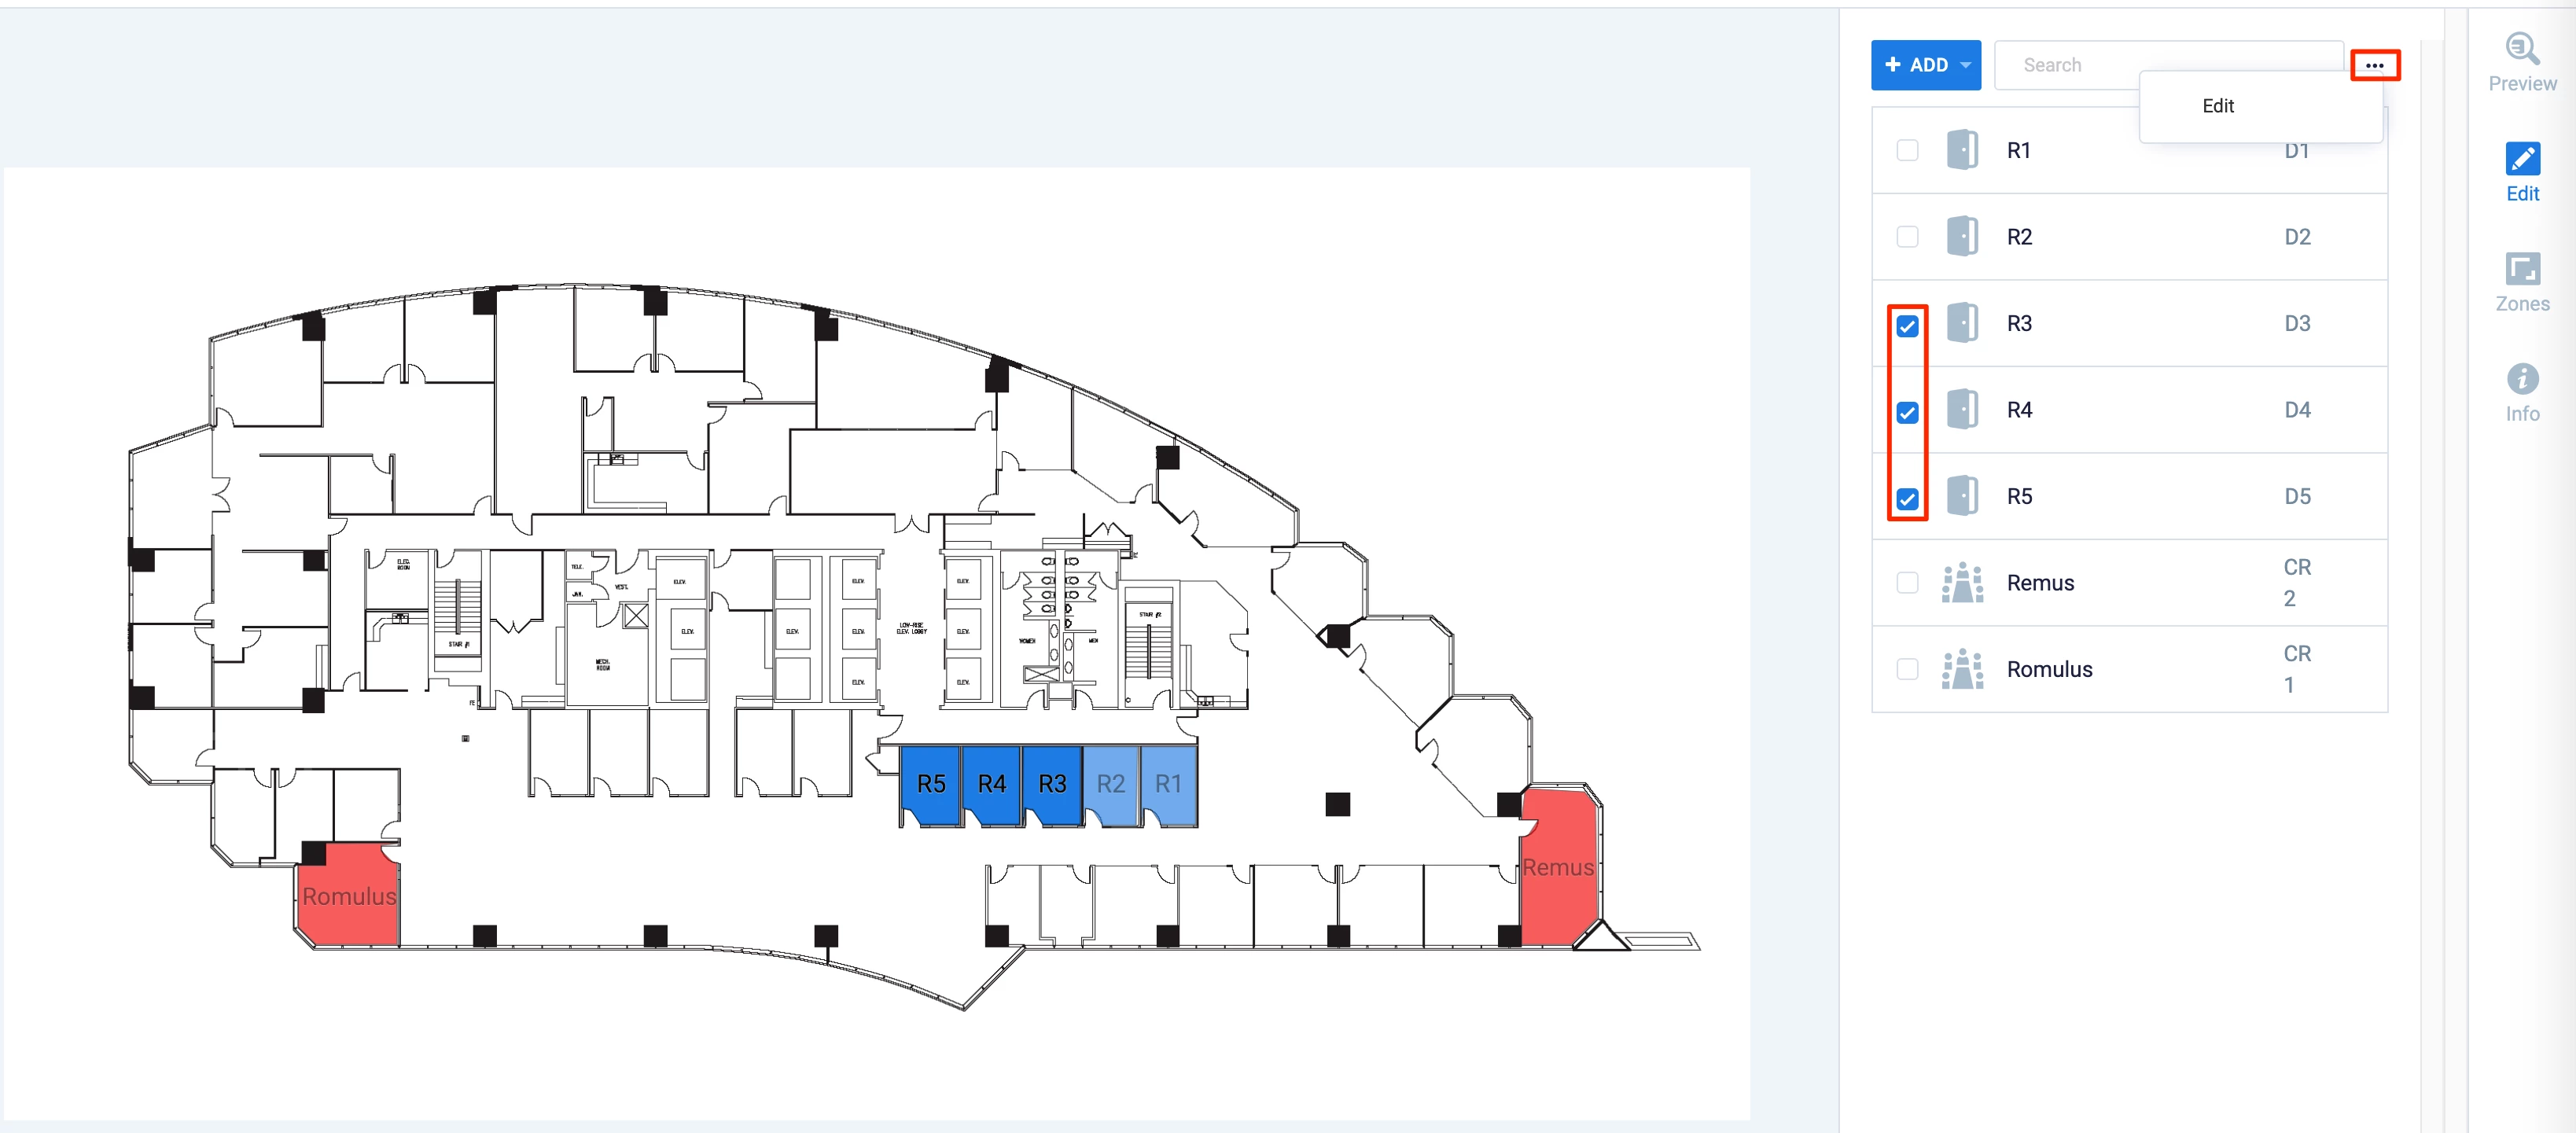
Manage Bulk Resources
Follow the instructions below to bulk manage the rooms, spaces, or points of interest on the floor plan.
- Click Locations from the ☰ Appspace menu.
- Navigate to the building containing the floor plan you wish to configure from the Locations tree.
- Click the floor plan to configure and click the Resources tab. If multiple floor layers are available, select the layer that you wish to configure under Floor Layers.
- Select the rooms, space, or points of interest checkboxes you wish to manage, and click the ellipsis, and select Edit.
- In the GENERAL section, click to expand:
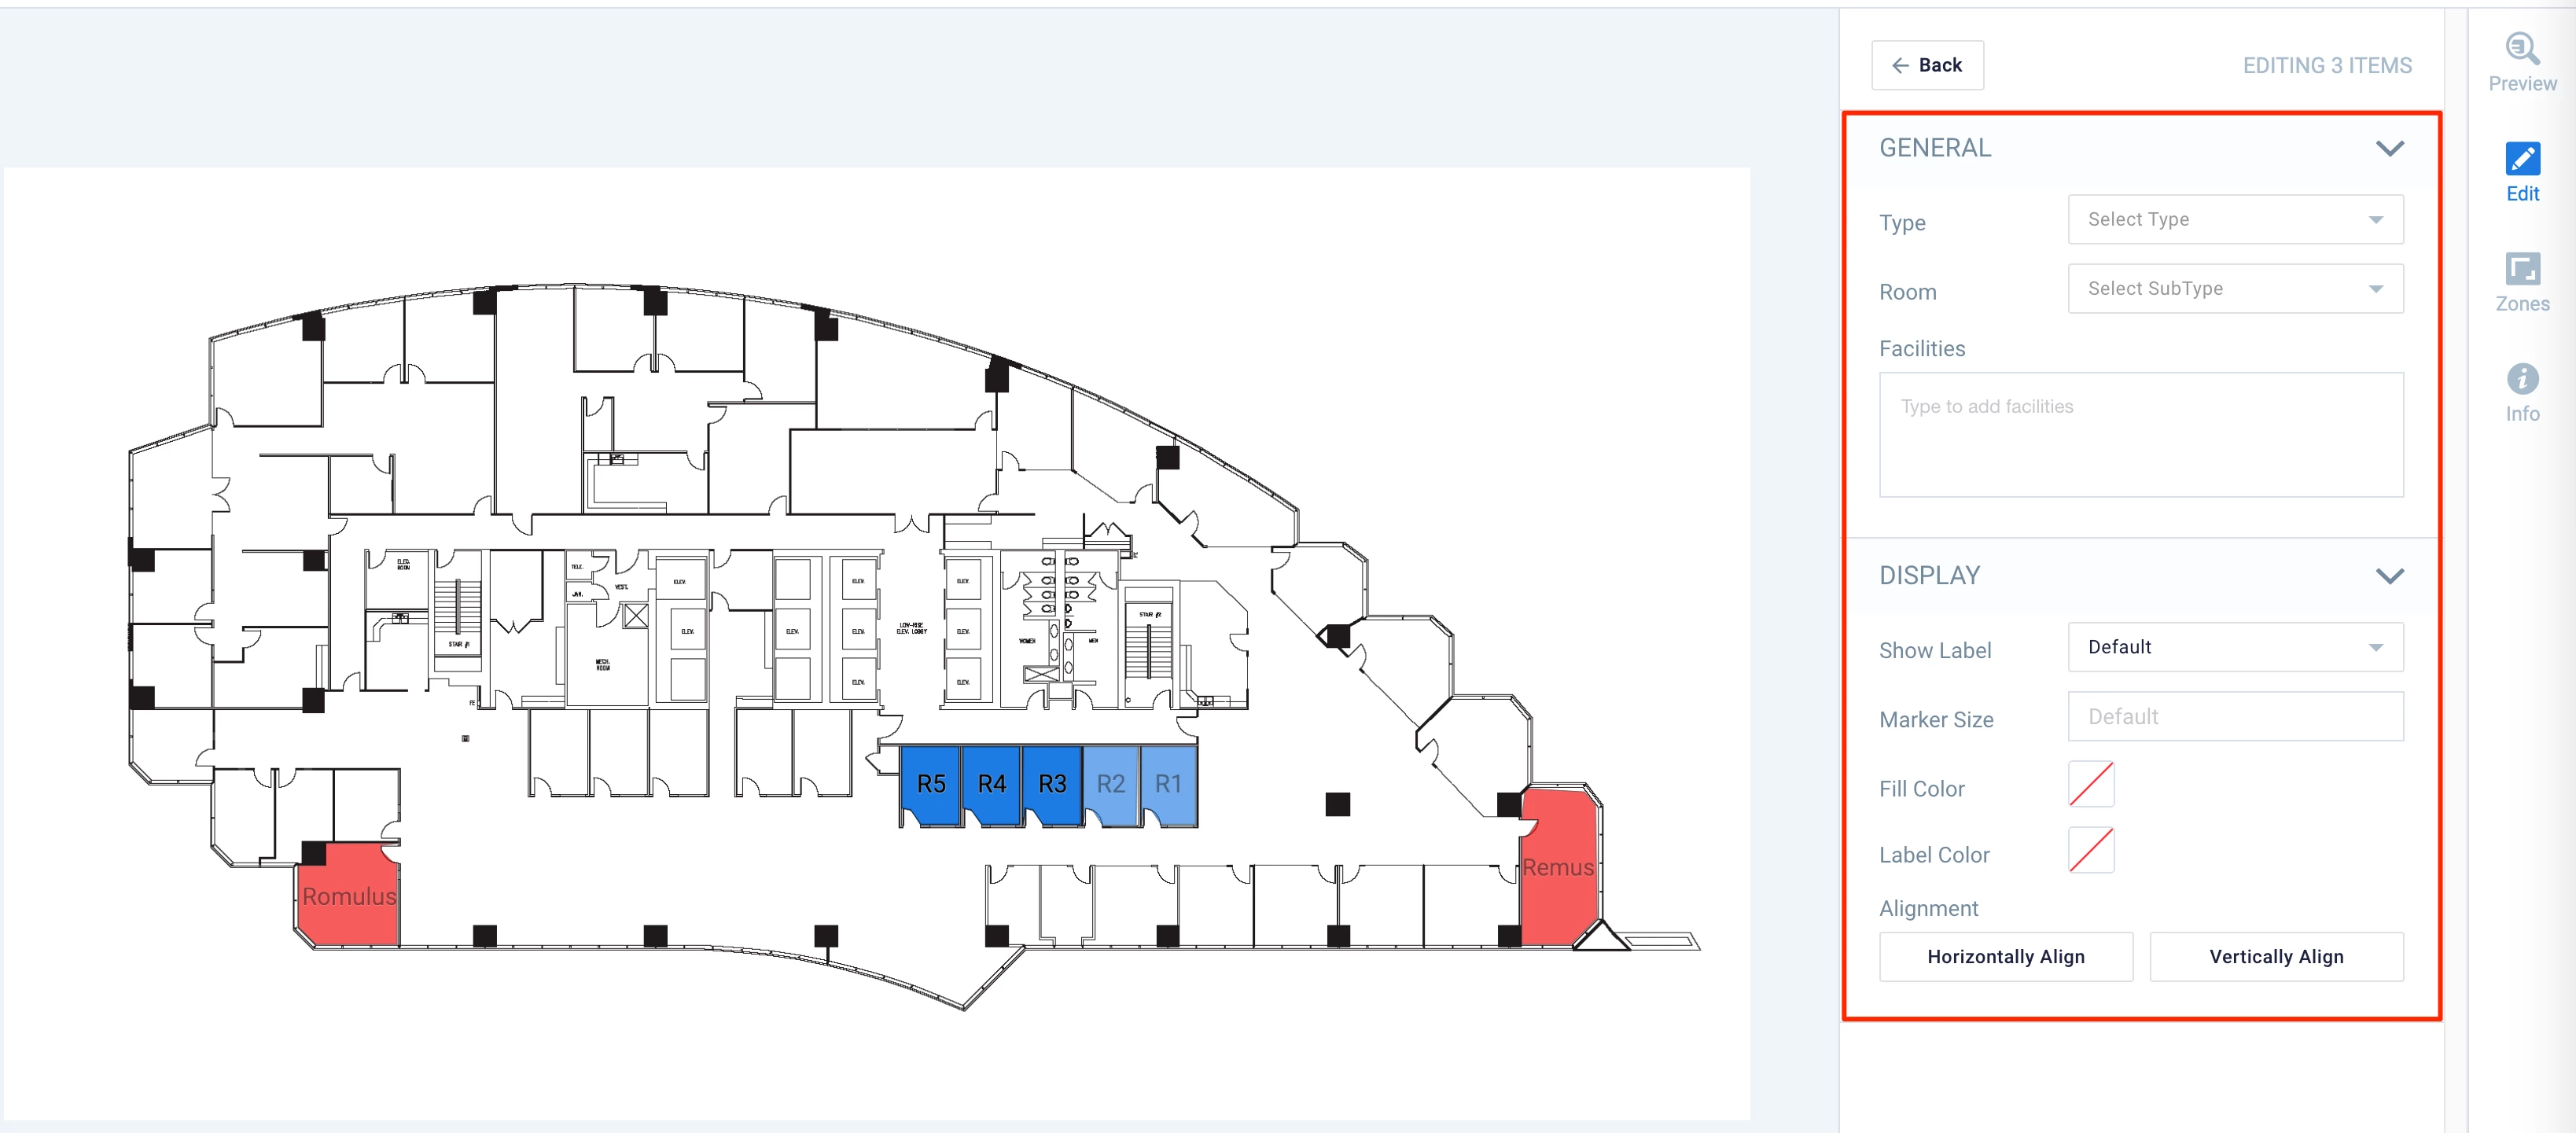
- Type – Select the type of mapping.
- Room – To define rooms in the floor plan, such as offices, conference rooms, auditoriums, etc.
- Space – To define spaces in the floor plan, such as training areas, social areas, huddle spaces, etc.
- Room – Select the subtype of room or space. For a list of complete options that are available, refer to the Floor Plan Rooms, Spaces, and Points Of Interest Options section below.
- Amenities – Add the amenities available in the room.
- Zone – Select if the resource is assigned to a zone.
- Auto detect – Select this for the system to automatically determine if the mapped resource is within a Zone by its boundaries.
- Manual assign – Select this to manually assign the resource to a Zone. Select the zone from the drop-down list or select None.
- Type – Select the type of mapping.
- In the DISPLAY section, click to expand:
- Coordinates – Enter the coordinates of the zone to the floor plan. The edit shape tool lets users modify resource outlines, without having to first delete and then remap the target.
- Show Label – Displays a label for the resource.
- Marker Size – Point of Interest marker size.
- Fill Color – Customize the resource color.
- Label Color – Customize the resource label color.
- Alignment – Horizontally Align or Vertically Align labels.
- Once done, click Save.