


Appspace is now compliant with the SCIM (System for Cross-domain Identity Management) specification, a standard for automating the exchange of user identity information between applications.
As Appspace is now a SCIM compliant application, Appspace can integrate with any SCIM client to automate the provisioning, updating, and de-provisioning of users, as follows:
- User provisioning – when users are created in the organization’s system of record, SCIM can automatically provision those users to the Appspace platform.
- User de-provisioning– when users change roles or leave the organization, SCIM allows for the automated suspension of those users from the Appspace platform as soon as the system of record has been updated.
- User data updates– additional properties that may be used within Appspace can be updated automatically via SCIM once the system of record (HRIS/IdP) has been updated.
SCIM Clients
Appspace customers will now be able to use their HRIS (Human Resources Information System) or IdP (Identity Provider) systems as a source of record to create/import their own user attributes, leveraging Appspace’s integration capabilities that allow user-defined attributes to be created and mapped to external data sources. However, in order to take advantage of these capabilities, Appspace customers need to have an IdP or HRIS system that supports the SCIM protocol. If both IdP and HRIS systems are in place, the IdP acts as the SCIM client to transfer data between the HRIS system and Appspace.
Note
Supported external data sources must adhere to either SAML (Security Assertion Markup Language) or SCIM protocols.
Appspace has tested and officially supports the two leading SCIM compliant IdPs; Microsoft Azure AD and Okta. However, most SCIM compliant IdPs should be able to integrate with Appspace. Most of the leading HCM systems support SCIM integration. Please check with your provider to ensure support and assist with any configuration issues.
SCIM and SAML Single Sign-On (SSO)
Appspace recommends using SCIM with SAML-based Single Sign-On (SSO), which provides access to Appspace through your identity provider (IdP). While these two protocols work together, it is important to understand the role of each:
- SCIM – user provisioning services
- SSO – user authentication services
Summary
Customers who are implementing the Appspace Employee Communications, Space Reservations, and the Visitor Management systems, may now leverage their existing IdP or HRIS systems to be their source of record, to create/import their own user attributes to provide flexibility targeting content, creating groups, and applying security measures, in multi-domain scenarios via a standardized service.
Note
If you’d like to configure SSO with Just-In-Time user provisioning instead, which only allows for user provisioning, without data management and de-provisioning capabilities, please refer to Configure Single Sign-On (SSO) & Just-in-Time (JIT) for Appspace Cloud.
This article provides the instructions to enable and configure SCIM capabilities within Appspace.
Configure Identity Provider
Important
Appspace only supports a single Identity Provider per customer instance.
Prerequisites
- Identify and configure the user attribute that will be used to map with the IdP or HRIS system on the Appspace console. Configure SAML Attributes for Appspace Cloud.
- Appspace has tested and officially supports the following two leading SCIM compliant IdPs:
- Microsoft Azure AD
- Okta
Note
Most SCIM compliant IdPs should be able to integrate with Appspace. Most of the leading HRIS systems support SCIM integration. Please check with your provider to ensure support and assist with any configuration issues.
Configure IdP
Please find the following guides when configuring your preferred IdP:
- Microsoft Azure AD – Managing user account provisioning for enterprise apps in the Azure portal document.
Warning
Custom SAML attributes that are removed from Azure AD, are not automatically removed from the Appspace console, thus the User profile will still display the attribute and value, however, it would not be updated.
- Okta – Build a SCIM provisioning integration overview document.
Warning
Do not change the username in Okta even when Okta allows you to change the usernames. In the event a username is changed, the user may not be able to access the Appspace platform. The administrator must either revert back to the original username or must re-provision the user.
Enable and Configure Single Sign-On (SSO) Authentication
Prerequisites
- Account Owner role with an Appspace Platform user license.
- An Identity Provider (IdP) that is SAML 2.0 compliant.
- IdP metadata, or the SSO URL and the x.509 certificate.
Important
Please ensure the NameID in the SAML assertion is the email address of the user.Appspace uses the following NameID format: urn:oasis:names:tc:SAML:1.1:nameid-format:emailAddress
- Configure a SAML identification attribute flag to identify an IdP user as one that should be created in Appspace. This attribute can be selected by the IdP administrator and should be configured in both the IdP and in Appspace.
- Configure the IdP to pass the correct attributes to Appspace such as attribute mappings for the First Name, Last Name, and Username fields.
Note
See Introduction to Configuring SSO with Appspace for more information. If you’d like to configure SSO on Appspace private cloud, please contact Appspace Support.
Enable SSO
Follow the instructions below to enable and configure SSO (Single Sign On) authentication for Appspace.
- Log in to the Appspace console.
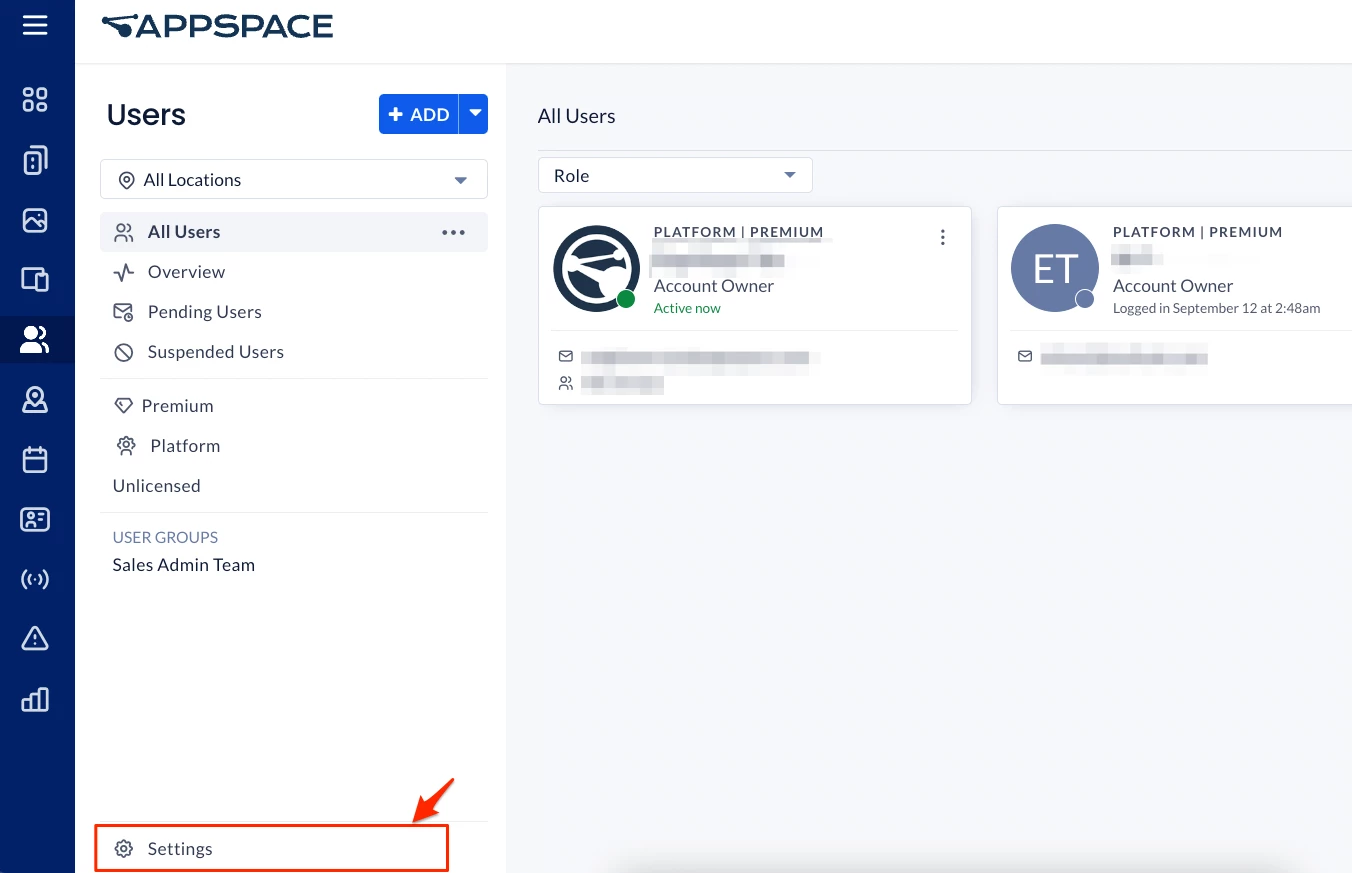
- Click the ☰ Appspace menu, and select Users. Click Settings at the bottom of the left menu.
- Click the Account Authentication side panel tab.
- In the AUTHENTICATION METHOD section, select Single Sign-On (SSO) authentication method from the drop-down menu to enable and configure SSO.
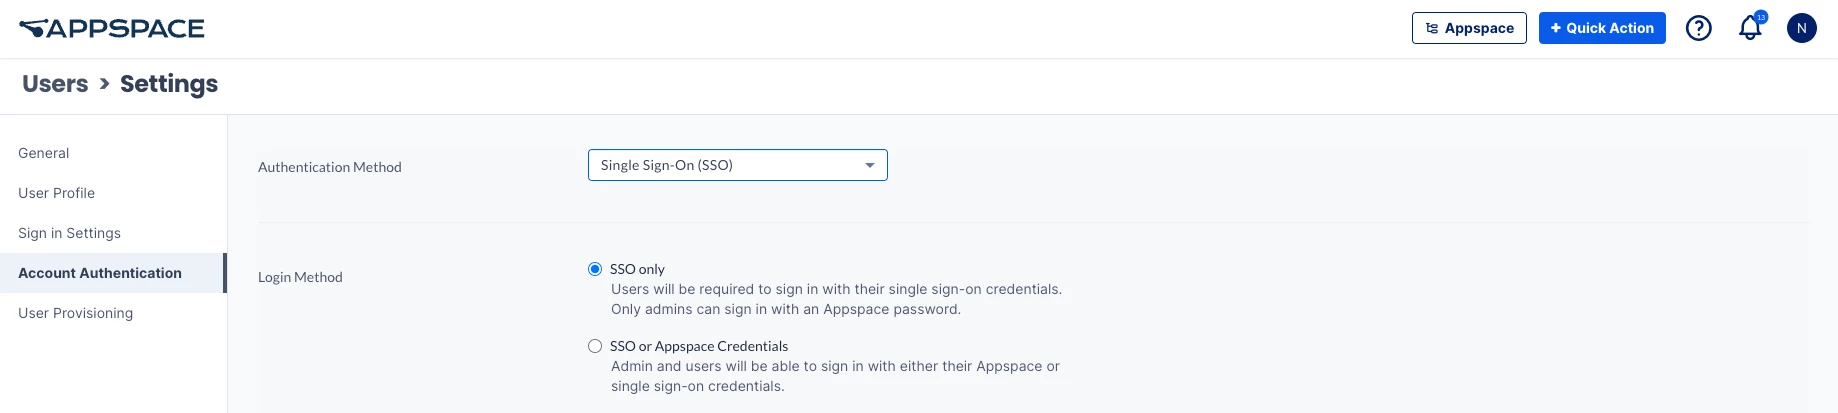
- In the SINGLE SIGN-ON (SSO) SETTINGS section, select the desired Login Method:
- SSO only – Users will be required to sign in with their single sign-on credentials. Only admins can sign in with an Appspace password.
- SSO or Appspace Credentials – Admin and users will be able to sign in with either their Appspace or single sign-on credentials.
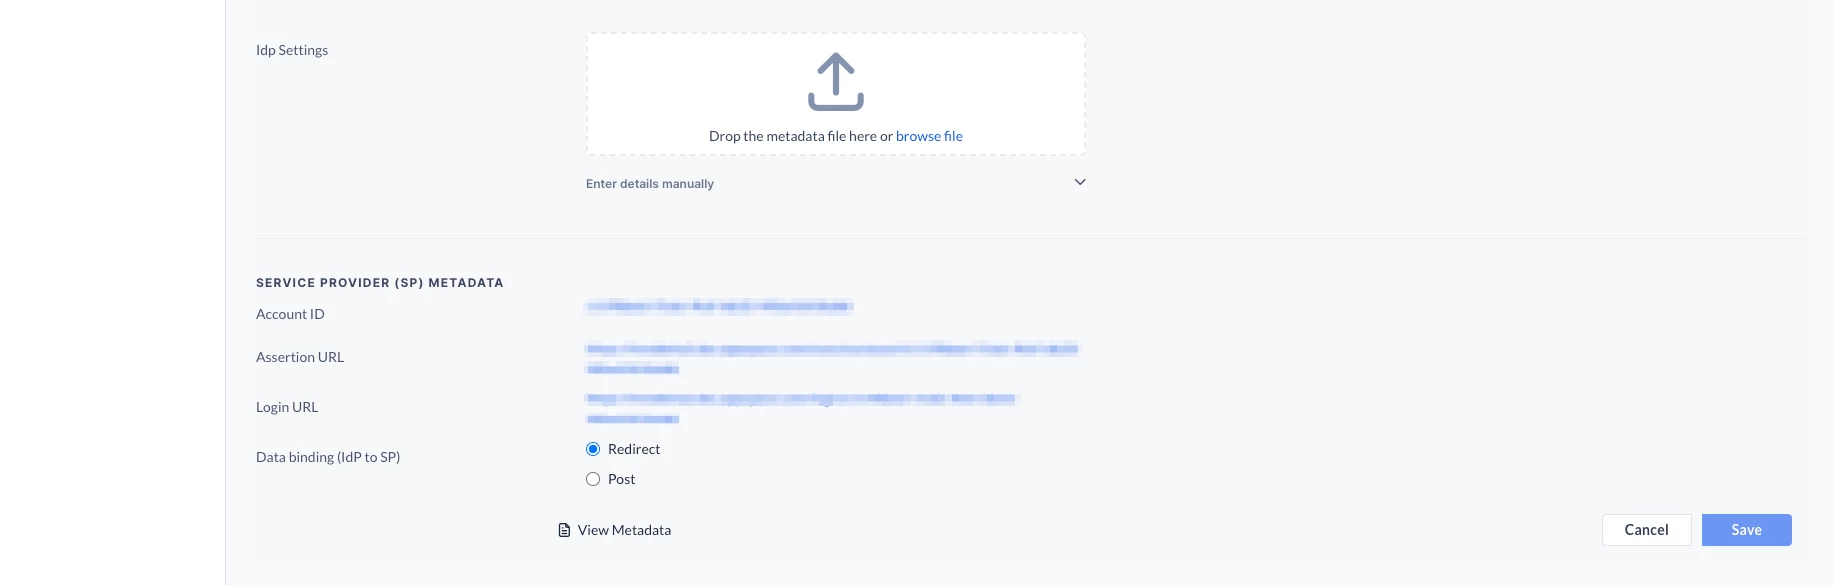
- In the IDENTITY PROVIDER (IDP) INFORMATION section, configure the IdP settings using one of the following methods:
Important
Please ensure the NameID in the SAML assertion is the email address of the user.Appspace uses the following NameID format: urn:oasis:names:tc:SAML:1.1:nameid-format:emailAddress
- Drop or upload the IdP metadata XML file.
- Manually enter the SSO URL and X.509 Certificate details in the relevant fields.
- In the GENERATING SERVICE PROVIDER (SP) METADATA section, select the desired Data binding (IdP to SP) option:
- Redirect – Users are redirected to the Identity Provider. SSO details will be passed in a query string with “?SAMLRequest=……” as part of the URL.
- Post – SSO details are passed using the POST method. Ensure the Identity Provider has direct access to the Appspace Server for this method to work.
- Click Save once all SSO configurations have been made.
Configure SCIM User Provisioning
When configuring your IdP to integrate with Appspace, you will need to enable SCIM for Appspace in your IdP, and provide information about Appspace’s SCIM API endpoints, including the SCIM Base URL, the unique ID for users that are provisioned, provisioning actions that are supported, and the authentication mode used.
Prerequisites
- Account Owner role with an Appspace Platform user license.
- A HRIS or IdP that is SCIM 2.0 compliant, such as:
- Microsoft Azure AD
- Okta
- The username must follow the user’s email address.
- Support for User endpoints only. (Group endpoints not supported currently)
Enable SCIM
Follow the instructions below to configure SCIM (System for Cross-domain Identity Management) user provisioning in Appspace.
- Log in to the Appspace console.
- Click the ☰ Appspace menu, and select Users. Click Settings at the bottom of the left menu.
- Click the Settings tab, and click the User Provisioning side panel tab.
- Select the SCIM radio button from the User Provisioning options to display the SCIM settings, and click Save.
- Enter the SCIM Base URL and ensure the SCIM Bearer Token has been generated below:
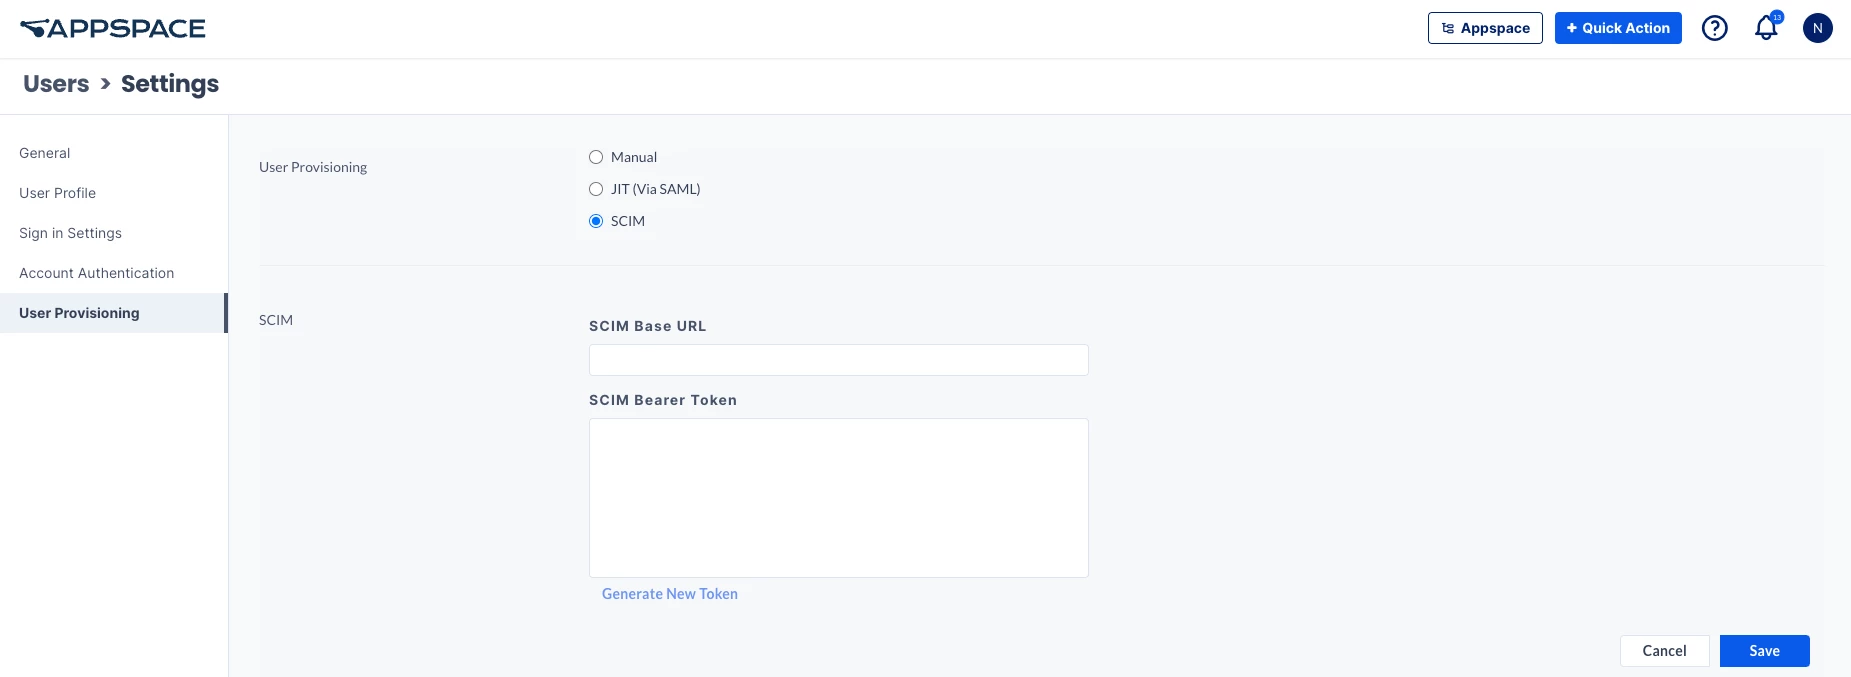
- SCIM Base URL – The SCIM Base URL is the API endpoint that connects the provisioning system with Appspace. Example: https://cloud.appspace.com/identity/scim
- SCIM Bearer Token – The authentication token that manages the SCIM API. Automatically generated, however a new token can be generated by clicking the Generate New Token link.
- Select the Enable User Group Sync checkbox to also include user groups in SCIM provisioning.
Important
External user groups provisioned from an Identity Provider (IdP) via SCIM have different characteristics than user groups created in Appspace. Refer to this article on how to manage SCIM provisioned user groups.
-
Enable Allow Automatic Activation to let SSO-enabled accounts activate automatically without requiring email invitations. This option is available only when SSO is enabled.
- Configure the following settings in the Email Notifications section:
- Invited Users – Users invited by the administrator are sent an email invitation. This option cannot be disabled. Click Edit template to modify the email content and appearance:
- Click the Language button and select the language from the drop-down menu to preview translations for the invitation email. Click Translate all languages to translate the email using AI, or to Clear all translations.
- Sender Display Name – Set the name that appears as the sender.
- Email Subject – Leave blank to use the default subject: “You are invited”.
- Accent Color – Choose a color to highlight key elements in the email.
- Logo – You can upload a custom logo to replace the default Appspace logo.
- Banner – Add a banner image to be displayed in the email, or leave the design as default.
- Title – Enter the main heading for the email body.
- Description – Include additional text below the title.
- Additional Text – Choose where to place extra text: None, Top, or Bottom. If Top or Bottom is selected, enter the desired text.
- Click Restore to default to undo all settings.
- Click Save or Cancel.
- Click the Language button and select the language from the drop-down menu to preview translations for the invitation email. Click Translate all languages to translate the email using AI, or to Clear all translations.
- Added Users – If this option is enabled, users provisioned by SCIM are also sent an email invitation. Click Edit template to modify the email content and appearance for added users, with options similar to Invited Users above.
- Invited Users – Users invited by the administrator are sent an email invitation. This option cannot be disabled. Click Edit template to modify the email content and appearance:
- Click Save once done.