IoT Sensor Framework - VergeSense: Setup Guide
Introduction
This guide provides a configuration and integration walkthrough for the IoT Sensor Framework, focusing on the setup required to capture and utilize data from VergeSense sensors. The VergeSense Driver Support feature expands the Appspace IoT ecosystem with native, out-of-the-box integration, allowing administrators to connect and configure sensors without custom integrations or middleware layers.
Key Benefits
- Simplified Deployment: Connect and configure sensors without custom integrations, reducing operational overhead.
- Real-Time Automation: Power automations that respond to real-world conditions by enabling direct communication between VergeSense devices and the Appspace platform.
- Unified Intelligence: Consolidate data from VergeSense sensors directly within Appspace to enhance visibility and operational efficiency.
What This Guide Covers
This guide covers the following topics:
- Configuring the Appspace IoT Driver.
- Configuring the VergeSense Webhook.
- Registering the VergeSense sensor to an Appspace Resource.
- Configuring Occupancy-based Sensor Rules.
- Testing and Validation.
Prerequisites
- Access Credentials: Administrator access to the VergeSense configuration page to set up webhooks.
- Appspace Configuration: Access to the Appspace Console with permissions to manage Reservations and IoT settings.
- Sensor Mapping: You will need the Space Name for each area defined in VergeSense to map it correctly to an Appspace resource.
Configuration and Integration
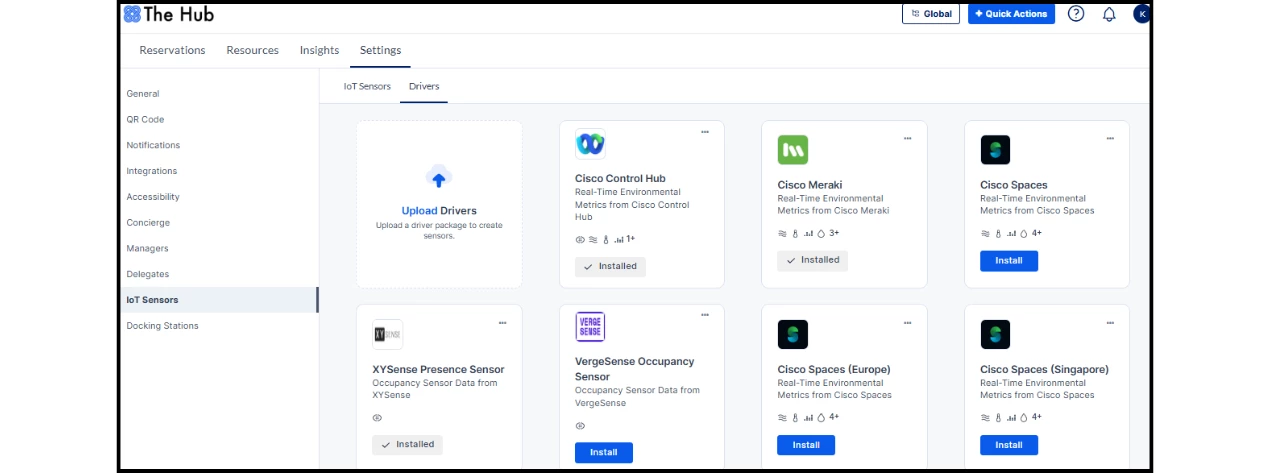
Step One: Installing the Appspace IoT Driver
The IoT Drivers enable Appspace to accurately identify, parse, and store incoming sensor data.
- Log in to the Appspace Console.
- Navigate to Reservations > Settings > IoT Sensors.
- Select the Drivers tab.
- Locate the VergeSense Sensor Driver and click Install.
- Once installed, click the three dots (⋮) on the driver tile to Copy URL and Copy Key. Store these for use in the next step.
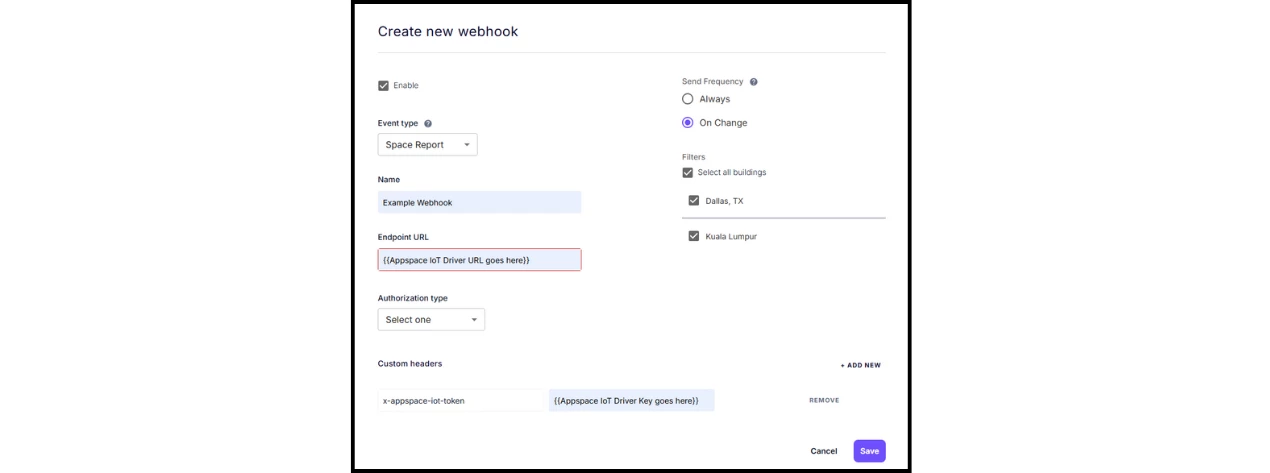
Step Two: Configuring the VergeSense Webhook
To enable data flow, you must configure a webhook in VergeSense to push occupancy changes to Appspace.
- Log in to the VergeSense admin console.
- Navigate to Settings > Webhooks.
- Click Create New Webhook and configure the following:
- Event Type: Select Space Report.
- Name: Enter an identifier (e.g., "Appspace Integration").
- Endpoint URL: Paste the URL copied from the Appspace driver.
- Authorization Type: Select No Authorization.
- Custom Headers: Click +Add New. Enter x-appspace-iot-token as the header name and paste the Key from the Appspace driver as the value.
- Send Frequency: Select On Change.
- Ensure the Enable toggle is switched ON and click Save.
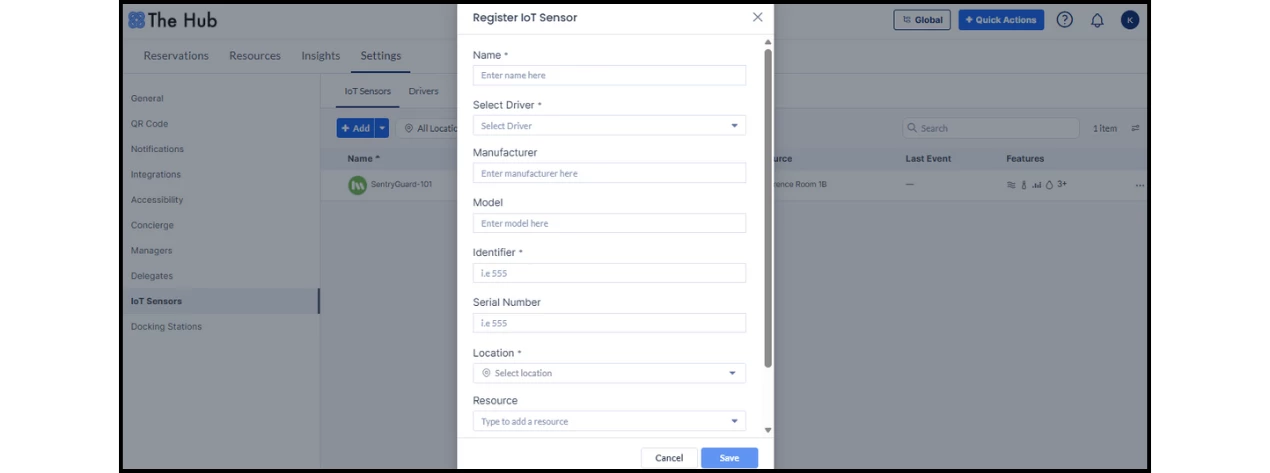
Step Three: Registering the Sensor to an Appspace Resource
After the webhook is active, you must register the specific sensor in Appspace and link it to a resource.
- Identify the Sensor ID: In the VergeSense console, go to Dashboard, select a floor, and navigate to the Spaces tab. Copy the Space Name (e.g., POLY-AHP88JJ9).
- In Appspace, navigate to Reservations > Settings > IoT Sensors.
- Select the IoT Sensors tab and click +Add.
- Fill out the registration form:
- Name: Enter a recognizable name for the sensor.
- Driver: Select VergeSense from the dropdown.
- Identifier: Enter the Space Name copied from VergeSense. Note: This must match exactly.
- Location/Resource: Map the sensor to the corresponding Appspace meeting room or desk.
Step Four: Configuring Occupancy-based Sensor Rules
Even after data begins flowing into Appspace, resource statuses will not automatically update until specific occupancy rules are established. These rules define how the system responds to the incoming sensor data.
- Navigate to Reservations > Settings.
- Configure the Occupancy-based Sensor Rules for your resources to ensure the space reacts to real-time presence. To learn how to configure these rules, follow this article.
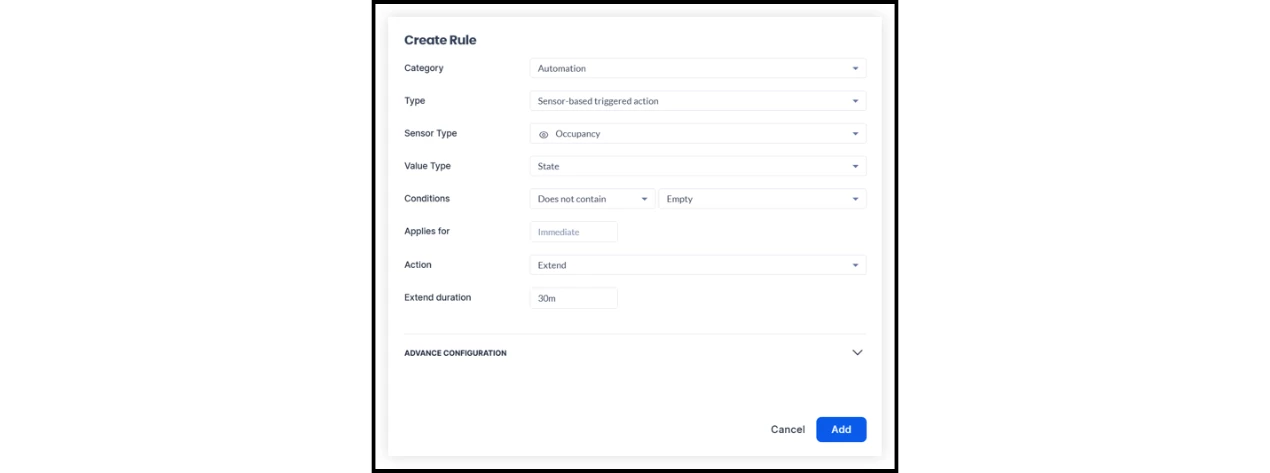
Note: Without these rules, the physical occupancy of a space will not trigger status changes (e.g., "Occupied"), though you will still see data updates in the Last Event column under Reservations > Settings > IoT Sensors.
Testing and Validation
After configuration, verify that the data is flowing correctly from VergeSense to Appspace.
- Check Webhook Events: In the Appspace webhook settings, verify that the IoT events are visible.
- Verify Data Flow: Check the Appspace webhook logs or query the API to ensure the payload is being received correctly.
- UI Verification: Confirm that the Last Event column under IoT Sensors updates when the physical sensor is triggered.
- Functional Test: Trigger an occupancy change in the physical space (e.g., walk into the room) and verify that the status updates for the mapped resource in the Employee Experience (e.g., the room status changes to "Occupied").