


Sensor-Based Occupancy Rules: User Guide
Introduction
This guide provides information on configuring, setting up prerequisites for, and properly using Sensor-Based Occupancy Rules. This feature is intended for facilities managers and employees. It allows Location Administrators to use sensor data to set occupancy-based rules for resources, which automates booking actions.
Key Benefits
Using sensor-based rules offers several benefits:
- Improved Efficiency: Ensures rooms are used efficiently, which reduces empty bookings and improves availability.
- Real-Time Adaptation: Rooms automatically adjust bookings based on actual occupancy without requiring user input.
- Responsive Environments: The system adapts to real-time conditions, supporting a more responsive workplace.
- IoT-Governed Spaces: Designate specific resources as reservable only through IoT workflows, preventing manual booking conflicts with sensor-driven automation.
What This Guide Covers
This guide will cover the following topics:
- How sensors enhance the Appspace platform
- How IoT Drivers and Sensors work
- How to register IoT sensors
- How to configure sensor-based rules
- How to establish rule conditions, along with examples
- How to configure IoT Managed Resources
Prerequisites
Before you can use sensor-based rules, you need to meet the following requirements:
- Resources must be mapped in Appspace.
- You must have a platform license.
- You must have a Location Admin or Account Owner role.
- IoT sensors must be installed in resources.
Using Occupancy Sensors in Appspace
Appspace integrates with sensors to collect occupancy data. The only sensor data used to create a sensor-based rule is occupancy data. These rules can automatically trigger actions based on whether a room is occupied. When a sensor detects occupancy, it can change a resource's reservation status.
Setting up the IoT Framework and Devices
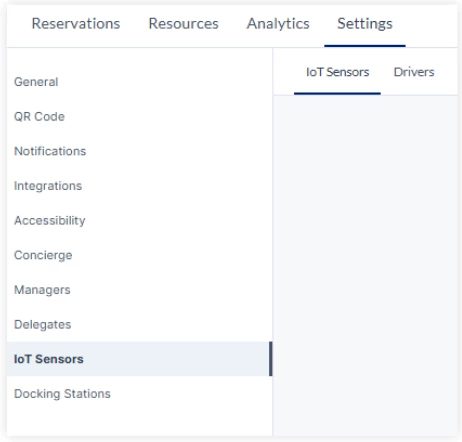
To set up your IoT Drivers and Sensors, go to Reservation > Settings > IoT Sensors. If this option isn't visible, contact your Customer Success Manager (CSM) or submit a support ticket to enable it. You can create sensor-based rules and add your devices later.
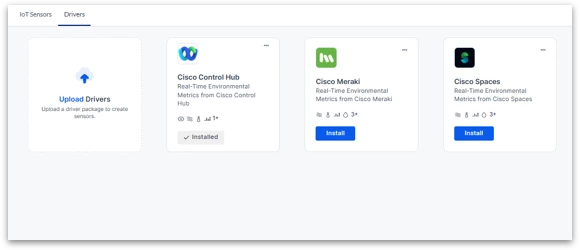
Step One: Install the Sensor Driver
IoT Drivers provide the framework for how Appspace interacts with sensors, allowing the platform to identify, parse, and store sensor data.
To install a driver:
- Go to the Drivers tab or click the Manage Drivers button under the Sensors tab.
- Click Upload Drivers to upload a driver package from your files.
- Each driver will have its own configuration process within the sensor platform.
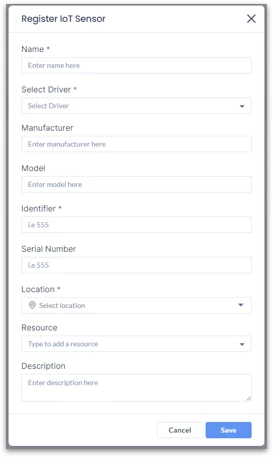
Step Two: Register the IoT Sensor
IoT Sensors are physical devices that are installed in a workplace to detect changes and collect data. Once registered, you can link sensors to a specific resource or location in Appspace.
To register a new sensor:
- In the IoT Sensors tab, click +Add.
- Add a Sensor Name and select the Driver type.
- (Optional) Enter the Manufacturer, Model, Serial Number, and Description to help manage your sensors.
- Enter the sensor's Identifier. This is a crucial field and must match the unique ID from your sensor platform’s data payload.
- Select a Location for the sensor from the dropdown menu.
- Map the sensor to an existing resource. The system uses this mapping to identify the resource.
- Click Save.
You can also import an Excel sheet to register multiple devices at once. A template is available in the console.
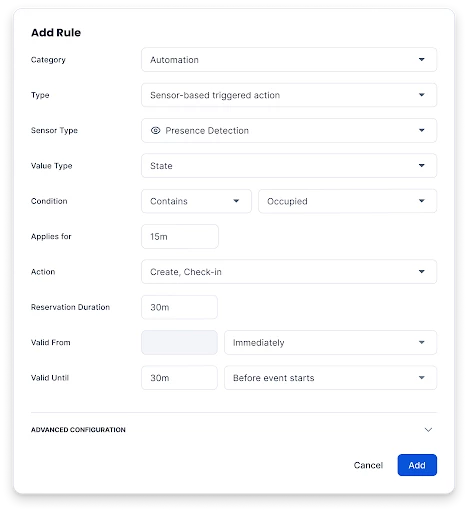
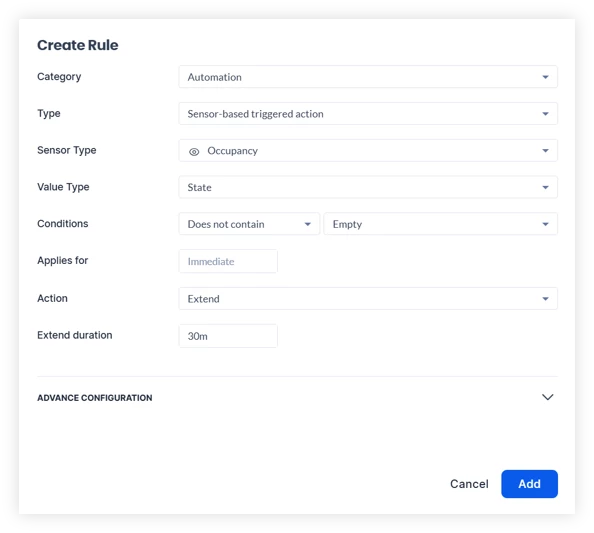
Creating a Sensor-Based Rule
Sensor-based rules allow you to automatically update a resource's reservation status using occupancy data from a sensor.
To create a rule:
- Go to Reservations > Resources.
- Select a specific resource.
- Note: Sensor-based rules apply only at the resource level, not to geos, buildings, or floors.
- Click the Rules tab, then select +Add Rule.
- From the Category dropdown, select Automation.
- Select the available options for Type, Sensor Type, and Value Type.
- Choose the conditions that will trigger a reservation status change based on occupancy.
- Click Add to save the rule.
Configuring IoT Managed Resources
Some workplace resources — such as hot desks with docking stations, sensor-enabled rooms, or access-controlled spaces — are intended to be managed exclusively through IoT-driven workflows. By default, these resources can still be reserved through web views or plugins, which can create conflicts between manual bookings and real-time sensor-based usage.
The IoT Managed rule allows administrators to designate specific resources as reservable only through IoT workflows. When enabled, employees cannot book the resource through Appspace web views or plugins, but can still see real-time availability on employee views and interactive maps.
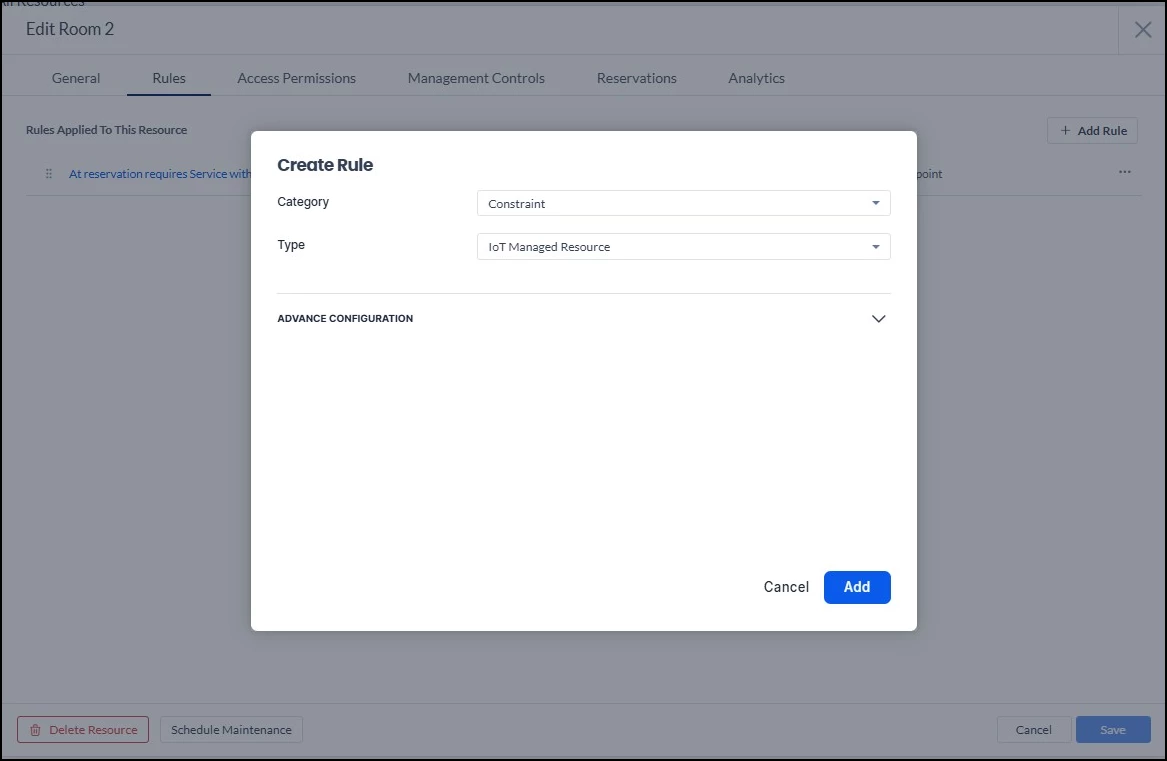
Step One: Mark the Resource as IoT Managed
To configure a resource as IoT Managed:
- Go to Reservations > Resources.
- Select the specific resource.
- Click the Rules tab, then select +Add Rule.
- From the Category dropdown, select Constraint.
- From the Type dropdown, select IoT Managed Resource.
- Expand Advance Configuration to set an active period or add a description if needed.
- Click Add to save the rule.
Note: Like other sensor-based rules, this applies at the individual resource level. Existing resources are not automatically converted — administrators must enable the rule on each resource individually.
Step Two: Verify the Employee View
After enabling the rule, confirm how the resource appears to employees. Resources marked as IoT Managed remain visible on maps and in the employee view, and real-time availability is still displayed. However, the resource cannot be booked through the web view or plugins — a clear UI indicator shows that the resource is IoT managed and not manually reservable.
Important: When a resource is marked as IoT Managed, there is no option to override and book manually. If you need a manual booking option for a resource, do not enable this rule.
Step Three: Pair with Occupancy Rules
IoT Managed Resources work best when combined with the sensor-based rules covered earlier in this guide. For a fully automated reservation lifecycle, configure the following on the same resource:
- Automatic check-in — Sensor detects presence and checks the user in.
- Early end — Sensor detects the room is empty and ends the reservation.
- Ad-hoc reservation creation — Sensor detects an impromptu gathering and creates a reservation automatically.
Together with the IoT Managed rule, these provide end-to-end automation: the resource is reserved, checked in, extended, and released entirely through sensor-driven interactions.
Examples of Rule Conditions
You can set rules to automatically start, check in, extend, or end reservations based on a room's occupancy.
Common Use Cases
- Automatic Check-in: If a sensor detects someone's presence for 5 minutes after a reservation starts, it can automatically check them in.
- Rule Settings:
- Condition: Contains, Not Empty
- Applies for: 5 minutes
- Action: Check in
- Rule Settings:
- Early End to a Meeting: If a meeting ends early and the room becomes empty, the sensor can detect that the room has been unoccupied for 20 minutes and end the reservation, making the room available sooner.
- Rule Settings:
- Condition: Contains, Empty
- Applies for: 20 minutes
- Action: End
- Rule Settings:
- Extending a Reservation: If a meeting runs longer than the original reservation, the sensor can detect that people are still present after 5 minutes and extend the reservation by 30 minutes.
- Rule Settings:
- Conditions: Contains, Not Empty
- Applies for: 5 minutes
- Action: Extend
- Extend duration: 30 minutes
- Rule Settings:
- A Meeting without a Reservation: If a group of employees gathers in an available meeting room for an impromptu meeting, the sensor can detect their presence without a reservation for 5 minutes and create a 30-minute reservation.
- Rule Settings:
- Conditions: Contains, Not Empty
- Applies for: 5 minutes
- Action: Create
- Reservation duration: 30 minutes
- Rule Settings: