

Note
This article is part of a series of articles to help administrators configure the reservation system. Please see the main article for links to all related articles.
Automation
Automation rules enhance the Space Reservation rule engine by integrating live data from environmental and occupancy sensors. This feature enables real-time, automated booking management based on actual room conditions, such as presence detection, without requiring any manual input. Designed for workplace, facilities, and IT teams, automation and sensor-based rules address the challenges of space management, such as unused bookings and wasted resources caused by missed check-ins or ghost meetings.
By integrating presence sensors, automation rules can be used to perform the following in real-time room management:
- Automatically releasing reserved rooms if no one checks in for five minutes after the meeting start time, or if the space becomes vacant before the scheduled end time.
- Automatically checking in users and extending reservations when continued presence is detected.
- Automatically creating room bookings when a space is occupied for a minimum of five minutes without a prior reservation.
Create Automation Rule
Follow the instructions below to configure automation rules for a resource.
Note
Automation rules cannot be applied to locations, buildings, floors, or zones.
- In Reservations, click the Resources tab, and select a specific resource from the All Resources list to configure the automation rule.
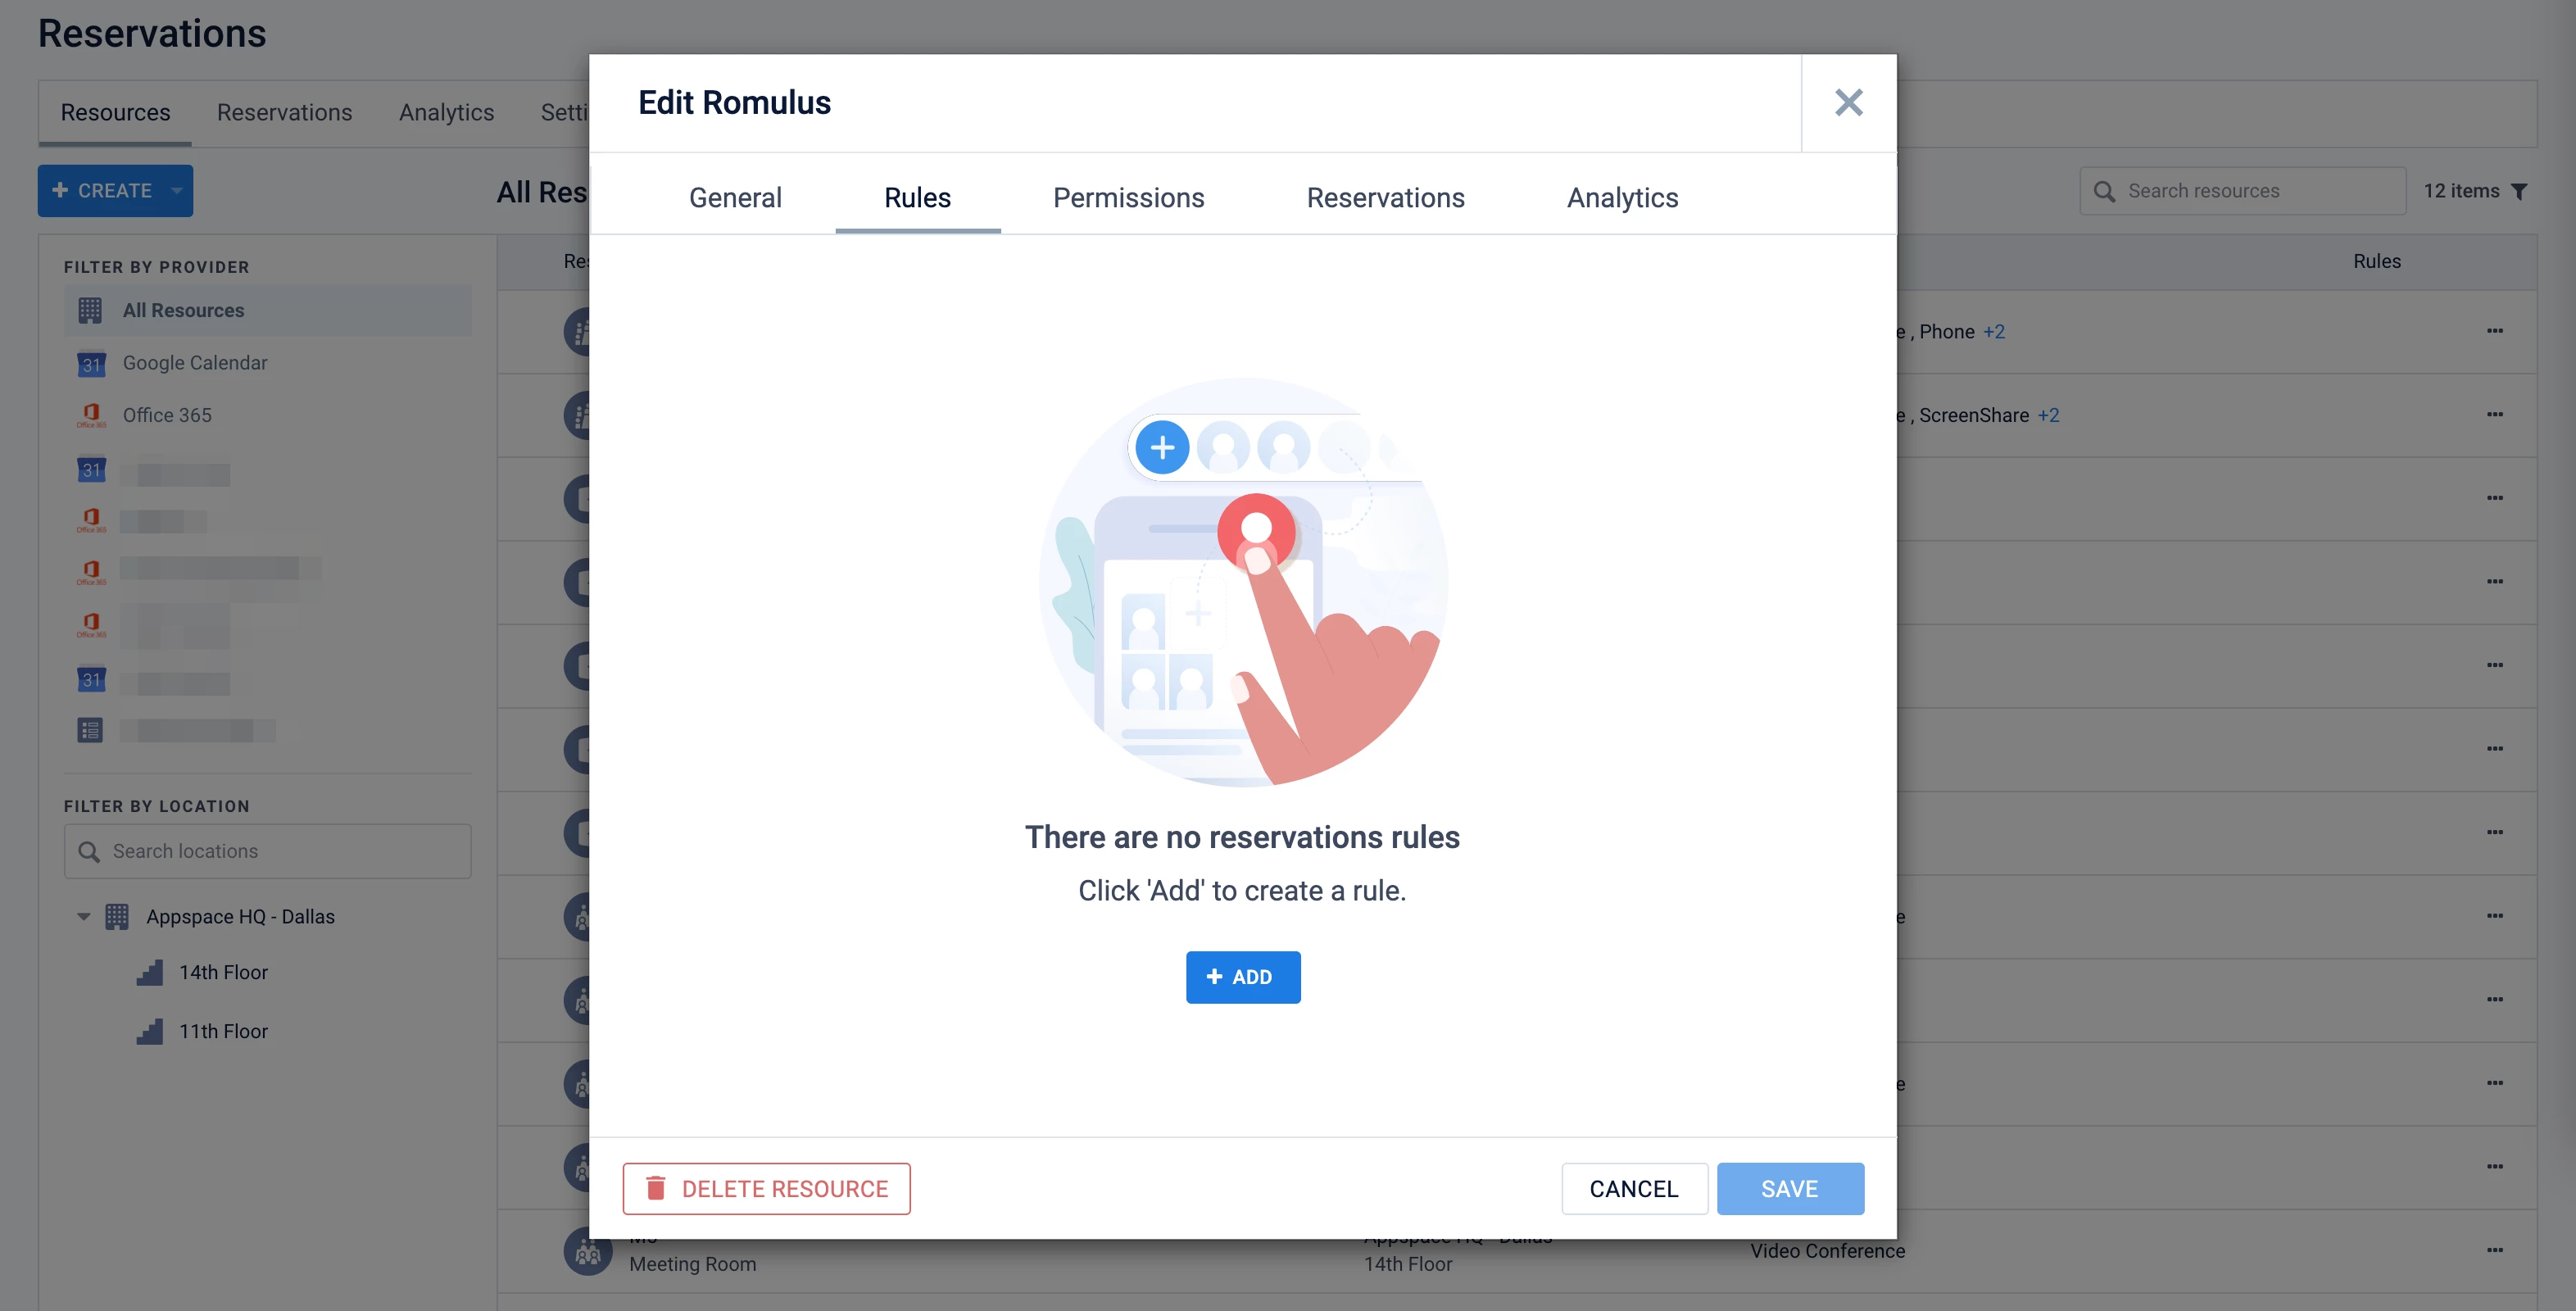
- In the Edit resource window, select the Rules tab to configure the resource rules, or to view inherited rules.
- Click the ADD button or the + icon to create a rule for the resource.
- In the Create Rule window, select Automation as the Category type.
- Select an automation type under Type:
- Sensor-based trigger action – The rule performs an action when a sensor is triggered.
- Select a Sensor Type:
- Occupancy – A sensor that detects when a meeting room or desk is being used by someone.
- Select the Value Type that is returned by the system:
- State – A status or condition is returned by the system, specific to the sensor type.
- For Conditions, set a rule to check if the value returned Contains or Does Not Contain a state of Empty (unoccupied) or Not Empty (occupied).
- For Applies For, you can leave the field empty to set the condition to be immediate, or set the hours and minutes to set how long the resource (such as a room or workspace) has been occupied or unoccupied.
- For Action, you can set the action that will be performed when the condition is met:
- Create – Create a reservation for the resource. Set the Reservation duration for the resource.
- Extend – Extend the current reservation of the resource. Set the Extend duration for the reservation.
- Check-in – Perform a check-in for the reservation for the resource.
- End – End the current reservation of the resource.
You can also select both Create and Check-in to create a reservation and then check-in the reservation for the resource. Set the Reservation duration for the resource.
- Expand the Advanced Configuration section.
- For the Active period, select the start and end dates from the calendar, then click Apply to set the rule duration.
- Enter a Description for the rule.
Constraints and Checkpoints
A constraint is a rule that limits or controls how end-users can interact with a reservable resource. It can define maximum reservation duration, capacity limits, or the requirement to impose check-in. Below is a list of constraints available:
- Allow visitor reservations (Only available at the Building Level) – Allows visitors to be invited to buildings that are not reservable.
Important
Setting Allow Visitor Reservations to NO prevents meeting organizers from inviting external visitors to reservations at the selected building location. This restriction applies to all associated floors, zones, and resources.
- Allow visitor drop-in (Only available at the Building Level) – Allow visitor drop-ins to check-in with a different host, if the original host had not responded to the guest arrival notification within a certain duration.
- Min advance reservation period
- Max advance reservation period
- Min reservation duration
- Max reservation duration
- Max capacity
- Min duration between reservations
- Only available on specific days / times
- Recurring reservation limits
Note
Currently, the default maximum recurrences that can be configured is 730.
- If the Default Recurrence > the Max # of Recurrences, then the Max # of Recurrences will be increased to match the Default Recurrences.
- If the Max # of Recurrences < the Default Recurrence, then the Default Recurrences will be decreased to match the Max # of Recurrences.
- Concurrent reservation limits
- Mutually exclusive resource reservations
Note
This rule prevents users from booking specific resource types concurrently.
- Administrators can define which resource types cannot be booked together (e.g., a user can book a meeting room OR a private office, but not both).
- Once the rule is in effect, if a user tries to reserve a mutually exclusive resource, a message will appear stating that the resource is unavailable. If a resource is already reserved for the selected time, the user won’t be able to choose that resource type. The user must select a different resource to proceed with the reservation.
- Requires Check-in
- Restrict max resource reservations by user – This rule limits the number of reservations a user can make, either per day or concurrently during the day. For instance, an organization may allow users to book up to three spaces per day but not have more than one active reservation at a time.
- Zombie Meetings – Unattended Recurring Meetings
Note
Administrators may now set a constraint to auto-cancel future recurring meetings and send a notification to meeting organizers after an (X) number of consecutive recurring meetings are missed or unattended.
Thus, when an organizer sets a recurring meeting, but fails to check-in resulting in an auto-cancellation for that meeting, and if repeated an X number of times consecutively, then all future recurring meetings will be automatically canceled, and a notification sent to the organizer.
However, if a check-in does occur within an X number of times, then the missed meeting counter resets to zero (O). This also applies to recurring meetings that are manually canceled a day in advance.
- In-Person QR Code Actions
Note
Administrators may now set constraints to ensure resources are only reserved, checked-in, extended, etc. via the Room Scheduling QR Code only when the employee is physically at the location. Attempts to check-in will be denied.
This constraint is only supported on resources created by the Appspace provider.
- Visitor multi check-in/check-out
Note
Administrators may set a constraint (only at the building level) for hosts and facilitators to allow visitors to check-in and check-out multiple times throughout the duration of the event, using the same QR code/code. The host is notified whenever a check-in/check-out action is done. The rule ends when the set active period is ended, regardless of having a check-in or check-out pending.
- (New) IoT Managed Resource
Note
Administrators can set this constraint to ensure that the resource is only reservable through IoT workflows and cannot be booked through the Appspace web or app views, or plugins. Users attempting to book the resource through these channels will see a message clearly explaining that it is unavailable because it must be reserved through IoT-based interactions. This ensures IoT-managed spaces are available to and governed exclusively by sensor-driven or device-based interactions.
- Lock resources while reserving
Note
Administrator may now set constraints to ensure that resources are only reserved by one user at a time. Once a resource is locked, it cannot be released until the locking period expires, and other users must wait. The only alternative to release the resource during event creation is to deselect it. The locking period begins when a resource is selected, and even after the event is created, the lock remains until it is manually released, regardless of concurrent reservation rules. If the organizer does not complete the event creation within the locking period, the lock will be automatically released and the resource may be occupied by another user. Lock extensions will apply when the event’s date, time, or time zone is edited.
This constraint only supported on resources created by the Appspace provider.
A checkpoint is a rule designed to provoke interaction with the end-user. Information can be displayed or an acknowledgment may be required before a team member can reserve the resource.
How the Checkpoint and Constraint rules work:
- A rule targets specific users or user groups. If no target is selected, the rule applies to all.
- A rule can be applied more than once e.g. the “Restricted Days/Times” constraint applied twice but with different targets. If same targets, the target’s existing rule is overwritten.
- If a user is targeted by multiple rules of the same type, the following logic is applied.
- Priority
- The inherited rule is lower in priority than the direct rule.
- The target user is higher than the target user group that the user belongs to.
- If priority is the same, then the last rule created (sort based on date) is used.
- These rule types are replaced based on priority:
- Min duration, max duration, min book time, max advance book time, capacity.
- These rule types are replaced based on the OR rule:
- Restricted Days/Times
- Priority
Create Constraint Rule
Follow the instructions below to configure constraint rules for any building, floor, zone, or resource:
- In Reservations, click the Resources tab, and select a specific resource, or location to configure the constraint rule.
- To configure a constraint rule on a specific resource, click the resource name from the All Resources listing page.
- To configure a constraint rule on a location (all resources within the location will inherit the constraint rule), click the ellipsis of the selected resource from the location tree in the side panel, and click Edit.
- In the Edit resource window, select the Rules tab to configure the resource rules, or to view inherited rules.
- Click the ADD button or the + icon to create a rule for the resource.
- In the Create Rule window, select Constraint as the Category type. Constraints will be processed when employees search for and attempt to reserve an available resource.
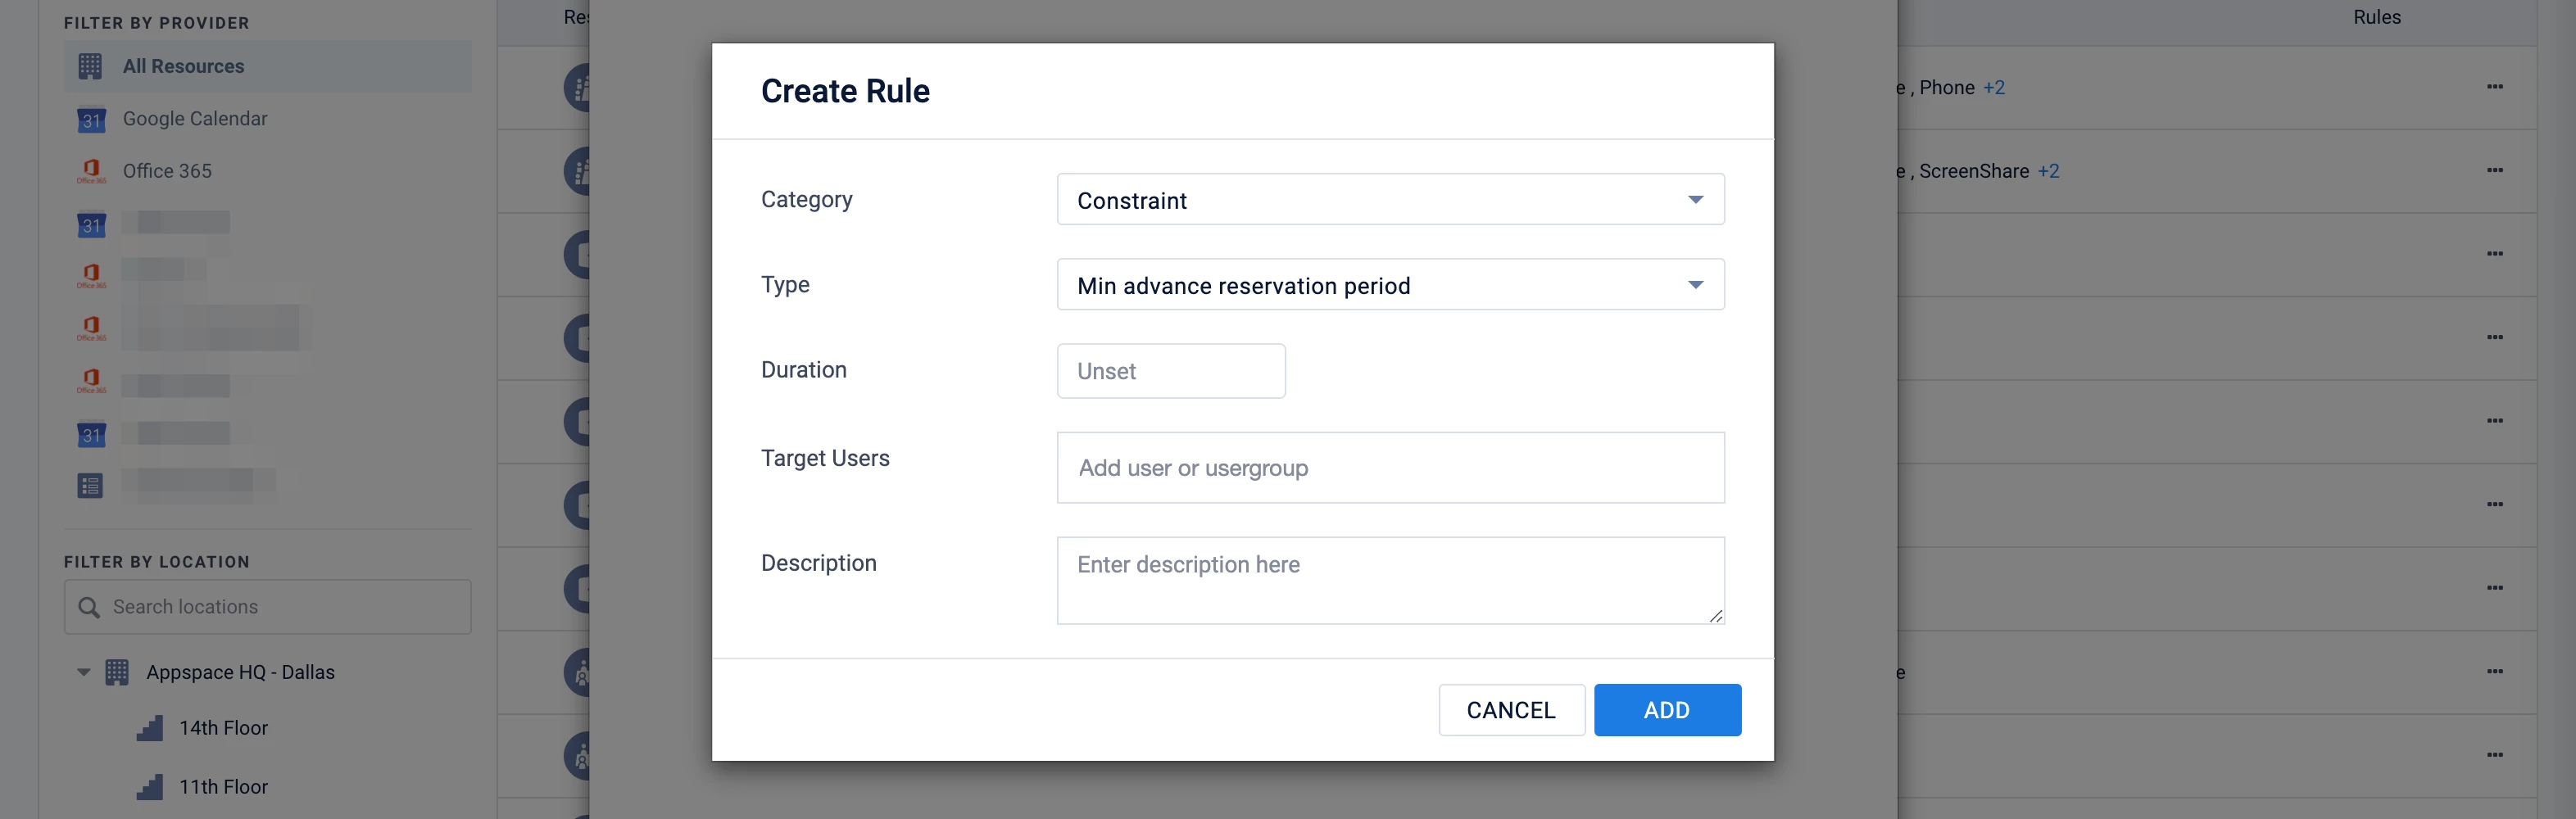
- Select a constraint Type from the drop-down menu, and proceed to configure the constraint fields based on the type selected:
- Allow visitor reservations
- Target Resource – Building
- Allow Visitor Reservations – Slide the toggle to YES to enable visitor reservations, or NO to disable visitor reservations.
Important
Setting Allow Visitor Reservations to NO prevents meeting organizers from inviting external visitors to reservations at the selected building location. This restriction applies to all associated floors, zones, and resources.
- Visitor Check-in Lead Time – Administrators can set the flexibility to define how far in advance a visitor can check in for a scheduled meeting. Leave it to set the default of 1 Hour.
- Target Users – Assign the user or user groups.
- Active Period – Determine the Start and End date based on the UTC time zone.
- Description – Enter the description of the constraint.
- Allow visitor drop-ins
- Target Resource – Building
- Allow Visitor Drop-In – Slide the toggle to YES to enable, No to disable.
- Allow Visitor Drop-In – Slide the toggle to YES to enable, NO to disable. Setting this to NO hides the visitor drop-in screen on the Visitor Kiosk card. Instead, it will only display fields for entering a reservation access code or visitor contact information to search for existing reservations.
- Require Confirmation By – Determine if confirmation is required by the Host or Facilitators.
- Target Users – Assign the user or user groups.
- Active Period – Determine the start and end date.
- Description – Enter the description of the constraint.
- Min / Max advance reservation period, Min / Max reservation duration, or Min duration between reservations
- Duration – Enter the Duration of how long the constraint is.
- Booking Period – Select if the booking period Must Start Before or Must Be Complete By, the advanced reservation period. This field is only available when Max advance reservation period is selected.
- Max capacity
- Capacity – Enter the Capacity value, and select if the value is based on per person or percentage from the drop-down menu. This field is only available when Max Capacity is selected.
- Only available on specific days / times
- Setup Availability – Select the time blocks where reservations will be permitted.
- Recurring reservation limits – Administrators can establish limits for recurring reservations, including setting the maximum number of recurrences, suggesting default recurrence options, and enabling or disabling never-ending recurring events.
- Default Recurrence: How many recurrences will be suggested to users when booking this room.
- Max # of Recurrences: The maximum number of recurrences that will be permitted to be scheduled. Doing it will remove the never-ending option in the reservation panel.
- Max Time period: Define for how long a recurrence sequence can span out.
- Concurrent reservation limits
- Administrators can customize the system to limit the number of concurrent users who can reserve Spaces, Rooms, or Points of Interest.
- Mutually exclusive resource reservations – Administrators can define which resource types cannot be booked together (e.g., a user can book a meeting room OR a private office, but not both) under a location (such as a location, building, or floor).
Note
This rule is only available for locations, buildings, or floors. It is unavailable if a resource is selected.
- Target Resource – Set the rule to apply to Rooms, Spaces, and/or Points of Interest.
- Sub-Types – Select one or more specific sub-types that the rule will apply to, or leave the field blank for the rule to apply to all sub-types under the resources selected above.
- Target Users – You can add specific users or user groups that this rule will apply to. Leave the field blank to apply the rule to all users for the location.
- Active Period – Choose the start and end dates during which the rule will be in effect.
- Description – Provide a description for the rule.
- Requires check-in
Note
- If a reservation is created for a resource between the Allow Before time and the event start time, the rule is bypassed and the resource is automatically set to checked-in for the current event.
- If the reservation is set to Office Hours, the reservation will start at the beginning of Office Hours for the resource. Thus the check-in time (Allow Before and Timeout After) will follow the beginning of office hours.
- In a reservation that has more than one resource (multi-resource reservation), the organizer will be able to view the check-in status of all the scheduled resources and will see an asterisk (*) next to their assigned resource. The organizer will also have the option to check in for all resources. Attendees will only be able to check in their assigned resources.
Important
- In a reservation that has more than one resource (multi-resource reservation), if a resource needs to be checked in but isn’t
- The resource will be removed from the event. The organizer and attendees will be notified of this via email.
- In-person attendees assigned to the resource will be converted to virtual attendees.
- The multi-resource event is not affected and the status remains as confirmed.
- If all resources except one have been removed or canceled, and the remaining resource needs to be checked in but isn’t, the event will be automatically canceled. The organizer and attendees (including virtual attendees) will be notified via email.
- Allow Before – Enter the number of minutes the check-in option will be displayed before the reservation starts.
- Check-in Action – Select the action to perform upon check-in.
- None - No action is taken.
- Start Meeting - The reservation starts immediately, and the scheduled start time is updated to reflect the actual meeting start time.
- Timeout After – Enter the number of minutes the check-in option will timeout after the reservation starts.
- Timeout Action – Select the action to perform when the timeout period is reached.
- None - No action is taken.
- Auto Cancel - If the reservation is not checked in before the configured timeout period, the reservation is automatically canceled and the resource is immediately released for booking by others. If the reservation includes a virtual conference link, the link is retained in the calendar. The organizer receives a notification informing them that the reservation was canceled due to a missed check-in, and the auto-cancellation event and timing is recorded in the audit logs for tracking and reporting purposes.
- Auto Check-in - Automatically checks in the reservation when the timeout period is reached.
- Set to Conflict (New) – Sets the resource to Conflicted while keeping the reservation active.
-
Restrict max resource reservations by user
- Max Reservations – Set the number of reservations a user can make, at a time or per day.
- At a time – Set the concurrent limit, restricting how many active bookings a user can hold at any given time.
- Per day– Set a daily limit on the number of reservations per user on a resource type.
- Target Resource – Set the rule to apply to Rooms, Spaces, and/or Points of Interest. This field only appears if the selected target of the rule is higher than a resource (such as a location, building, or floor).
- Sub-Types – Select one or more specific sub-types that the rule will apply to, or leave the field blank for the rule to apply to all sub-types under the resources selected above.
- Max Reservations – Set the number of reservations a user can make, at a time or per day.
- Visitor multi check-in/check-out
Note
Administrators may set a constraint (only at the building level) for hosts and facilitators to allow visitors to check-in and check-out multiple times throughout the duration of the event, using the same QR code/code. The host is notified whenever a check-in/check-out action is done. This rule ends when the set active period is ended, regardless of having a check-in or check-out pending. After the period is ended the host is notified of users who have not completed their pending check-ins or check-outs.
- Target Resource – This is set as Building.
- Visitor multi check-in/check-out – Enable this option to set the rule.
- Zombie Meetings
Note
Administrators may set a constraint to auto-delete or send a notification to the meeting organizer when zombie meetings occur, with the option to set when the constraint will be triggered (i.e. cancellation of multiple consecutive meetings after X number of times). Thus, when an organizer sets recurring meetings, but does not check-in resulting in auto-cancellation for that date, and this is repeated X number of times for the same meeting, then all the recurring meetings are either auto-deleted or a notification is sent to the organizer.
Important
- In a reservation that has more than one resource (multi-resource reservation), if a resource within a multi-resource event hits the maximum number of allowed consecutive misses, resulting in auto cancellation:
- The resource will be removed from the event. The organizer and attendees will be notified of this via email.
- In-person attendees assigned to the resource will be converted to virtual attendees.
- The multi-resource event is not affected and the status remains as confirmed.
- In a multi-resource reservation, if all resources except one have been removed or canceled, and the remaining resource hits the maximum number of allowed consecutive misses, the event will be auto-canceled. The organizer and attendees (including virtual attendees) will be notified via email.
- After – Enter the number of missed consecutive meetings before executing the action.
- Action – Select the action to be taken:
- Auto cancel the recurring event series.
- Send a notification to the organizer.
- In a reservation that has more than one resource (multi-resource reservation), if a resource within a multi-resource event hits the maximum number of allowed consecutive misses, resulting in auto cancellation:
- In-Person QR Code Actions
Note
Administrators may now set constraints to ensure resources are only reserved, checked-in, extended, etc. via QR Code only when the employee is physically at the location.
This constraint only supported on resources created by the Appspace provider.
- Action – Select the action to be taken:
- Create
- Edit / Extend
- Cancel
- Check-In
- End
- Action – Select the action to be taken:
- (New) IoT Managed Resource
Note
Administrators can set this constraint to ensure that the resource is only reservable through IoT workflows and cannot be booked through the Appspace web or app views, or plugins. Users attempting to book the resource through these channels will see a message clearly explaining that it is unavailable because it must be reserved through IoT-based interactions. This ensures IoT-managed spaces are available to and governed exclusively by sensor-driven or device-based interactions.
- Target Resource – Set the rule to apply to Rooms, Spaces, and/or Points of Interest. This option only appears if there are resources under the parent resource, such as a building.
- Active Period – Choose the start and end dates during which the rule will be in effect.
- Description – Provide a description for the rule.
-
Lock resources while reserving
Note
Administrator may now set constraints to ensure that resources are only reserved by one user at a time. Once a resource is locked, it cannot be released until the locking period expires, and other users must wait. The only alternative to release the resource during event creation is to deselect it. The locking period begins when a resource is selected, and even after the event is created, the lock remains until it is manually released, regardless of concurrent reservation rules. If the organizer does not complete the event creation within the locking period, the lock will be automatically released and the resource may be occupied by another user. Lock extensions will apply when the event’s date, time, or time zone is edited.
This constraint only supported on resources created by the Appspace provider.
- Duration – To lock the resource, the duration is limited to one hour.
- Description – Enter the description as a remark.
- Allow visitor reservations
- In the Target Resource drop-down menu, select the location or resource type the constraint rule applies to. Multiple locations or resource types may be selected from the drop-down menu. This field is hidden if you’re configuring the constraint rule for a specific resource.
- Buildings
- Floors
- Zones
- Rooms
- Sub-Types – You may narrow down the list of resources the constraint rule is applied by selecting the desired Room Sub-type from the drop-down menu.
- Spaces
- Sub-Types – You may narrow down the list of resources the constraint rule is applied by selecting the desired Spaces Sub-type from the drop-down menu.
- In the Target Users field, enter the user or user groups the constraint rule applies to. This field is hidden if Max Capacity is selected.
- In the Active Period calendar field, select the start and end date of the constraint rule duration.
- Enter a Description for the constraint rule.
- Click the ADD button.
- Once a constraint rule has been added, click SAVE in the Edit resource window.
Create Checkpoint Rule
Checkpoints configured here will be displayed to the employee during a reservation or check-in.
You can set the type of checkpoint for the reservation:
- At reservation – the checkpoint rule is set when the reservation is created for the resource.
- On-demand – the checkpoint rule is optional when first creating the reservation and can be added later (but not removed) when editing the reservation. When creating the reservation, these checkpoints will be displayed as options under the Services section. The checkpoint rule is only applicable to the meeting organizer and only the meeting organizer will be able to view these options and receive notifications from the checkpoints.
Types of Checkpoints
You can configure the following checkpoints types:
- Consent – Input the text for a consent form that will be displayed during a check-in/reservation. The employee/visitor must choose to either Accept or Decline the content of this form during a reservation. If the consent form is declined by the employee, they cannot proceed with the check-in/reservation.
- Notice – Input the text for a notice that will be displayed during a check-in/reservation. The employee only needs to read the text and click Done to proceed with the reservation/check-in.
- Form – Include a custom card or a URL (HTTPS recommended) pointing to a form, both with a checklist that returns data for validation. During a check-in/reservation, the checklist form is displayed, and the employee must select the options for each item, and click Submit. If the user does not meet any one of the items listed in the checklist, they cannot proceed with the check-in/reservation.
- Service – During check-in or reservation, a form will appear asking if the employee wants to order food from a catering service menu (which must be set up in the Services module). The Service option is only available At reservation and not for On-demand, and is only for Appspace users.
Note
(New) The employee can select to view either All, Business, or Catering tabs to view available services:
- Order – the employee can select from a list of Business or Catering services to view their request forms or menus, and select items for the reservation / meeting / conference.
- Maybe later – the employee chooses to perform the order later when completing the check-in process. After the checkpoint is completed, attendees will be able to view their own orders and requests.
- No, thank you – The employee does not perform an order from any request form or catering menu. This option is available only if Attendee Compliance for the checkpoint is set to Optional.
Refer to the Complete Service Checkpoint in a Reservation article to see an example.
Note
Multiple checkpoints can be added to any check-in or reservation/booking. During a check-in/reservation, the checkpoints will be displayed in sequence. If the user does not complete a mandatory checkpoint or does not meet one or more of the checkpoints, the check-in/reservation will be declined.
Options for configuration checkpoints on the Room Booking card are as follows:
- Resource checkpoints will only be shown if they match the following conditions:
- Applies to > “All”
- Valid From
- Valid Until
- Active Period
- Inherited checkpoints will only be shown if they match the following conditions:
- Valid From
- Valid Until
- Applies to > “All”
- Target Resources > “Rooms” / “Spaces”
- Active Period
- Sub-Types > applicable only if the resource subtype matches
Follow the instructions below to configure the checkpoint:
- In Reservations, click the Resources tab, and select a specific resource, or location to configure the checkpoint.
-
To configure a checkpoint on a specific resource, click the resource name from the All Resources listing page.
-
To configure a checkpoint on a location (all resources within the location will inherit the checkpoint), click the ellipsis of the selected location from the location tree in the side panel, and click Edit.
-
- In the Edit resource window, select the Rules tab to configure the resource rules, or to view inherited rules.
- Click the +Add Rule button to create a rule for the resource.

- In the Create Rule window, select Checkpoint as the Category type. Checkpoints will be processed and displayed to the employee during a reservation or check-in.
- Select when the Checkpoint should be displayed. Default is At reservation.
Note
Setting the Requirement as Service in the next step will set the checkpoint to At reservation.
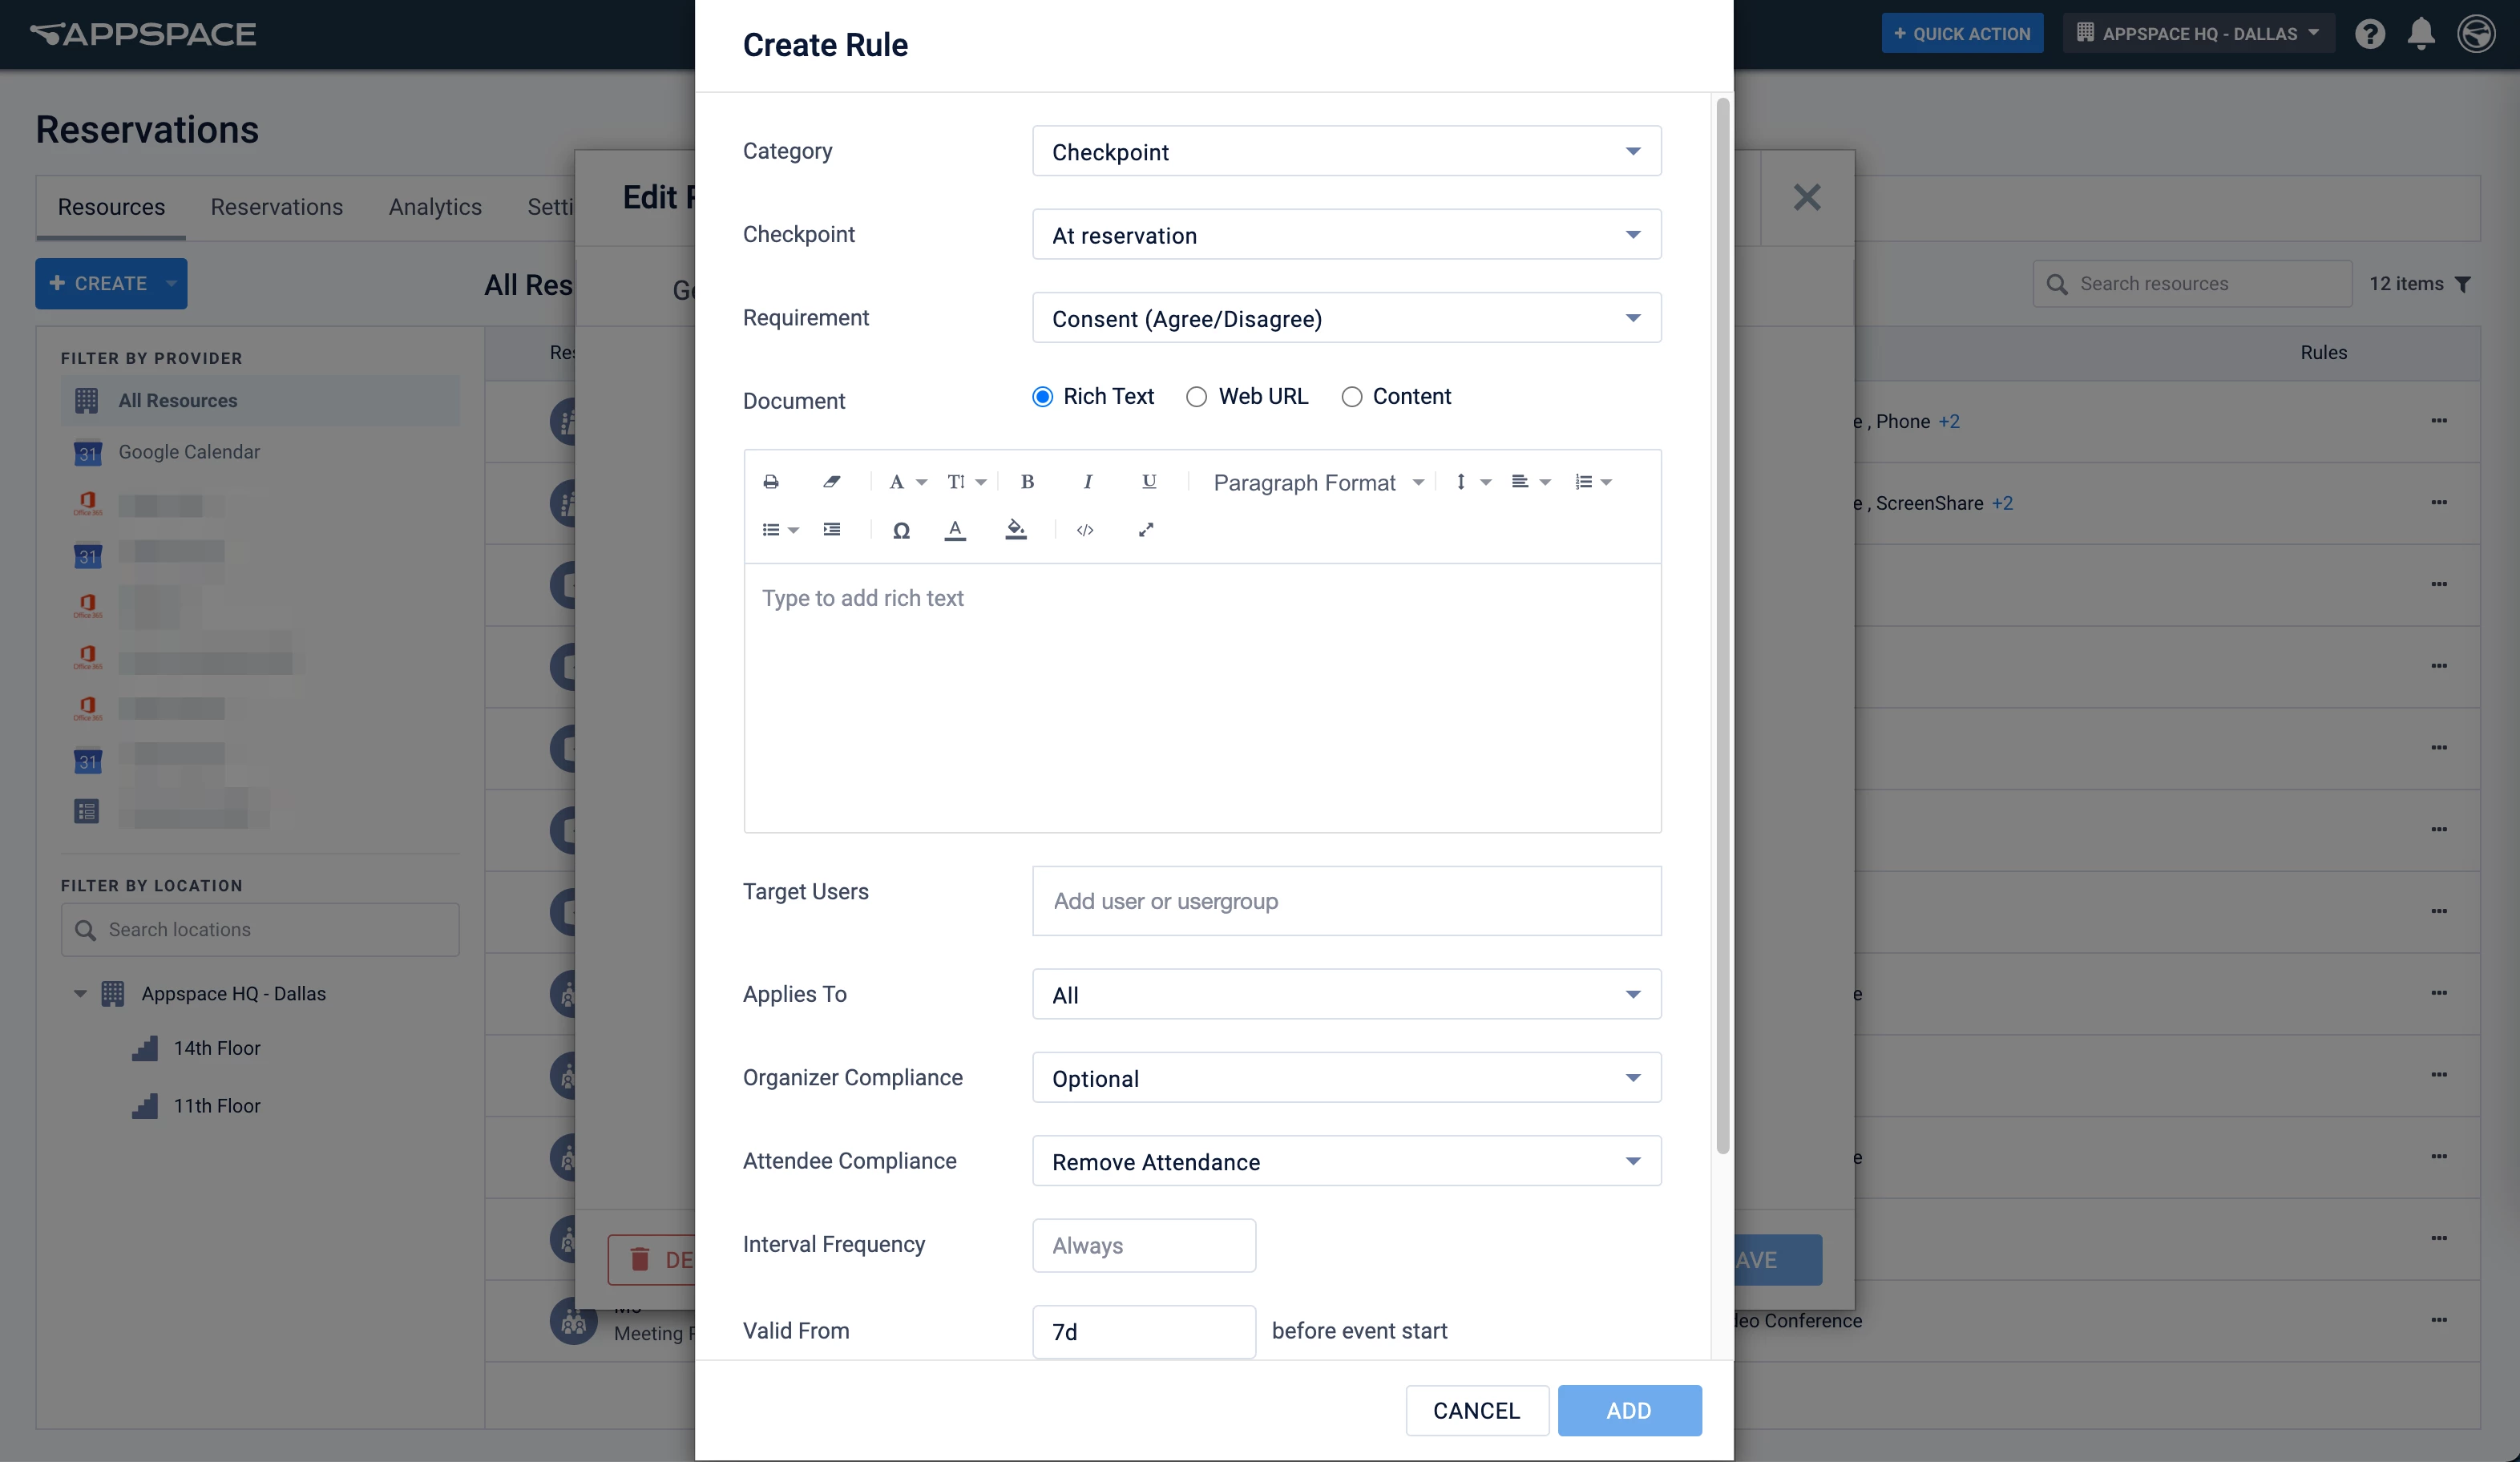
- Select a checkpoint type under Requirement. The employee will need to fulfill this requirement before being able to make a reservation or check-in via (as described above):
- Consent (Agree/Disagree) – The consent form must be declined or accepted by the user before proceeding with check-in/reservation.
- Notice – A notice is displayed to the user. The check-in/reservation will proceed once Done is clicked.
- Form – A validation form is displayed, and the employee must pass the validation to proceed with check-in/reservation.
- Service – A form will appear asking if the employee wants to order from a business or catering service (configured in the Services module). The employee can choose to place the order immediately from a service for the reservation / meeting / conference, or to complete the order later when completing the check-in process. If the checkpoint is set as Optional, the employee can choose to decline to order.
Important
Ensure that a Business Service and a Form, or a Catering Service and Menu have been set up in the Services module and are set as Active if selecting Service in this step.
Note
If Service is selected, skip the next step (Document), and proceed to Step 8 below.
- Select the desired Document format for entering the checkpoint requirement information:
- Rich Text – Enter the desired text using the rich text editor.
- Web URL – Enter the website URL link that would be displayed to the user.
- Content – Select content from the Library that can return a validation such as a Custom Form Card.
Note
- It is recommended that Web URL links are in HTTPS.
- If using the Form option, we recommend using only the Web URL or Content document format at this point. Ensure the Web URL website or Content using a custom card is able to return a Pass or Fail validation in order for the checkpoint to proceed.

- In the Service field, type in and/or select a service (refer to this article on how to first set up a Business or Catering service) from the drop-down. The Service and Form/Menu fields are only available if Requirement is set as Service above.
- If you select a Business Service, proceed to select or type in a form for the Form field.
- (New) Pre-selected by default – Select this option to make the business form mandatory when checking in to a reservation. When enabled, users (meeting organizers and attendees) must complete the business form when checking into the reservation and cannot choose No, thank you or Maybe later.
If the business form is not completed, the reservation will be marked as not checked in. Users (including organizers, attendees, or concierge users) can later Edit their responses, but cannot Cancel them.
- (New) Pre-selected by default – Select this option to make the business form mandatory when checking in to a reservation. When enabled, users (meeting organizers and attendees) must complete the business form when checking into the reservation and cannot choose No, thank you or Maybe later.
- If you select a Catering Service, proceed to select or type in a menu for the Menu field.
- If you select a Business Service, proceed to select or type in a form for the Form field.
- In the Checkpoint Name field, you may provide the name and description of the checkpoint that will be shown during the checkpoint.
- Select the Checkpoint Icon which will be displayed in the Reservations module to represent this checkpoint.
- For Banner image, select a color or upload an image to be displayed at the top of the checkpoint.
- Select Color – Select a background color for the banner of the checkpoint.
- Upload Image – Upload an image to be displayed as the banner of the checkpoint.
- If the Requirement field for the checkpoint is selected as Form or Service above, the Allow Response Editing option is displayed. Select Yes to allow organizers or attendees to edit their respective checkpoint answers after submitting their checkpoints. If Yes is selected, the following options will be displayed:
- Editable Until – Enter the minutes before or after the reservation event is started and select one of the following options.
- After event start – The checkpoint answers are editable for the number of minutes after the event has started. This option is hidden if Service is selected for Requirement above.
- Before event start – The checkpoint answers are editable until the number of minutes before the event starts.
- Editable Until – Enter the minutes before or after the reservation event is started and select one of the following options.
- For Notification, you may add custom notifications for the checkpoint. The notification can be triggered by a set of rules within the checkpoint.
Note
(New) Checkpoint notifications and checkpoint reminder notifications are also sent for reservations created via calendar providers (Microsoft Outlook or Google Calendar) or the Appspace Outlook Add-In.
- Name – Name the notification to identify it in a list within the checkpoint rule.
- Event – Select the event that causes the notification to trigger:
- Checkpoint Passed – The checkpoint was completed successfully.
- Checkpoint Failed – The checkpoint was not completed by the end of the validation period.
- Event Updated – The reservation event was updated by the organizer.
- Event Cancelled – The reservation event was canceled by the organizer.
- Operator – The condition for the notification trigger. Select Contains or Does not contain.
- Labels – Enter labels in the form data that will trigger the notification.
- Notification Type – Select the type of notification:
- User Notification – The notification is sent via Email and/or Enterprise Message. Enter the Users that will be notified below.
- HTTP endpoint – Sends the checkpoint information to a 3rd party HTTP endpoint.
- In the Target Resource drop-down menu, select the location or resource type the checkpoint applies to. Multiple locations or resource types may be selected from the drop-down menu. This field is hidden if you’re configuring the checkpoint to a specific resource, or if Requirement is set as Service above.
Note
In a reservation that has more than one resource (multi-resource reservation), in-person attendees will receive, see and fill checkpoints only for their assigned resources.
- Buildings
- Floors
- Zones
- Rooms
- Sub-Types – You may narrow down the list of resources the checkpoint is applied to by selecting the desired Room Sub-type from the drop-down menu.
- Spaces
- Sub-Types – You may narrow down the list of resources the checkpoint is applied to by selecting the desired Spaces Sub-type from the drop-down menu.
- In the Target Users field, enter the user or user groups the checkpoint rule applies to.
- In the Applies To drop-down menu, select if the checkpoint rule is applied to the following:
- All
- Attendees Only
- Organizers Only
- Select the Organizer Compliance: Optional or Required.
- Select the Attendee Compliance: Optional, Remove Attendance, or Required.
Note
- When Remove Attendance is selected, if the attendee does not complete the checkpoint during a reservation, the attendee will be removed from the attendees list. If completed, a QR code is generated for reservations.
- If Requirement is set as Service above, the Remove Attendance option is unavailable. Selecting Required removes the option to not order a menu item during check-in.
- Select the Attendee Type: All, Appspace Users Only, or Visitors Only. Attendee type is set to Appspace Users only if Requirement is set as Service above.
- The Visitor Types option is available if Attendee Type is selected as All or Visitors Only. Click to select the visitor types that the checkpoint rule will apply to (you can select more than one option).
- In the Interval Frequency field, select days, hours, or minutes. This will determine at which interval or how often you are required to complete the checkpoint document when reserving a resource.
Note
The Interval Frequency, Valid From, and Valid Until fields are not displayed if Requirement is set as Service above.
- In the Valid From field, select the duration in days, hours, or minutes, to determine when the checkpoint is in effect before the start of the event.
- In the Valid Until field, select the duration in days, hours, or minutes, to determine when the checkpoint is in effect after the start of the event, before the start of the event, or after a checkpoint is valid. Ideal for displaying a checklist a few days prior to a meeting.
Note
- Ensure the Valid Until value is less than the Valid From value date to be able to create a checkpoint.
- If the Valid Until value is the same or greater than the Valid From value date, the Valid Until value will be automatically updated to be less than 10 mins from the Valid From value date.
Note
If a reservation is set to Office Hours, the event will start at the beginning of Office Hours for the resource. Thus the time the checkpoint is in effect (Valid From and Valid Until) will follow the beginning of office hours.
- (New) The Preparation time is set based on the same setting for Request Form (Business service) or Menu (Catering service) in the Services module and cannot be changed in this step. This field is only displayed if Service is selected for Requirement above.
- In the Active Period calendar field, select the start and end date of the checkpoint duration.
- Enter a Description for the checkpoint rule.
- Click the ADD button.
- Once a constraint or checkpoint rule has been added, click SAVE in the Edit resource window.
- Proceed to the Create Approval Workflow section if you wish to specify approvers for the resource. Otherwise, proceed to the Configure Resource Permissions section below.
Create Approval Workflow
Approval workflows enable organizations to specify that meeting organizers must go through an approval process when attempting to reserve certain resources (e.g., rooms, workplaces, buildings, or locations). Administrators can configure an approval workflow for a resource similar to a rule/constraint, and assign users or concierge users as approvers for the resource.
Note
- Users must possess premium licenses to be designated as approvers.
- (New) Concierge users must be provided Approve permissions under Reservation Permissions to be able to approve a resource. Refer to Concierge Settings for Reservations.
The approval workflow is started when the organizer creates the reservation for a resource that requires approval. The assigned approver is notified that the reservation is pending approval and can choose to approve the reservation of the resource or decline it.
When the allocation is approved, the resource status is changed from pending approval to reserved. The organizer is notified through email that the reservation is approved.
Follow the instructions below to add and configure approval workflow rules to a resource:
- In Reservations, click the Resources tab, and select a specific resource, or location to configure the approval workflow.
- To configure the approval workflow, click the resource name from the All Resources listing page.
- To configure the approval workflow for a location (all resources within the location will inherit the workflow), click the ellipsis of the selected location from the location tree in the side panel, and click Edit.
- In the Edit resource window, select the Rules tab to configure the resource rules, or to view inherited rules.
- Click the ADD button or the + icon to create a rule for the resource.

- In the Create Rule window, select Workflow as the Category type.
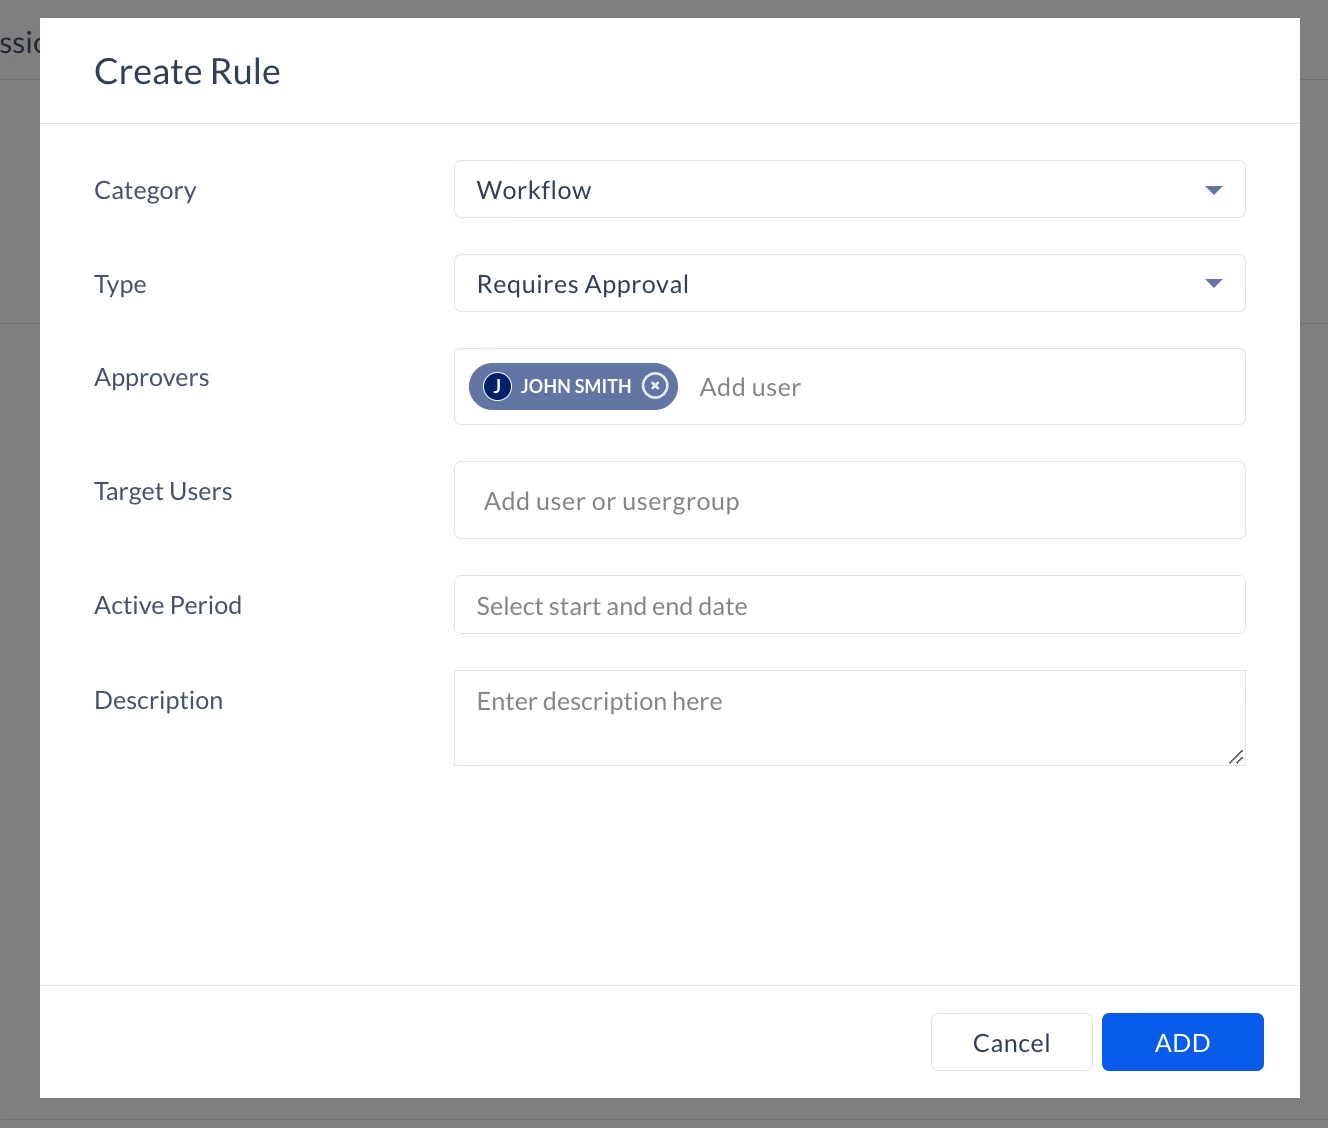
- For Type, leave is as Requires Approval (default).
- In the Target Resource menu, select the location or resource type the approval workflow applies to. Multiple locations or resource types may be selected from the drop-down menu. This field is hidden if you’re configuring the checkpoint to a specific resource.
- Buildings
- Floors
- Zones
- Rooms
- Spaces
- In the Sub Types menu, you may narrow down the list of resources the checkpoint is applied to by selecting the desired Sub-type. This field is hidden if you’re configuring the checkpoint to a specific resource.
- In the Approvers field, assign one or more approvers for the resource. Only users with premium licenses can be assigned to be approvers.
- (New) In the Timeout field, specify the number of days, hours, and minutes before the event starts during which the approver can approve the reservation. Leave this field blank to allow approvals up until the reservation start time.
- (New) For the Timeout Action, specify the action if the approver or concierge does not approve the reservation within the defined timeout period:
Note
If the reservation has resources with different rules, Auto Decline will take precedence over Auto Approve.
- None - The reservation stays in Pending Approval status until the end of the reservation, when the status is auto-changed to Cancelled.
- Auto Approve - If the approver or concierge does not approve the meeting until the selected time, the reservation is auto-approved and will continue.
- Auto Decline - If the approver or concierge does not approve the meeting until the selected time, the reservation is auto-declined and the reservation status is changed to Cancelled.
- (New) For Minor Changes, specify whether to exclude minor updates from re-approval for an already approved reservation. This option ensures that only significant changes to the reservation will require review. You can choose to exclude the following changes from re-approval. Multiple options can be selected:
- Name
- Date(s)
- Start and End Time
- Attendees
- Notes
- Conferencing link
Note
Changing hosts in already approved reservation will not trigger a re-approval.
- In the Target Users field, leave it blank to set it to all users, or enter the user or user groups the checkpoint rule applies to.
- In the Active Period calendar field, leave it blank to set it to always, or select the start and end date of the approval workflow duration.
- Enter a Description.
- Click ADD.
- Once added, click SAVE in the Edit resource window.
Note
Approvers will be notified of their appointment.
Configuration Rule
Organizations managing a variety of resource types often struggle with a one-size-fits-all configuration model. Key settings (such as reservation duration or calendar visibility), are typically applied globally or at the location level, which limits flexibility and can result in configurations that do not align with real-world usage.
Configuration rules allow administrators to define specific configuration options—such as reservation duration, calendar visibility (Free/Busy), and enabling or disabling recurring reservations—at the individual resource level. By creating configuration rules, administrators can apply tailored settings to individual rooms or resources based on their specific use cases, overriding broader system defaults when necessary.
This provides administrators with more precise control over how each room or space functions within the reservation system. As a result, organizations can better align system behavior with the intended purpose of each space, reduce misuse (for example, preventing long bookings in focus rooms), and improve overall reservation efficiency.
Create Configuration Rule
Follow the instructions below to configure configuration rules for a resource.
- In Reservations, click the Resources tab, and select a specific resource from the All Resources list to configure the automation rule.
- In the Edit resource window, select the Rules tab to configure the resource rules, or to view inherited rules.
- Click the ADD button or the + icon to create a rule for the resource.
- In the Create Rule window, select Configuration as the Category type.
- Select an configuration type under Type:
- Reservation Duration – Sets the default duration of the meeting when booking a resource. Use this to change the duration from the default (30min).
- Duration – Set the duration to 15 mins, 30 mins (default), 45 mins 1 hr, 1.5 hrs, 2 hrs, Office hours, All Day, or custom (minimum 5 mins).
- Free / Busy reservations – Set the Show as Busy option to be ON or OFF by default when creating a reservation for the resource. The meeting organizer can still manually toggle this option when creating the meeting. Setting Show as Busy to OFF keeps the calendar open for creating additional reservations during the period, even if an all-day reservation has been made for a resource such as a desk or workplace, for example.
- Set to Default to Busy or Default to Free.
- Recurring reservations – Allows administrators to enable or disable recurring reservations when creating a reservation for the resource.
- Set to YES or NO.
- Reservation Duration – Sets the default duration of the meeting when booking a resource. Use this to change the duration from the default (30min).
- You can expand the Advanced Configuration section and enter a Description for the rule.