

Note
This article is part of a series of articles to help administrators configure the reservation system. Please see the main article for links to all related articles.
Create Resource
Note
This section provides instructions on how to create a single resource. You can also create a Connected Resource, which is a merging of two or more resources (such as rooms or spaces) to allow users to reserve multiple resources as a single, unified area. For steps on how to do that, refer to the Create Connected Resource section below.
Follow the instructions below to create a resource:
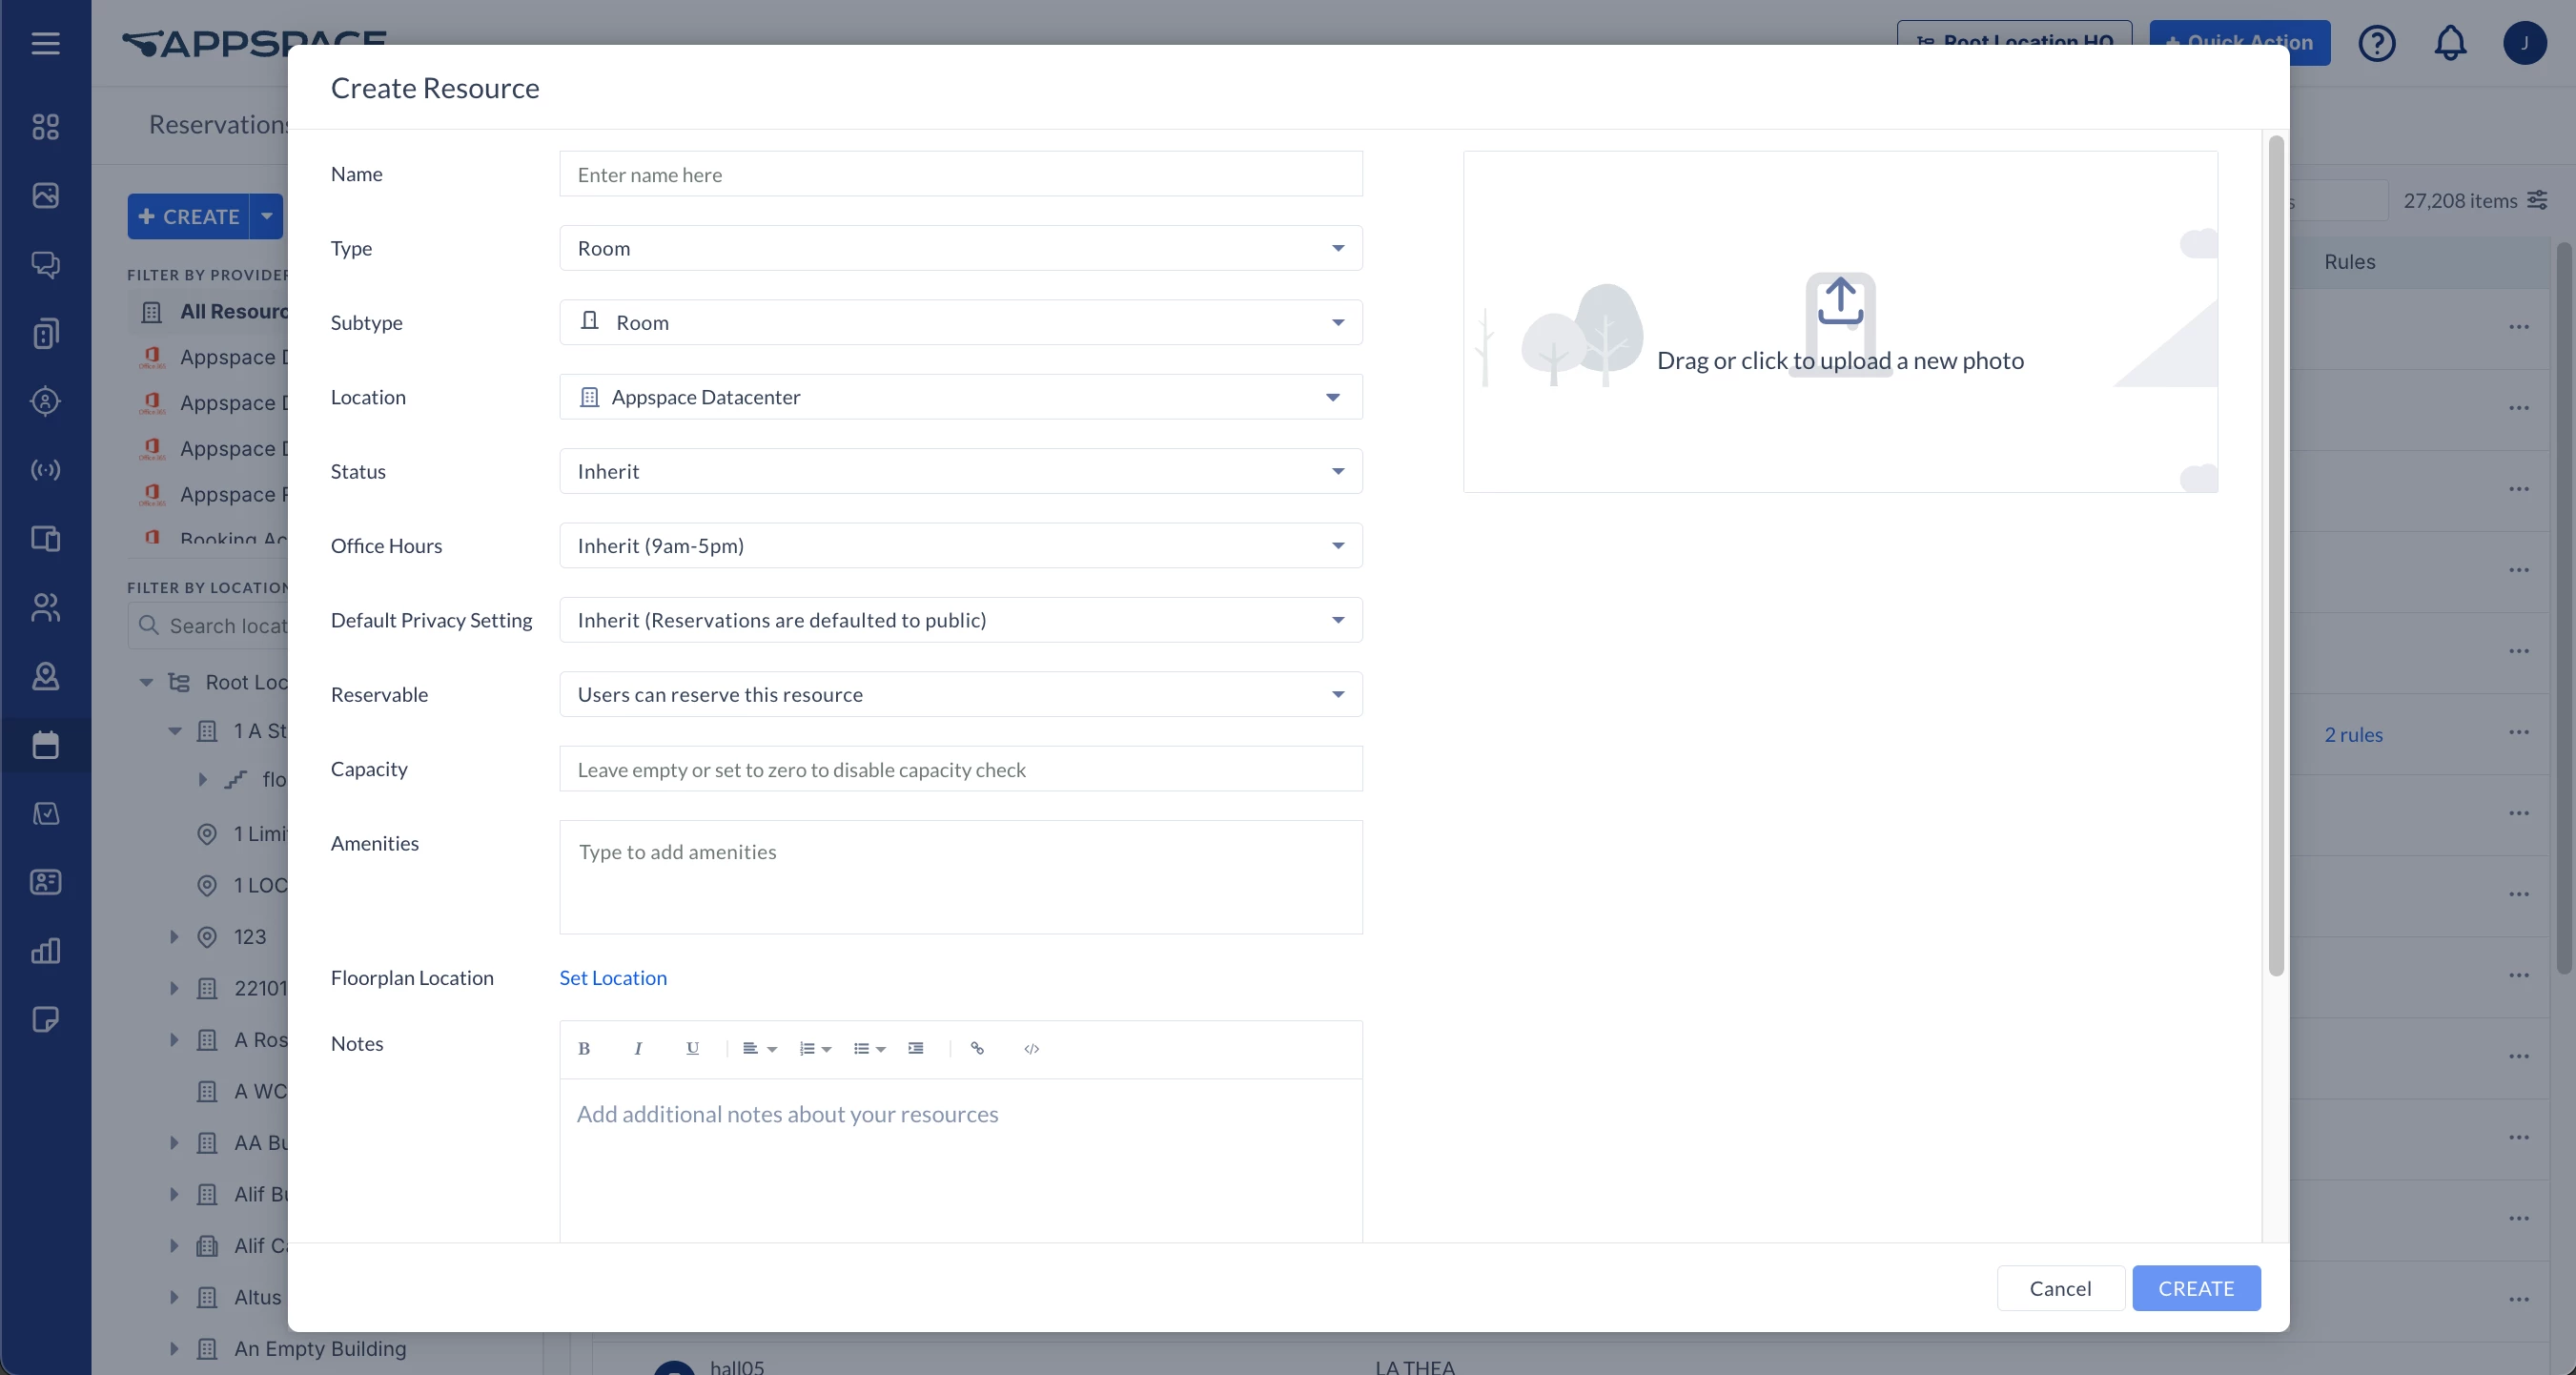
- Select the Resources tab on the Reservations dashboard, click the + CREATE button, and select Create Resource.
-
- Name – Enter a name for the resource.
- Type – Select as Room, Space, POI, or Connected Resource. Refer to the section below for steps on how to create a connected resource.
- Subtype – Select a sub-type for the resource. The options listed differ based on the Type (Room/Space) selected above.
- Location – Select the building, campus, or floor, where the resource is located from the location tree.
- Status – Select the status of the resource i.e. Active, Inactive, Inherit.
Note
Administrators have the ability to set the Floor Status to Inactive, which hides the floor, and corresponding inactive resources from being displayed and listed in the Map in the employee view of the app.
- Office Hours – Set the office hours for the resource. When reserving the resource, you can set the Duration of the reservation to office hours.
- Inherit – The office hours are inherited from the building or location level (parent resource). If there are no office hours to inherit, the setting would default to 9 am to 5 pm.
- Custom – Manually set the office hours for the resource. In the Create Resource window, enter the following details:
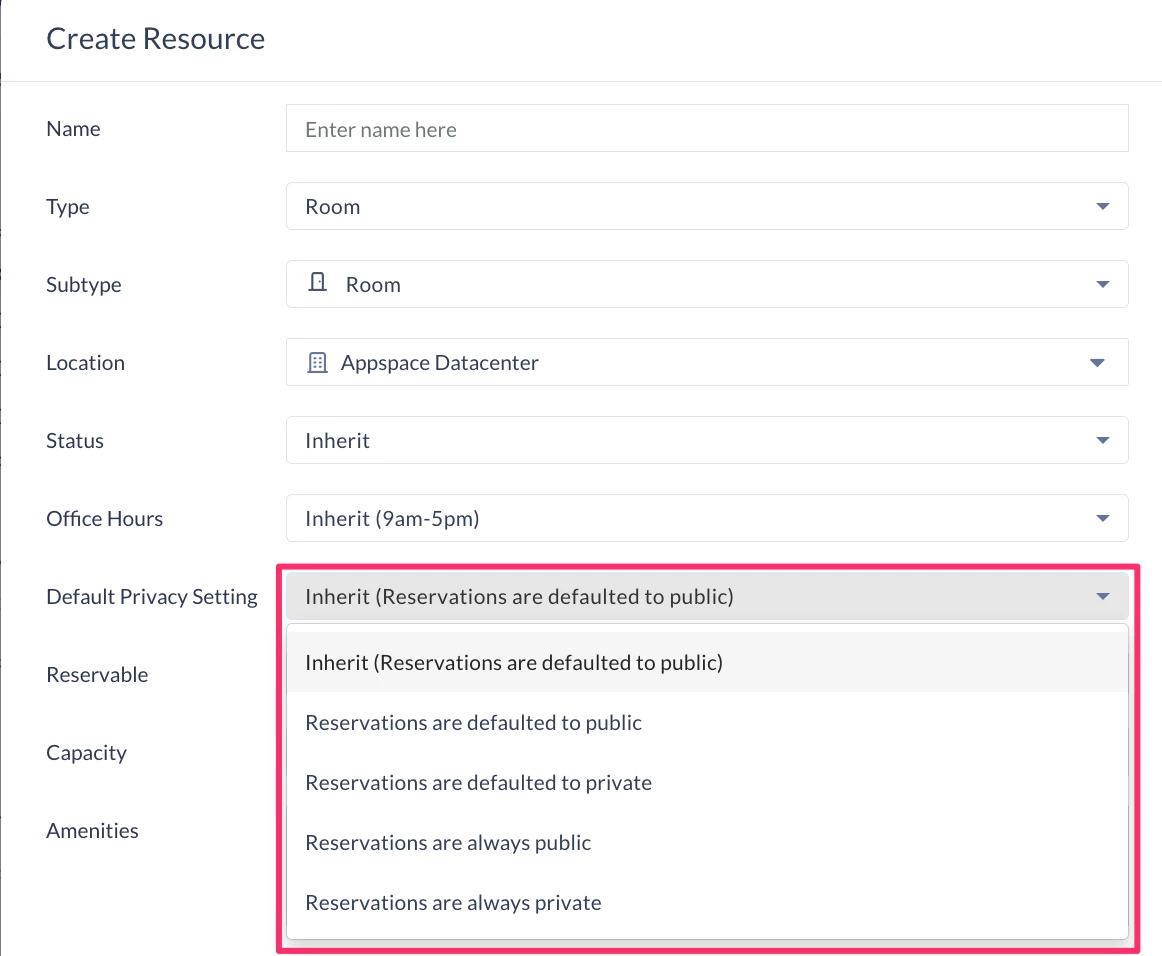
- Default Privacy Setting (New) – Set the privacy of reservations that use this resource.
- Inherit – The reservation privacy setting is inherited from the location, building, or floor level (parent resource). If there is no setting to inherit, the Reservation privacy setting is set to OFF default.
- Reservations are defaulted to public – Reservations are made public (by default), with the option to change the Reservation privacy setting during the reservation process.
- Reservations are defaulted to private – Reservations are made private (by default), with the option to change the Reservation privacy setting during the reservation process.
- Reservations are always public – Reservations are always made public, without the option to change the Reservation privacy setting during the reservation process.
- Reservations are always private – Reservations are always made private, without the option to change the Reservation privacy setting during the reservation process.
- Reservable – If you want this resource to be reservable, slide the slider to YES to enable it. If the resource is disabled (default), users may still view the resource displayed on the map, but will be unable to reserve it. If an external provider is used, this option is disabled by default and follows the external provider’s default configuration settings.
-
- Capacity – Enter the maximum number of attendees that are able to attend or fit in the resource room or space. The Add attendees field will be disabled if the resource capacity has been configured to be equal or less than two (2).
- All Resources – If left unconfigured or blank, it would default to zero (0), and the in-person capacity will not be enforced. When making reservations, users will be able to add one or more in-person attendees to the reservation.
- Desk Resources – If left unconfigured or blank, it would default to one (1), and the in-person capacity of one (1) will be enforced. When making reservations, users will be able to add only one in-person attendee to the reservation.
- Amenities – Type in any amenities that are available in this resource, such as wifi, whiteboards, projectors, etc. Press Enter on the keyboard after each keyword to add multiple words.
- Floorplan Location – Click the Set Location link to identify and select this resource on a map. If there is no floorplan configured prior to this, skip this step now. You may come back and update this section after you Add Reservable Resources to Floorplan.
- Photo – Upload an image of the resource.
- Notes – Enter additional notes regarding the resource.
- The QR Code Settings for the resource is set to Inherit (Enabled) by default, and can be disabled from the drop-down menu.
- (New) The Enforce sub-location management rights option needs to be enabled to allow the assignment of the management of the resource or location for specific location administrators.
- Click the CREATE button.
- To edit or update this resource click the resource name in the Resources tab on the Reservations dashboard.
- Select the General tab to make any edits. See descriptions in Step 2 above for details.
- You may now PRINT or DOWNLOAD the resource QR Code for reservations.
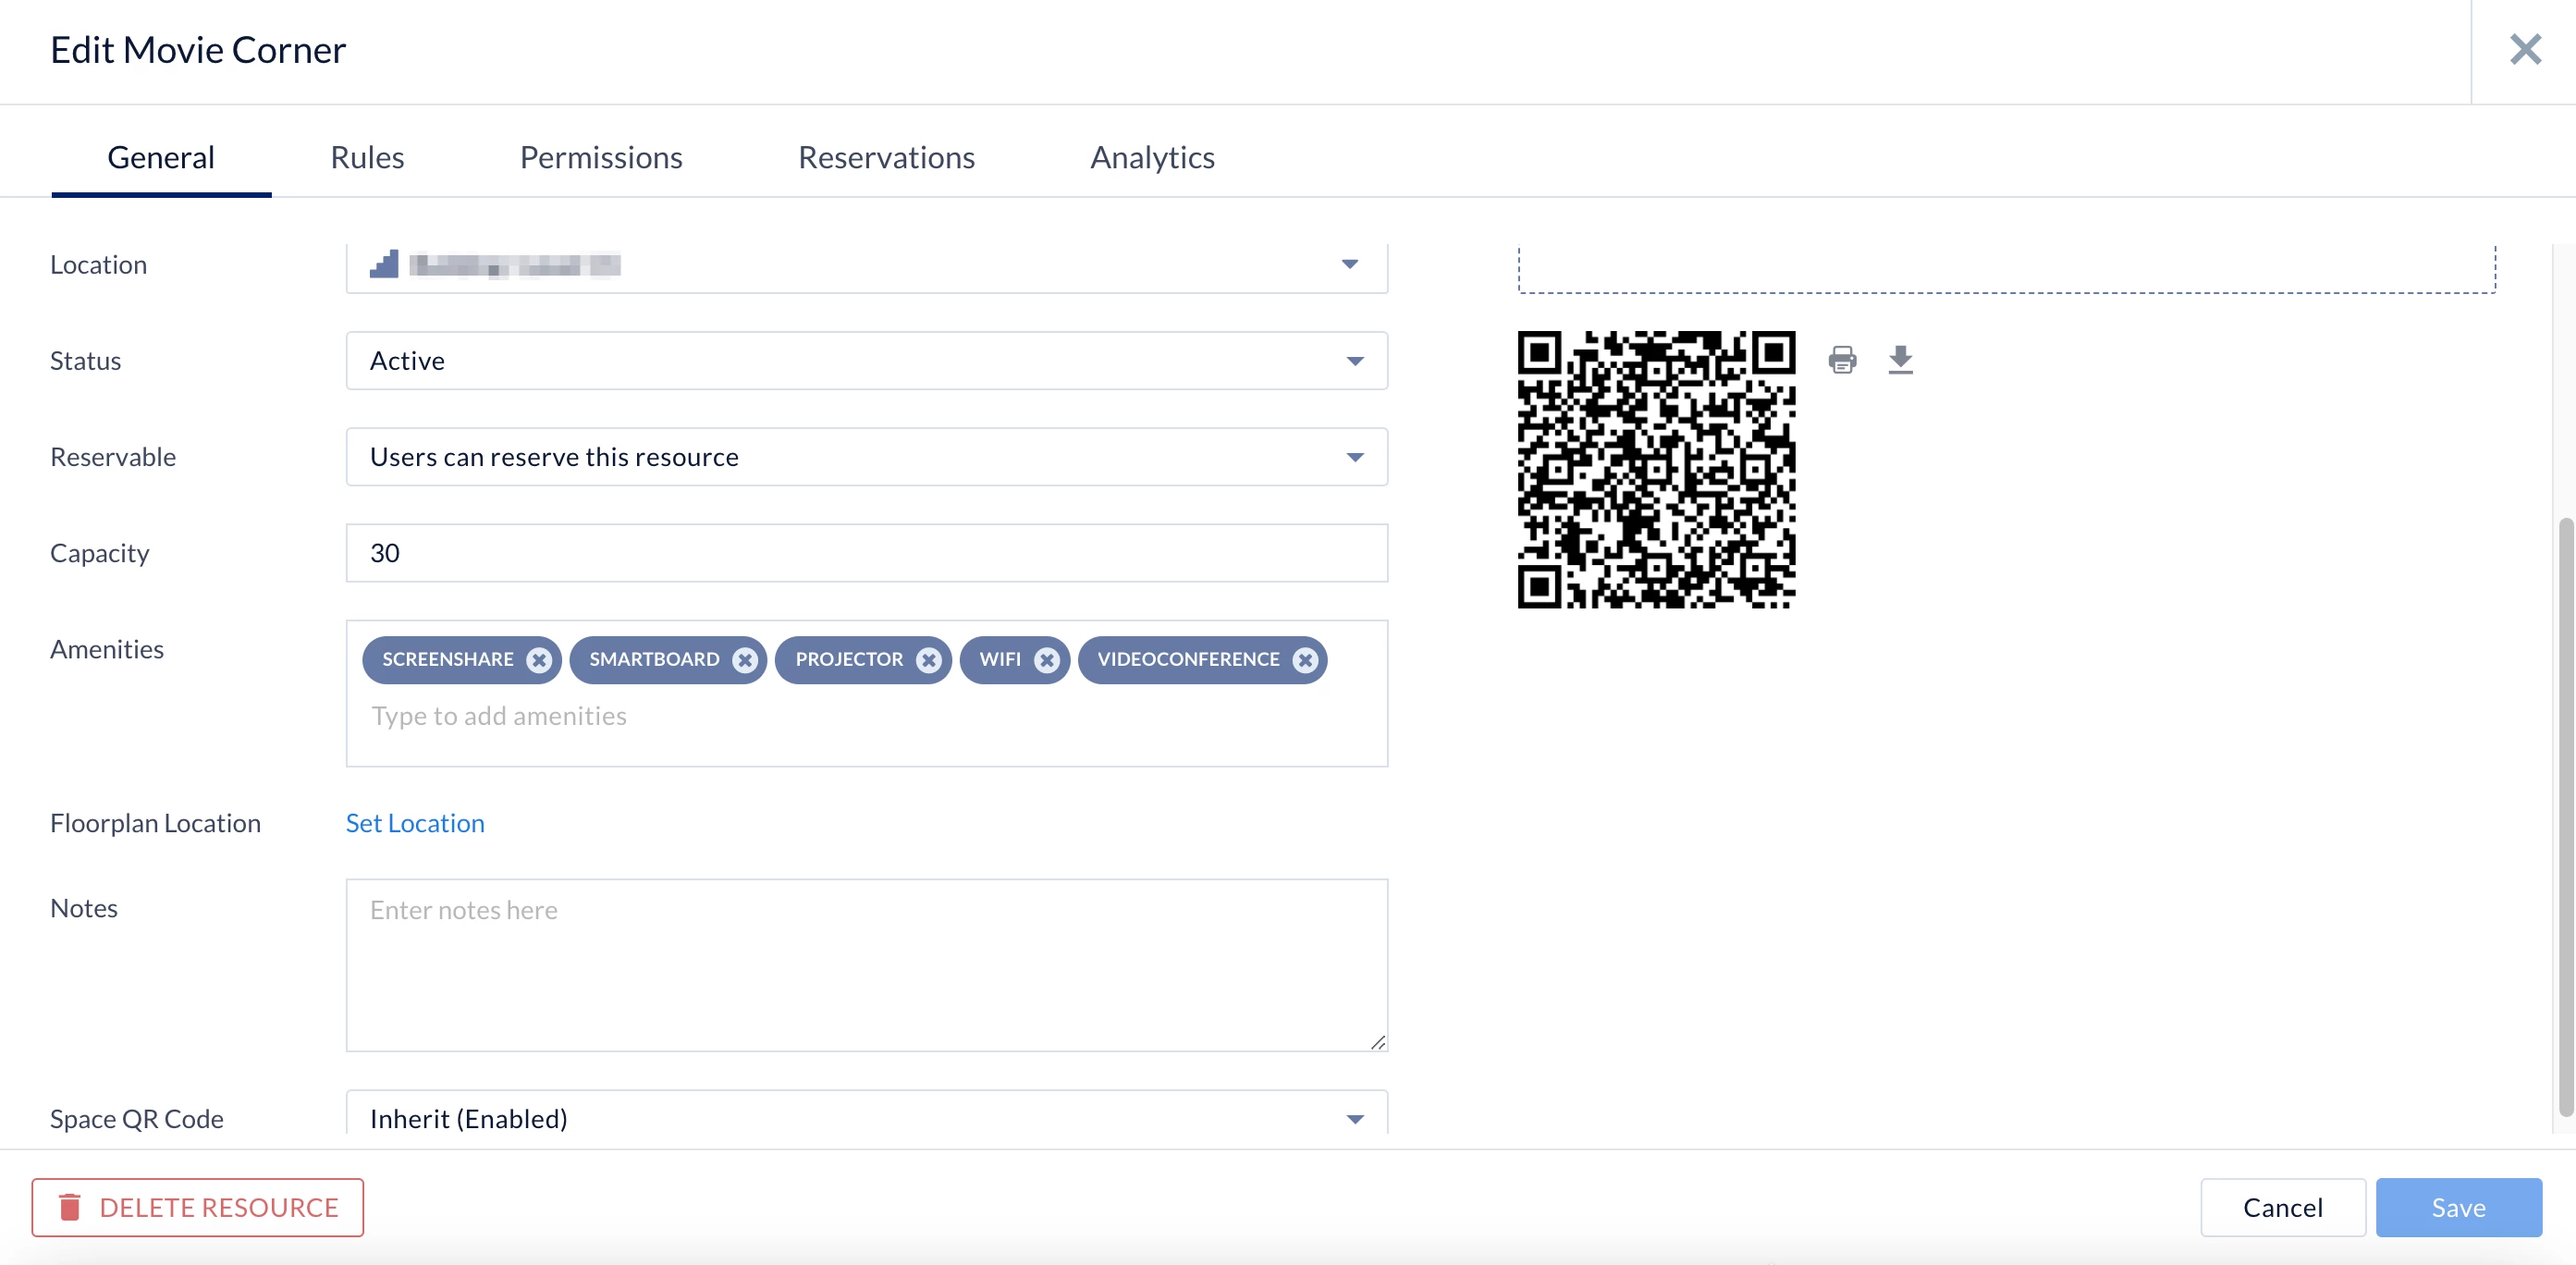
- Click SAVE to make changes.
- Proceed to the Configure Resource Rules section below.
Create Connected Resource
(New) Connected resources allow users to reserve multiple resources as a single, unified area. This functionality is used for accommodating larger numbers of attendees, such as by merging two or more rooms or spaces.
Follow the instructions below to create a connected resource and link resources (such as room, spaces, or POIs) to it:
- Select the Resources tab on the Reservations dashboard, click the + CREATE button, and select Create Resource.
-
- Name – Enter a name for the connected resource.
- Type – Select Connected Resource.
- Location – Select the building, campus, or floor where the resource is located from the location tree.
- Connect – Select the resources that will be linked to the connected resource. This will be known as a linked resource.
Note
- A connected resource can have up to six linked resources.
- A connected resource must be in the same location and/or floor as its linked resources.
- Linked resources (such as rooms, spaces, or POIs) will be removed from a connected resource when:
- The location of either the linked resource or connected resource is changed.
- The connected resource is changed to another type or resource (e.g. room, space or POI).
-
- Continue with the instructions in the Create Resource section above.
Import Resources
What's New
In Appspace 8.7 Cygnus, the Reservation Import functionality now supports importing Points of Interest, resulting in users now being able to import and export all types of resources (Rooms, Spaces, and Points of Interest).
Follow the instructions below to import resources from a .xlsx file:
- Log in to the Appspace console.
- Click Reservations from the ☰ Appspace menu, and click the Resources tab.
- Select the Location you wish to import the resources to.
- Click + CREATE, and select Import Resources.
- In the Import Resources screen, you may drop the resource file containing the resources, or click the Browse link to select the resource file.
- Once the resource .xlsx file has been added, the Import Resources screen will display the summary of resources that will be imported to Reservations. Here, you may identify if the imported resource is a new resource, an update to an existing resource, or if the resource is invalid due to an incorrect value.
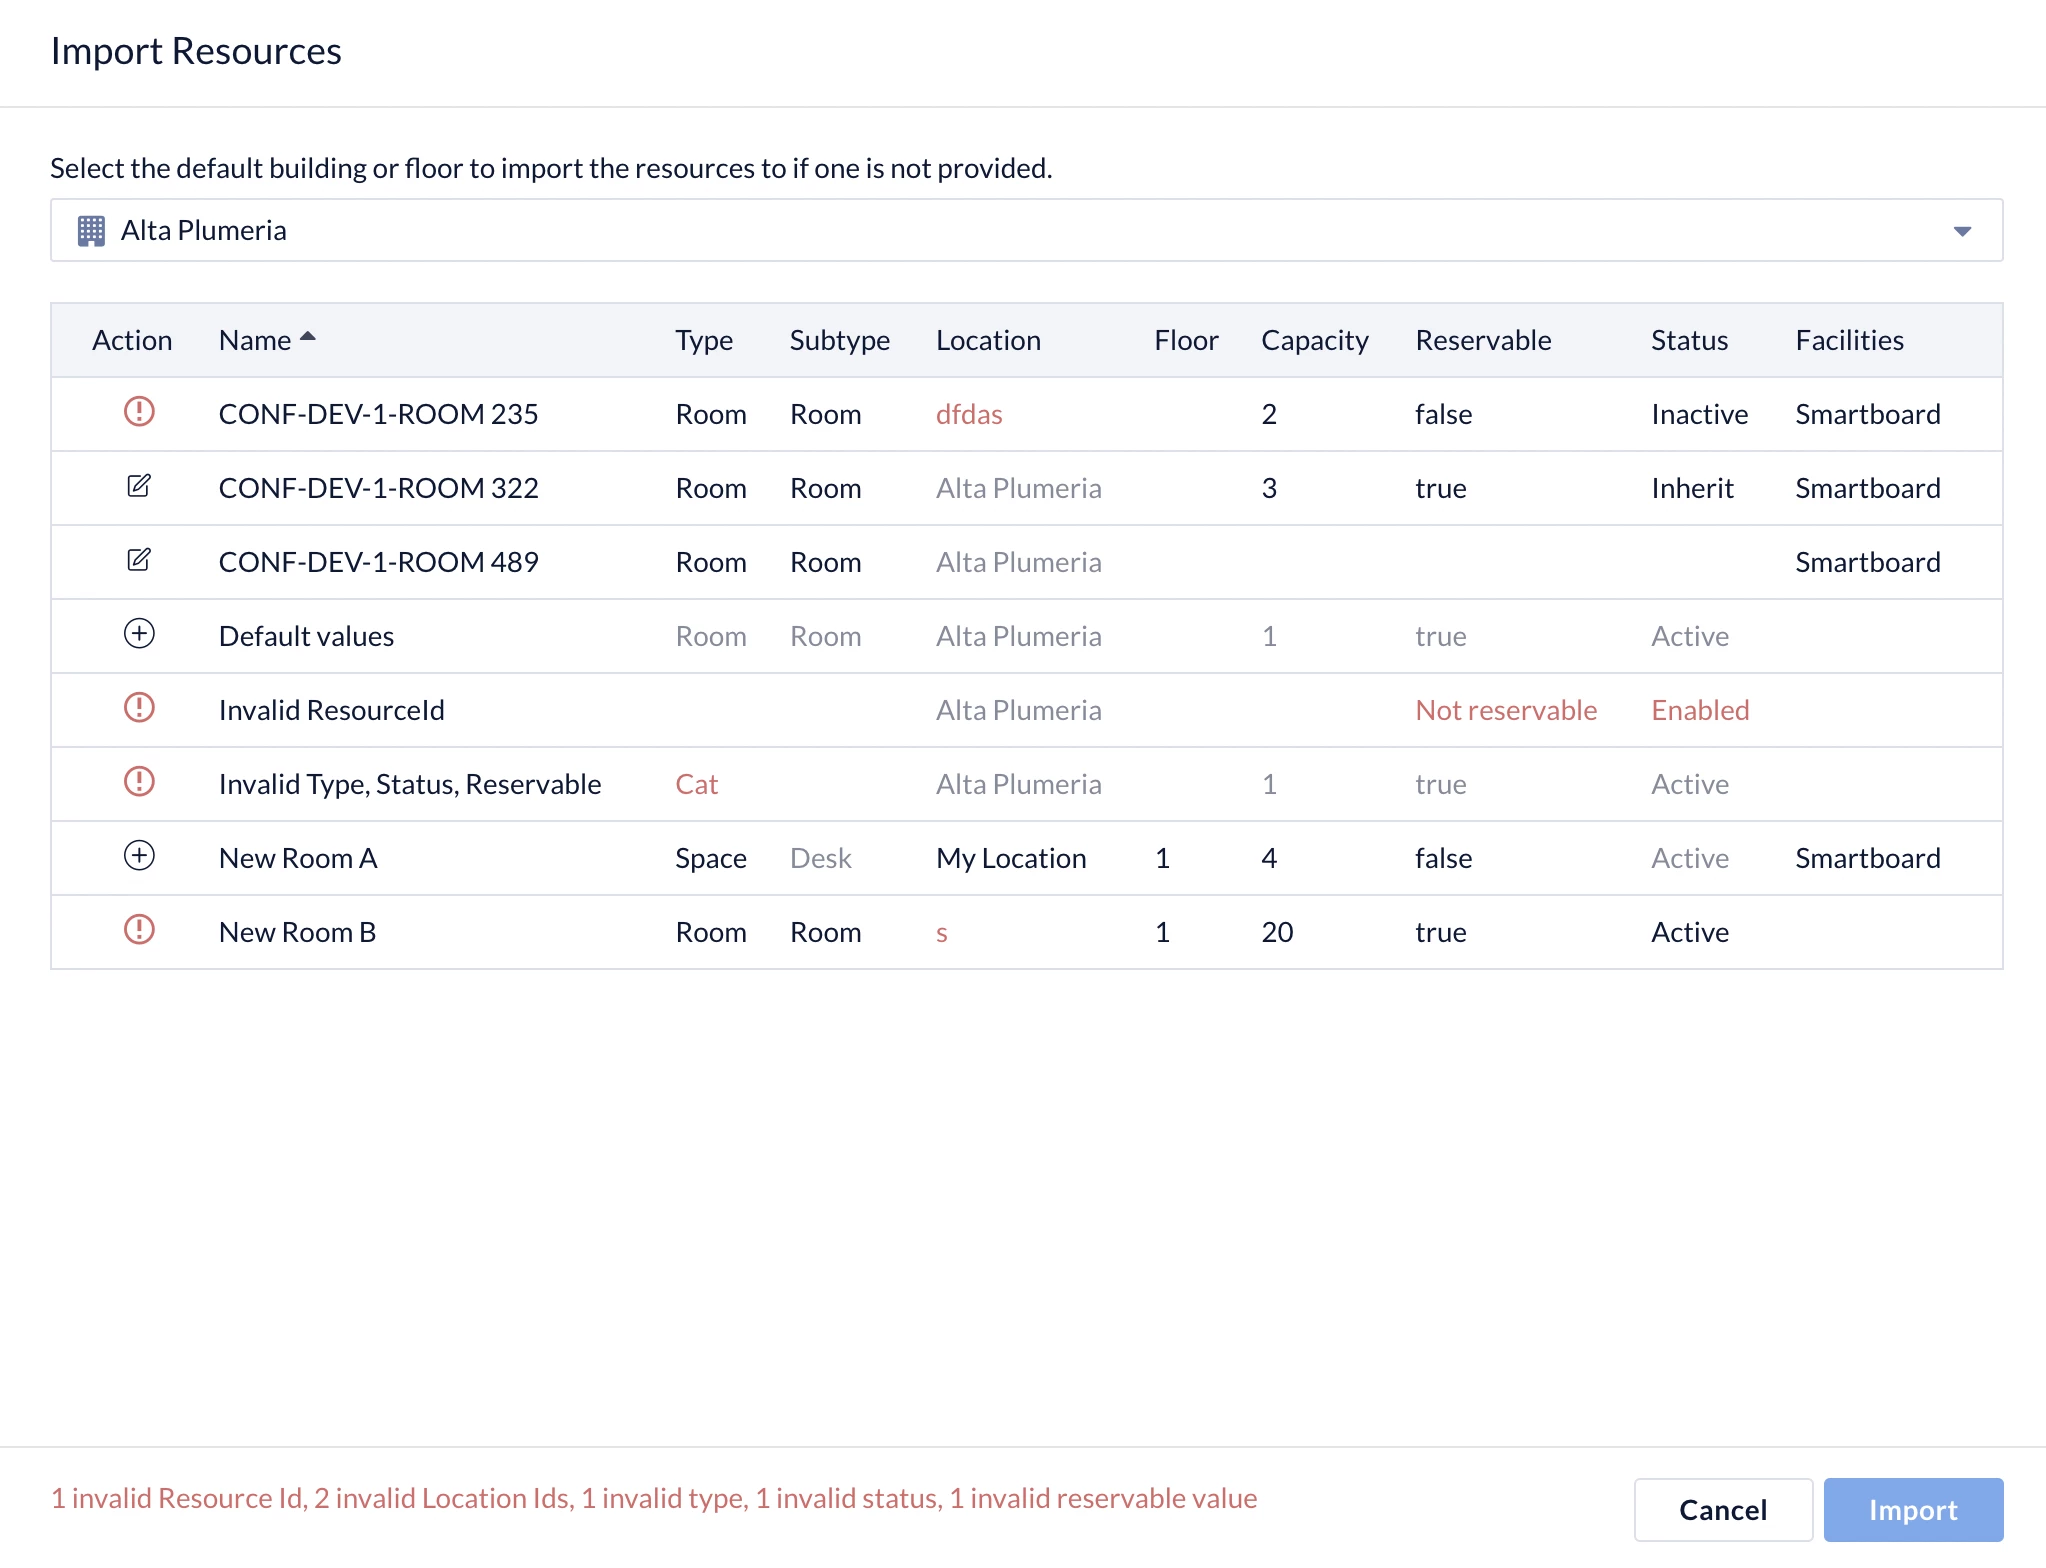
- Proceed to also select the default building or floor from the drop-down menu, to import the resources to, if the Location for the resource was provided in the resource .xlsx file.
- Once done, click Import to confirm importing the resources.
Export Resources
Follow the instructions below to export resources from a .xlsx file:
- Log in to the Appspace console.
- Click Reservations from the ☰ Appspace menu, and click the Resources tab.
- Select the Location you wish to export the resources from.
- Click + CREATE, and select Export Resources.
- The resources file will be automatically downloaded to your default download folder with the .xlsx file extension.
- Listed below are the Resources that may be found in the.xlsx file:
- ID
- Name
- Type
- Subtype
- Location ID
- Location Identifier
- Location Name
- Floor ID
- Floor Name
- Zone ID
- Zone Name
- Status
- Capacity
- Reservable
- Facilities