

This article provides administrators with the instructions to create and manage Services in the Admin Console. The Services module allows for the configuration and management of catering services and catering-related activities, such as planning, ordering, and tracking, within Appspace Reservations.
Note
This article is for navigating the Services module in the Admin Console. For instructions on how to create and modify Business Services and forms, Catering services with menus and categories, and their Workflow states, see this article.
Services enhances Appspace Reservations with a dedicated Catering Management module, offering a complete set of tools for configuring, ordering, tracking, and managing catering services. This module allows users to customize catering orders to suit their preferences, dietary restrictions, and event requirements, allowing them to select menu items, specify quantities, and add special instructions. The module also links with checkpoints to ensure seamless menu selection and ordering within the reservation process, and allows hosts and attendees to track their submitted catering orders.
Prerequisites
- An Appspace Platform user license.
- An active Appspace public/private cloud user account.
- Account Owner or Location Admin role.
- Buildings and locations with floor plan(s) created in Locations for resource mapping.
- Users and user groups.
Services Dashboard
A Service refers to the name or title assigned to a business, restaurant, or food caterer. Once a Service is set up, it can be used to create Service checkpoints to display business request forms, or food catering menus for workplace reservations.
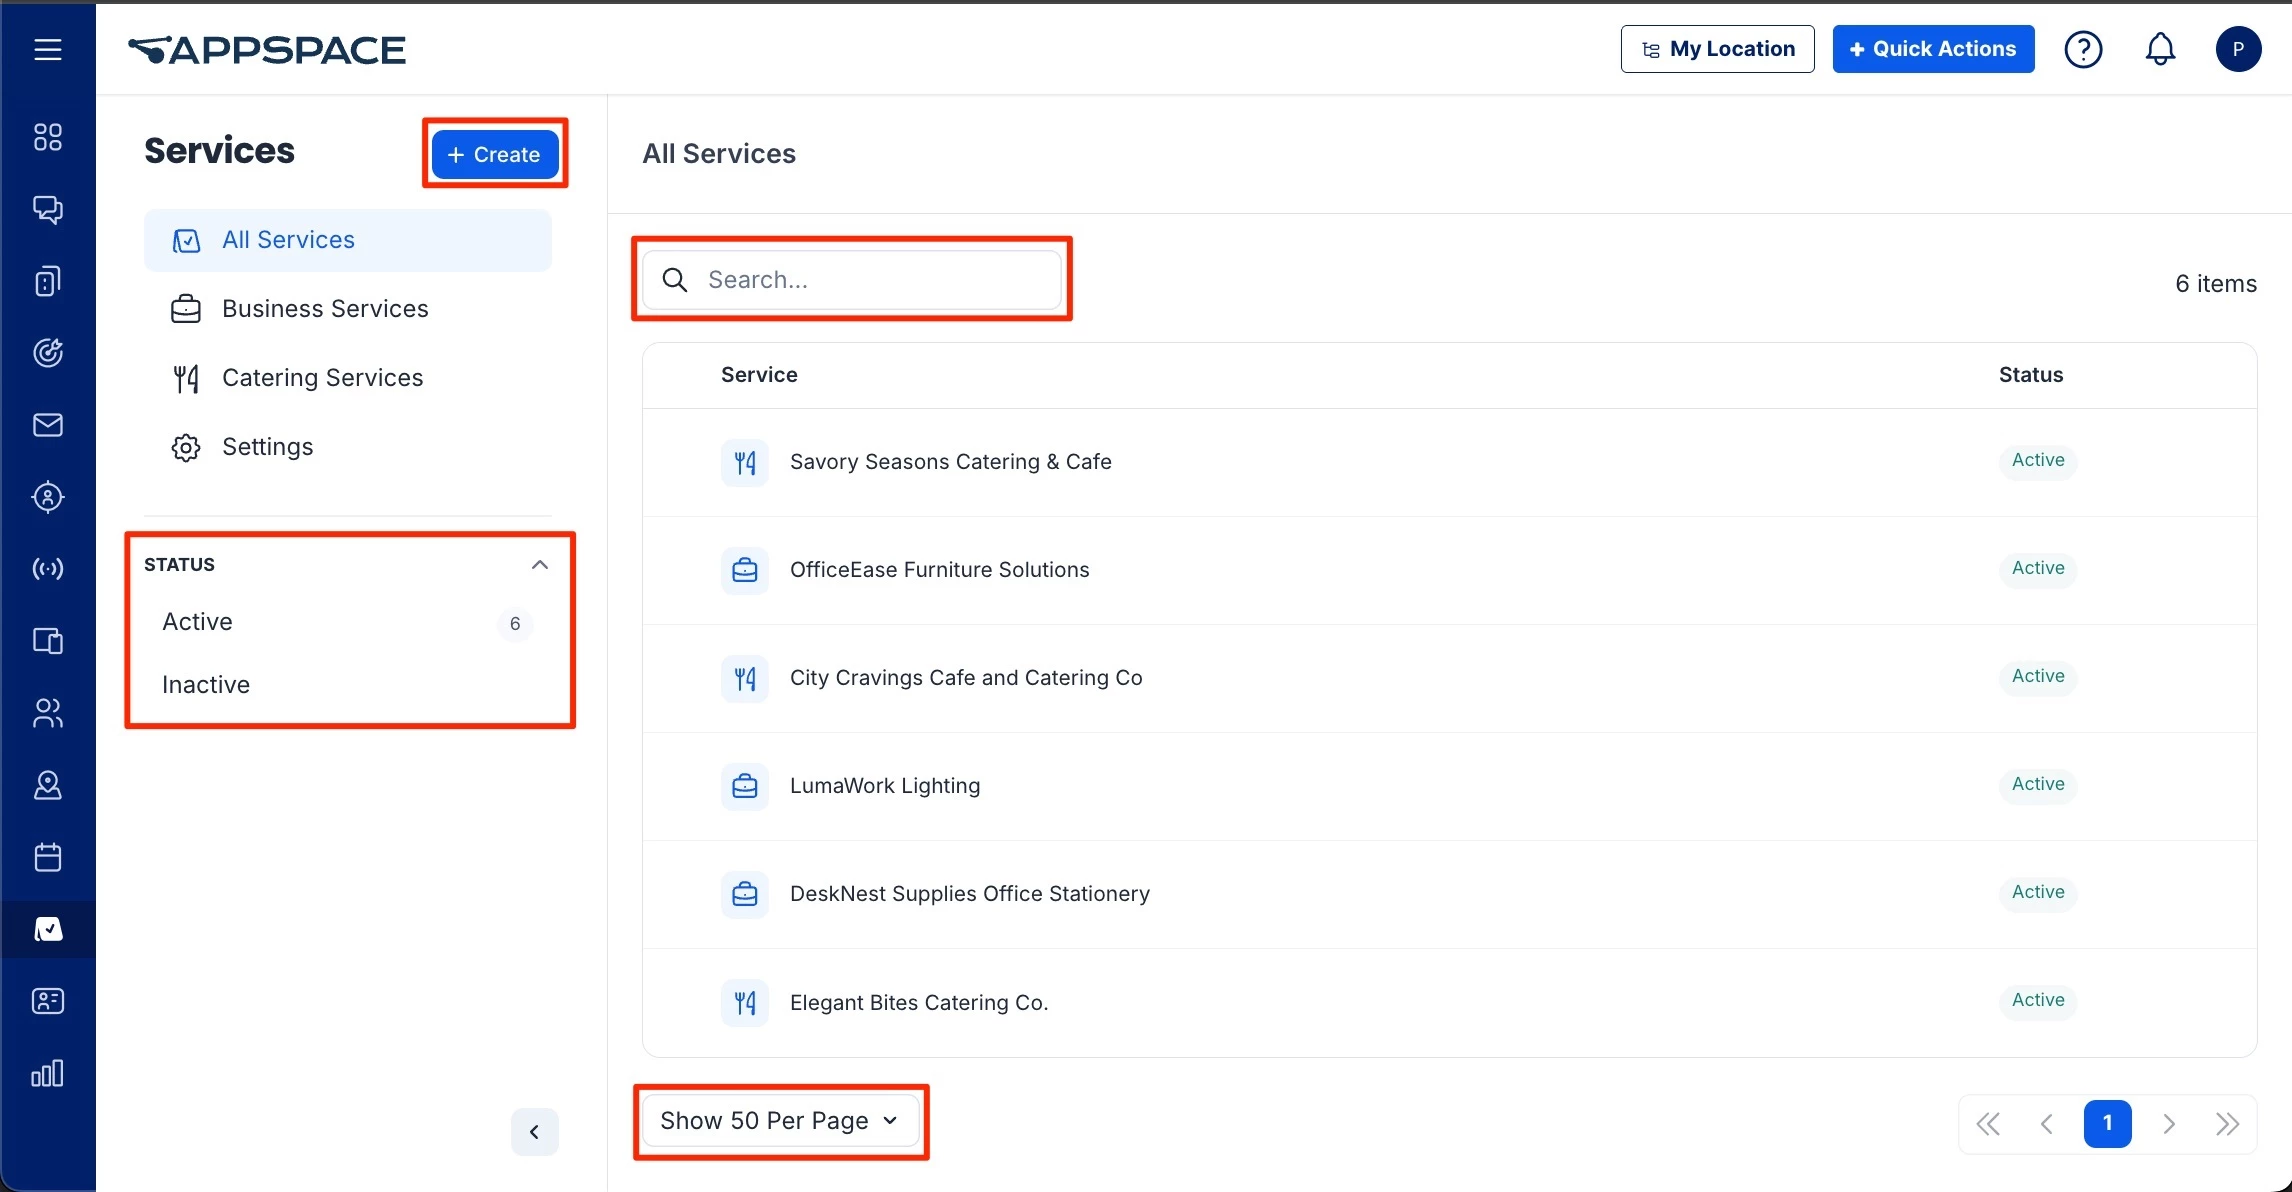
- The Services dashboard can be accessed via the ☰ Appspace menu under Workplace from the Appspace console sidebar. Here, you’ll be able to view, create, and manage services, menus, and categories within the Appspace console.
- The + Create button on the dashboard enables administrators to create a new Service.
- Use the Search field to search across all services by name.
- The Show per page option allows you to set the number of items displayed per page before you need to click Next.
Services Listing
- Select All Services on the Services sidebar to view all the services available, or Business Services or Catering Services to view either only Business Services or Catering Services. The following information and options are displayed:
- Service – Displays the service name or title.
- Status – Displays the status of the service as Active or Inactive. Inactive services and their forms or menus are not available to be set in the services checkpoint or viewed by the employee.
- Ellipsis – Move your mouse over a service and click the ellipsis (…) at the end of the row to perform the following actions:
- Activate/Deactivate – Set the service to active or inactive.
- Edit – Edit the Name and Notes of the service.
- Delete – When you delete a service, you will also delete all forms, sections, or questions (for business services) or menus, menu items, and categories (for catering services) associated with the service. This action cannot be undone.
- Click Settings to view the Workflow page, which displays the States of the ordering process in sequence (refer to the section below).
- Status – Expand the Status section and select the option to view only Active or Inactive services.
Workflow States
A State is used to track the progress of each request from its initial submission through to final completion. Each service request moves through a defined set of states that represent its current status in the order process flow.
The Workflow page allows administrators to create and manage states for the type of service (Catering services or Business services). This ensures that every request follows a clear, consistent process from start to finish. By configuring states to align with catering or business workflows, administrators can ensure that Concierge users, and catering and business services are able to monitor and maintain orders and requests consistently in accordance with organizational requirements.
Refer to the Manage Workspace, Desk, or Room Reservations - Concierge article on how a Concierge user manages the workflow states in an order for a service. To learn how to create a new workflow state, refer to the Note at the top of this article.
- To view the Workflow page, select Settings on the Services sidebar.
- Select the or Business Services or Catering Services tab to view the workflow for only Business Services or Catering Services.
- The Workflow page displays the workflow States of the ordering process in sequence. Each row contains the following information and options:
- State – Displays the state name or title.
- Type – Indicates whether the state is Open (not the end of the process) or Closed (the end/conclusion of the ordering process).
- Sort - Click and drag the Sort (⋮⋮) icon up or down to rearrange the position of the state in the order process flow.
- Ellipsis – Move your mouse over a state and click the ellipsis (…) at the end of the row to perform the following actions:
- Edit – Edit the Name, Color, and Closed status.
- Delete – Delete a state. Once deleted, the state cannot be recovered.
The following default states are configured for each service:
- Catering Services:
- In Progress
- Pending
- Complete
- Canceled
- Business Services:
- Pending
- Complete
- Canceled
Business Services
To view all Business services on the Services listing, select Business Services on the sidebar. Select a Business service to view its forms, items, and settings such as special instructions and checkout fields.
Request Forms – Displayed to the users as an order form. The user can browse items from within the form and select options to make an order.
Settings – Allows you to change settings such as enabling Special instructions, which allow the user to add additional requests for delivery, and Checkout fields which are displayed as additional fields that are displayed during checkout, giving users the flexibility to add additional requirements or requests for orders.
Forms
Request forms are displayed to the employee as an order form during employee check-in when attending a reservation. A Business service (such as a stationery supply company or office furniture supplier) can have more than one type of request form for different types of orders.
To view the Forms section, select a Business service, then the Forms tab. The Forms section lists the menus with the following information and options :
- Request Form – Displays the request form name or title.
- Pricing – Displays the currency for the request form.
- Status – Displays the status of the request form as Active or Inactive. Inactive forms are not available to be set in the services checkpoint or selected by the employee.
- Ellipsis – Move your mouse over a request form and click the ellipsis (…) at the end of the row to perform the following actions:
- Activate/Deactivate – Sets the request form to active or inactive.
- Edit
- Delete – When you delete a request form, you will also delete all questions and settings within the form. This action cannot be undone.
Items
Items are options to select from the request form when an employee checks in for a reservation. To view Items, select a form under the Forms tab. The form will display the items and Sections with the following information and options :
- Item – Displays the name of the item.
- Ellipsis – Move your mouse over an item and click the ellipsis (…) at the end of the row to perform the following actions:
- Edit – Click to view and edit the Question asked for the item, the Description, and the Type of answer and options the user can select.
- Delete
Sections
Sections are items that are grouped under a title within the request form. To view the items within a section, click the arrow (˄) next to the section to expand the section within the form.
- Section – Displays the title of the section. You can edit the section by clicking the following buttons or icons:
- Rename – Renames the section.
- Delete – Deleting the section will also delete all items within it. This cannot be undone.
- Expand – Click the arrow (˄) next to the title to expand the section and view the items under it.
Settings
The Settings tab (within a business service) allows you to change the following settings for the Business service:
Special instructions – enables an additional field which allows the user to add additional requests on all request forms for the Business service. This can be overridden by the settings within the Checkout tab of a form.
Setup Date – enables a field that allows the user to select a date for additional requests for delivery. This can be overridden by the settings within the Checkout tab of a form.
The Checkout section allows you to add checkout fields, which are displayed as additional fields that are displayed during checkout, giving users the flexibility to add additional requirements or requests for orders.
Refer to the following article for instructions on Settings for a service.
Catering Services
To view all Catering services on the Services listing, select Catering Services on the sidebar. Select a Catering service to view its menus, menu items, modifiers, and categories.
Menu – Displayed to the users as a food order form. The user can browse and order menu items from within the menu.
Modifiers – Displayed as additional options within menu items, giving users the flexibility to personalize their orders. For example, a modifier can allow users to specify their preferred spice level of most menu items.
Categories – A method of organizing and grouping certain menu items within a menu. For example, certain menu items can be categorized under Burgers and Wraps.
Menus
Menus are displayed to the employee as a food order form during employee check-in when attending a reservation. A service (such as a restaurant or catering) can have multiple menus.
To view the Menus section, select a Service, then the Menus tab. The Menus section lists the menus with the following information and options :
- Menu – Displays the menu name or title.
- Pricing – Displays the currency for the menu item prices.
- Status – Displays the status of the item as Active or Inactive. Inactive menus are not available to be set in the services checkpoint or selected by the employee.
- Ellipsis – Move your mouse over a menu and click the ellipsis (…) at the end of the row to perform the following actions:
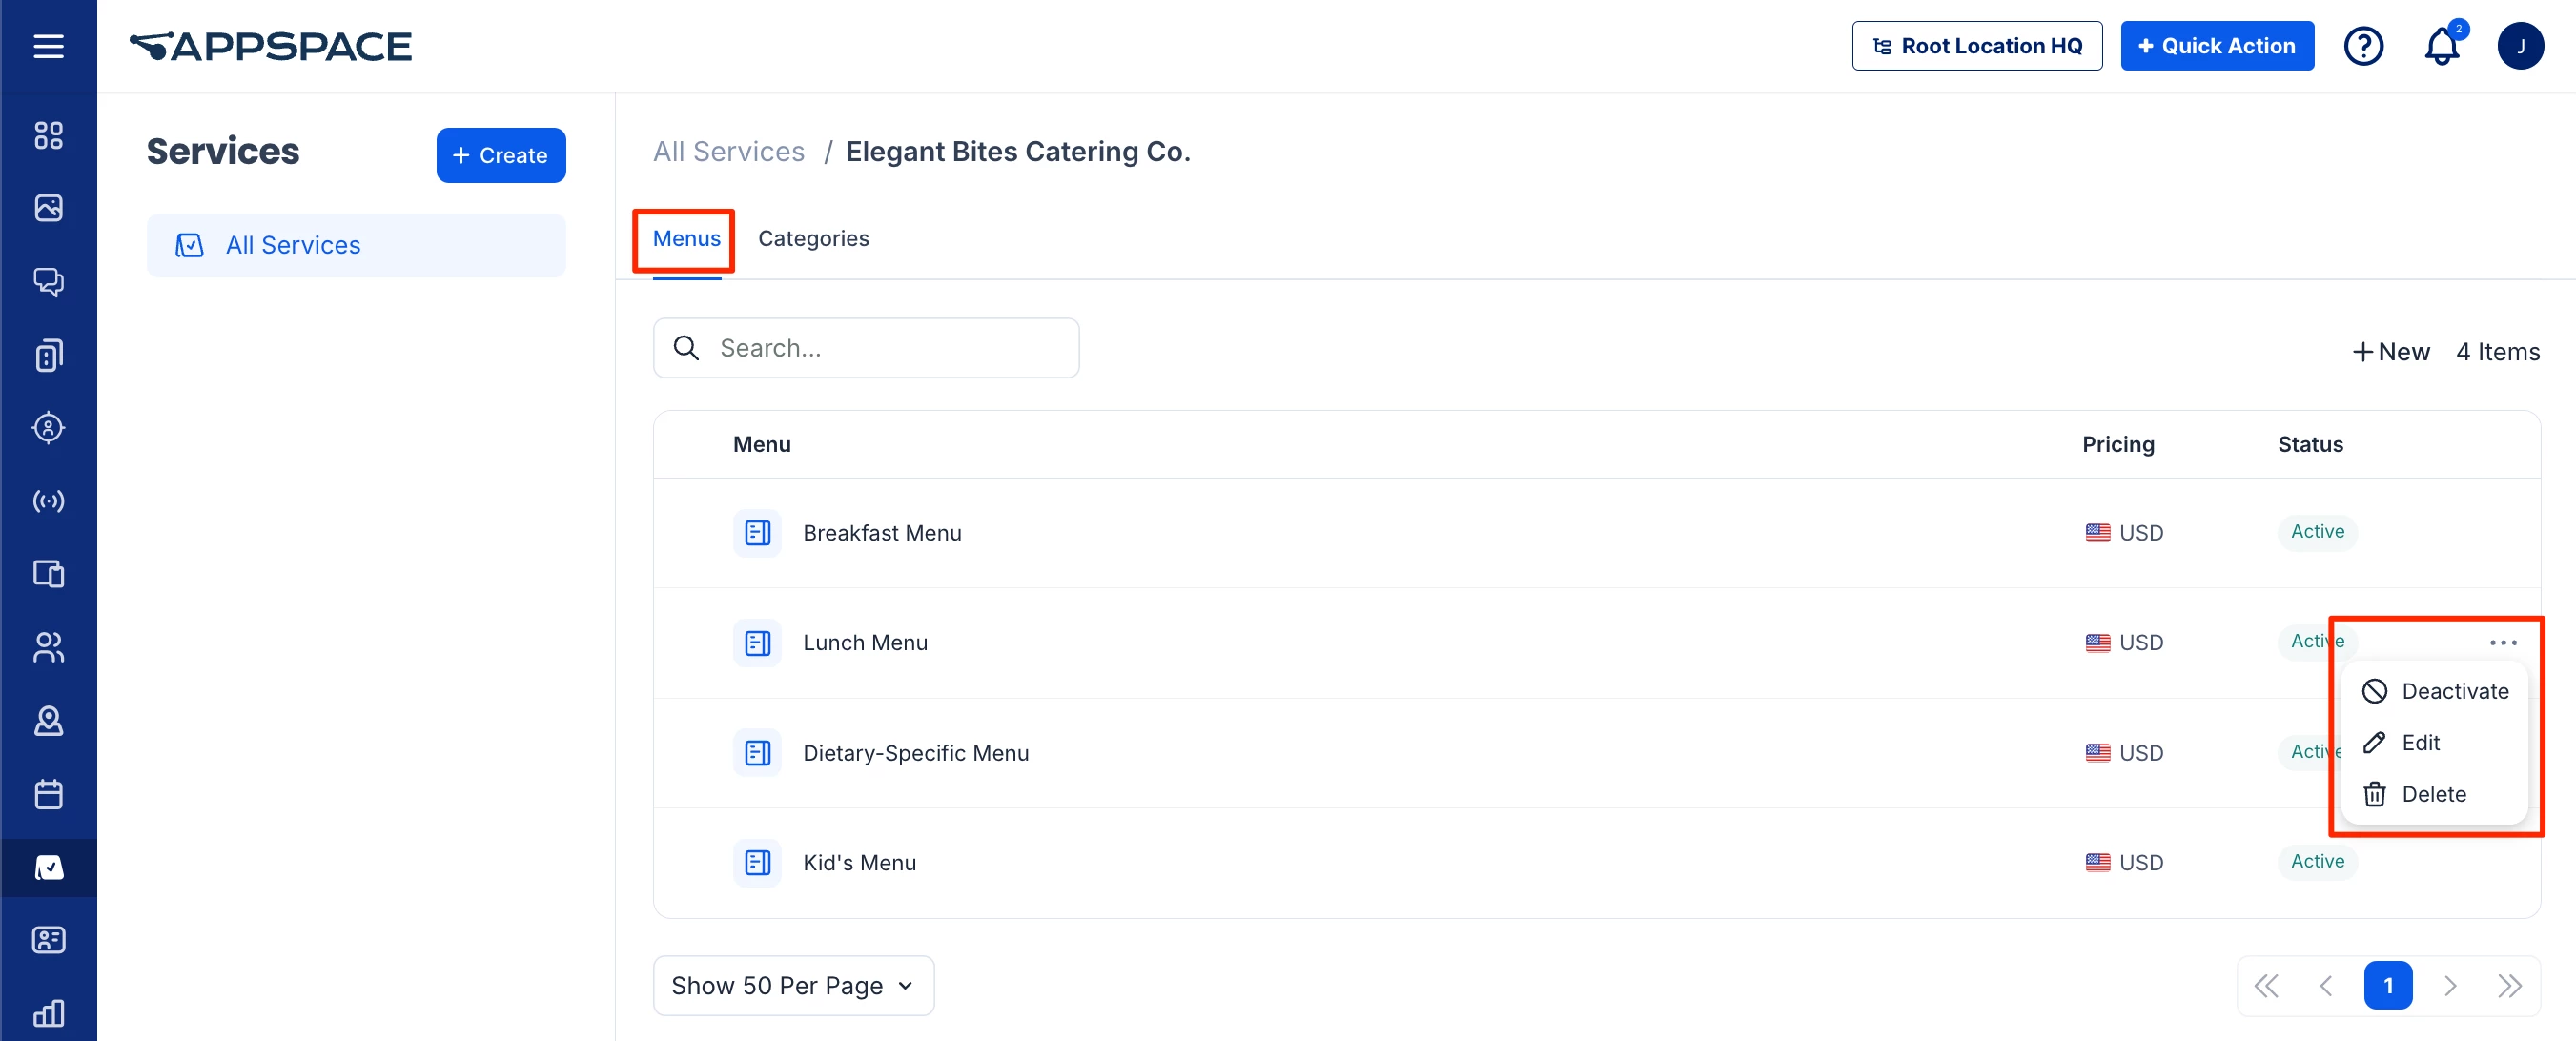
- Activate/Deactivate – Sets the menu to active or inactive.
- Edit
- Delete – When you delete a menu, you will also delete all menu items within the menu. This action cannot be undone.
Menu Items
Menu items are food options to select from the food order form when an employee checks in for a reservation. To view Menu items, select a menu under the Menus tab. The Menu items section lists the menu items grouped by Category with the following information and options :
- Item – Displays the name of the menu item.
- Price – Displays price for the menu item set for the currency in the menu.
- Status – Displays the status of the item as In Stock or Out of Stock.
- Ellipsis – Move your mouse over a menu item and click the ellipsis (…) at the end of the row to perform the following actions:
- In Stock/Out of Stock – Setting as In Stock allows employees to order this menu item in the food order form during reservation check-in. Setting the item as Out of Stock hides the menu item from the order form.
- Edit
- Delete
Modifiers
A Modifier allows users to select additional options within menu items, giving them the flexibility to personalize their orders. Modifiers can be reused across multiple menus and items within a service.
To view the Modifiers section, select a Catering service, then the Modifiers tab. The Modifiers section lists the categories with the following information and options :
- Modifiers – Displays the name of the category.
- Options – Previews the options provided by the modifier.
- Ellipsis – Move your mouse over a category and click the ellipsis (…) at the end of the row to perform the following actions:
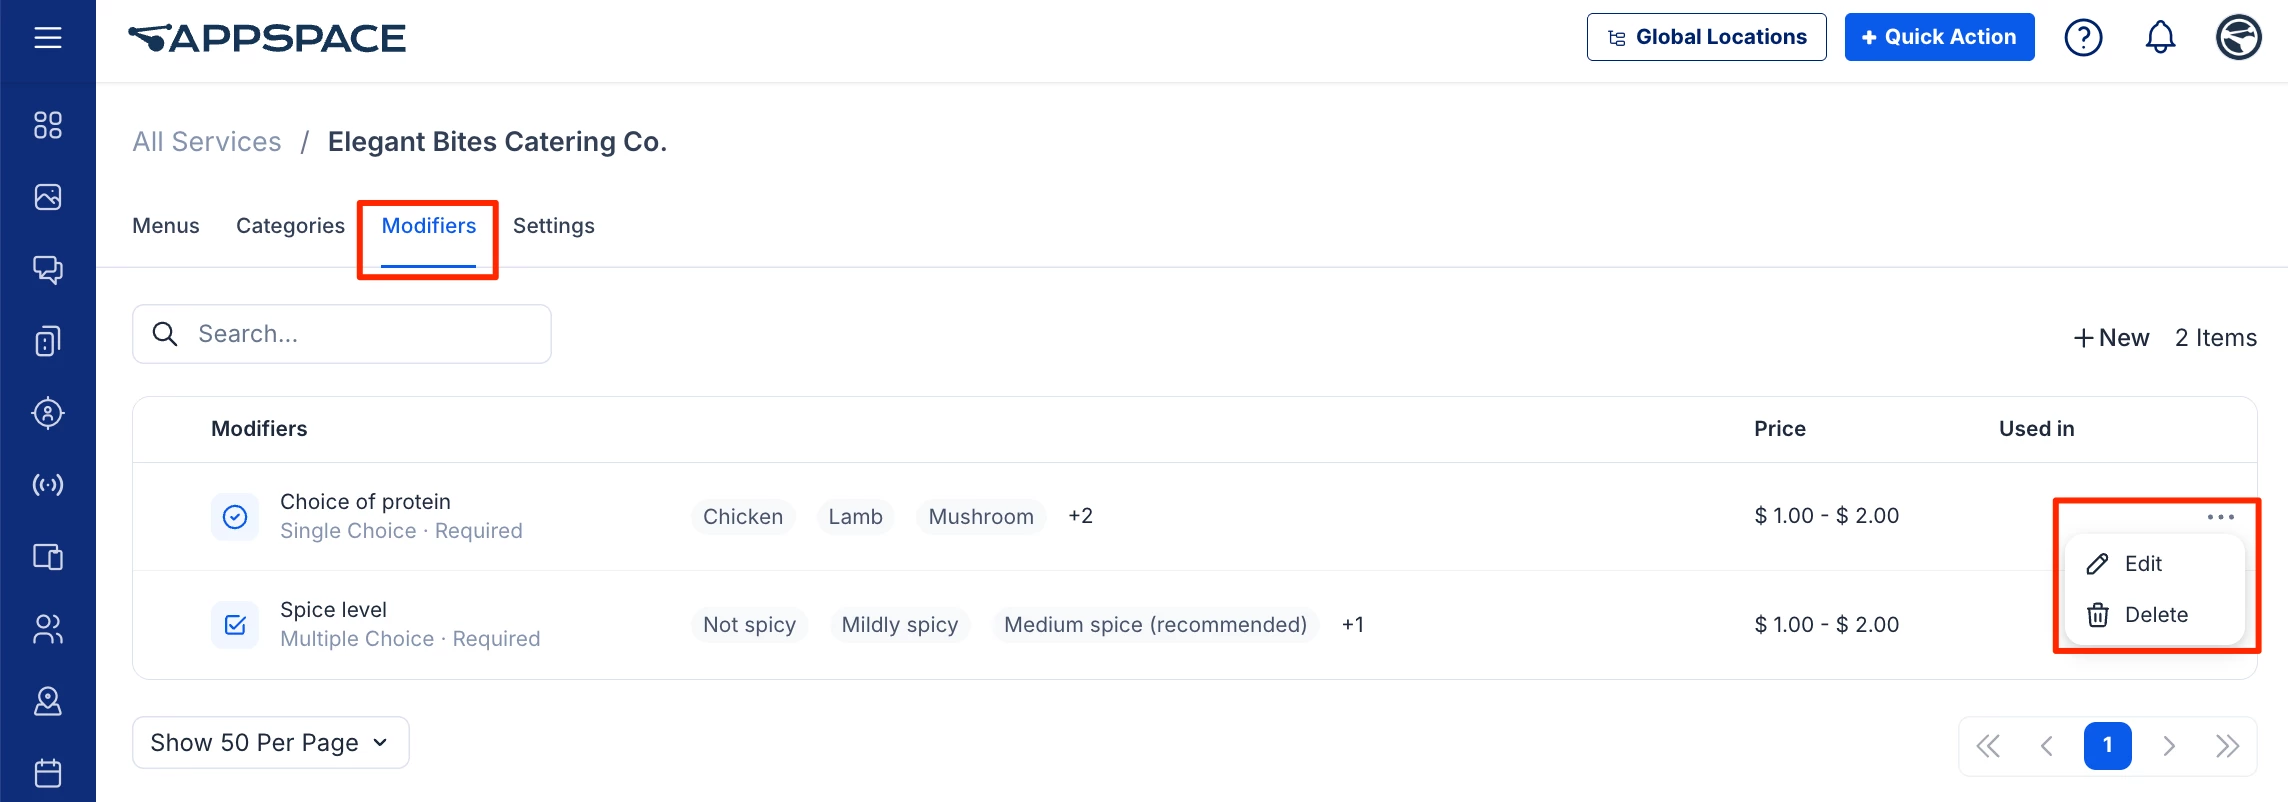
- Edit
- Delete – This will delete the modifier and detach it from all menu items where it has been applied. This cannot be undone.
Categories
A Category is a method of organizing menu items within a menu and can be reused across multiple menus within a service. To view the Categories section, select a Service, then the Categories tab. The Categories section lists the categories with the following information and options :
- Categories – Displays the name of the category.
- Used in – Displays the number of menu items that are tied to the category.
- Ellipsis – Move your mouse over a category and click the ellipsis (…) at the end of the row to perform the following actions:
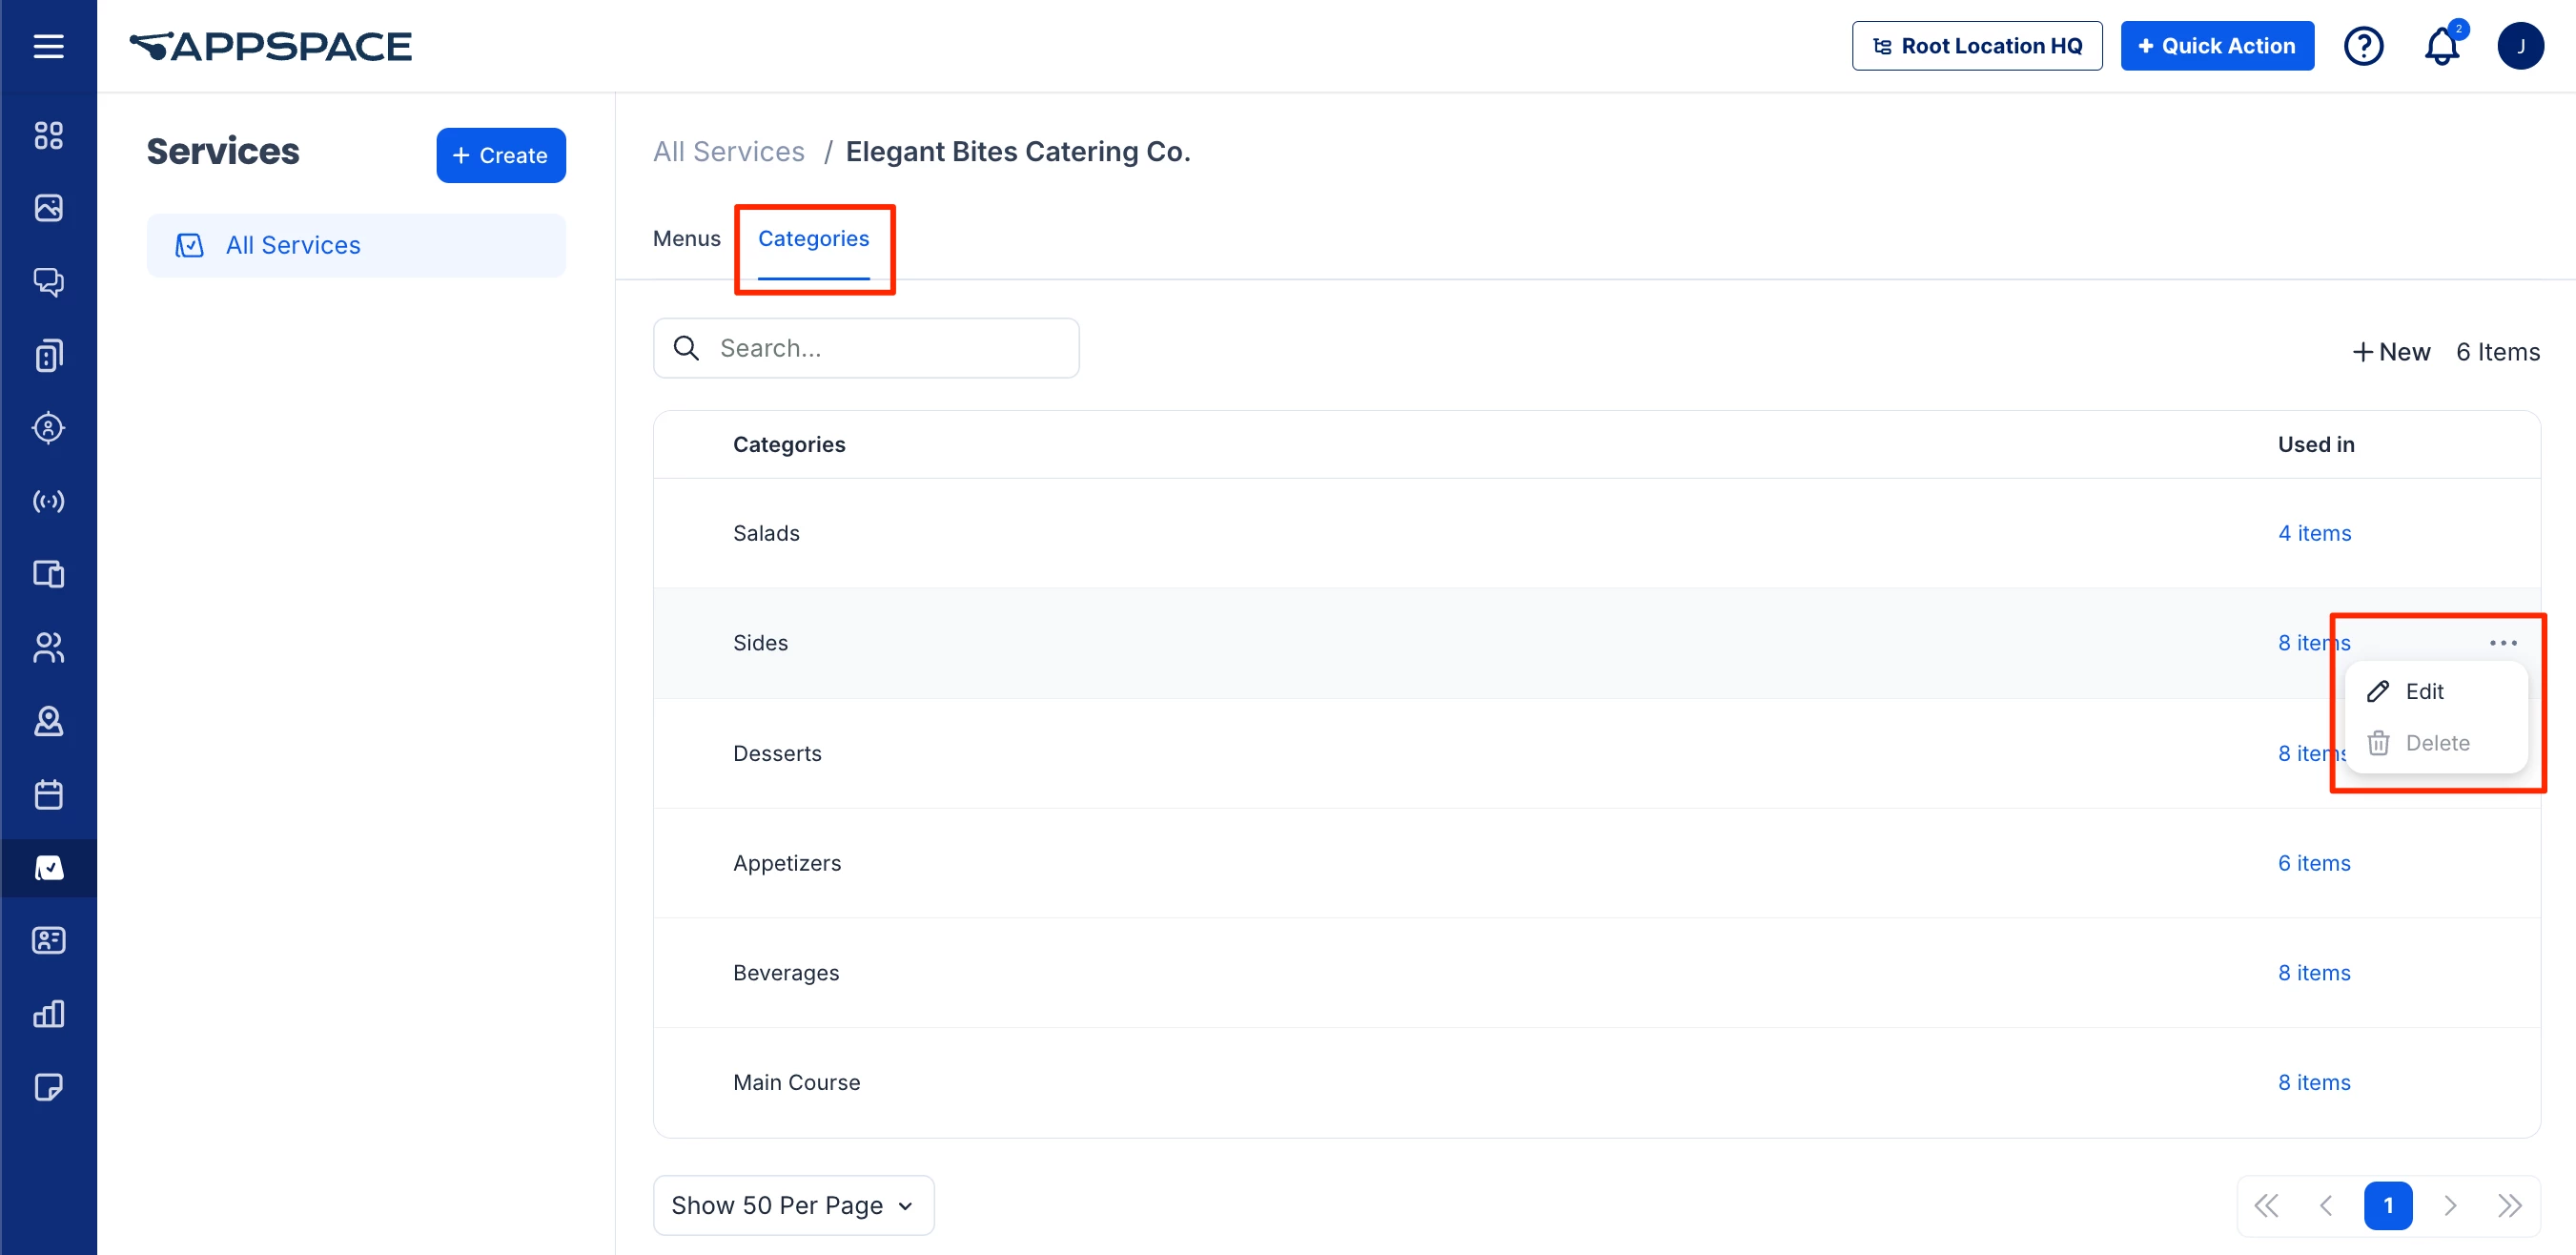
- Edit
- Delete – The Delete option will be greyed out if the category contains menu items. You need to delete all menu items associated with the category before you can delete the category itself.
Settings
The Settings tab (within a catering service) allows you to change the following settings for the Catering service:
Delivery instructions – Enables an additional field which allows the requester to add additional requests on all menu orders for the Catering service. This can be overridden by the settings within the Checkout tab of a menu.
Delivery Date – Enables a field that allows the requester to select a date for additional requests for delivery. This can be overridden by the settings within the Checkout tab of a menu.
The Checkout section allows you to add checkout fields, which are displayed as additional fields that are displayed during checkout, giving requester the flexibility to add additional requirements or requests for orders.
Refer to the following article for instructions on Settings for a service.