



Learn how to manage a Media Container widget in a Multizone Signage Channel. This article is for Communicators who create multi-level menus that contain media in a layout zone. After you read this article, you can add the widget, organize folders and asset types, and configure how items display.
For: Communicators — Media Container Widgets
Prerequisites
-
You must be a Publisher for the selected location, channel, or channel group, or have another role that allows you to manage the channel.
-
Create a Multizone Signage Channel with at least one layout and one zone. See Create a Multizone Signage Channel.
Note: Add folders and media on the channel Edit tab. Appearance, actions, and permissions are configured in the layout editor. A Media Container widget opens there with five tabs: Edit, Content, Actions, Properties, and Permissions.
Add a Media Container Widget
Add Media Container to a zone from the channel Edit tab. Follow the Add Widgets to a Zone steps in Create a Multizone Signage Channel, then select Media Container from New widgets.
The widget appears in the content list for the selected zone. The picker description is Create multi-level menus for media.
Note: Select Existing widgets when you want to reuse a Media Container widget that already exists in another layout in the same channel.
Manage Folders and Media
Organize menu folders and add media from the channel Edit tab.
-
Select Channels from the Appspace menu.
-
Open the Multizone Signage Channel.
-
Select the Edit tab.
-
Select the layout that contains the Media Container widget.
-
Select the Media Container widget in the layout list.
The Media Container content view opens in the center of the page. A folder tree appears on the left. Asset type tabs and the media table appear on the right. If the widget has folders, the first child folder is selected. If it has no folders, Root is selected.
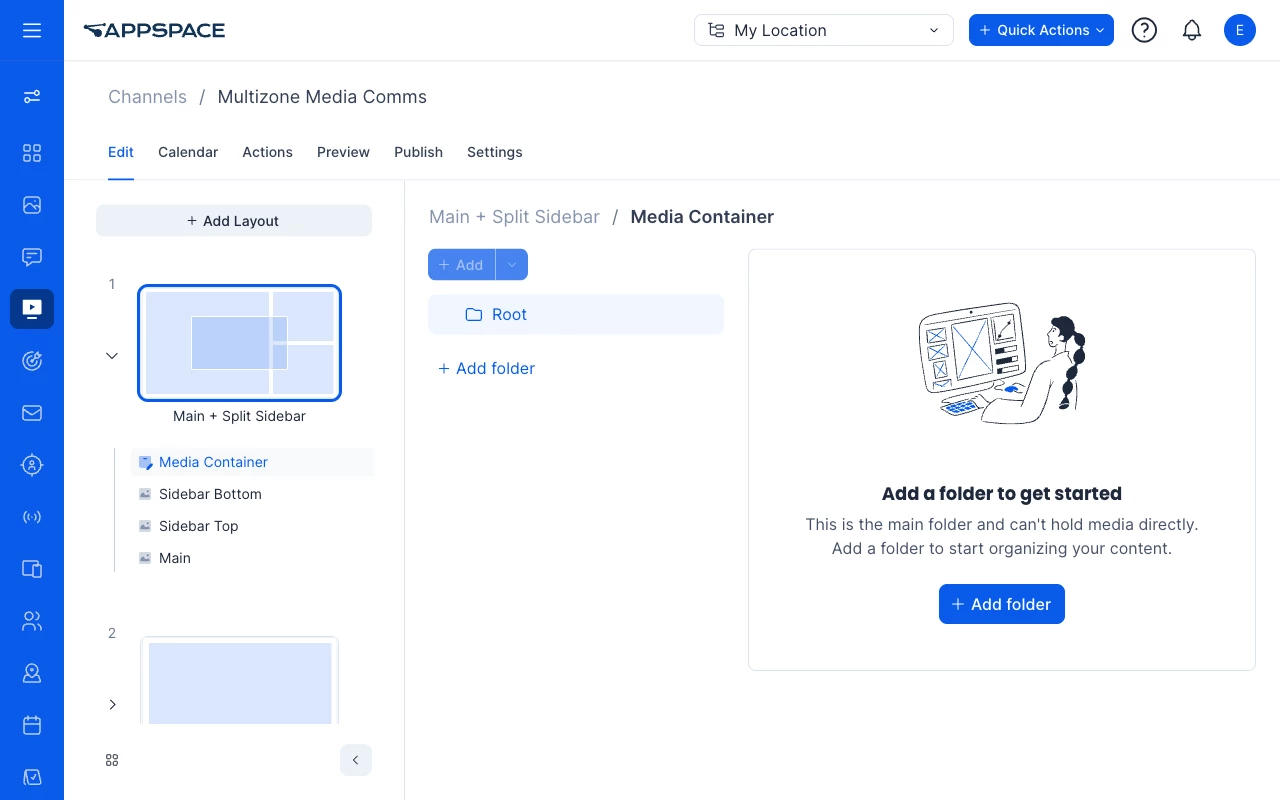
The Media Container content view, with Root selected and the Add a folder to get started empty state.
Note: The root folder is labeled Root. Root cannot hold media. The empty state is Add a folder to get started, with the message This is the main folder and can't hold media directly. Add a folder to start organizing your content.
Tip: You can also add folders and media from the layout editor Content tab. On the layout canvas, click the + button on the widget to open Add media, Add folder, Manage content, or Open editor.
Add a Folder
Add a folder under Root, then add nested folders if you need more than one menu level.
-
Select the Media Container widget on the channel Edit tab.
-
Select Root, or select the folder that should contain the new folder.
-
Click Add folder in the folder tree, or on the Root empty state.
-
Enter the Name.
-
Enter Body Text if needed.
-
Enter Tags if needed.
-
Click Save.
The sidebar title is Create New Folder for a new folder and Edit folder when you change an existing folder. Name is required. After you save, the new folder is selected and the parent folder is expanded.
When a folder other than Root is selected, you can also click Add, then select Add folder. The Add control is disabled when Root is selected.
To change a folder, select it, open the folder menu, and select Edit. To remove a folder, select it, open the folder menu, and select Delete. Confirm Delete folder? The message is Are you sure you want to delete this folder? This action cannot be undone. Root cannot be renamed or deleted.
Add Media
Add library files or uploads to a folder and asset type. Media cannot be added to Root.
-
Select a folder in the folder tree. Do not select Root.
-
Select the Thumbnail tab, or select another asset type tab.
-
Click Add to add media from the library, or open the Add menu and select Add media or Upload media.
-
Select one or more files from the library, or click Upload to add files from your computer.
-
Click Add.
The sidebar title is Media. The files appear in the table for the selected folder and asset type. The table includes a position number, Content (thumbnail and title), Type (Image, Video, Audio, Card, or Other), and a duration when the item has one. Click the content thumbnail or title to open the library content editor.
Reorder rows by dragging the handle, or enter a position number and press Enter. To remove items, open the row menu and select Remove, or select items and click Remove on the overlay that shows how many items are selected. Confirm that you want to remove the item from this asset. This action cannot be undone.
When a folder and asset type have no media, the empty state is No content in the Thumbnail collection, or the matching asset type name. The message is Add content to start building your collection. You can include images, videos, cards, or other media to control what displays and in what order.
Note: A file already in the selected folder and asset type is not added again.
Tip: On the layout canvas, you can drop library media onto the widget. The Add to media container window opens. Select the Media container item. If the widget has more than one asset type, select Asset type. Select New item when you need a new folder.
Manage Asset Types
Asset types group media in the same folder. Thumbnail is created with the widget and cannot be renamed or deleted.
-
Select the Media Container widget on the channel Edit tab.
-
Click the plus control on the asset type bar.
-
Enter a name in Add Asset Type.
-
Click Save.
The new tab appears after Thumbnail. To rename or delete a custom asset type, select its tab, open the tab menu, and select Rename or Delete. You cannot reuse the name Thumbnail, and you cannot use a name that already exists. You cannot delete the last remaining asset type.
Note: Deleting an asset type also deletes the media in that asset type. Confirm Delete asset type? The message is Deleting this asset type will also delete all the content within it. This can't be undone.
Configure Media Container Settings
Media Container settings that control click behavior, scroll, alignment, item size, and spacing are on the layout editor Edit tab, in the Properties accordion. These labeled fields are the same values as the keys on the Properties tab.
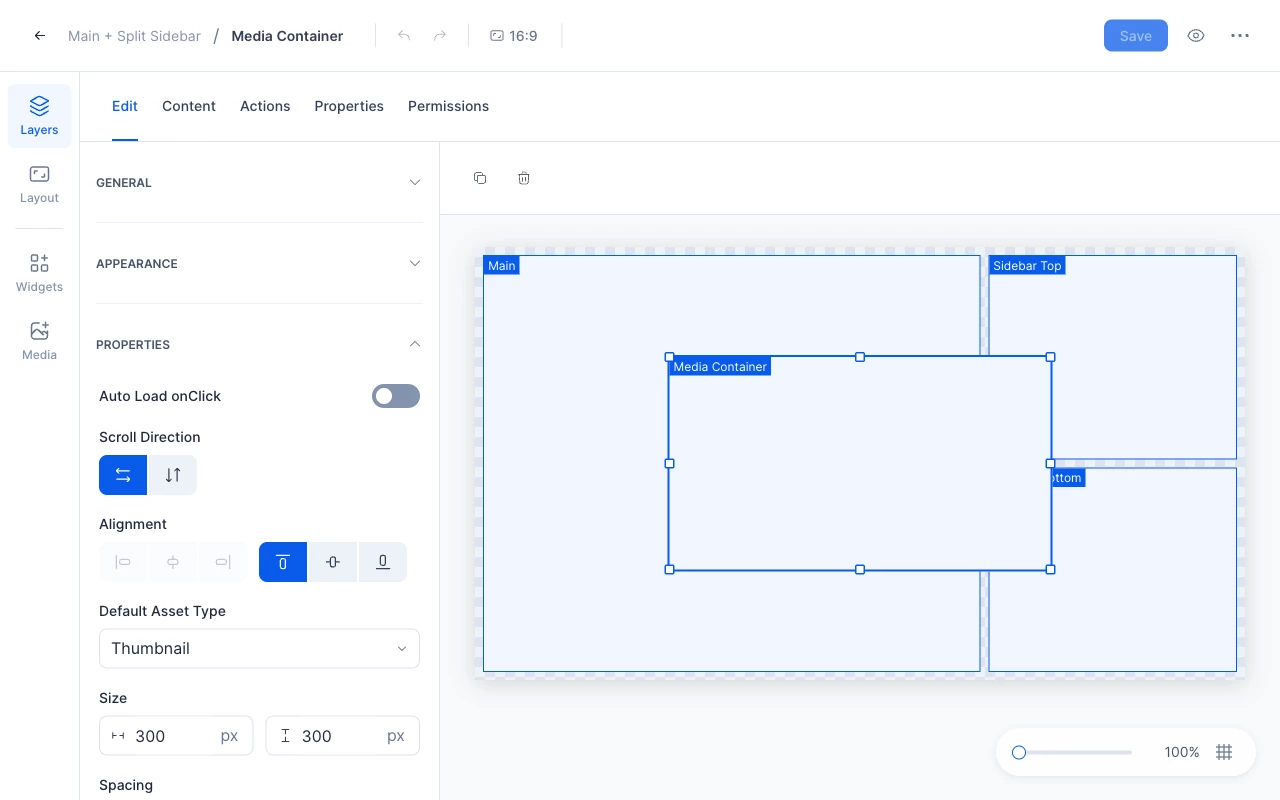
The Edit tab Properties accordion, with Auto Load onClick, Scroll Direction, Alignment, Default Asset Type, Size, and Spacing.
-
Select Channels from the Appspace menu.
-
Open the Multizone Signage Channel.
-
Select the Edit tab.
-
Select the layout that contains the Media Container widget.
-
Select Edit from the layout more options menu.
-
Select the Media Container widget.
-
Select the Edit tab.
-
Expand Properties.
-
Set the fields you need.
-
Click Save on the layout editor header.
| Setting | What you set |
|---|---|
| Auto Load onClick | Turns automatic load on click on or off. New widgets have Auto Load onClick off. |
| Scroll Direction | Horizontal or Vertical. New widgets default to Horizontal when the setting is not set. |
| Alignment | When Scroll Direction is Horizontal, set Align top, Align middle, or Align bottom. When Scroll Direction is Vertical, set Align left, Align center, or Align right. The other group is disabled. New widgets default to start, which is top for Horizontal scroll. |
| Default Asset Type | The asset type used when the widget loads. The list is Thumbnail. Custom asset types do not appear in this list. New widgets default to Thumbnail. |
| Size | Item width and height in px. New widgets default to 300 px × 300 px. |
| Spacing | Horizontal and vertical spacing between items in px. New widgets default to 10 px × 10 px. |
Use the other Edit accordions for placement and style:
-
General — Name, Size, Position, Opacity, Animation In, and Animation Out.
-
Appearance — Background color, background image, border color, thickness, corner radius, and margins.
-
Code — Widget GUID and Custom CSS.
Tip: Selecting the Media Container widget on the channel Edit tab opens the folder and media content view. To open the layout editor, select Edit from the layout more options menu, or click the + button on the widget and select Open editor.
Note: The Properties tab lists the same settings as searchable key-value pairs. Change the labeled fields on Edit unless you need to add, disable, or delete a key.
Note: Widget actions are configured on the Actions tab. Media Container events include Item On Load, Item On Click, and Page Load. Media Container methods include Load Next Item, Load Previous Item, Load Parent Item, Next Page, Previous Page, Set Default Asset Type, and Load Item By ID. See Configure Signage Channel Widget Actions. Widget permissions are configured on the widget Permissions tab, not on the channel Permissions tab. See Configure Signage Channel Widget Properties.