
This article consists of three parts. You can continue reading with the links below:
Configure General Visitor Settings
Configure Visitor Directory Data Deletion and Obfuscation
This feature allows organizations to delete and obfuscate visitor directory data that include personal data such as visitor names, and email addresses, based on a specific retention period, ideal for meeting both regulatory and business requirements related to data privacy:
- Delete – Visitor directory data records older than the specified retention period will be deleted. You will not have access to the visitor directory data records beyond the provided retention period.
- Obfuscate – Visitor directory data records older than the specified retention period will be obfuscated/masked. The visitor directory data records will continue to exist, however they will not be personally traceable back to a specific individual.
The retention period for visitor directory data is determined by the number of days from the visitor’s created date, however visitor directory data records will not be deleted if it’s associated with any upcoming reservations, even when it has passed its retention period.
Important
Choosing to delete or obfuscate visitor data will affect other components in the Visitors module reliant on this data, such as Analytics and visitor history. Other components will only display results based on the selected retention period by the organization.
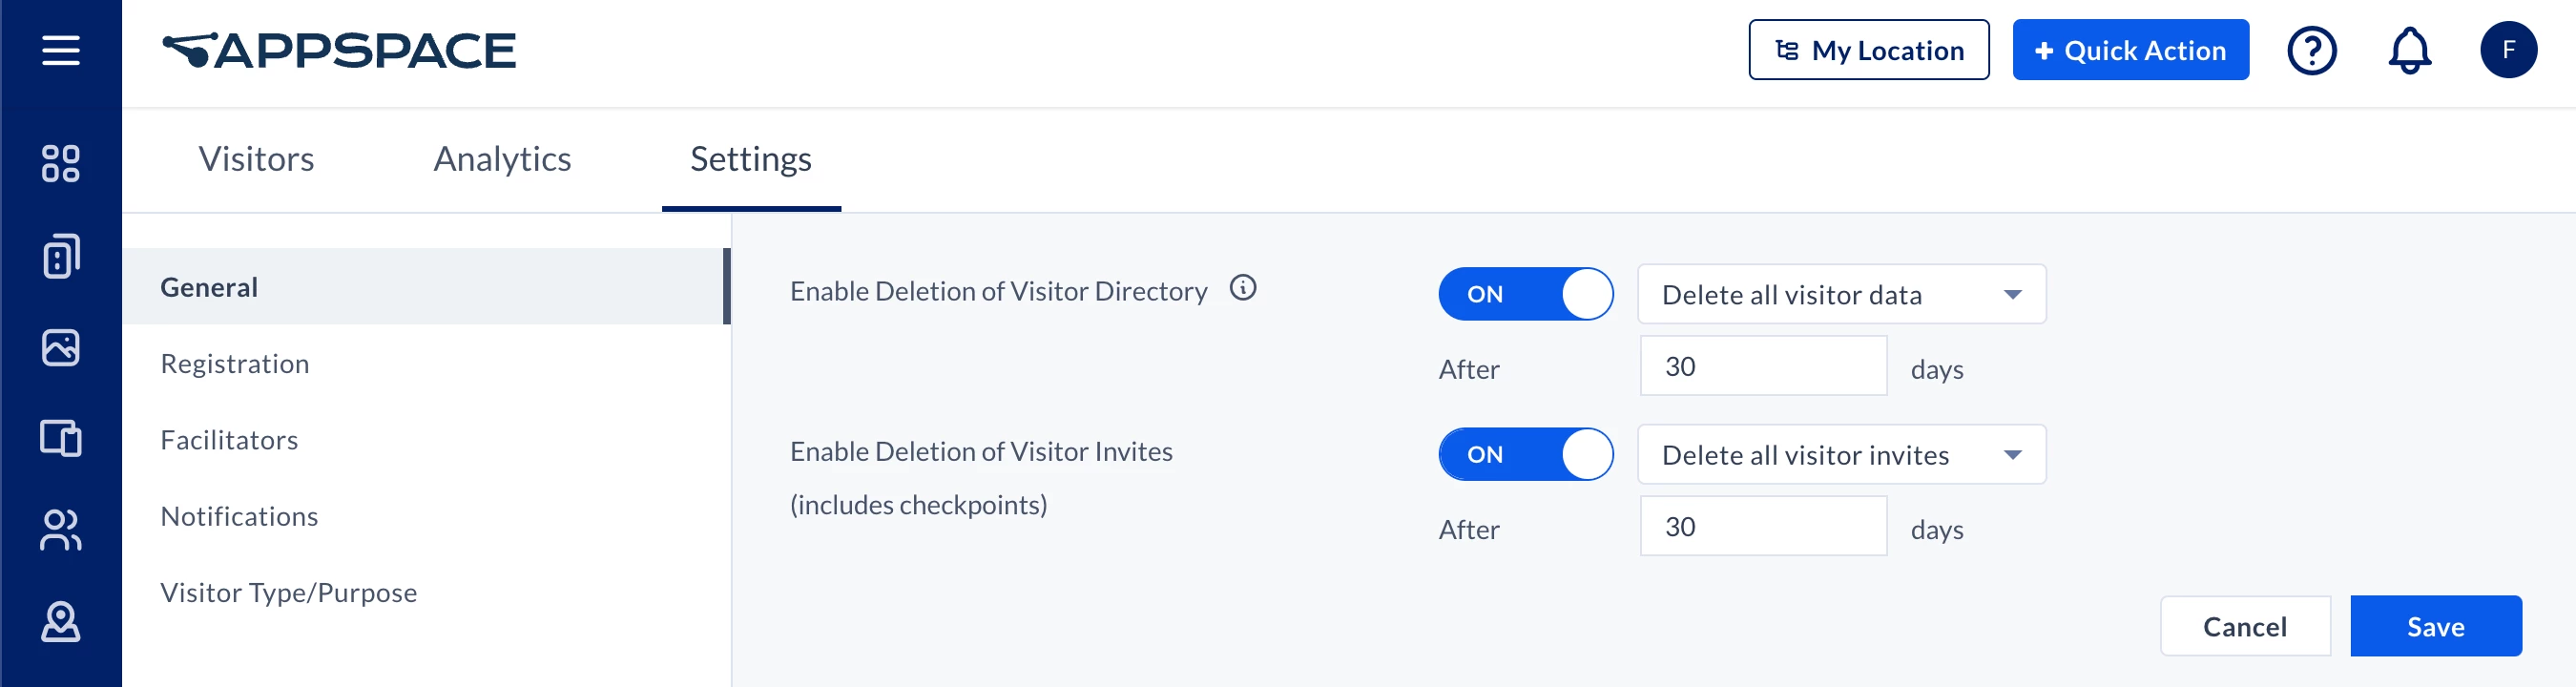
Follow the instructions below to configure the retention periods for visitor directory data.
- Log in to the Appspace console.
- Click Visitors from the ☰ Appspace menu, and click the Settings tab.
- Click the General tab from the side panel to configure the retention periods for the visitor directory data.
- Slide the Enable Deletion/Obfuscation of Visitor Directory toggle switch to ON, and click CONTINUE to confirm deletion of visitor directory data records.

- Select the option to determine if visitor directory data records are deleted or obfuscated after the retention period:
- Delete all visitor data – Visitor directory data records are deleted, with no recovery option.
Warning
Customers enabling the Delete functionality will lose all data associated with visitors beyond the specified retention period.
- Obfuscate all visitor data – Visitor directory data records exist, however they will not contain any personal data that can be traceable.
- Delete all visitor data – Visitor directory data records are deleted, with no recovery option.
- Enter the duration of the retention period in days, defaulted at 30 days from the created date of the visitor directory data record, while the maximum retention period is 180 days.
- Once done, click Save.
Configure Visitor Invitation Data Deletion and Obfuscation
This feature allows organizations to delete and obfuscate visitor invitation data that include personal data such as visitor names, and email addresses, based on a specific retention period, ideal for meeting both regulatory and business requirements related to data privacy:
- Delete – Visitor invitation data records older than the specified retention period will be deleted. You will not have access to the visitor invitation data records beyond the provided retention period.
- Obfuscate – Visitor invitation data records older than the specified retention period will be obfuscated/masked. The visitor invitation data records will continue to exist, however they will not be personally traceable back to a specific individual.
Important
Choosing to delete or obfuscate visitor data will affect other components in the Visitors module reliant on this data, such as Analytics and visitor history. Other components will only display results based on the selected retention period by the organization.
Follow the instructions below to configure the retention periods for visitor invitation data.
- Log in to the Appspace console.
- Click Visitors from the ☰ Appspace menu, and click the Settings tab.
- Click the General tab from the side panel to configure the retention periods for the visitor invitation data.
- Slide the Enable Deletion/Obfuscation of Visitor Invites toggle switch to ON, and click CONTINUE to confirm deletion of visitor invitation data records.
- Select the option to determine if visitor invitation data records are deleted or obfuscated after the retention period:
- Delete all visitor data – Visitor invitation data records are deleted, with no recovery option.
Warning
Customers enabling the Delete functionality will lose all data associated with visitor invitations beyond the specified retention period.
- Obfuscate all visitor data – Visitor invitation data records exist, however they will not contain any personal data that can be traceable.
- Delete all visitor data – Visitor invitation data records are deleted, with no recovery option.
- Enter the duration of the retention period in days, defaulted at 30 days, while the maximum retention period is 180 days.
- Once done, click Save.
Configure Host Privacy Setting
This feature allows organizations to restrict the visibility of visitors and their personal data, such as email addresses and names, only to the respective hosts.
When this setting is enabled, hosts are able to search and view only visitors they have previously invited, and are not able to view other visitors invited by other hosts. This is ideal for organizations that need to meet regulatory and business requirements related to data privacy.
Follow the instructions below to configure the host privacy setting.
- Log in to the Appspace console.
- Click Visitors from the ☰ Appspace menu, and click the Settings tab.
- Click the General tab from the side panel to configure the host privacy setting.
- Slide the Restrict host visibility to only their visitors toggle switch to ON.
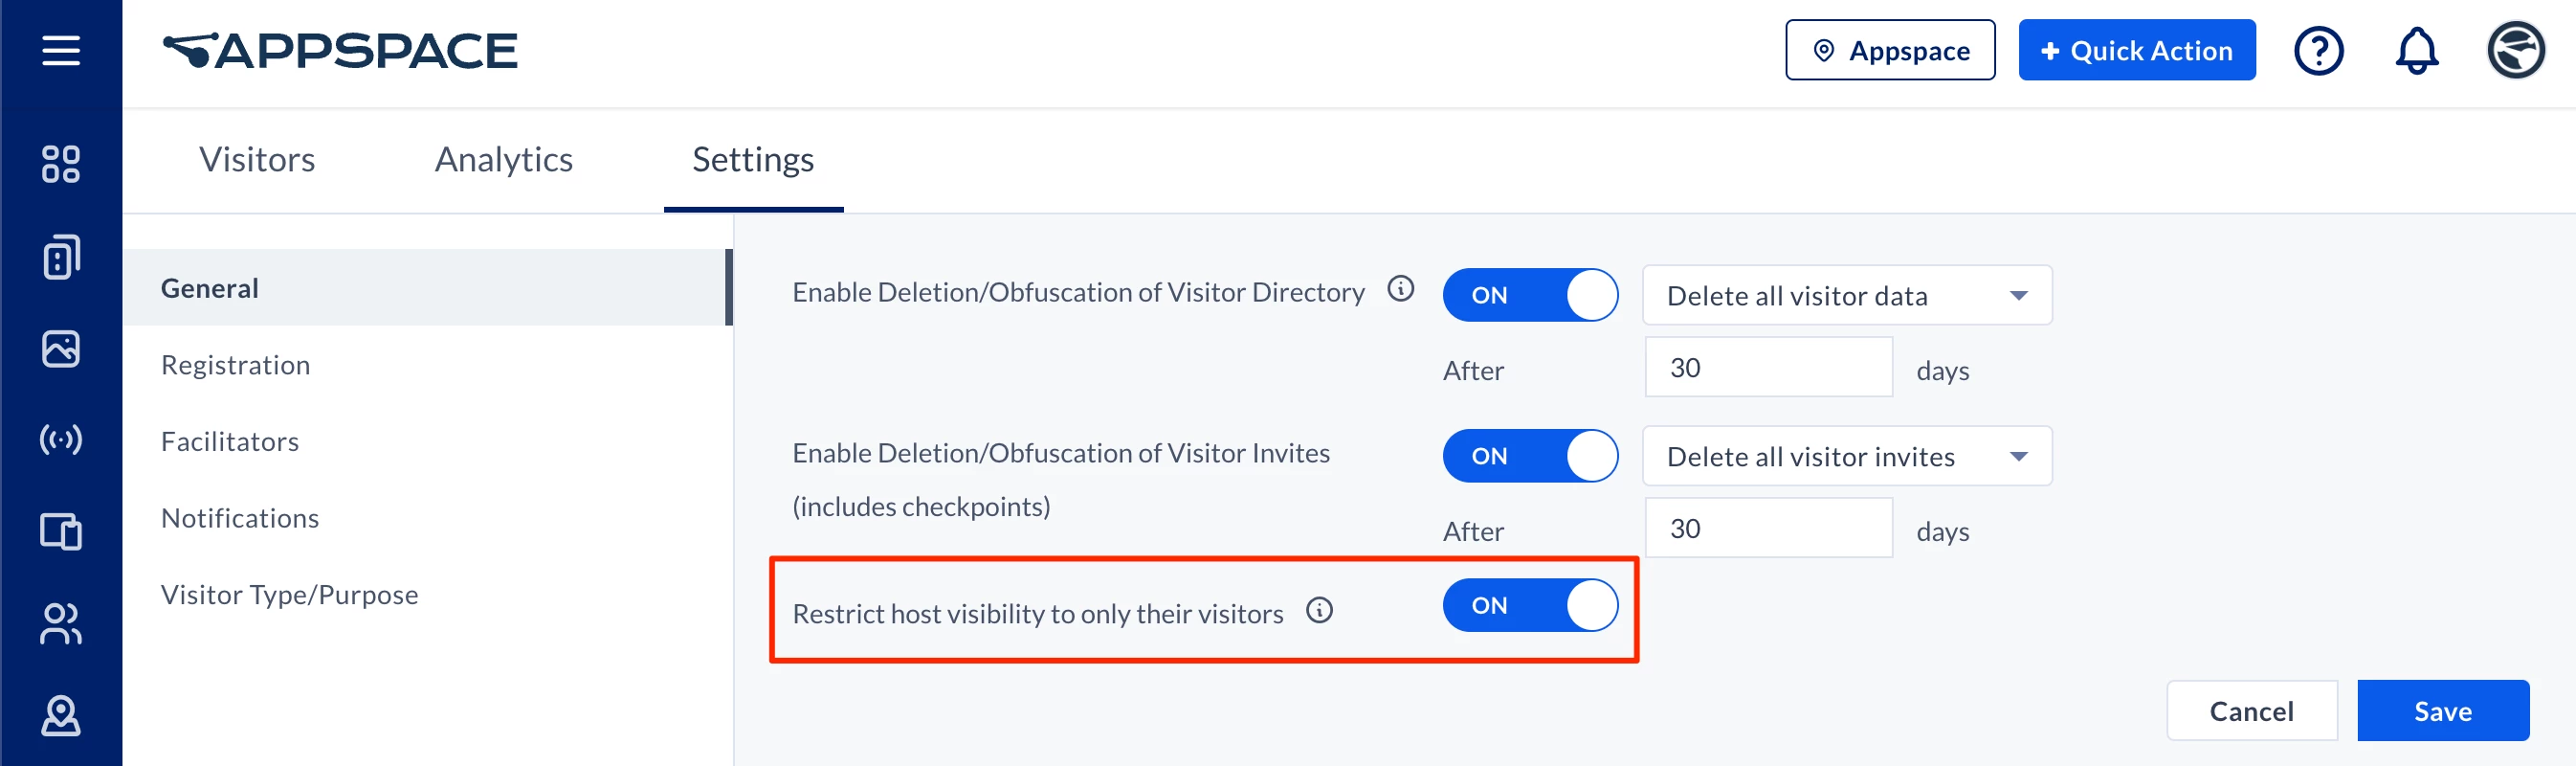
- Once done, click Save.
Configure the Visitor Registration Form
Visitor Management configurations can only be performed by Appspace administrators; a user with Account Owner or Location Admin permissions.
Follow the instructions below to configure the Visitor Registration Form that will be sent when inviting visitors:
- Log in to the Appspace console.
- Click Visitors from the ☰ Appspace menu, and click the Settings tab.
- Click the Registration tab from the side panel to configure the Visitor Registration form.
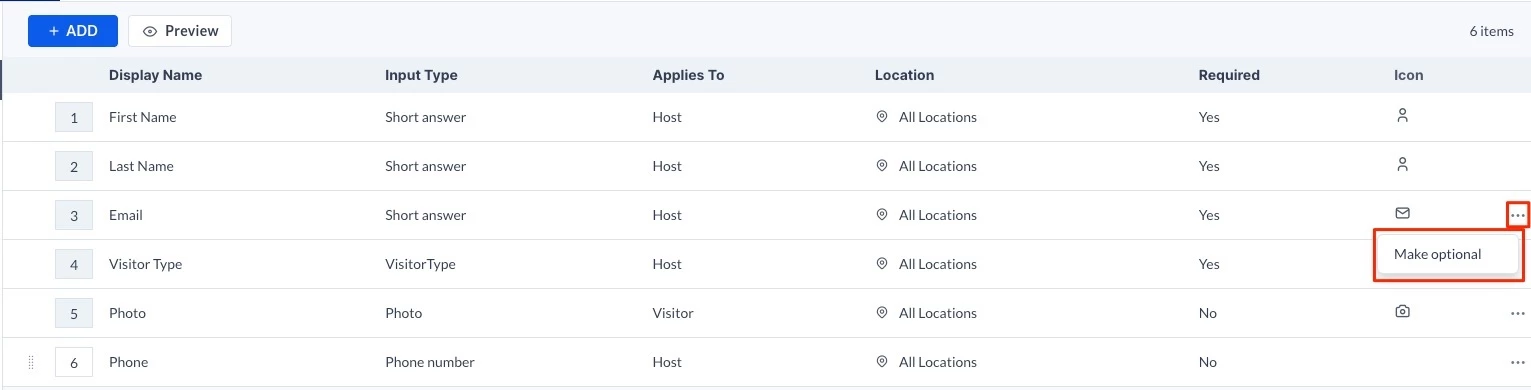
- The following system fields displayed are used as the default Visitor Registration form base, thus cannot be deleted or re-ordered:
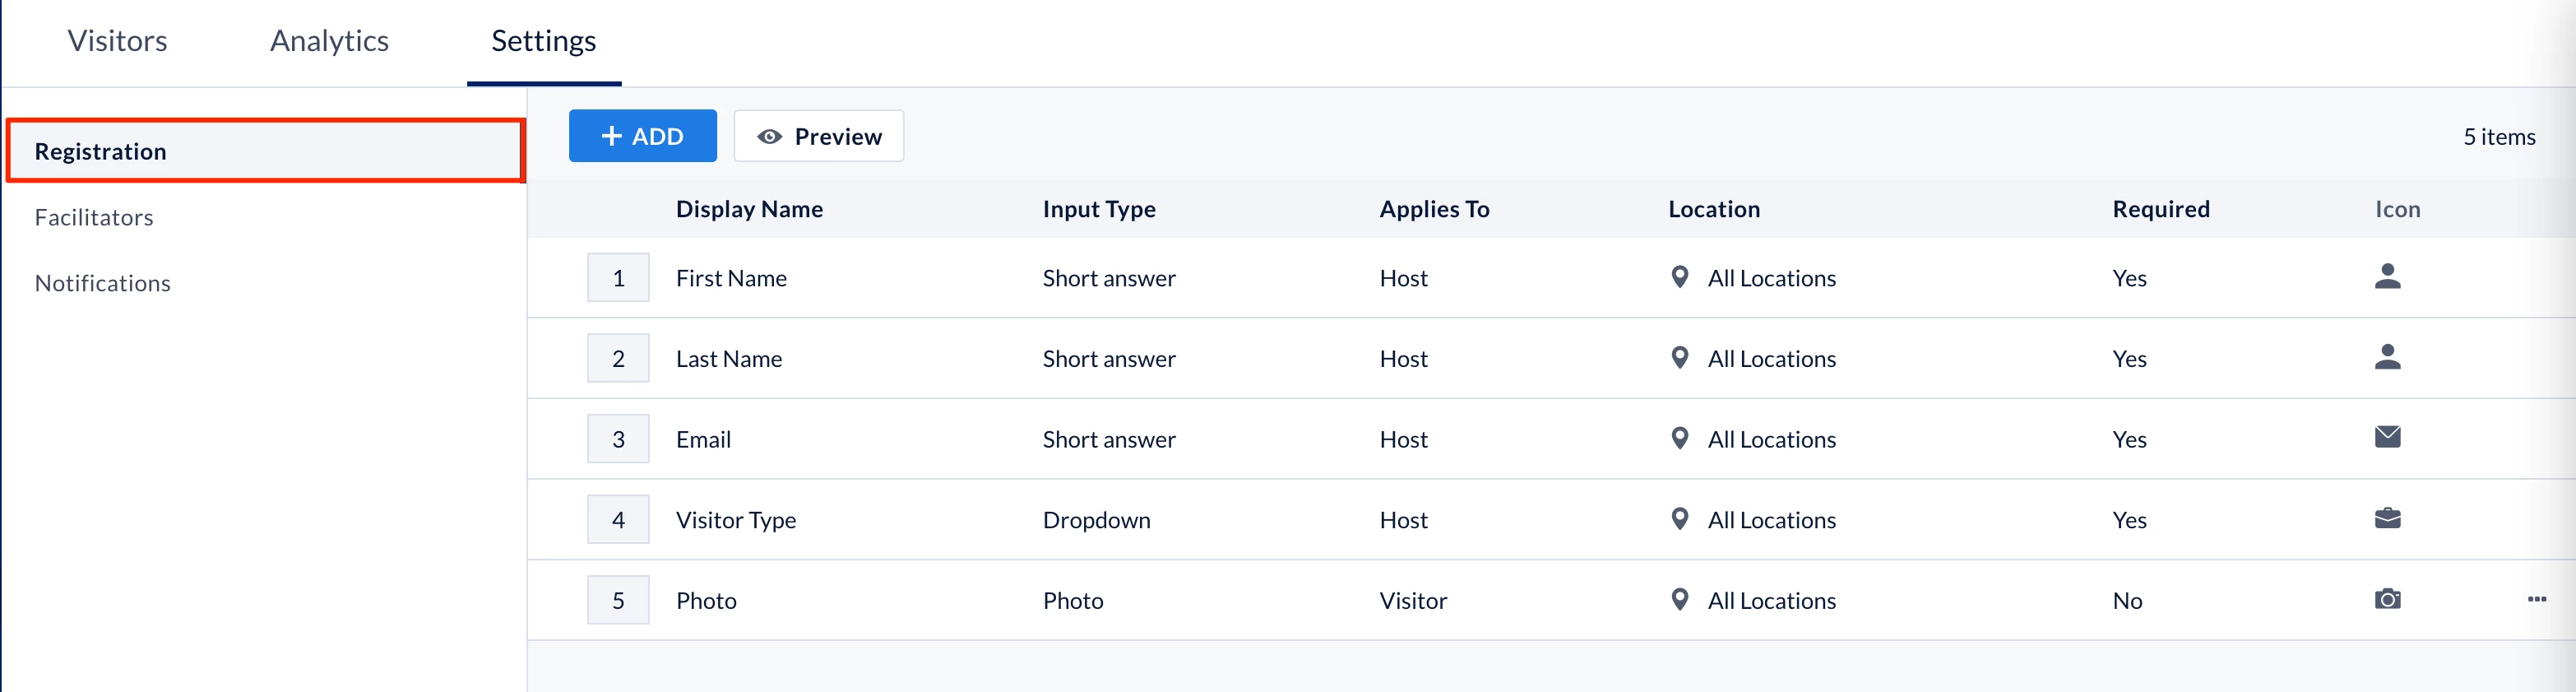
- First Name – Required, to be filled by the Host.
- Last Name – Required, to be filled by the Host.
- Email – Can be set as Required or Optional (new) and is to be filled in by the Host. Visitors also have the option to enter their email at the kiosk during check-in, where a registration form lets them review and confirm their details. To set the field as optional, click the ellipsis (…) and select Make as Optional.
Important
If the administrator changes the email field from Optional to Required and there are existing unregistered visitors, those visitors will remain listed in the Visitor Directory. However, if they are invited to a future meeting, they will be unable to check in, as the previous option to use their first and last name to check in (instead of their email) will not appear. Additionally, without an email associated with their registration, they will not receive a check-in code or QR code.
- Visitor Type – Required, to be filled by the Host.
- Photo – Can be set as Required or Optional, to be filled by the Visitor. To set the field as optional, click the ellipsis (…) and select Make as Optional.
- To further customize the Visitor registration form to include other visitor registration details, click the +ADD button.
- In the Add Field window, enter the following information:
Note
Fields may be configured to be displayed or restricted based on the following visitor criteria:
- Applies To
- Location
- Visitor Type
- Required Completion
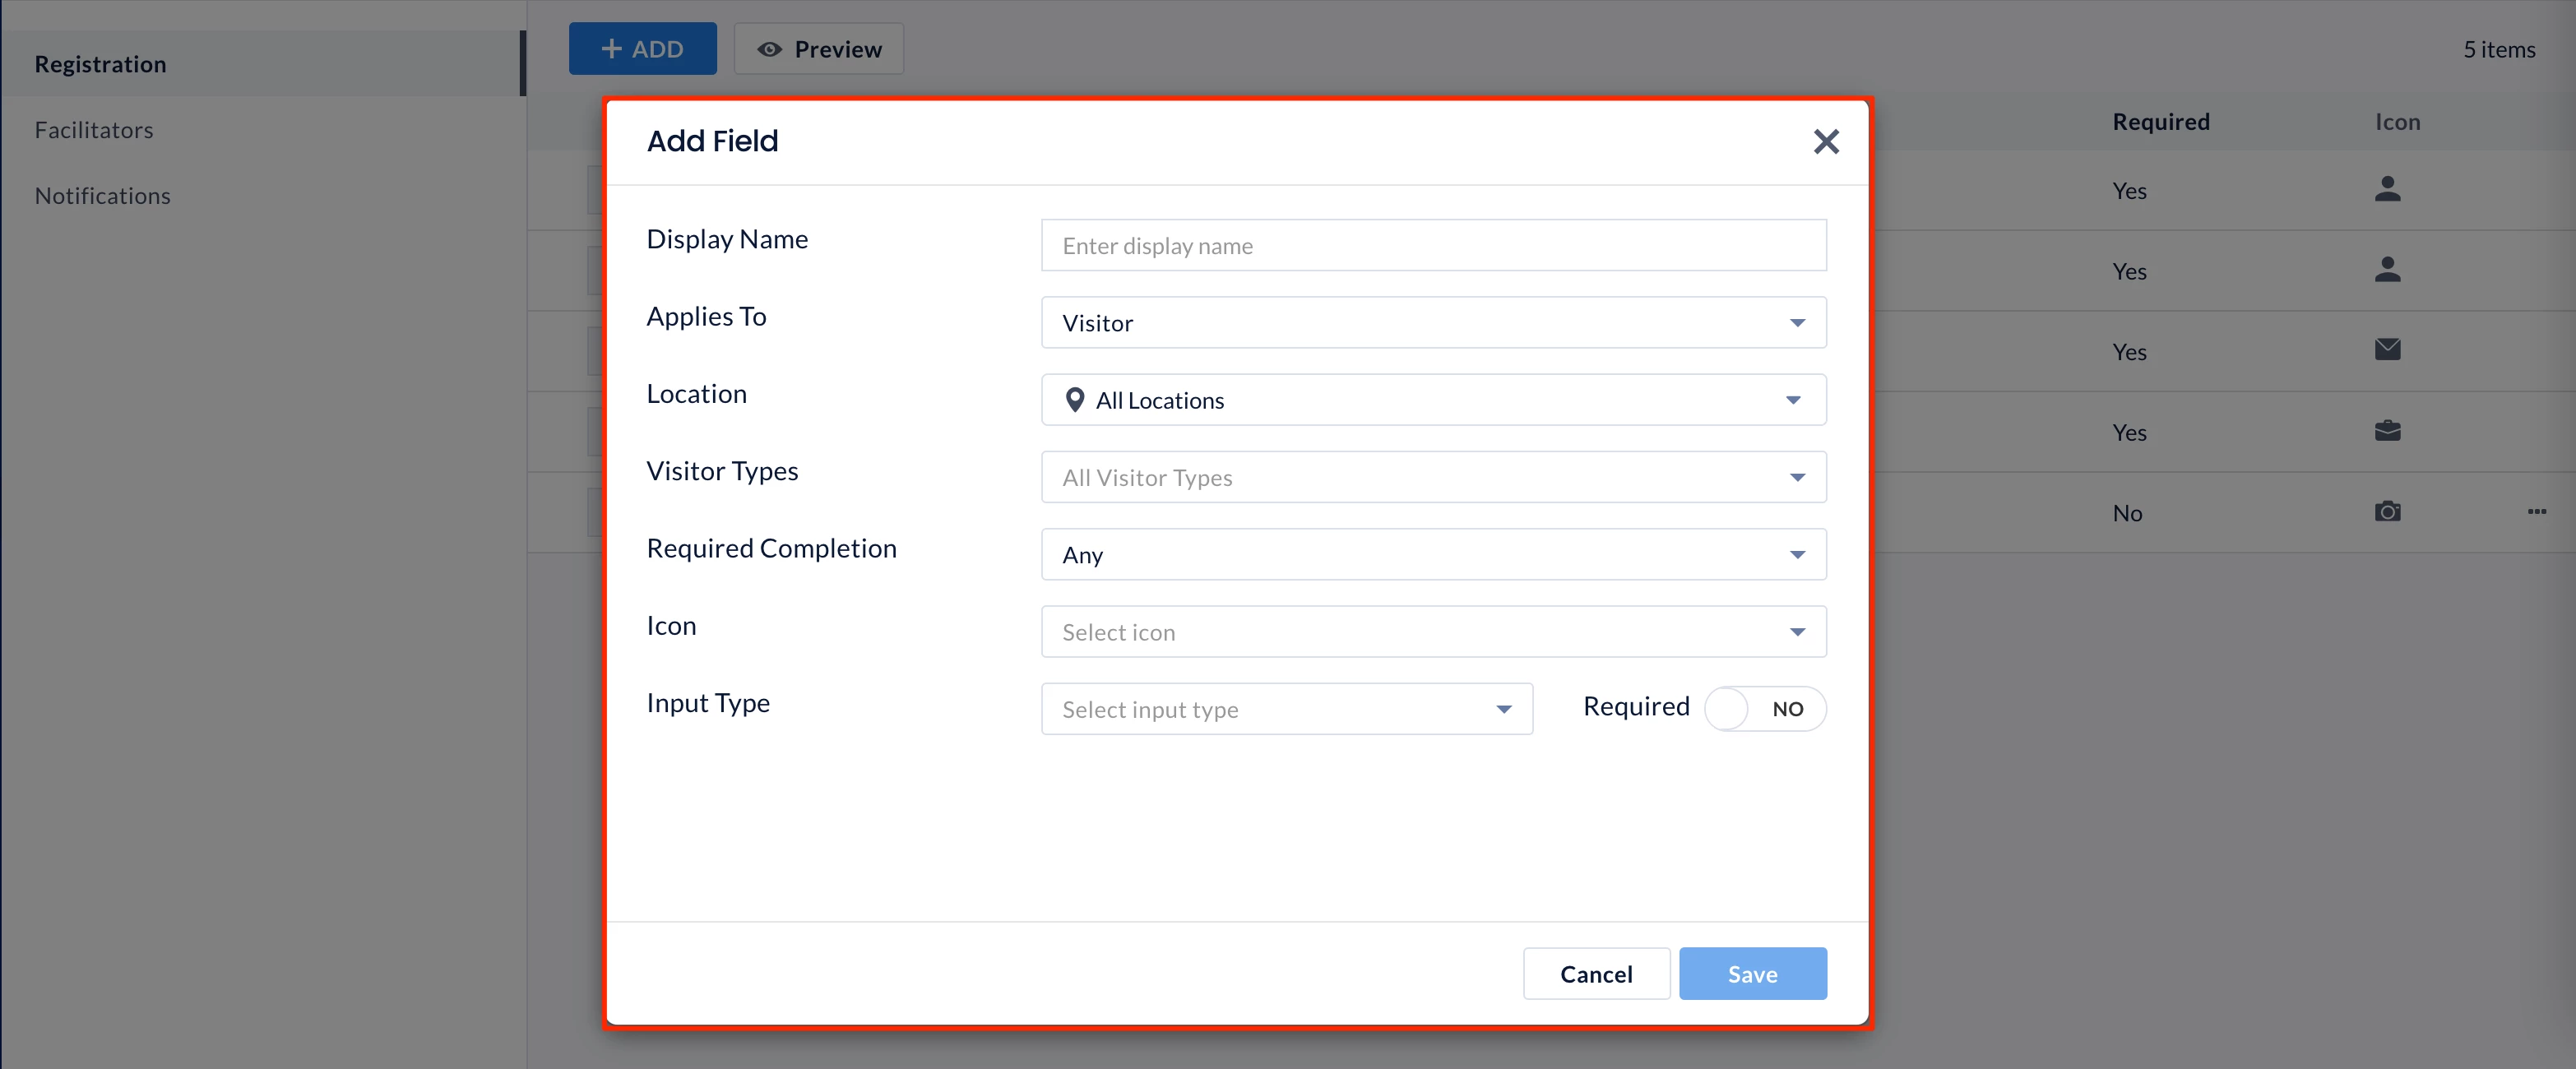
- Display Name – Enter the field name to be displayed.
- Applies To – Select if the field is to be filled by the Visitor, Host, or Admin.
- Location – Select the location this field will be displayed in.
- Visitor Types -Select the visitor types (you can select more than one) this field will be displayed to, or leave as All Visitor Types by default.
- Required Completion – Select the platform this field is required to be completed by the visitor.
- Any – Both the Visitor Portal site and on-site at the Visitor Kiosk.
- At Visitor Portal – On the Visitor Portal site.
- On Site – On the Visitor Kiosk.
- Icon – Select an icon as a graphical representation of the field.
- Input Type – Select the input field type. Additional fields may appear depending on the selected Input Type:
- Short answer or Paragraph
- Placeholder
- Maximum Length
- Minimum Length
- Checkboxes, Dropdown, or Multiple choice
- Options
- Placeholder
- Address or Phone number
- Short answer or Paragraph
- Required – Switch the toggle to YES to ensure the field must be filled, and NO to make it optional.
- Once done, click Save.
- The recently added custom field will be displayed, and can be reordered either by entering the order number in the numeric box, or by dragging and dropping the field within the list.
- Click the custom field ellipsis to either Edit or Delete the custom field.
Assign Visitor Management Facilitators
Visitor Management configurations can only be performed by Appspace administrators; a user with Account Owner or Location Admin permissions.
Follow the instructions below to assign users or user groups as Facilitator that will manage visitors check-ins and invitations:
- Log in to the Appspace console.
- Click Visitors from the ☰ Appspace menu, and click the Settings tab.
- Click the Facilitator tab from the side panel to assign users or user groups as facilitators.
- Click the +ADD button, and in the Add Facilitator window, enter the following information:
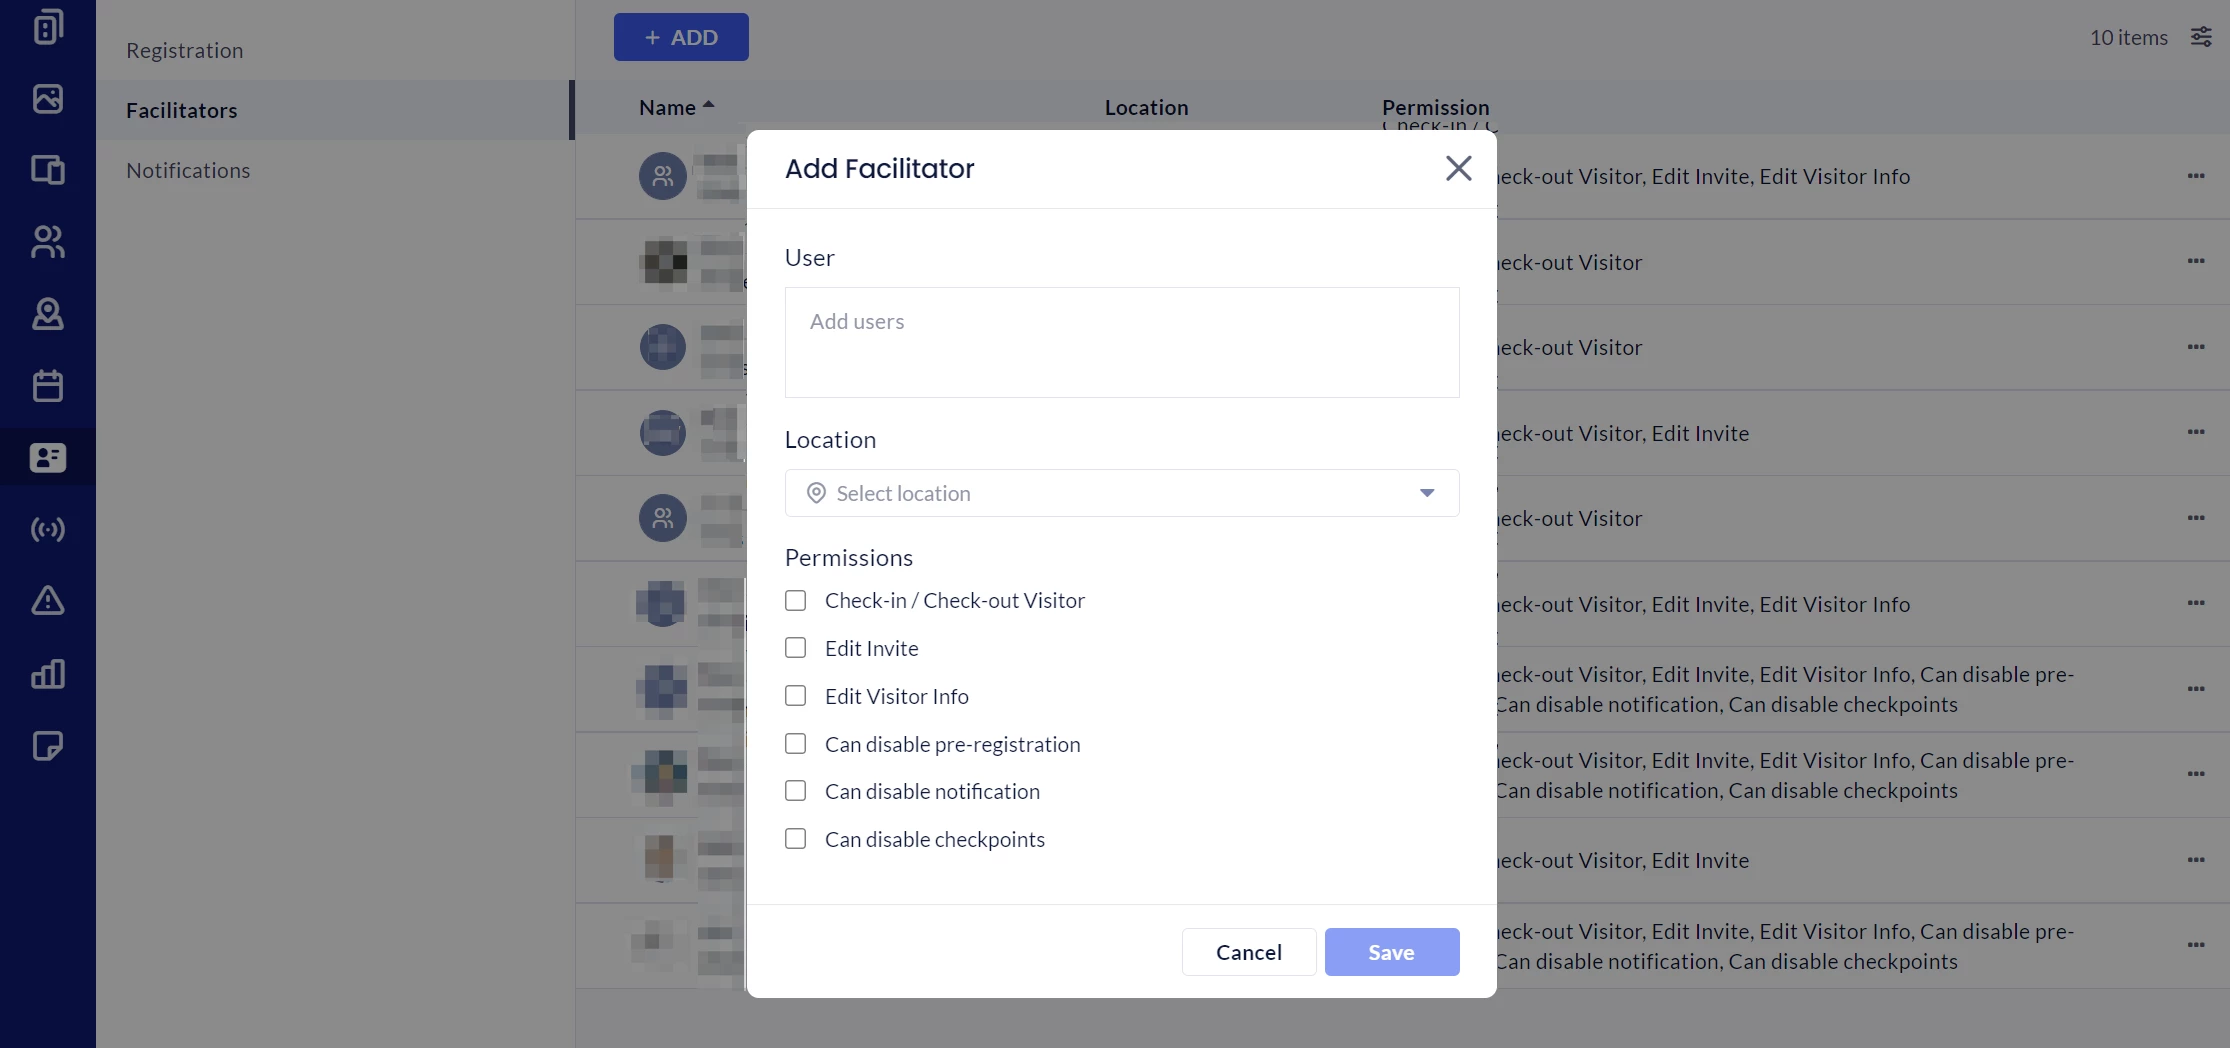
- User – Enter the user name or user group of the facilitators.
- Location – Select the location of the facilitator.
- Permissions – Select the permissions to be granted to the facilitator.
-
- View all events at this location – the facilitator can only view visitor events for the assigned location(s). This is enabled for all facilitators and cannot be disabled.
- Check-in / Check-out Visitor – the facilitator can check in and check out visitors to the assigned location.
- Edit Invite – the facilitator can edit visitor invitations.
- Edit Visitor Info – the facilitator can edit information about the visitor.
- Can disable pre-registration – The facilitator can enable/disable visitor pre-registration for events. Disabling pre-registration for an event will set visitors as Expected for the event and not send out the invitation email.
- Can disable notifications – The facilitator can enable/disable email notifications for the invite, update, removal, or cancellation of events sent to the visitor. This does not affect emails sent to the host.
- Can disable checkpoints – The facilitator can enable/disable the use of checkpoints for events.
- (New) Receive Host Notifications – Along with the meeting host, the facilitator has the option to also receive notifications (such as Visitor invite, Visitor Check-in, and Visitor Check-out) for events. This option will appear as the toggle Notify me in addition to the host to facilitators when sending visitor invitations.
-
- Once done, click Save.
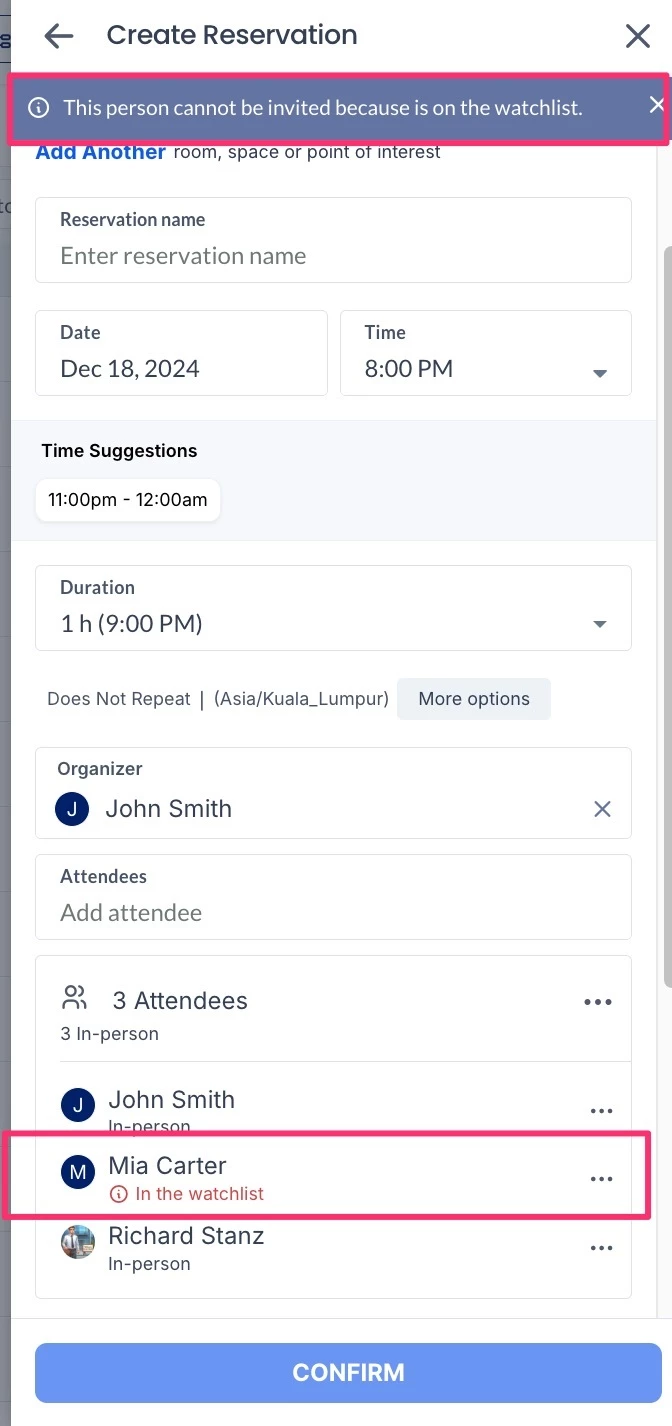
Add Visitors to Watchlist
The Watchlist module allows administrators to manage a list of individuals prohibited from entering the building premises. It ensures these individuals cannot be invited as visitors through the Reservations and Visitor Management systems. If a facilitator tries to add someone on the watchlist to a meeting reservation or visitor invitation, a notification will highlight their watchlist status, and the reservation cannot be confirmed until the visitor is removed.
Note
Watchlists can only be configured by Appspace administrators; a user with Account Owner or Location Admin permissions.
Follow the instructions below to add visitors to the Watchlist.
- Log in to the Appspace console.
- Click Visitors from the ☰ Appspace menu, and click the Settings tab.
- Click the Watchlist tab from the side panel to assign users or user groups as facilitators.
- Click the +ADD button, and in the Add Record window, enter the following information:
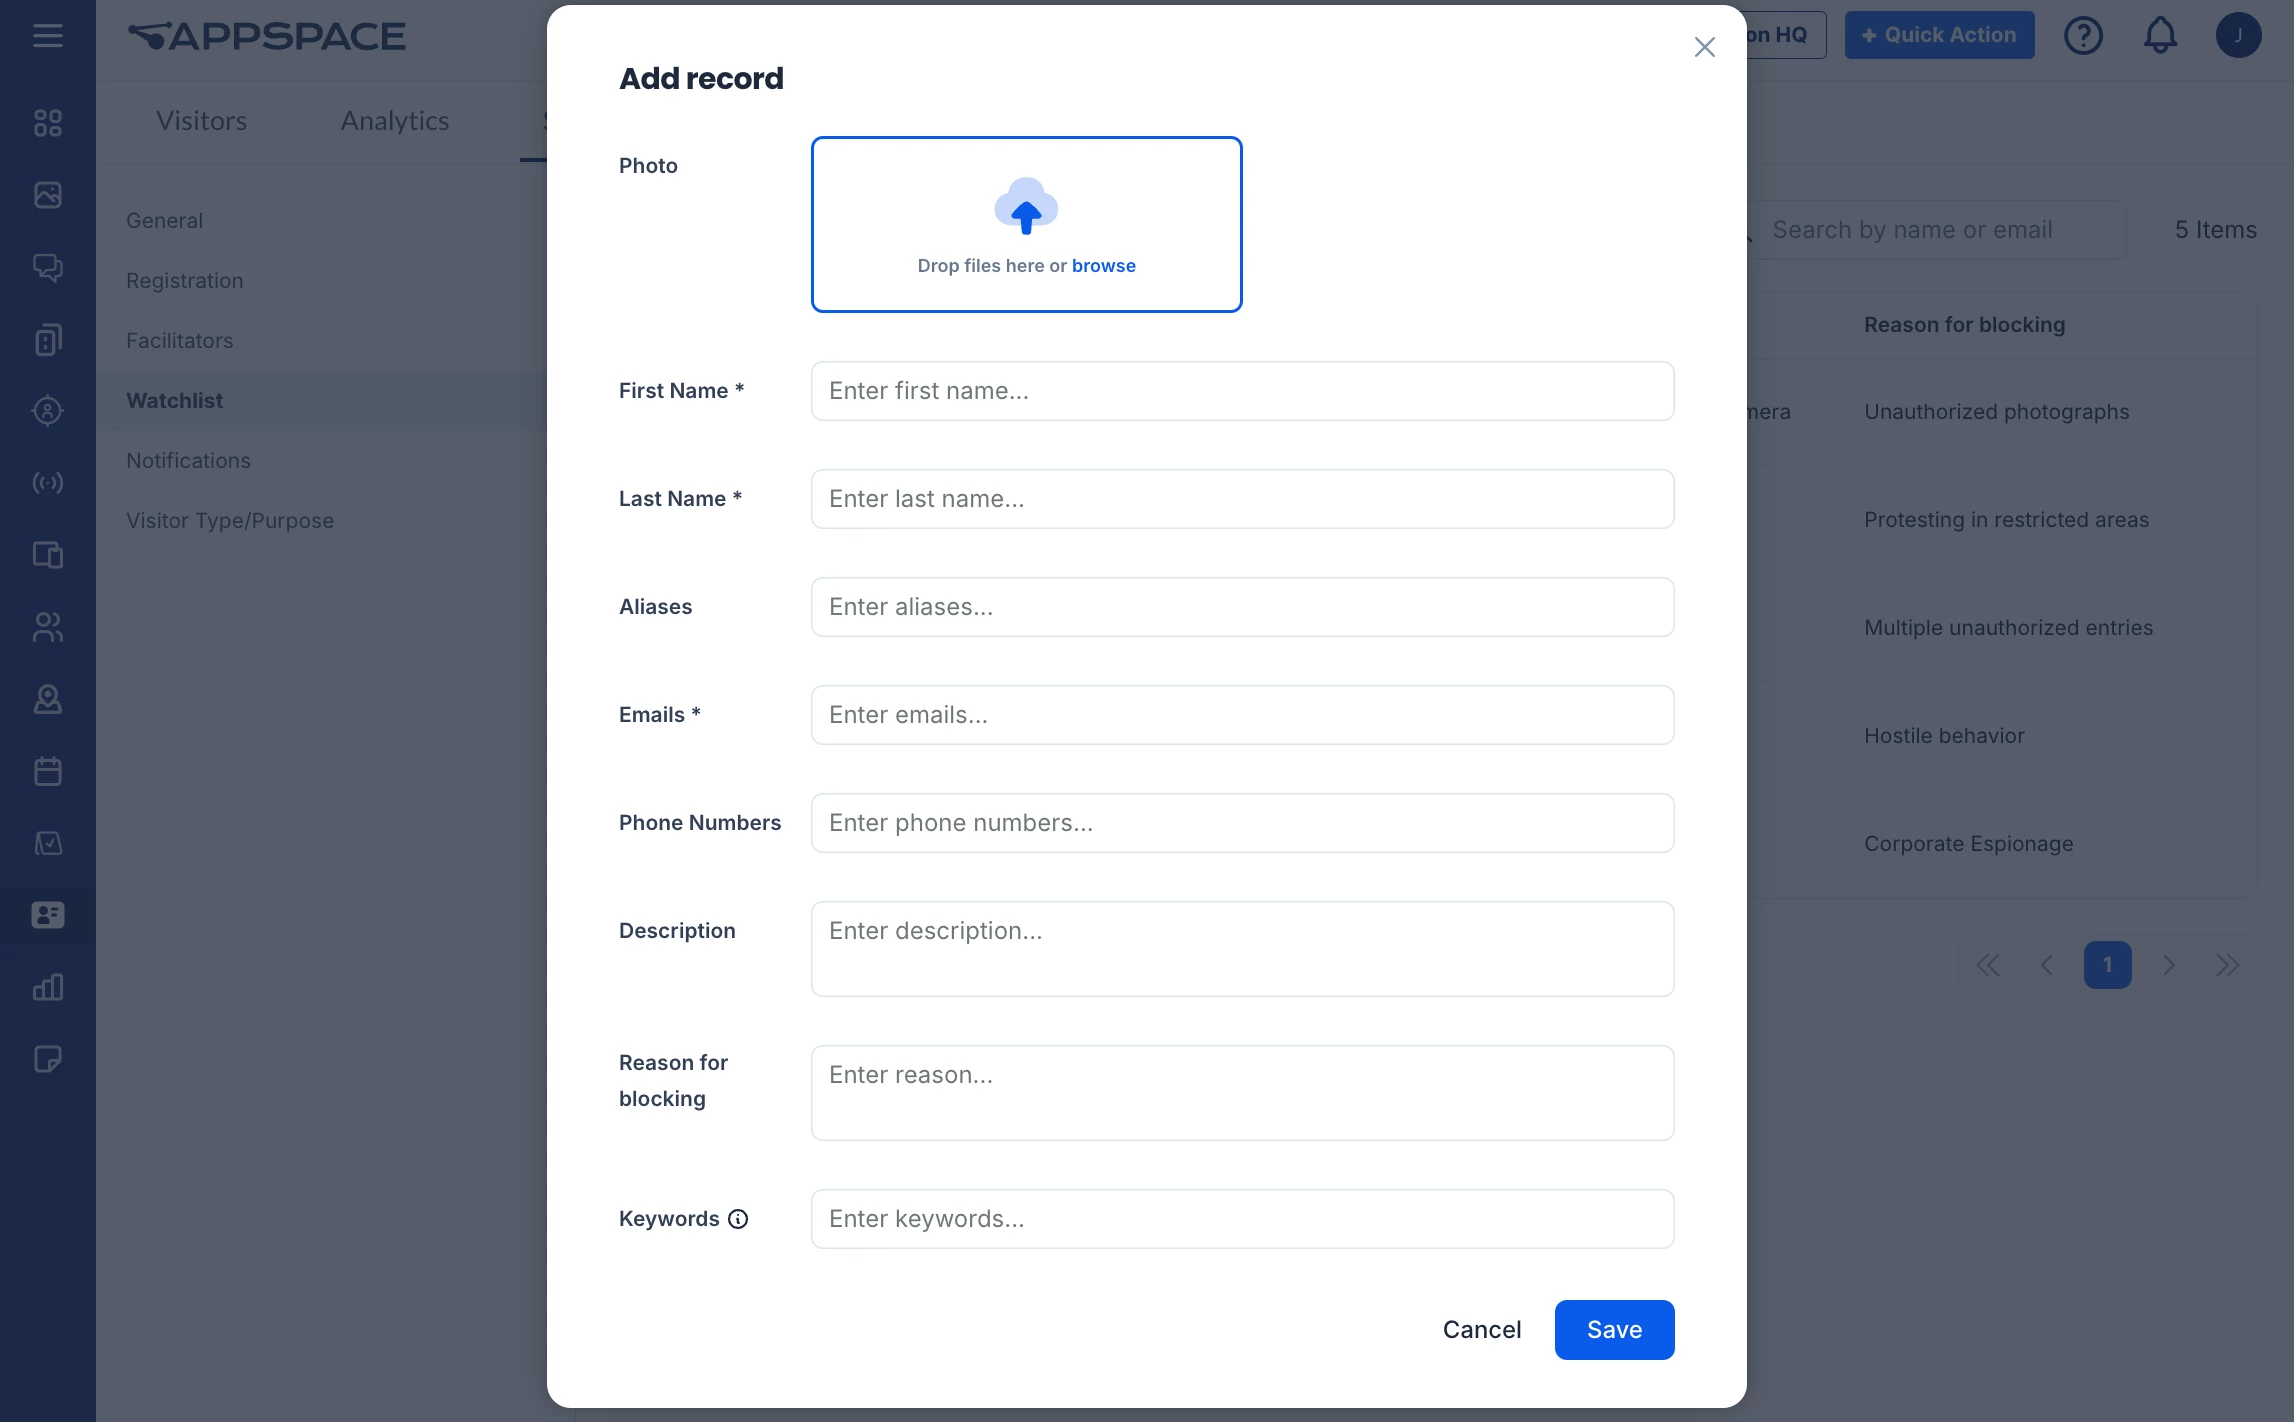
- Photo – You can upload a visitor’s photo file (in jpg or png).
- First Name and Last Name– Enter the first and last name of the visitor.
- Aliases – Type in any known aliases of the person, pressing Enter after each one. You can add multiple aliases.
- Emails – Type in any known emails of the person, pressing Enter after each one. You can add multiple emails.
- Phone Numbers – Type in a phone or mobile number associated with the person, and press Enter. You can add multiple numbers.
- Description– Enter a description of the person.
- Reason for blocking– Enter a reason for the visitor’s restriction.
- Keywords – Type in a keyword for the person, pressing Enter after each one. You can add multiple keywords.
- Once done, click Save.
- You can click the ellipsis at the end of each row to either Edit or Delete a visitor on the watchlist.
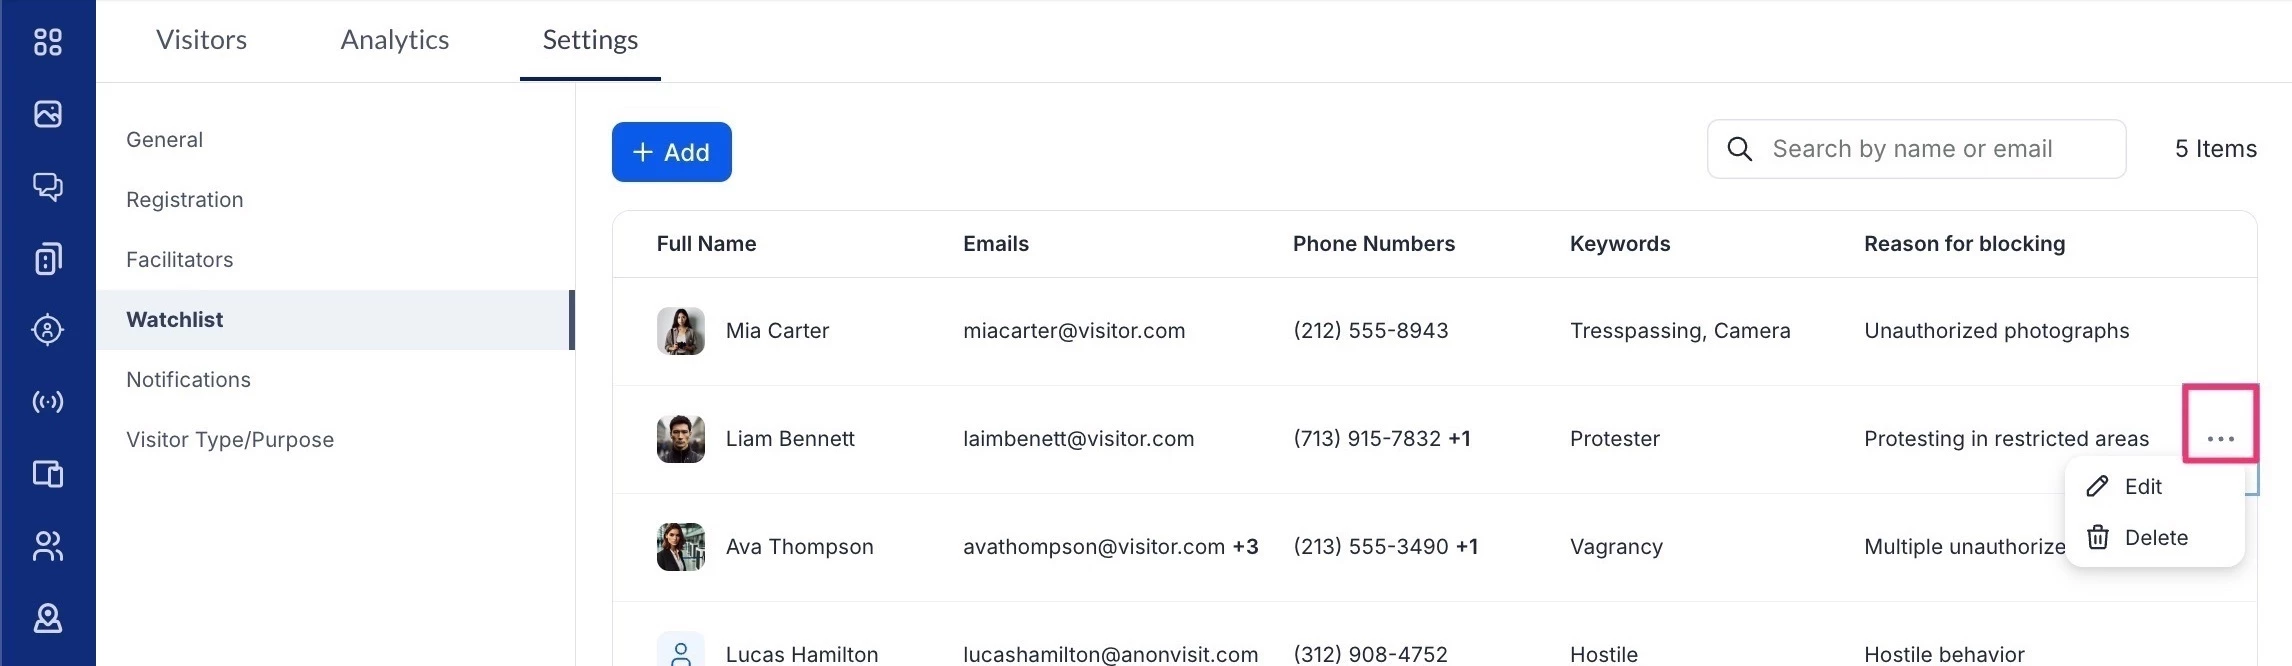
- If a visitor on the watchlist is added to a new or existing reservation or visitor invitation, a note will appear indicating their watchlist status. The reservation cannot be confirmed until the visitor is removed.
Notifications Settings for Visitors
(New) The Notifications settings contain settings focused on notifications within the Visitors module.
The Notifications settings can be accessed via the Settings > Notification tab within the Visitors module.
Configure Email Notifications
The Email Notifications setting option allows Admins to enable email notifications for reservations.
To configure the Email Notifications setting, slide the toggle switch to the preferred option:
- ON – Enable email notifications for invitations.
- OFF – Disables the feature.
Configure Push Notifications
The Push Notifications setting option allows Admins to enable push notifications on Appspace App mobile devices.
To configure the Push Notifications setting, slide the toggle switch to the preferred option:
- ON – Enable push notifications for Appspace App mobile devices.
- OFF – Disables the feature.
Configure the Global Notification Template
The Global Notification Template allows Admins to customize the email notifications layout to match the organization’s branding theme.
To configure the Global Notification Template, click the Edit icon on the Global Settings template:
- In the Global Notification Template window, proceed to configure the following customizations in the Details section:
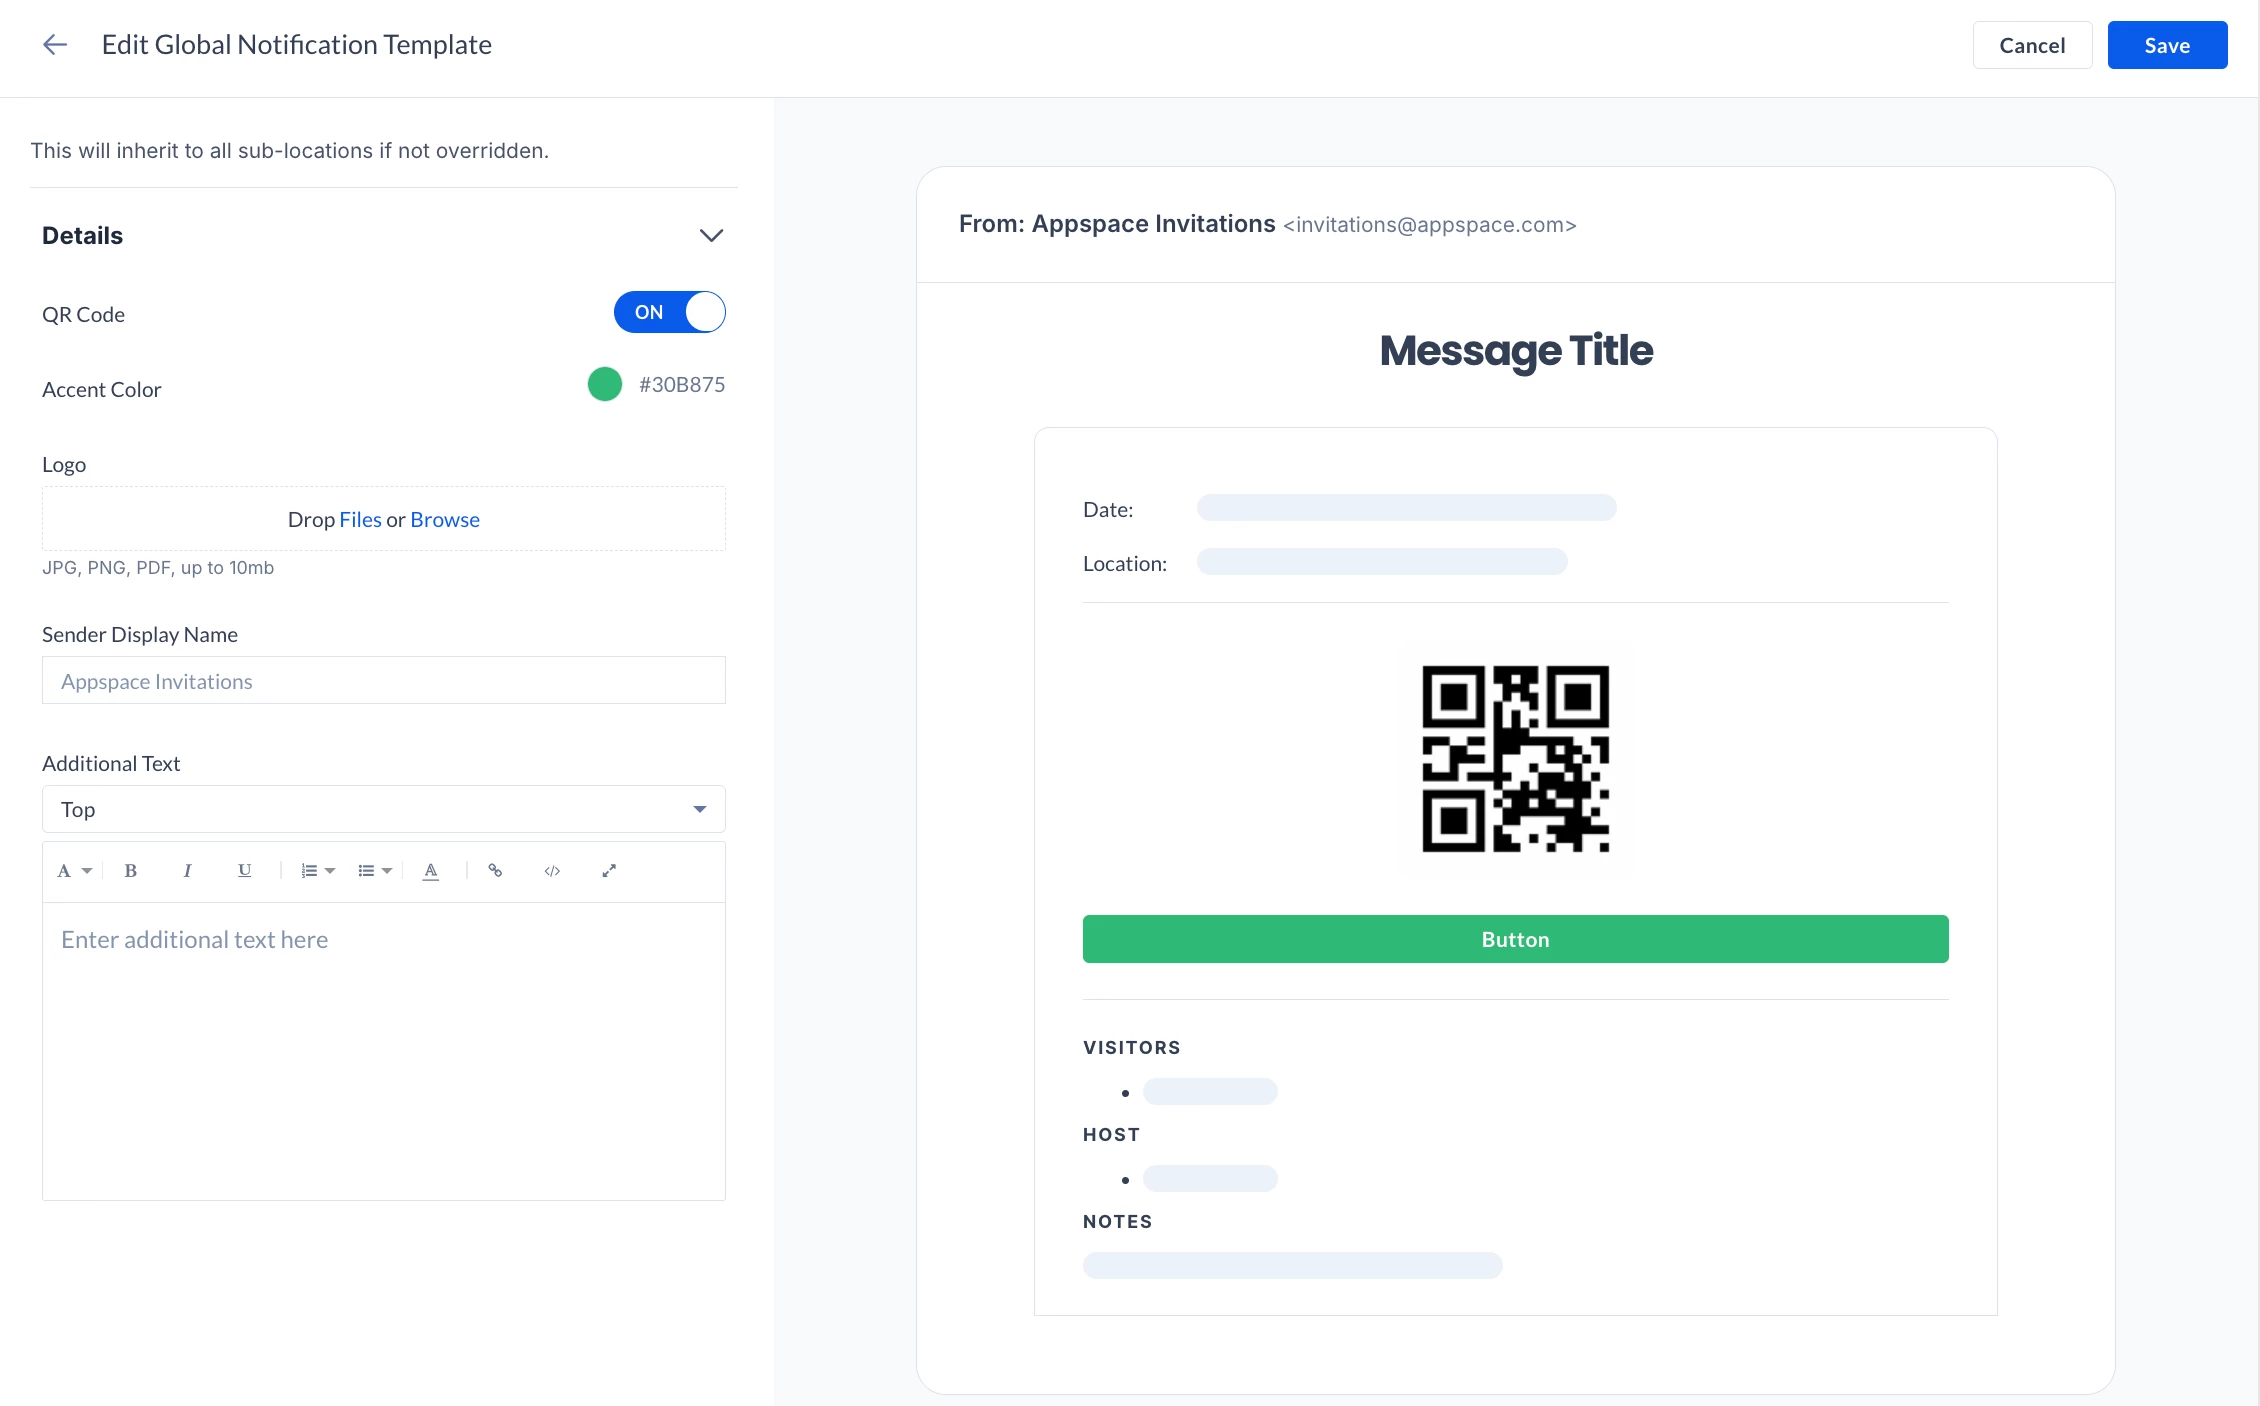
- QR Code – Enable (default) the display of the QR Code in the notification.
- Accent Color – Customize the accent color to match the organization’s branding theme, by selecting from the color picker or entering the color’s hex code.
- Logo – Displays the organization’s logo on the email notification, by uploading an image or browsing for the image in the Library.
- Sender Display Name – Customize the sender’s name, or leave it blank to display “Appspace Invitations” by default.
- Additional Text – Displays additional text to be included in the notification, such as important notices, or disclaimers.
- None – Disables additional text.
- Top – Displays additional text at the top of the notification, above the logo and event title.
- Middle – Displays additional text in the middle of the notification, below the reservation information and above the attendance block.
- Bottom – Displays additional text at the bottom of the notification.
The Preview section on the right displays the customizations made to the Global Notification template.
Create and Configure Location-Based Notification Templates
The Location-based Notification Templates allows Admins to customize the email notifications layout to match the organization’s branding theme.
To configure the Location-based Notification Templates, click the Edit icon on the desired Location-based template:
- In the Location-based Notification Template window, proceed to select the Location and inheritance of the notification template from the dropdown menus.
- Next, configure the location-based notification in the Notifications section:
- Inherited – Follows the Global settings to enable or disable Email and Push notifications for the location. If this is set to off, the Customize email and push notifications option is displayed.
- Customize email and push notifications – Enable or disable Email and/or Push notifications for the location.
- Once done, proceed to configure the following customizations in the Details section:
- QR Code – Enable (default) the display of the QR Code in the notification.
- Accent Color – Customize the accent color to match the organization’s branding theme, by selecting from the color picker or entering the color’s hex code.
- Logo – Displays the organization’s logo on the email notification, by uploading an image or browsing for the image in the Library.
- Sender Display Name – Customize the sender’s name, or leave it blank to display “Appspace Invitations” by default.
- Additional Text – Displays additional text to be included in the notification, such as important notices, or disclaimers.
- None – Disables additional text.
- Top – Displays additional text at the top of the notification, above the logo and event title.
- Middle – Displays additional text in the middle of the notification, below the reservation information and above the attendance block.
- Bottom – Displays additional text at the bottom of the notification.
The Preview section on the right displays the customizations made to the Location-based template.
Configure Visitor Management Notifications
Follow the instructions below to configure the notifications that will be sent to both Visitor and Host via email:
- Log in to the Appspace console.
- Click Visitors from the ☰ Appspace menu, and click the Settings tab.
- Click the Notifications tab from the side panel to configure the email notifications that are sent to both visitors and hosts.
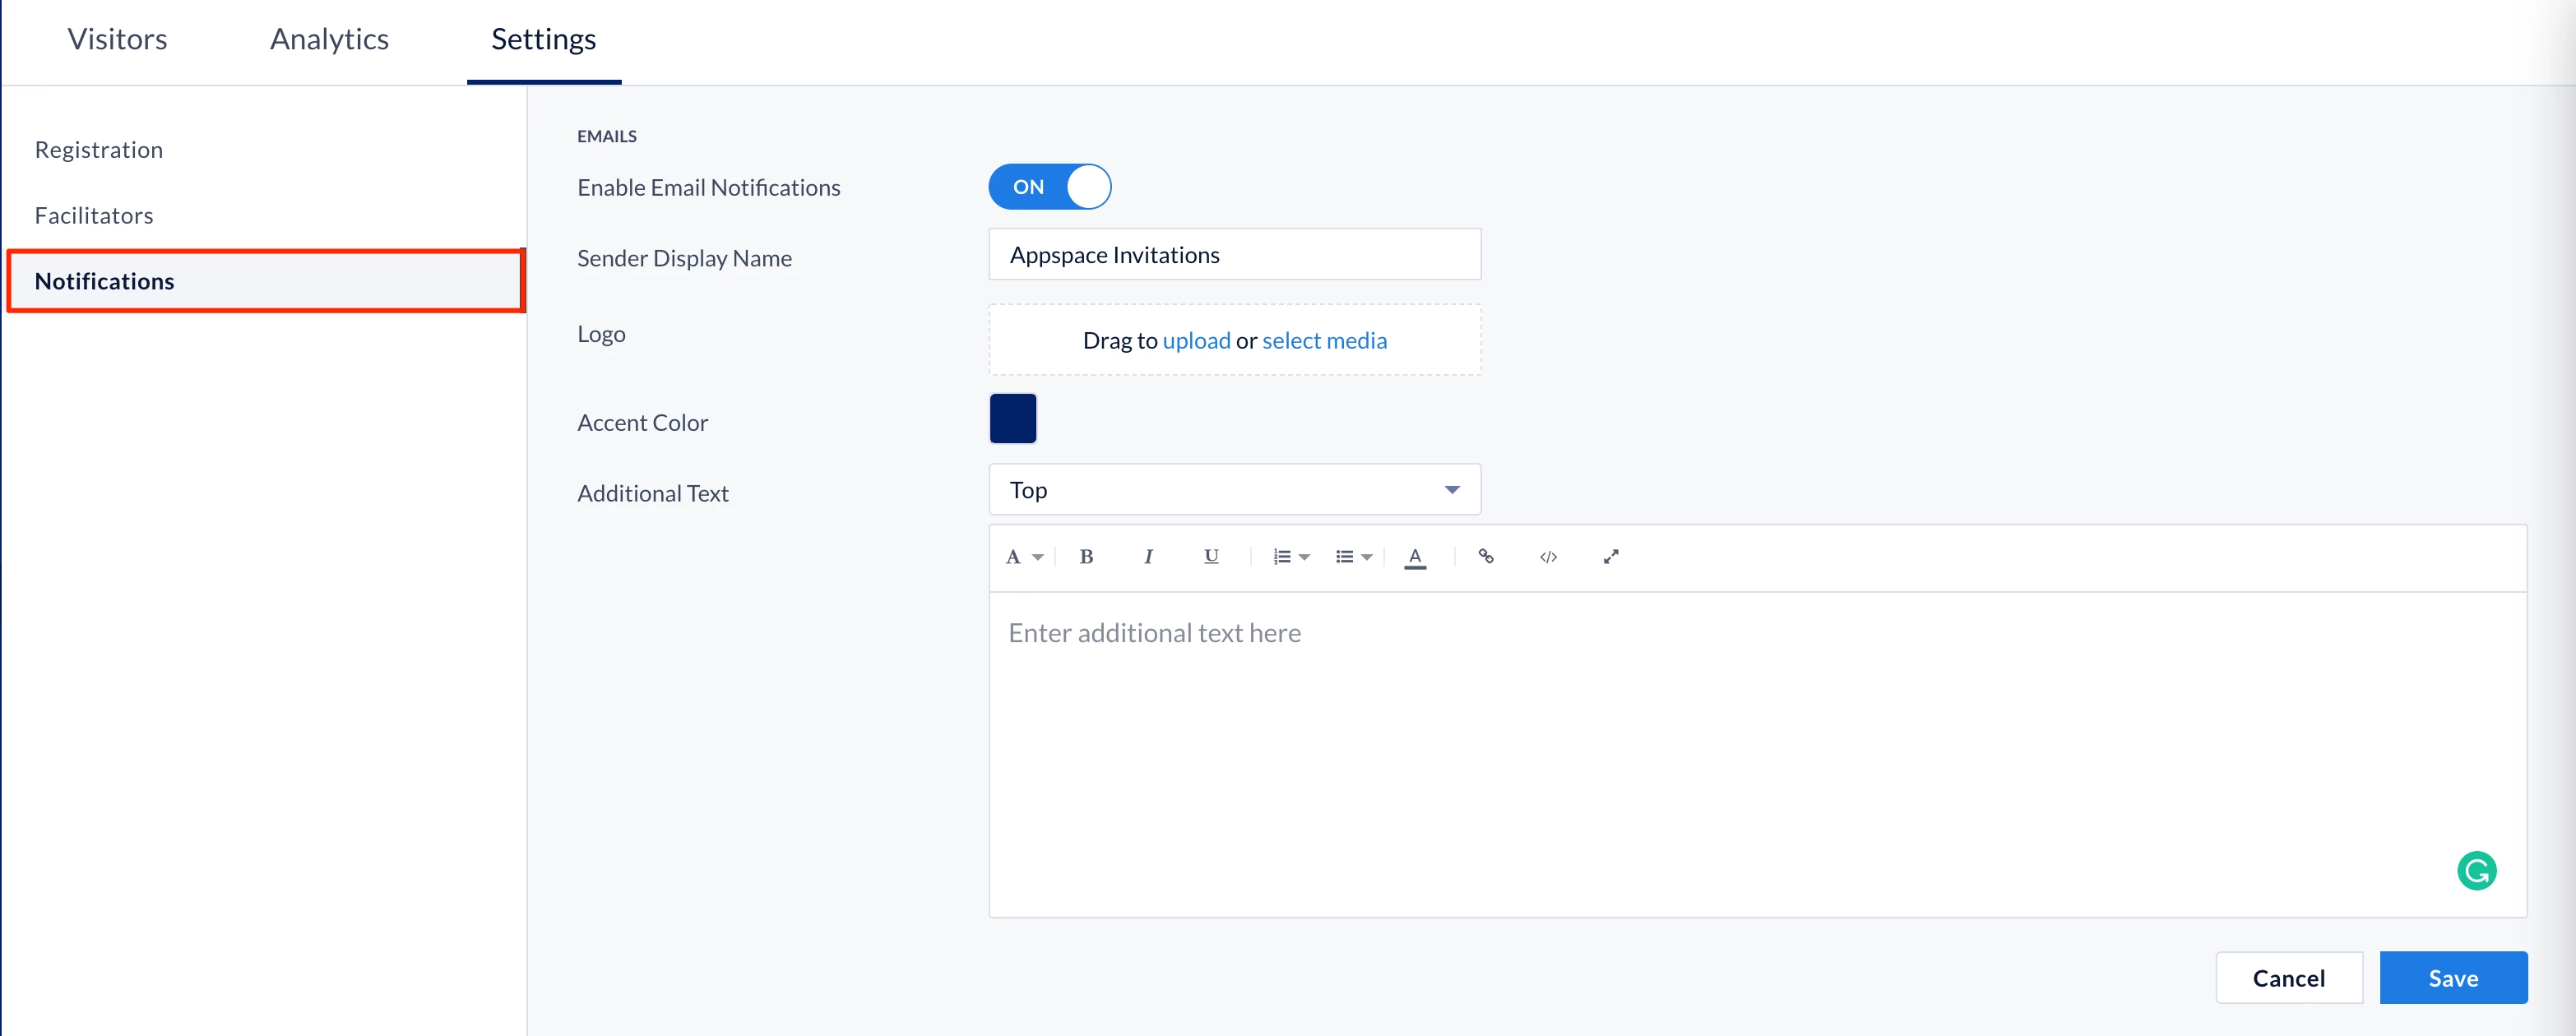
- Slide the Enable Email Notifications toggle to ON to enable visitor notifications.
- Proceed to configure the following visitor notification fields:
- Sender Display Name – Enter the name you wish displayed as the sender name when sending out the email notification.
- Logo – Upload or select a logo from the library to be added as the logo for the email notification.
- Accent Color – Select the accent color from the color picker to match your organization’s branding theme.
- Additional Text – Additional text such as important notices can be included within the notification by entering the text to be displayed in the Additional Text editor, and selecting the alignment of where the text is displayed from the drop-down menu.
- Once done, click Save.
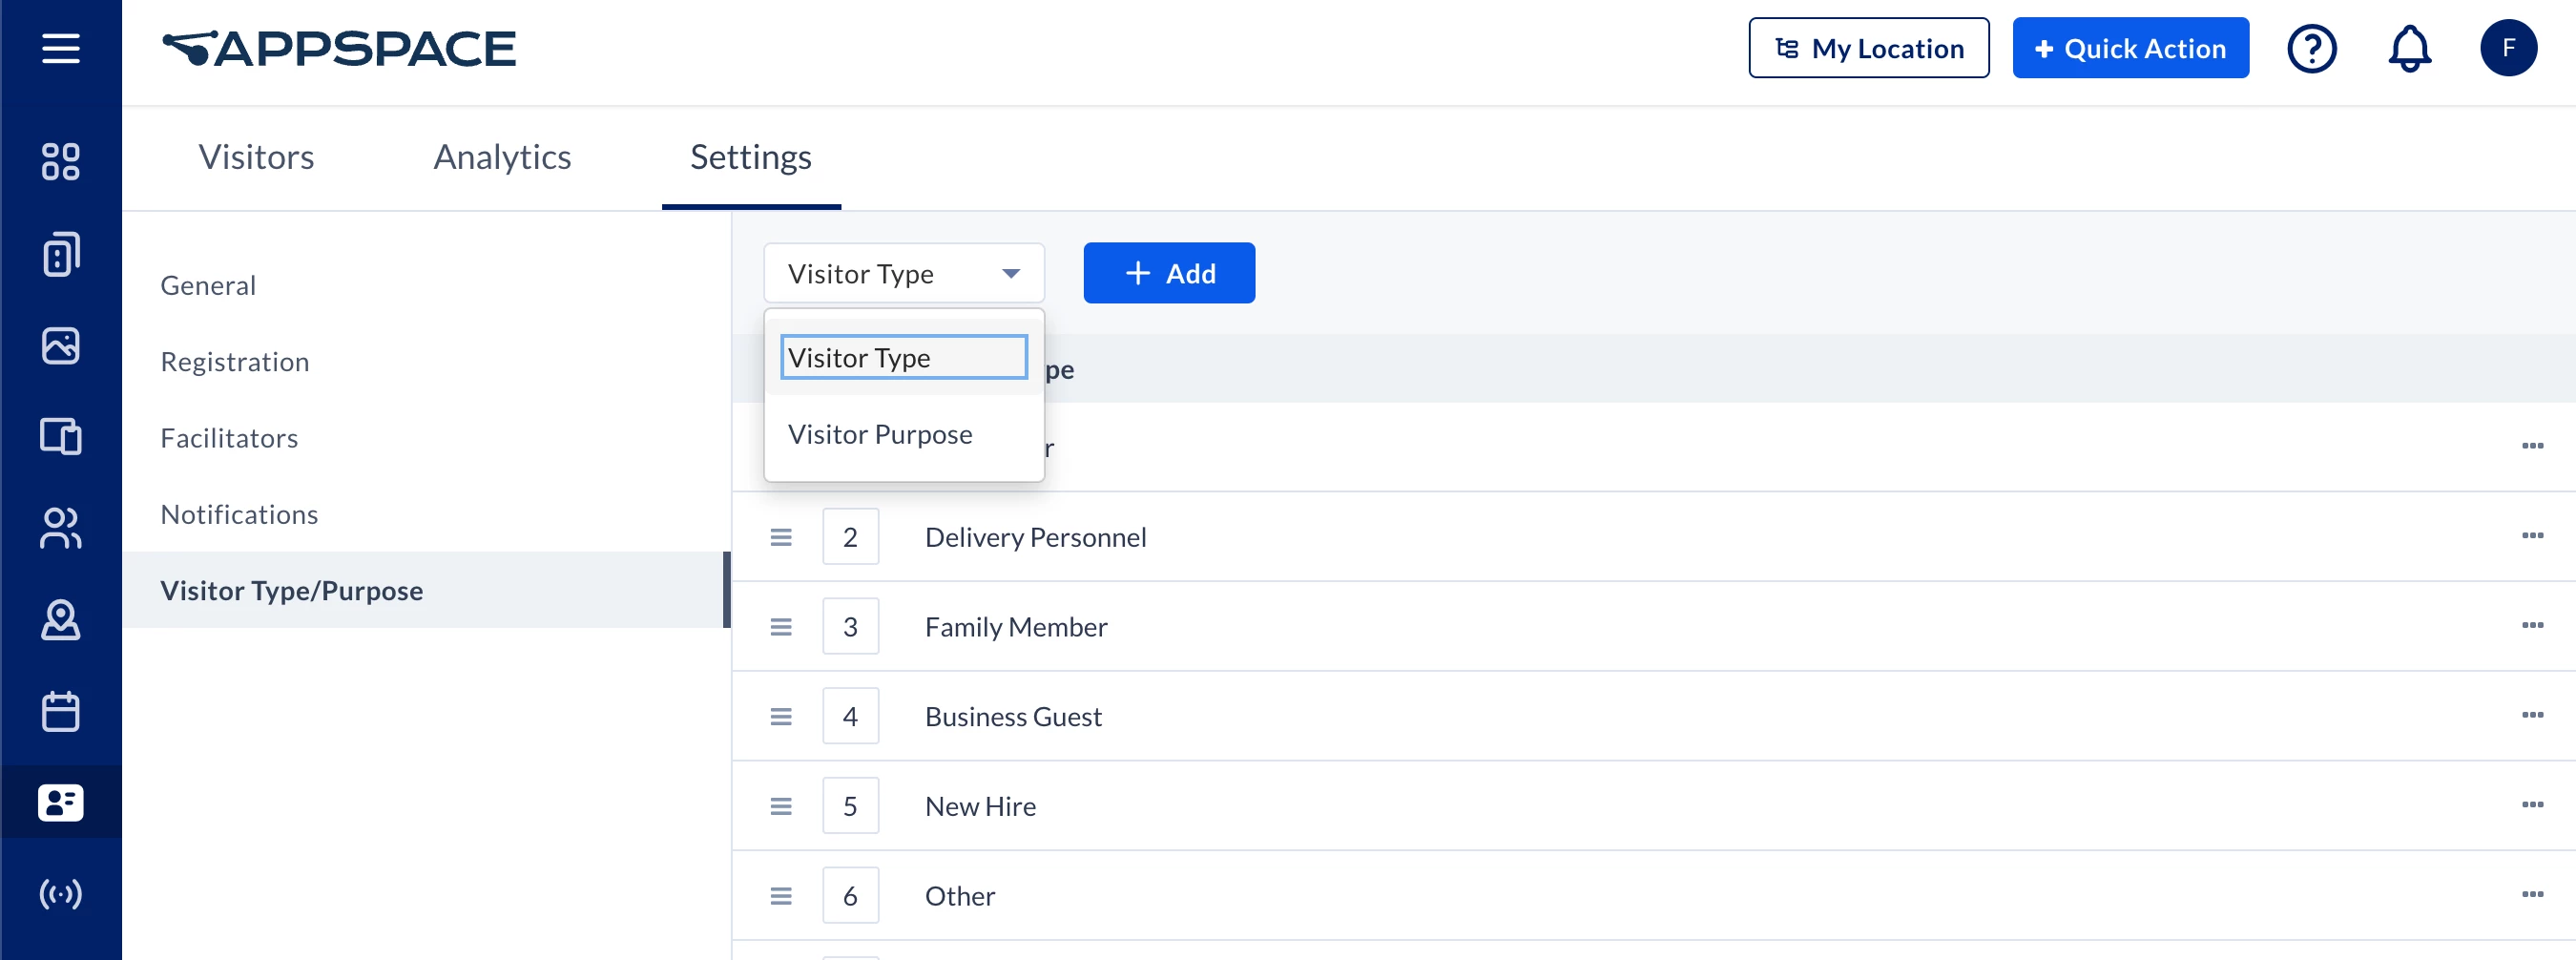
Configure Visitor Types and Visitor Purposes
Organizations are now able to customize and manage a list of Visitor Types and Visitor Purposes that are specific to their organization and daily operations.
Important
In this release, the option to delete visitor types or visitor purposes is currently unavailable. However, visitor types and purposes that have been added can still be edited or disabled if not in use.
The option to delete will be available in the upcoming release.
- Log in to the Appspace console.
- Click Visitors from the ☰ Appspace menu, and click the Settings tab.
- Click the Visitor Type/Purpose tab from the side panel, and select either Visitor Type or Visitor Purpose from the drop-down menu to be configured:
Note
The maximum number of Visitor Type and Visitor Purpose that can be added is 30 items.
- Visitor Type
- Click the + Add button, and enter the desired visitor type. Once done, click Save.
- Visitor Purpose
- Click the + Add button, and enter the desired visitor purpose. Once done, click Save.
- Visitor Type
- Once the visitor types and purposes have been added, you may perform the following actions by clicking the specific Visitor Type or Visitor Purpose ellipsis:
- Edit – Rename the visitor type or purpose. (Only applicable to custom visitor types or purposes)
- Disable – Disable the visitor type of purpose.
- Move to Top/Move to Bottom – Rearrange the visitor type or purpose that is displayed in the drop-down menu. Optionally, you may also rearrange the visitor type or purpose order by dragging the (☰) burger icon.
Configure Visitor Kiosks
Organizations wanting to utilize a self-service visitor kiosk in their buildings can configure their devices to display our Visitor Kiosk card. This allows visitors that have received invitations to self check-in via QR code or a 6-digit unique code, or use the visitor drop-in feature to create on-the-spot invitations.
Below is a workflow to display the Visitor Kiosk card on kiosks device that would be placed at entry points within your organization.
- Log in to the Appspace console.
- Create the Visitor Kiosk card by following the instructions in the Cards: Display Visitor Kiosk article.
- Assign the Visitor Kiosk card to a playlist channel by following the instructions in the Create a Playlist Channel article.
- Register or enable Appspace App on the kiosk device.In the Channel selection mode field in step 6 of the registration process, select the following option only:
-
- Administrators can select a single channel – assign the playlist channel with the Visitor Kiosk card from step 3 above to the kiosk device.
View Visitor Management Analytics
In the Visitors module, click the Insights tab. You will be able to view statistical data of all the visitor invitations that have been made using the Appspace Employee View either via the portal or your mobile app, or from the Visitor Kiosk card. Prior to the deployment of your visitor management application, this tab will be empty.
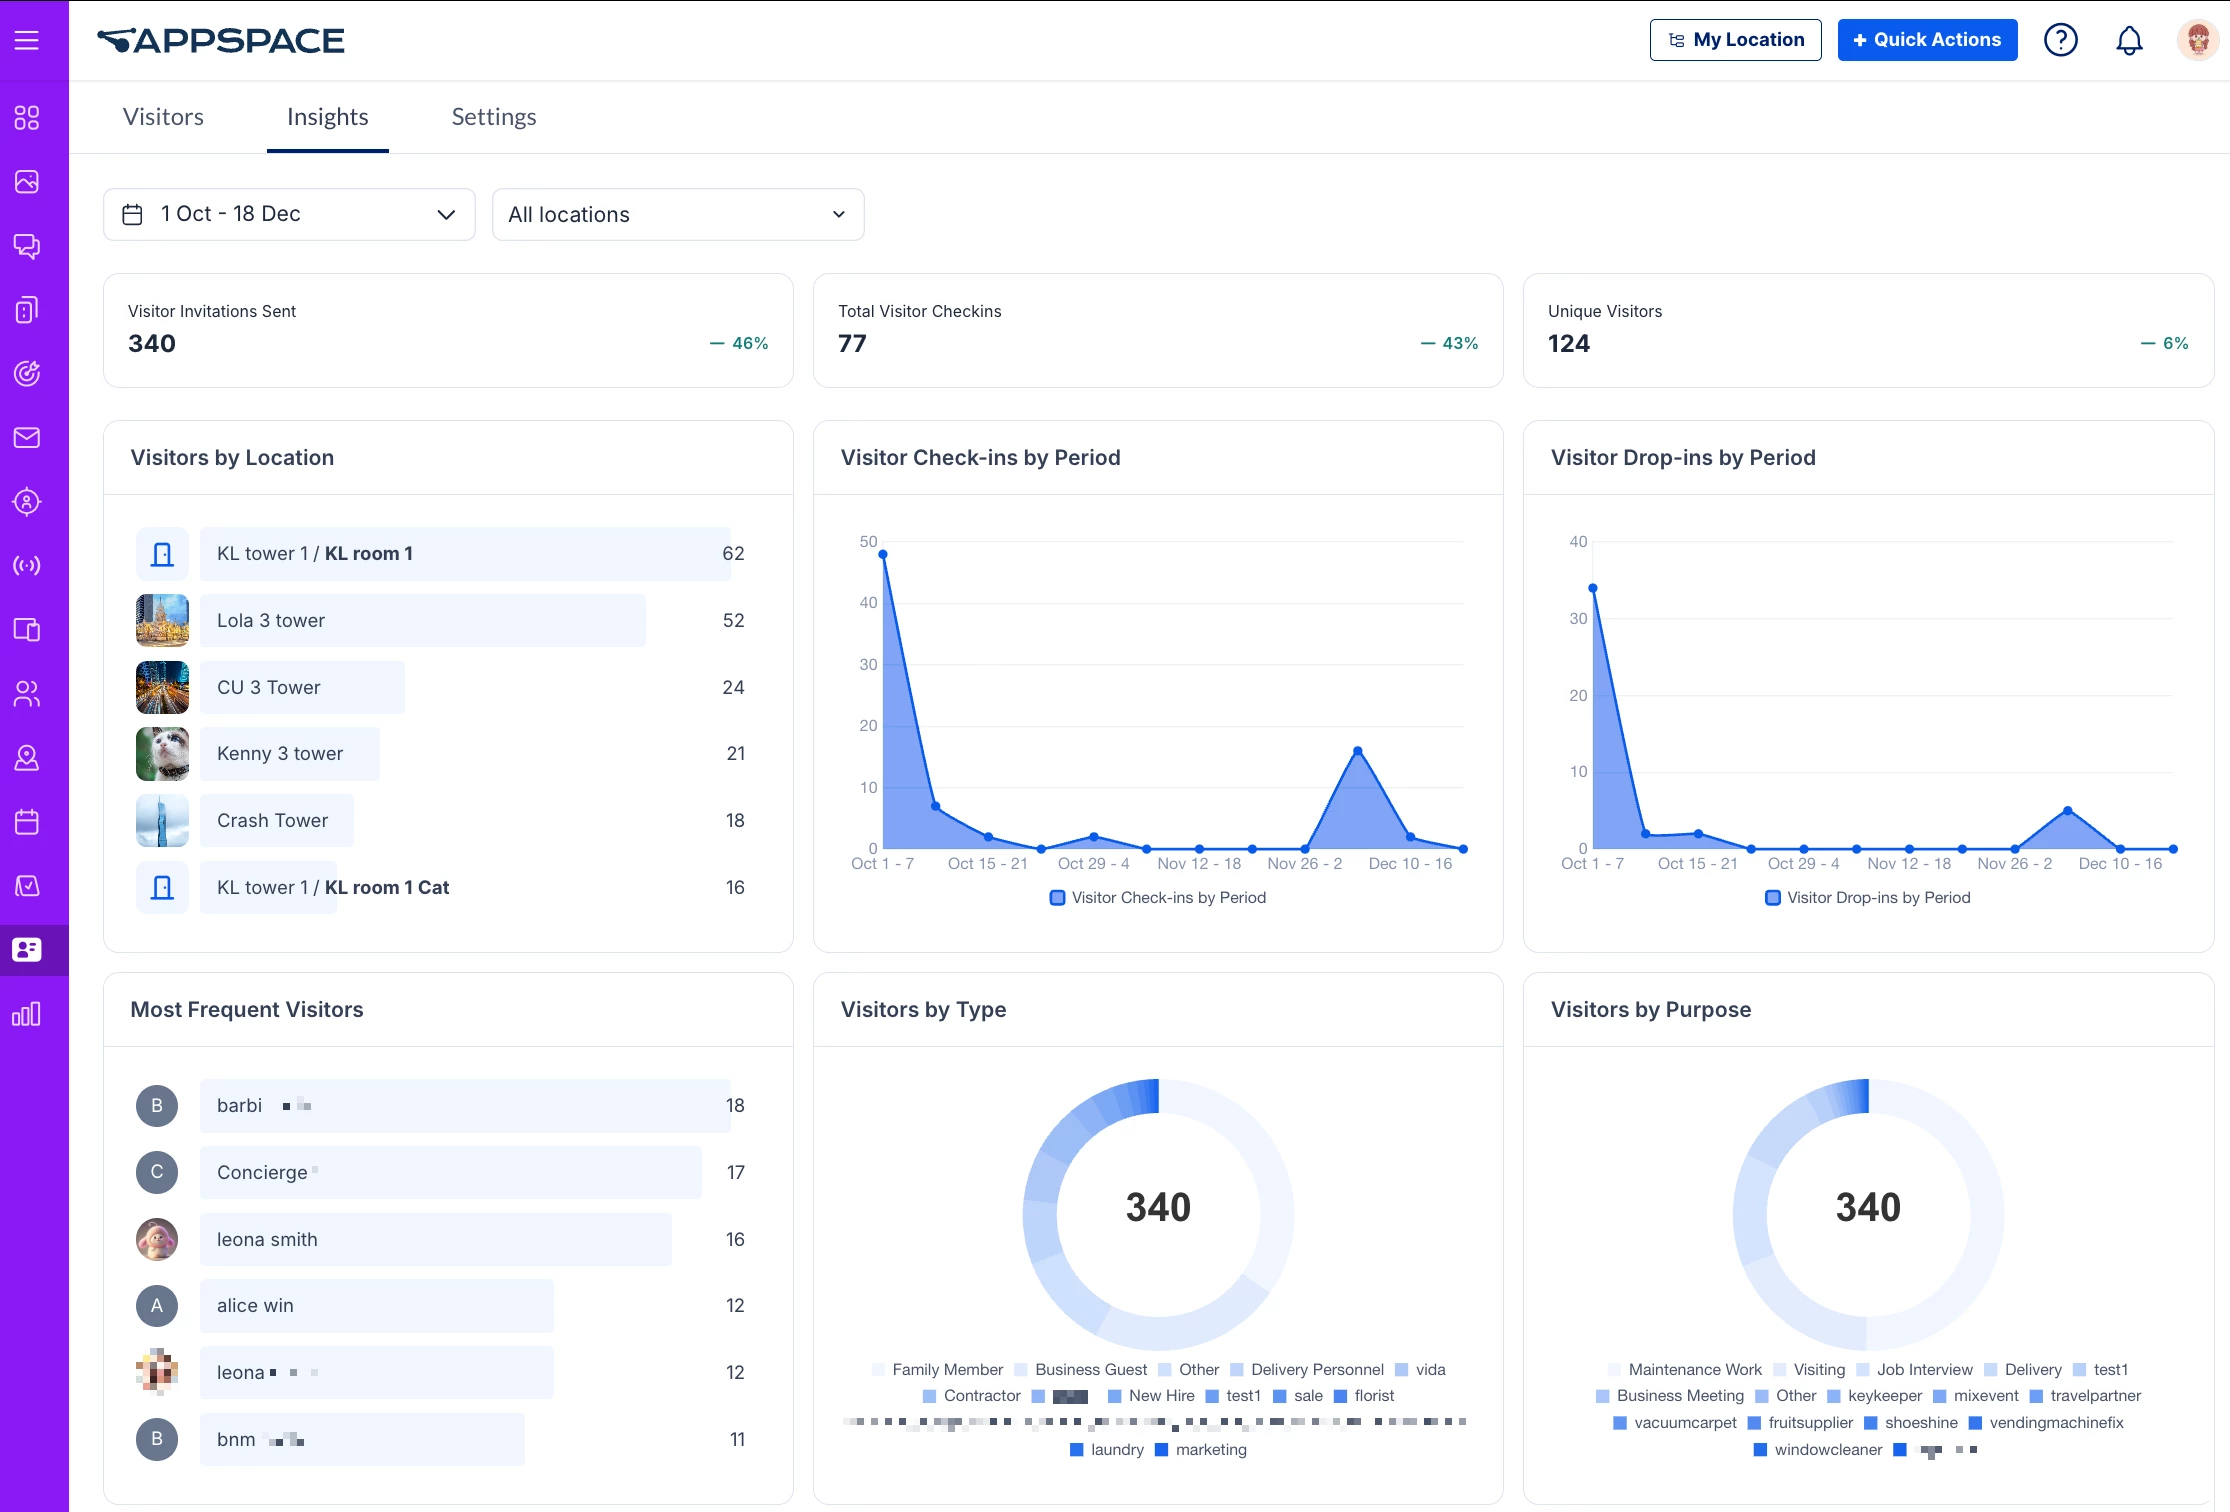
You may view all analytics for your visitor visits based on the Activity Period, which can be changed from the drop-down calendar. You can also filter your data by the location within your environment.
Administrators looking for information on the Insights tab, refer to Browse and Navigate Visitor Management.