

This article consists of three parts. You can continue reading with the links below:
Send Visitor Invitations
Follow the instructions to send a visitor invitation as an Administrator via the Appspace console:
- Log in to the Appspace console.
- Click Visitors from the ☰ Appspace menu, and click the Visitors tab.
- Click the +INVITE button to create a visitor invitation.
- In the Invite Visitors window, enter the following information:
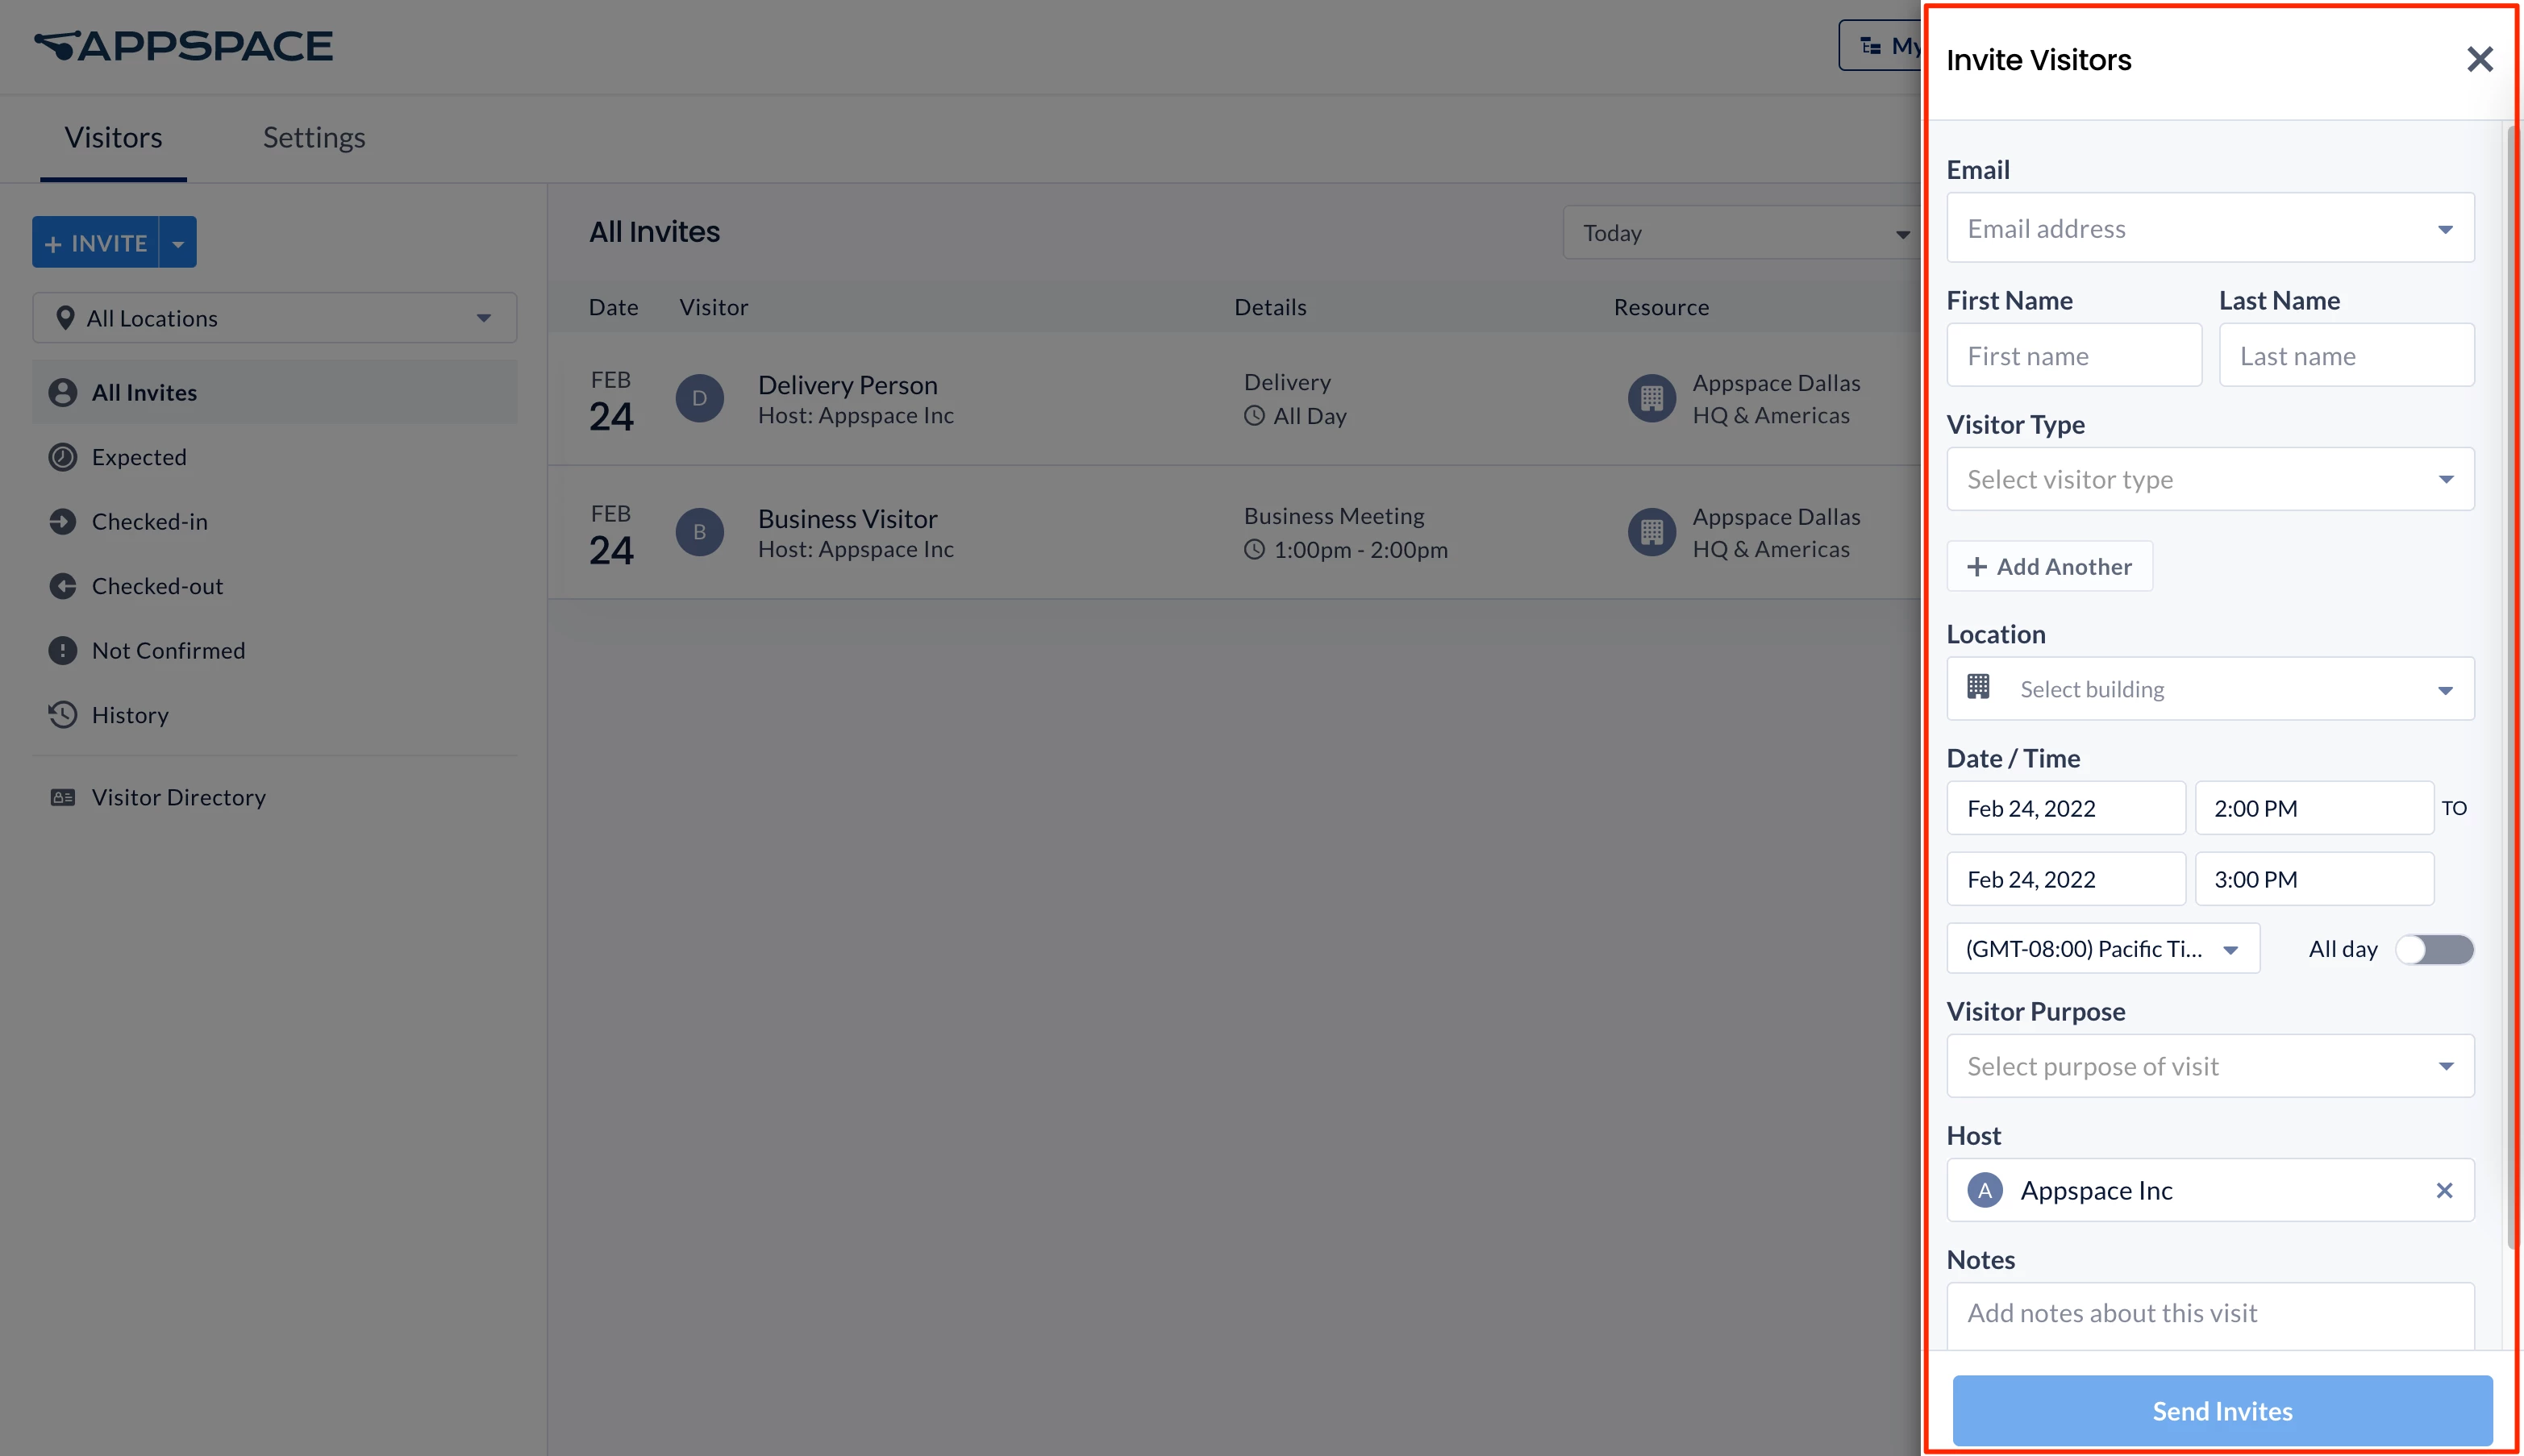
- Visitor – Enter the visitor’s email or first name / last name to search for an existing visitor, or select + Add new visitor to create a new visitor by entering the following information:
- Email
Note
This field can be set to be required or optional by an administrator, following organizational requirements to check in visitors with their email address. If the email field is set to optional and is not filled when adding the new visitor, a symbol is displayed to indicate that the visitor does not have an email registered.
- First Name, Last Name
- Visitor Type – Select if the visitor is a Contractor, Delivery Personnel, Family Member, Business Guest, New Hire, or Other from the dropdown menu.
- Email
- + Add Another – you may add another visitor to the visitor invitation, using the same methods above.
Note
(New) If an invitation includes more than one visitor, it is referred to as a Group Invitation. Each visitor receives an individual invitation containing only their own visit details, such as the date and time, host, and location. Upon arrival, visitors in the same group can be checked in together or individually.
- Optionally, you may import visitor data using a spreadsheet (bulk import), using the following steps. If not, skip to the Location step below.
- If you have not yet entered a visitor, click the Visitor field and click + Add new visitor from the drop-down. If you have already entered a visitor, click Add Another.
- Under Add Visitor, click the + Add Another button drop-down, and select + Download Import Template. Download the file.
- Open the downloaded spreadsheet template file. Enter the visitor information following the columns in the template:
- First Name
- Last Name
- Visitor Type – Specify if the visitor is a Contractor, Delivery Personnel, Family Member, Business Guest, New Hire, or Other.
- Save the file.
- In Invite Visitors, Click the + Invite button drop-down, and select + Import from xlsx. Select the saved file.
- After the file is uploaded, the information of the imported visitors is displayed in the Invite Visitors window.
- An error message appears if there are errors in the imported visitor information. Click the error message to go straight to the next field with an error.
- Correct the fields that have an error, or click – to remove that visitor entirely.
- Click Next.
- (New) Reservation Name – Enter a name that identifies the visitor invitation or group.
Note
- The reservation name can contain up to 255 characters.
- If the field is empty, the invitation is displayed as Visitor Invitation.
- The reservation name can be edited after the invitation is created.
- For visitor invitations associated with a Space Reservation event, reservation name changes are synchronized across the Visitor Management and Space Reservation modules.
- Location – Select the building location of the visit.
- Date/Time – Select the duration of the visit.
- Start Date / Time
- End Date / Time
- Timezone
- All day – If the invitation is for an all day visit, slide the toggle to enable.
- Visitor Purpose – Select the purpose of the visit by the visitor, such as for a Business Meeting, or a Job Interview.
- Host – Select the Host if other than you.
- Notes – Allows you to record details about the visit.
- Require pre-registration – Enable this to require visitors to perform event pre-registration and set them as Pending for the event. Disabling this will set them as Expected for the event and not send out the invitation email.
- Enable notifications – Enables or disables the email notifications for the invite, update, removal, or cancellation of the event sent to the visitor. This does not affect emails sent to the host.
- Require checkpoints – Enable this to require the visitor to use checkpoints using the Employee View. Disabling this will set the visitor as Expected at checkpoints.
- Visitor – Enter the visitor’s email or first name / last name to search for an existing visitor, or select + Add new visitor to create a new visitor by entering the following information:
- Once done, click Send Invites.
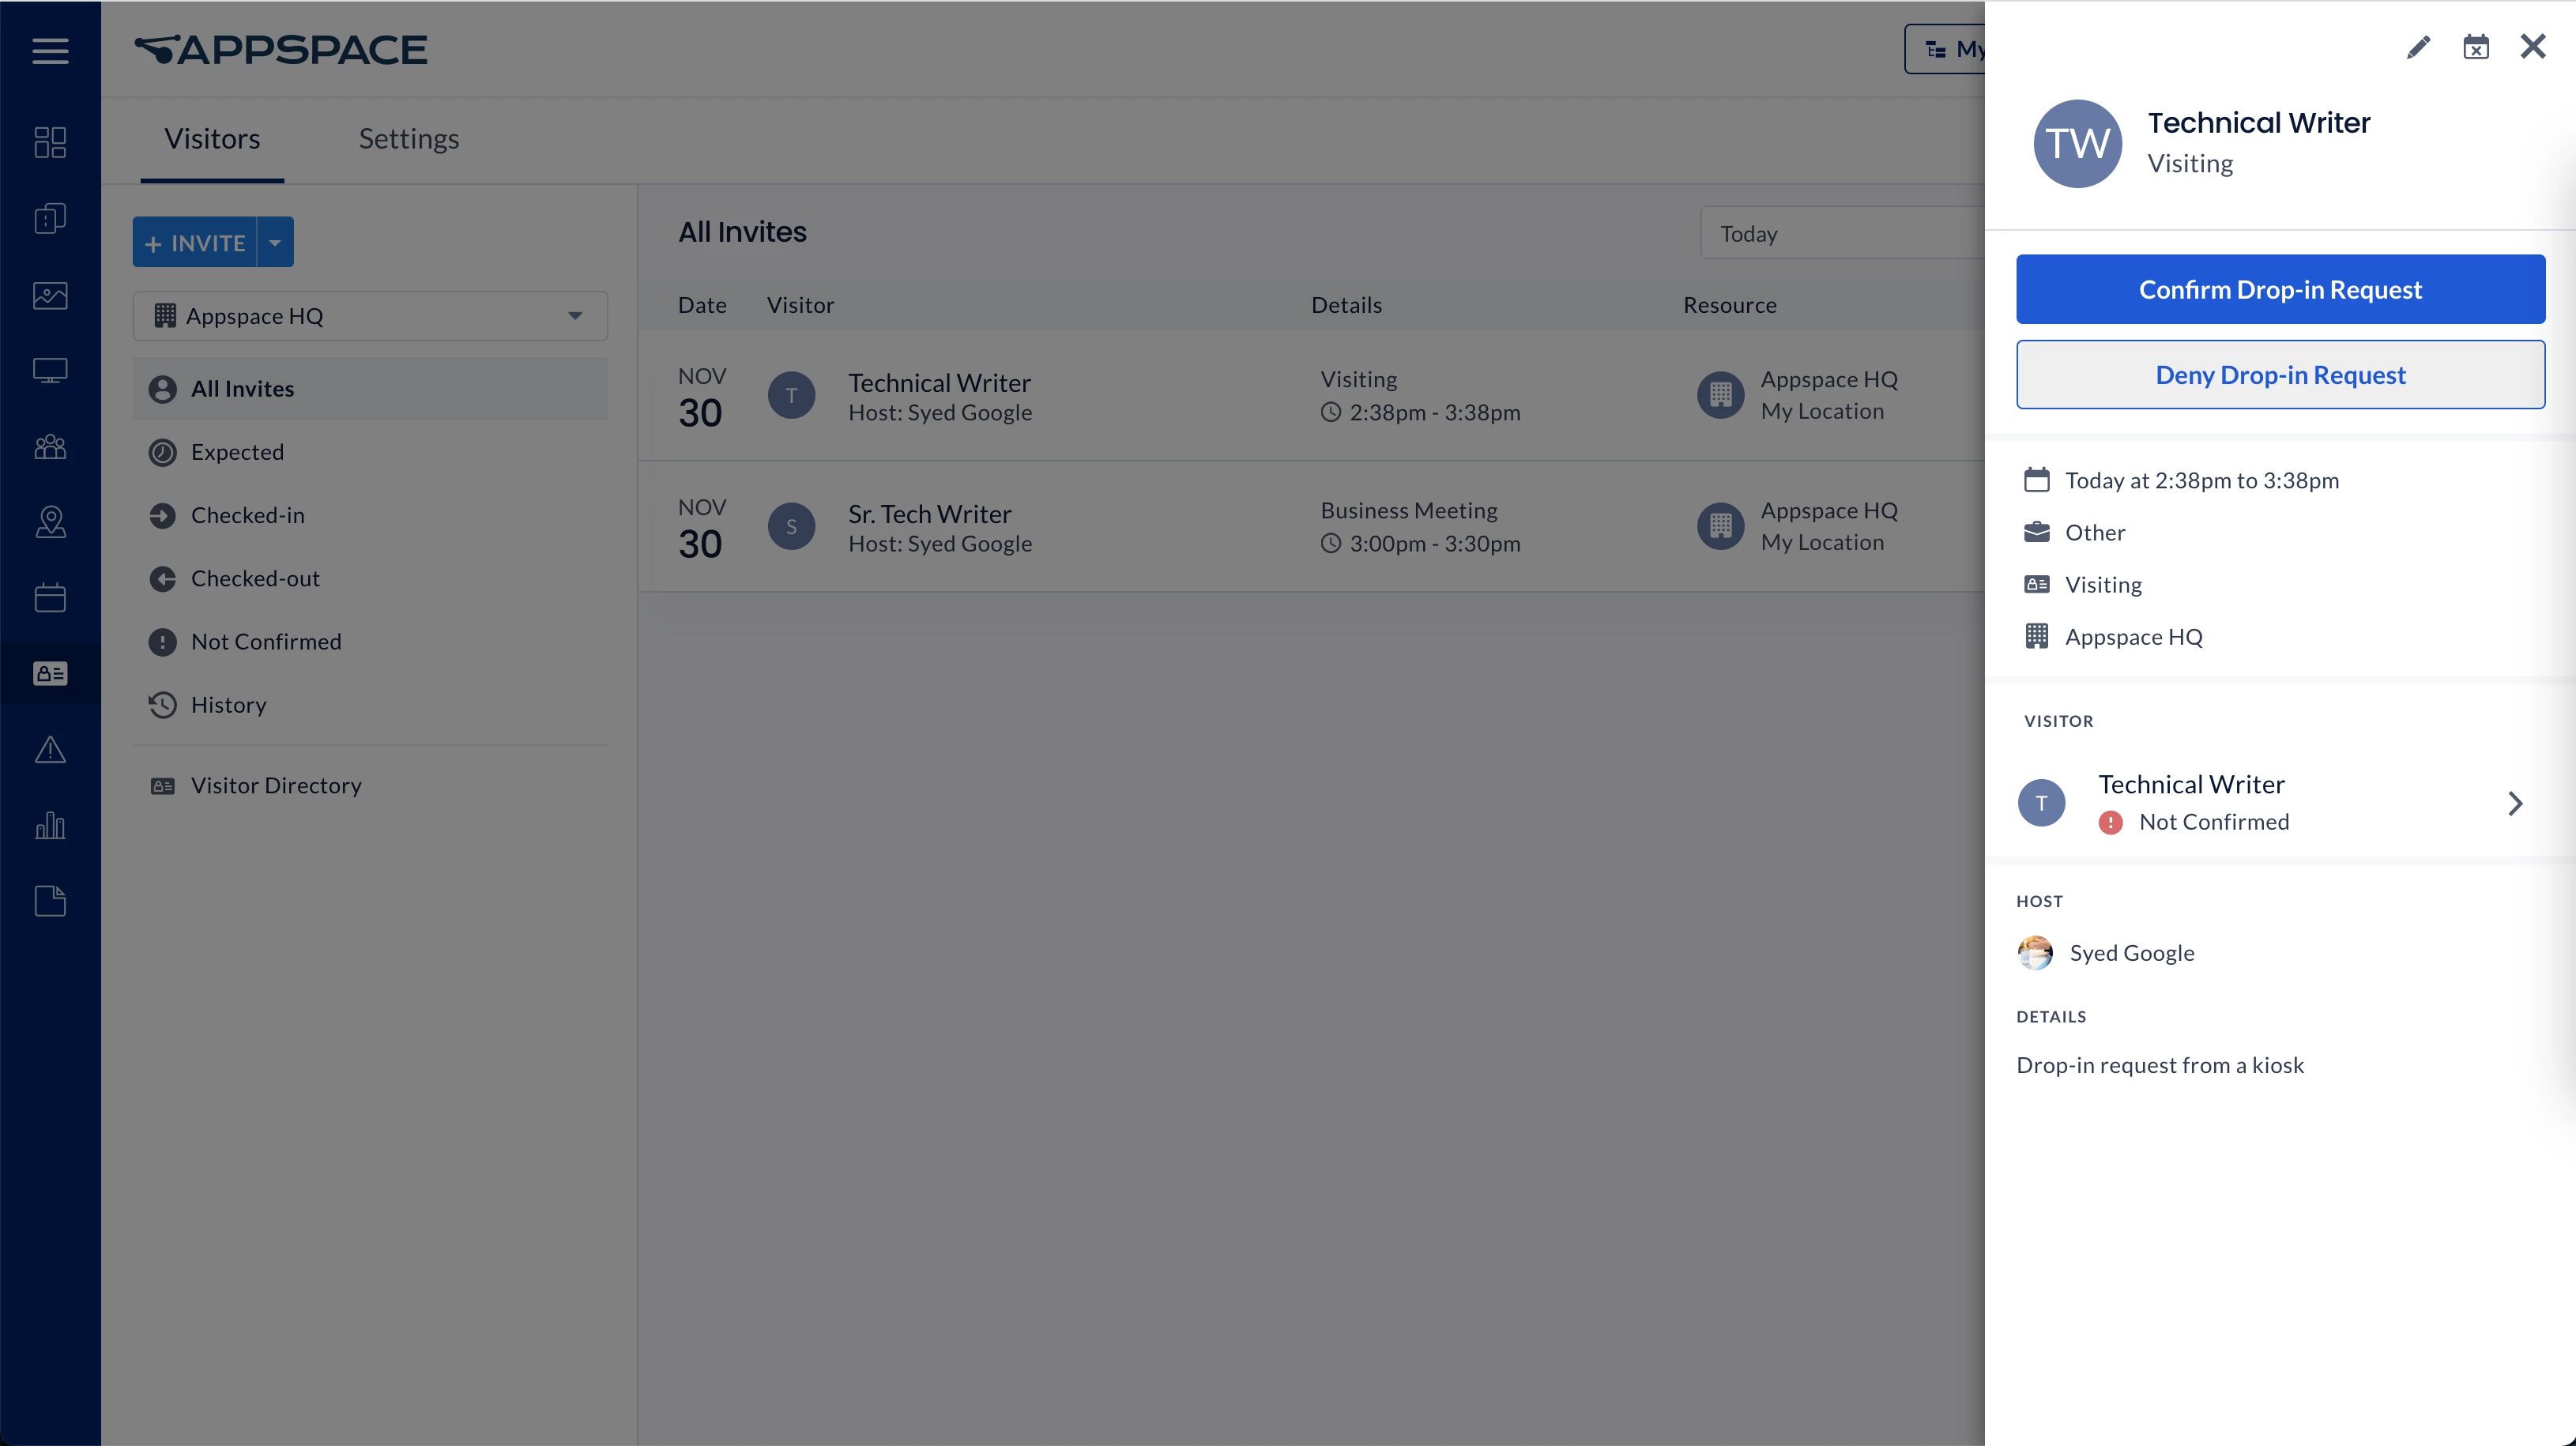
Confirm Visitor Invitation via Drop-In Request
Follow the instructions to confirm the visitor invitation via drop-in request as an administrator or facilitator via the Appspace console:
- Log in to the Appspace console.
- Click Visitors from the ☰ Appspace menu, and click the Visitors tab.
- Click the ellipsis of the visitor’s name you received the drop-in request notification from, and click Preview.
- Click the Confirm Drop-in Request button to confirm the visitor’s request, which will notify and send an invite to the visitor. You may also deny the drop-in request, which will reject the drop-in request and notify the visitor.
Create Visitor Profiles
Follow the instructions below to create visitor profiles.
- Log in to the Appspace console.
- Click Visitors from the ☰ Appspace menu, and click the Visitors tab.
- Click the + INVITE button drop-down, and select + Create Visitor.
- In the Create Visitor window, enter the following visitor information:
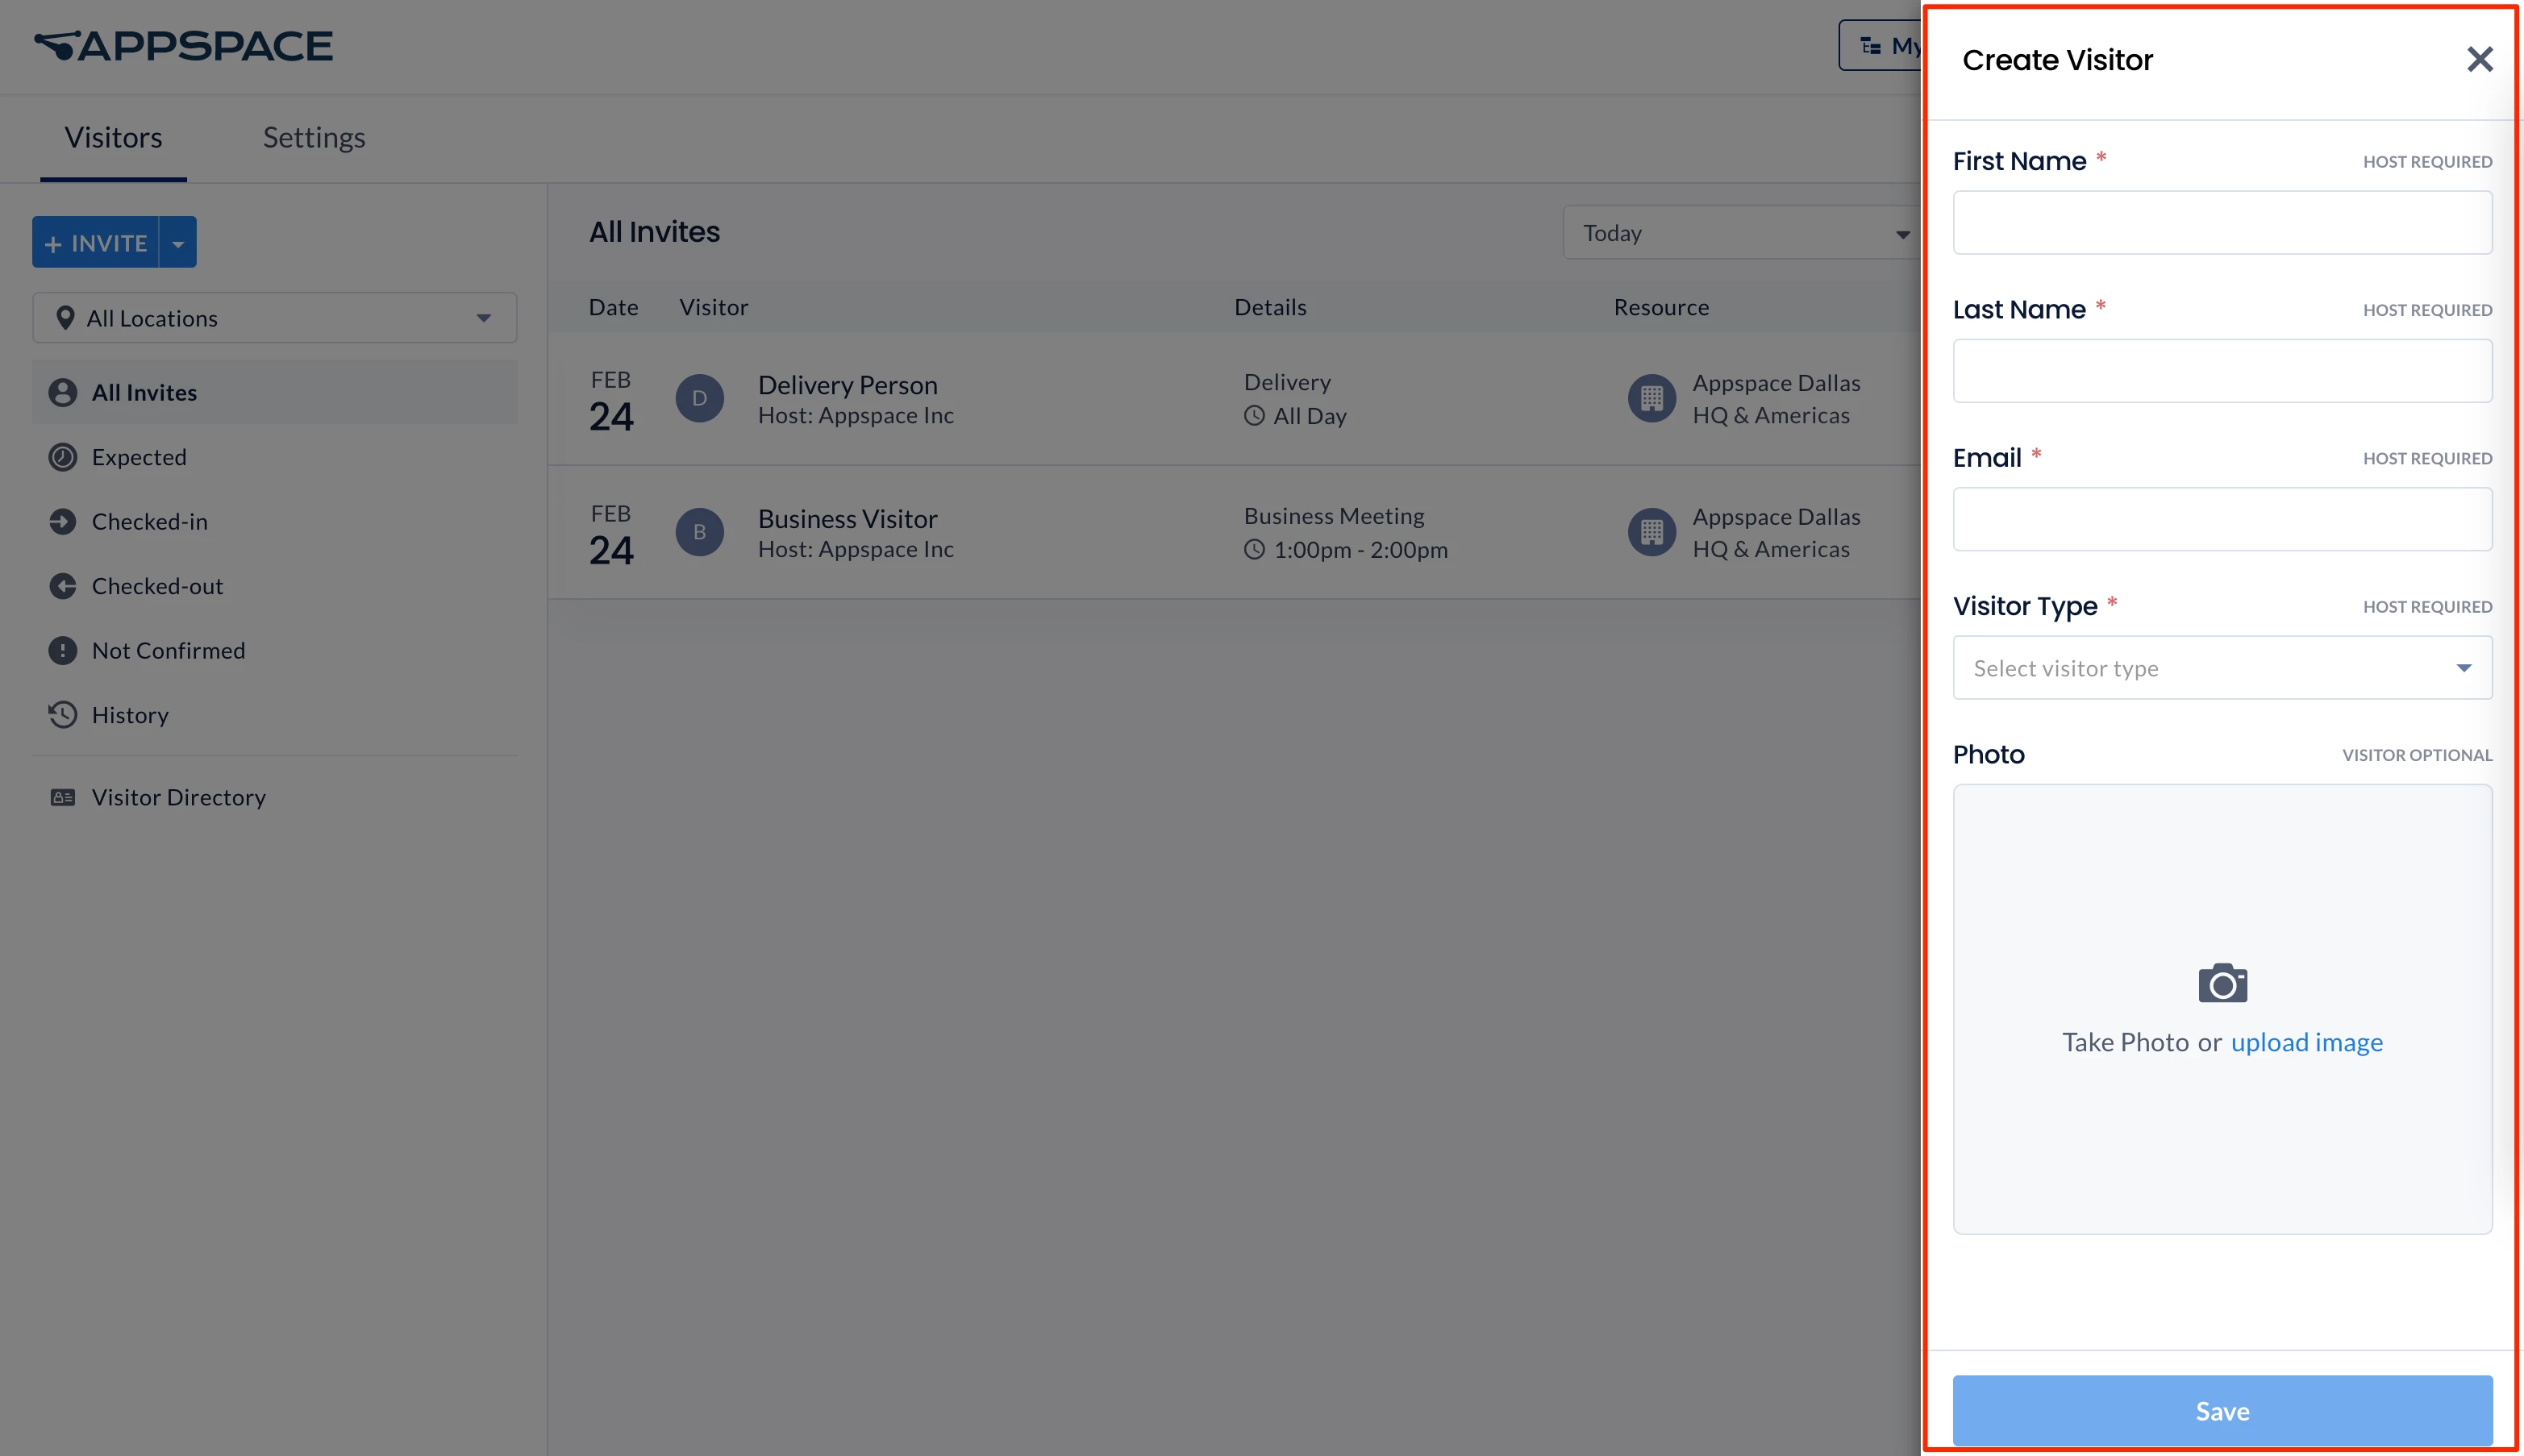
- First Name
- Last Name
- Email
Note
This field can be set to be required or optional by an administrator, following organizational requirements to check in visitors with their email address. If the email field is set to optional and not entered, a symbol is displayed to indicate that the visitor does not have an email registered.
- Visitor Type – Select if the visitor is a Contractor, Delivery Personnel, Family Member, Business Guest, New Hire, or Other from the dropdown menu.
- Photo – Take a photo, or upload an image of the visitor from the device. This field is optional.
- Click Save to create the visitor profile in the Visitor Directory.
Manage Visitor Profiles
Follow the instructions below to manage visitor profiles.
- Log in to the Appspace console.
- Click Visitors from the ☰ Appspace menu, and click the Visitors tab.
- Click the Visitor Directory tab from the side panel, and select or search for the visitor you wish to edit.
- Click the ellipsis, and select Edit.
- Make the necessary changes to the Visitor profile, and click Save once done.
