
Securely Integrate Third-Party Data into Appspace: Understanding Custom Passports
Custom Passports let administrators securely connect Appspace to any third-party service that supports OAuth authentication. You define a reusable passport that stores credentials, handles the OAuth flow, and makes authenticated data available to custom widgets, all without writing backend code or managing tokens manually.
This guide walks through the full Custom Passports workflow using ServiceNow as an example, but the same process applies to any OAuth-compatible service. For step-by-step configuration instructions, see the linked articles in the Next Steps section.
Key Benefits
- Secure Credential Storage: OAuth credentials like Client IDs, Client Secrets, and tokens are encrypted and managed centrally in Appspace. No need to store sensitive information in widget code or external systems.
- Reusable Authentication: A single passport can be shared across multiple custom widgets. Configure the connection once, then reuse it wherever that data source is needed.
- Platform Extensibility: Custom Passports open Appspace to any API-driven service, turning it into a central hub for live data from your entire tool ecosystem.
- Permission Controls: Administrators can manage which users and groups have access to each passport through a dedicated Permissions tab, so credentials stay limited to authorized publishers.
What This Guide Covers
- What a Custom Passport is and the key concepts behind it
- A full walkthrough of the workflow, from gathering credentials to displaying live data
- Other common use cases for Custom Passports
- Where to go for step-by-step configuration instructions
Prerequisites
- Appspace user role: Account Owner, Platform Administrator, or Location Publisher role is required to create and manage Custom Passports
- OAuth application credentials: A registered OAuth application with the third-party provider, including the Client ID and Client Secret
- Provider endpoint URLs: The Authentication URL and Token URL from the third-party provider must be available
- Custom Widget framework access: Custom Passports are used exclusively with the Custom Widget framework in this release
Key Concepts
Before walking through the workflow, here are the core concepts you will encounter when working with Custom Passports.
- Passport Identity: Each passport has a display name, a unique system identifier (prefixed with custom:), and an optional custom icon and description. The identifier is auto-generated from the display name and used for system integration.
- Categories: Passports can be organized into categories like Custom, Publishing, Calendar, Dashboard, Conferencing, and others. This helps administrators manage passports at scale as the number of integrations grows.
- Permissions: Each passport has a Permissions tab where administrators control which users and groups are allowed to use it.
- Token Management: Passports support configurable refresh strategies. Tokens can be set to refresh before expiry, on a periodic schedule, or not at all, depending on the third-party provider's requirements.
- Export and Import: Passport configurations can be exported as JSON files and imported into other Appspace environments. Sensitive values like Client Secrets are stripped from exports for security, so recipients re-enter those values after import.
Example Workflow: Connecting Appspace to ServiceNow
To show how the pieces fit together, this section walks through a complete example using ServiceNow. The steps below apply to any OAuth-compatible service; just substitute your own provider's credentials and endpoints.
Example scenario: Your IT operations team wants to display live ServiceNow data on the Appspace intranet, including open incident counts, service request status, and maintenance alerts. They need the data to update automatically so the intranet always reflects the current state of operations.
Step 1: Gather Credentials from ServiceNow
Before configuring anything in Appspace, you need OAuth credentials from ServiceNow. This means registering an OAuth application in your ServiceNow instance and collecting the following:
- Client ID and Client Secret issued by ServiceNow
- Authentication URL (the authorization endpoint where users grant access)
- Token URL (the token exchange endpoint used to retrieve access tokens)
Optionally, you can also collect the Profile URL and JSONPath expressions for extracting user details from the profile response. These allow Appspace to display the connected account name and email on the passport edit page.
Step 2: Create the Custom Passport in Appspace
With your ServiceNow credentials in hand, navigate to Integrations from the ☰ Appspace menu and select the Passports tab.
- Click the Add split button and select Add Passport.
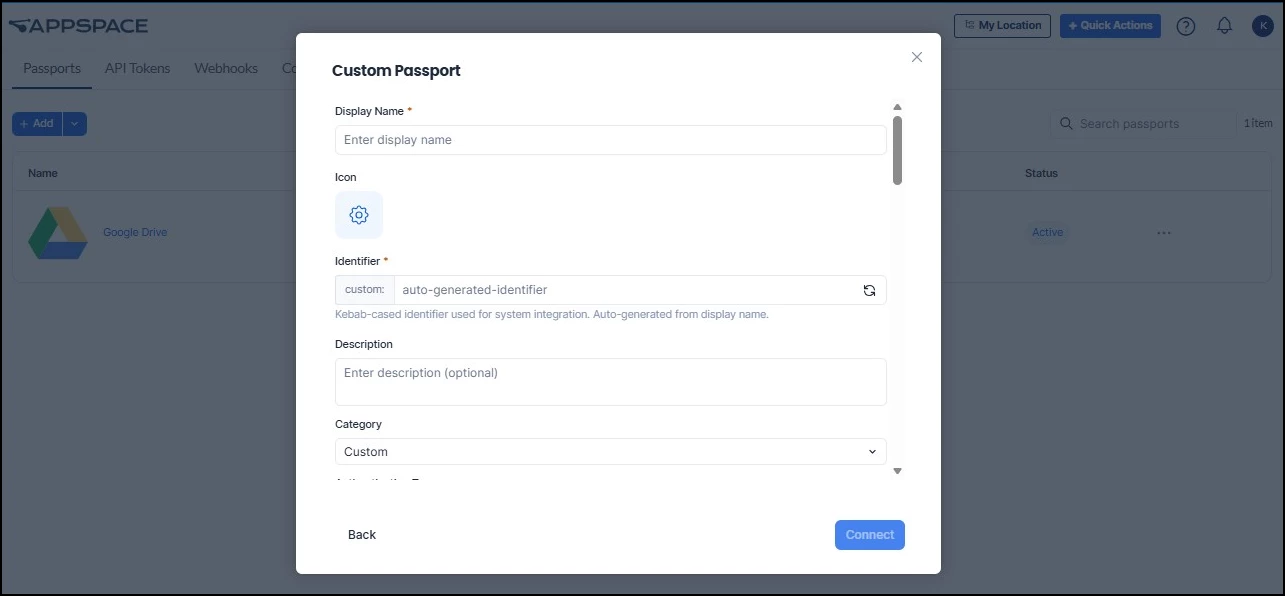
- Select Create Custom Passport.
- Enter a descriptive Display Name (e.g., "ServiceNow - Facilities Data").
- Review the auto-generated Identifier (prefixed with custom:). Edit it if a specific identifier is needed.
- Set the Category to Dashboard (or whichever category fits your organization's conventions).
- Under OAuth Configuration, enter the Client ID, Client Secret, Authentication URL, and Token URL you gathered in Step 1.
Step 3: Complete the OAuth Connection
Click Connect at the bottom of the configuration screen. A popup window opens where you authenticate with ServiceNow using your credentials. Once authentication completes successfully, the passport status changes from Inactive to Active.
If the OAuth flow is canceled or fails, the passport stays in the Inactive state. You can retry the connection from the passport edit page by clicking Connect Account.
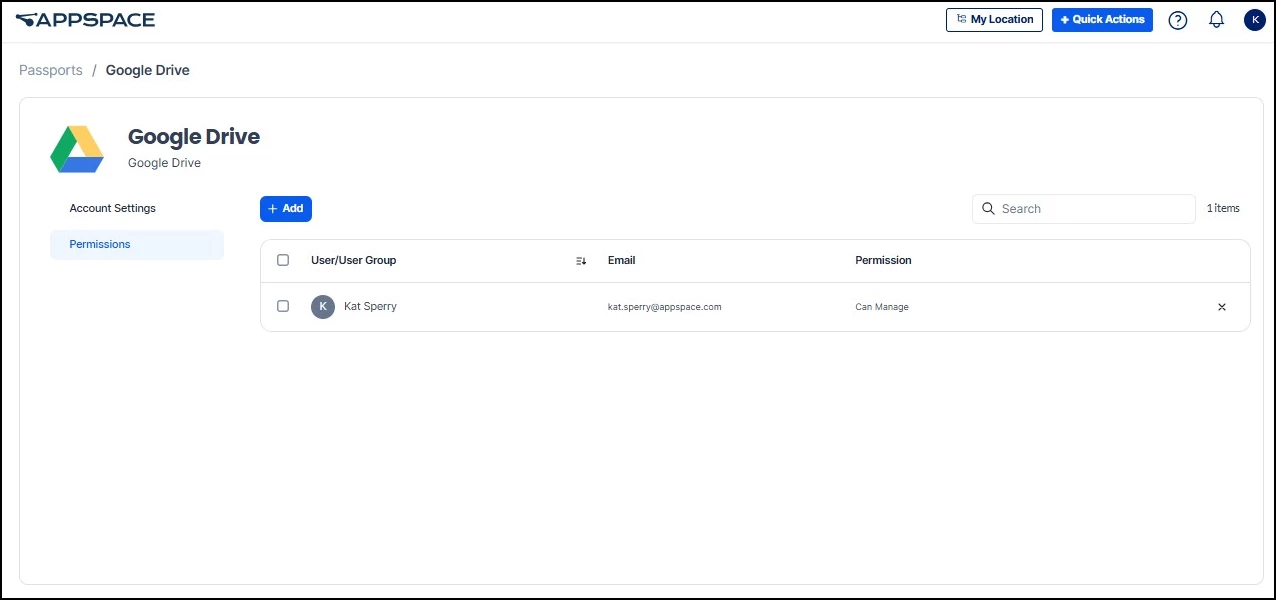
Step 4: Set Permissions
Click the Permissions tab on the passport edit page. Add the users or groups who will be building intranet widgets that reference this passport. This controls who can use the passport in their custom widgets, keeping the ServiceNow credentials limited to authorized publishers.
Step 5: Build and Deploy the Custom Widget
With the passport active and permissions set, a developer (or an AI-assisted workflow) builds a custom widget that references this passport to make authenticated API calls to ServiceNow. The widget queries the data you need (open incidents, service request counts, maintenance alerts) and formats it for display.
Once the widget is packaged and uploaded to Appspace, add it to your intranet Homepage or a Space. The passport handles token refresh automatically in the background, so the data stays current without anyone needing to re-authenticate.
For details on building and uploading custom widgets, see Extend Your Intranet with Custom Widgets.
Other Common Use Cases
The ServiceNow example above illustrates the full workflow, but Custom Passports work with any OAuth-compatible service. Here are a few other scenarios where administrators commonly use them:
- HR data on the intranet: Connect to an internal HR system to display live headcount data, open roles, or employee recognition highlights directly within your Appspace intranet.
- Multi-tool dashboards: Create a separate passport for each platform your team uses (ticketing, BI, project tracking) and combine the data into a single unified dashboard on Appspace.
- Cross-environment portability: Export a passport configuration as JSON from one Appspace environment and import it into another, making it easy to replicate integrations across staging and production.
Next Steps
For step-by-step instructions, see the following articles:
- Create a Custom Passport: Full walkthrough for creating a new passport, entering OAuth credentials, and completing the authentication flow
- Import a Custom Passport from JSON: How to import a passport configuration exported from another Appspace environment
- Manage a Custom Passport: Update credentials, configure permissions, export configurations, or delete passports you no longer need
- Custom Passport Configuration Reference: Detailed reference for every field and option available when configuring a Custom Passport
- Extend Your Intranet with Custom Widgets: How to build, upload, and add custom widgets to your Appspace intranet, including developer and AI-assisted workflows