

IoT Sensor Framework- Cisco Control Hub: Setup Guide
Introduction
This guide provides a configuration and integration walkthrough for the IoT Sensor Framework, focusing on the setup required to capture and utilize data from Cisco Control Hub sensors. The integration process configures hardware and software components to enable real-time data exchange for environmental data, occupancy, and other metrics within Appspace.
Key Benefits
The integration of the Cisco IoT Sensor Framework provides the following benefits:
- Integrate Environmental Data: Capture and utilize real-time environmental data and occupancy metrics within Appspace.
- Enable Real-Time Data Exchange: Ensure continuous, live data flow between Cisco Control Hub and Appspace.
- Centralize Metrics: Consolidate data from IoT devices for use within the Appspace platform.
What This Guide Covers
This guide will cover the following topics:
- Setting up the Cisco Room Series Device
- Configuring the Cisco Control Hub (including specific device settings)
- Integrating the Control Hub with Appspace via Webhooks
- Registering the Cisco device to an Appspace Resource
- Testing and Validation
Prerequisites
Before diving into the integration process, ensure the following requirements are met:
- Hardware: A compatible Room Series Device (e.g., Cisco Room Kit with a Navigator) is required.
- Note: Board, Room, and Desk Series support the listed sensors (with conditions), but DX, SX, and MX Series do not.
- Software: Access to the Cisco Control Hub.
- Connectivity: IoT devices must be properly connected and able to communicate with the Cisco Control Hub.
- Access Credentials: Necessary permissions and credentials to access the Cisco Control Hub and configure IoT devices.
Configuration and Integration
Step One: Setting Up the Cisco Room Series Device
- Ensure your Cisco device (e.g., Cisco Room Kit) is registered and properly configured to connect with the Cisco Control Hub.
- Verify that a Cisco Navigator is configured to be inside the room. Navigators set up outside the room will not send all sensor information to the Control Hub.
Step Two: Configuring the Cisco Control Hub
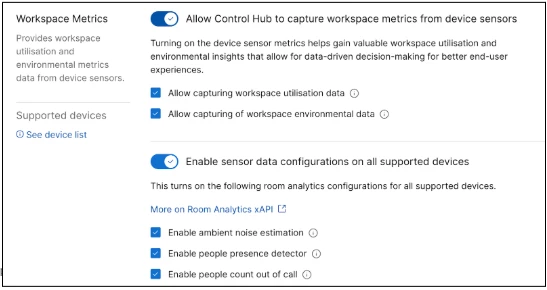
2A. Initial Control Hub Setup
- Log in to the Cisco Control Hub and navigate to Workplaces.
- Click Settings.
- Ensure Workspace Metrics is enabled.
- Ensure Enable sensor data configurations on all supported devices is also enabled.
2B. Configure Device Settings
You must enable specific settings on the Room series device to ensure it reports necessary data:
- Occupied (Presence): Ensure RoomAnalytics > PeoplePrecenseDetector: On is set.
- Occupants (Count): Ensure RoomAnalytics > PeopleCountOutOfCall: On is set.
- Sound/Ambient Noise: Ensure RoomAnalytics > AmbientNoiseEstimation > Mode: On is set.
- Temperature, Humidity, Air Quality: These settings are not configurable but should be enabled if your Navigator is set up correctly.
Step Three: Integrating Control Hub with Appspace (Webhooks)
This process involves setting up a webhook to push sensor data from Cisco Control Hub to the Appspace IoT Service.
- In Appspace (Install Driver): In the Appspace Console, go to Reservations > Settings > IoT Sensors and select Drivers. Click Install for the Cisco Control Hub Driver.
- In Appspace (Copy URL): Click the ellipsis next to the driver and select Copy URL.
- In Control Hub (Add Webhook): Go to Workspaces > Integrations. Click the down arrow next to Add Integration and select Connect Webhook.
- In Control Hub (Configure Webhook):
- Give your Webhook Connector a Name.
- Paste the URL you copied from Appspace into the URL field.
- Select Authentication token as the Authentication Type.
- In Appspace (Copy Key): Click the ellipsis next to the driver again and click Copy Key.
- In Control Hub (Paste Token): Paste the token into the token box.
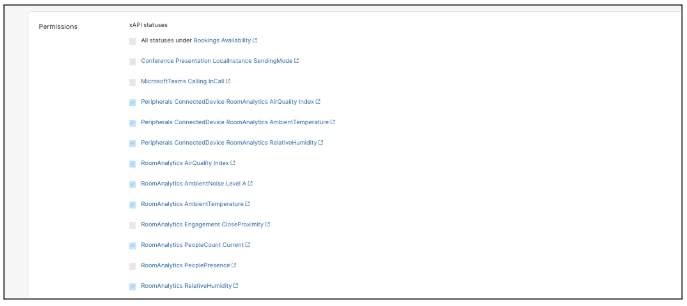
- Select xAPI Statuses: Scroll down and check the boxes for the following xAPI statuses you want the webhook to send:
- Peripherals ConnectedDevice RoomAnalytics AirQuality Index
- Peripherals ConnectedDevice RoomAnalytics AmbientTemperature
- Peripherals ConnectedDevice RoomAnalytics RelativeHumidity
- RoomAnalytics AirQuality Index
- RoomAnalytics AmbientNoise Level A
- RoomAnalytics AmbientTemperature
- RoomAnalytics PeopleCount Current
- RoomAnalytics RelativeHumidity
- Click Validate and connect.
Step Four: Registering the Device to an Appspace Resource
After confirming data is being pushed to the Appspace IoT Service, you must link the Cisco device to a resource in Appspace.
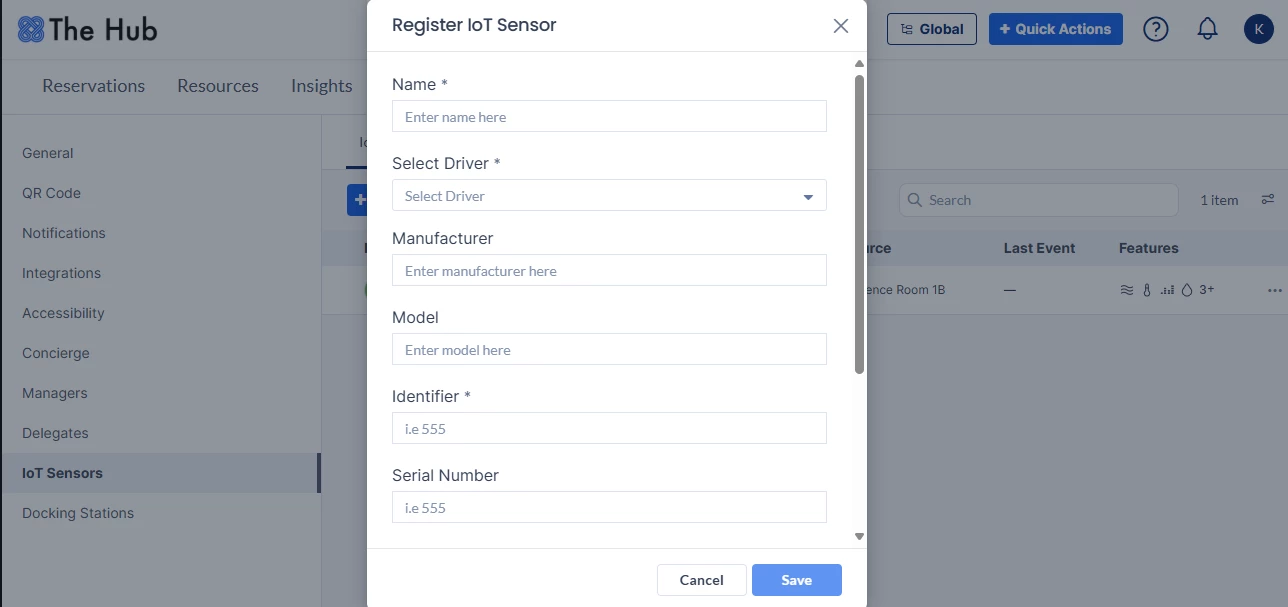
- In Appspace, go to Admin Console > Reservations > Settings > IoT Sensors.
- Ensure the IoT Sensors Tab is selected, then click +Add.
- Fill out the Register IoT Sensor form:
- Name: Give the sensor a recognizable name (e.g., Meeting Room Name).
- Select Driver: Choose the Cisco Control Hub Driver.
- Identifier: This is the device’s Webex DeveloperId.
- To find the ID: In Control Hub, find the device in the Devices Section. Open the device details, scroll down, and select View All Statuses. Navigate to the Webex tab and copy the Webex Developer ID.
- Paste the ID into the Identifier field in Appspace.
- Click SAVE.
Step Five: Testing and Validation
Conduct a test to ensure the Room Series Device is correctly capturing and sending data to the Appspace IoT service.
- You should see sensor information in the API response for the device in Appspace using Debug Tools.
- The information should also be displayed on the resource in the Employee Experience.