Search Configuration and Insights: User Guide
Introduction
This guide provides configuration steps, prerequisites, and guidance for properly using the Search Suggestions, Results Promotion, and Insights features. With this feature, Appspace Administrators can enhance the search functionality with preset search suggestions and promoted results, and also leverage powerful search insights to understand user behavior.
Key Benefits
The Search Configuration and Insights features provide the following key benefits:
- Better Admin Control: Shape the search experience for employees by promoting specific content and keywords to influence results.
- Suggested Content: Display recommended results to users before they even input search terms, improving discovery.
- Valuable Insights: Track user search behavior to accurately measure search efficacy and identify popular queries.
What This Guide Covers
This guide will cover the following topics:
- Configuring search suggestions.
- Adding promoted search results.
- Accessing search insights.
- Filtering search insights.
Prerequisites
To configure these features, you need to meet the following requirements:
- Platform license.
- Location Admin or Account Owner user role.
Search Configuration and Management
Step One: Configuring Search Suggestions
Search Suggestions enable administrators to promote specific terms, such as a trending event or topic, to users as they search. These promoted keywords will appear when users click to open the search field within the Employee View.
- Open the navigation in the Admin View and go to Settings > Configuration > Employee Experience > Search Configuration.
- In the Search Suggestions section, add the keywords you want to highlight by typing them in and pressing Enter after each term.
- When finished, click Save along the bottom.

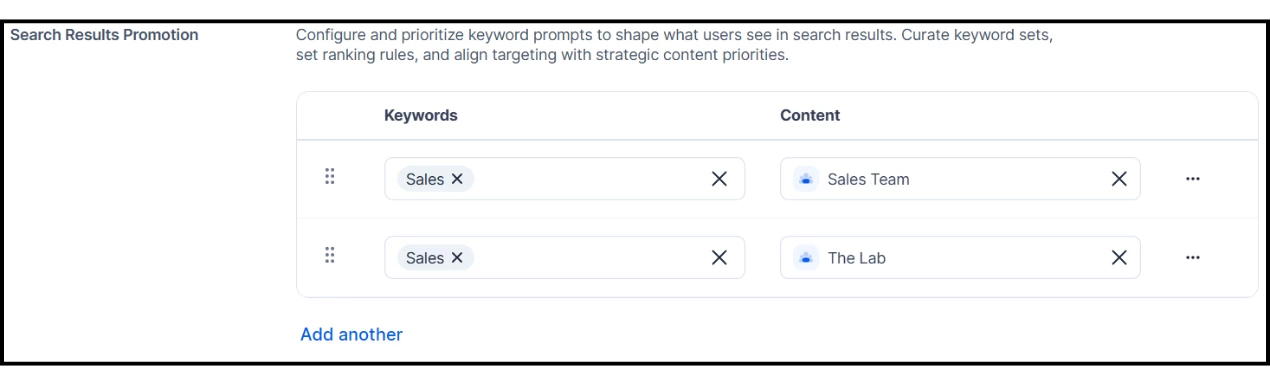
Step Two: Adding Results Promotions
Search Results Promotion influences the results users see when they search. This allows you to select which existing content appears at the top of the results when specific keywords are searched.
- Open the navigation in the Admin View and go to Settings > Configuration > Employee Experience > Search Configuration.
- In the Search Results Promotion section, add keywords and select the pre-existing content you wish to promote in search results.
- Click Add another to add more keyword promotions.
- When finished, click Save along the bottom.
- Tip: To arrange the promoted content in a specific order for a keyword, add that same keyword multiple times, select different content for each entry, and then drag and drop the entries to set the order.
Step Three: Accessing Search Insights
Search Insights enable administrators to view a detailed summary of user search behavior within a particular timeframe.
- Open the navigation in the Admin View and go to Settings > Configuration > Employee Experience > Search Insights.
- Click the calendar dropdown to select the desired timeframe for the data.
The dashboard captures the following data points:
- Total Searches
- Search Hit Ratio
- Click Through Rate
- Top Search Queries
- Search Volume Over Time
- Search Activity Trends
- Top Viewed Search Results
- Search Results by Type
- Top Searched Posts
- Top Searched Spaces
- Click Position Trends

Step Four: Filtering Search Insights
Within the Search Insights dashboard, you can apply filters to narrow the data to particular Audiences, Result Types, and Locations. This enables administrators to view data applicable to specific groups, content, and locations, or any combination of those filters.
- To apply filters to your search insights, click the Filters icon in the top-right of the Search Insights dashboard.
- Within the Filters panel, you can:
- Type in the name of an Audience.
- Select a Result Type from the dropdown menu.
- Select a Location from the dropdown menu.
- After applying your filters, click View. The dashboard will update automatically with the filtered data.