



Bring the Team onto Appspace: A Guide to Inviting Users to the Platform
Inviting users gives employees and administrators access to the Appspace experiences, locations, and capabilities appropriate for their work. During the invitation process, administrators can assign licenses, roles, user groups, and a home location.
Key Benefits
This article provides the following benefits:
- Controlled access: Grant only the Appspace experiences and administrative capabilities a user needs.
- Consistent onboarding: Assign locations, groups, licenses, and roles as part of a repeatable invitation workflow.
- Scalable administration: Invite individuals, multiple users, or bulk-import users from a spreadsheet.
What This Guide Covers
This guide covers the following topics:
- Understanding required invitation permissions
- Inviting one or more users
- Assigning licenses, roles, groups, and home locations
- Using bulk import
- Managing pending invitations
Important: This guide covers manual user invitations. If your organization uses SCIM provisioning, users will be added via that method.
Prerequisites
Before you begin, confirm the following requirements:
- Administrative permission: In Appspace Public Cloud, Account Owners and authorized Location Admins can typically invite users within their scope. Private Cloud or on-premises deployments may require additional Portal Administrator or environment-specific permissions.
- User details: Collect each user’s approved email address, phone number when supported, home location, user groups, licenses, and roles.
- Available licenses: Confirm that the account has the required Premium and/or Platform license capacity.
- Location and group setup: Create the required locations and user groups before sending invitations when users must inherit access from them.
Understanding License Assignment
Premium and Platform Access
- Premium license: Provides access to the Employee Experience and employee-facing features enabled for the account.
- Platform license: Provides access to the Appspace Console for administration, configuration, content creation, and other platform tasks.
- Both licenses: Assign both Premium and Platform when a user needs both the Employee Experience and Console access.
| Roles are separate: A license opens the relevant experience; roles and permissions determine what the user can do within that experience. |
Inviting Users
Step One: Open the Users Workflow
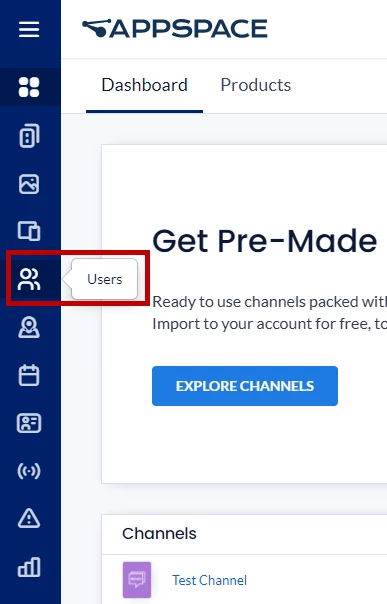
1. Open Users from the Appspace Console navigation, or use an available Quick Action.
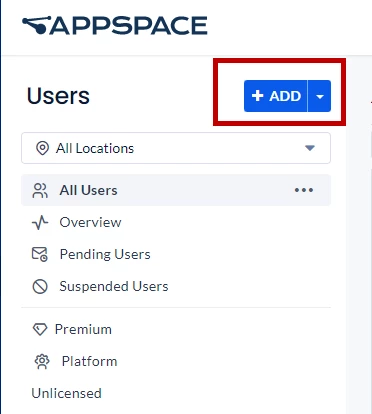
2. Select Add, Invite, or the equivalent user-creation option.
3. Choose an individual or bulk workflow.
Step Two: Enter User Information
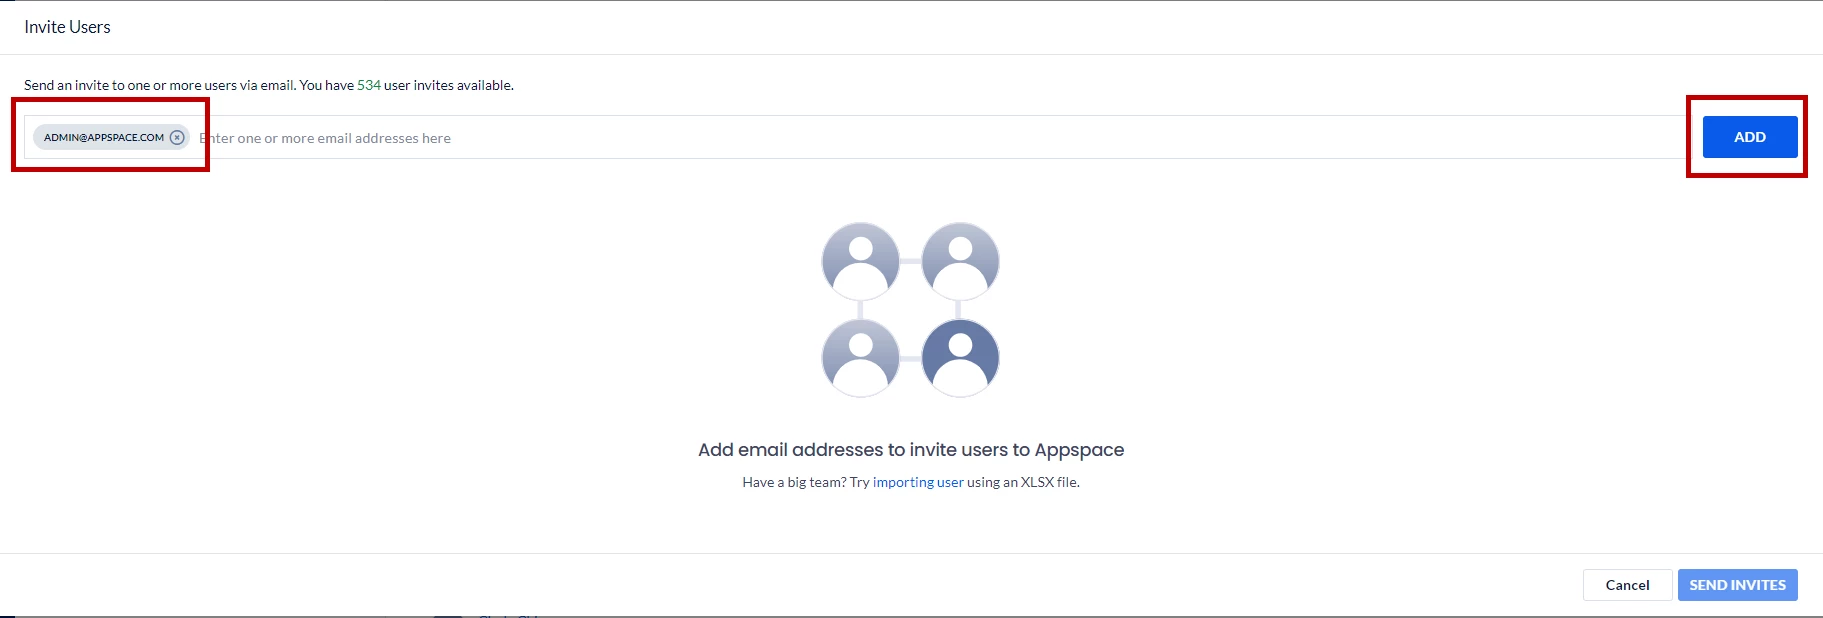
1. Enter one or more approved email addresses. Add a phone number only when your environment supports phone-based invitations or sign-in.
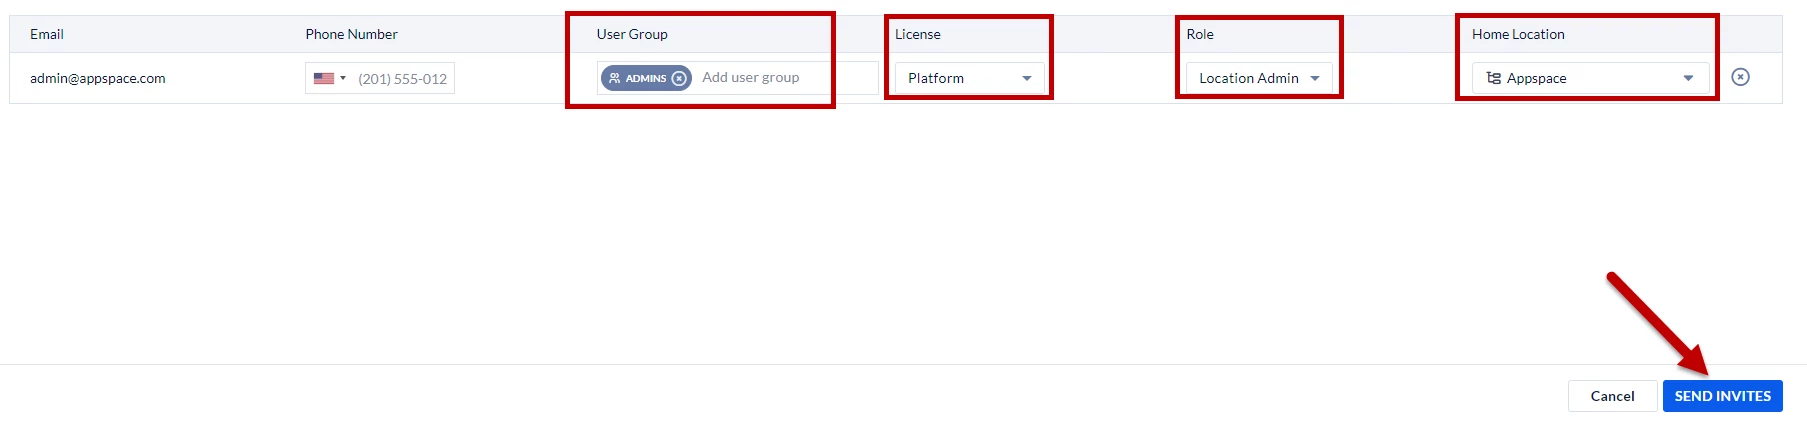
2. Assign the user’s home location.
3. Select applicable user groups.
4. Assign Premium, Platform, or both licenses.
5. Assign the required role or roles within the correct location scope.
6. Review the configuration and send the invitation.
Step Three: Confirm the Invitation
The recipient receives an Appspace invitation and completes the organization’s sign-in and profile steps. Invitation content and identity verification vary by deployment and authentication method.
Bulk User Invitations
Step Four: Import a Spreadsheet
Use the spreadsheet import option when onboarding many users. Download the current template from the product when available, because required columns can change.
1. Open the bulk import workflow.
2. Prepare the spreadsheet with the required identifiers and assignment fields.
3. Upload the completed file.
4. Review validation messages and correct any rejected rows.
5. Submit the valid invitations.
Managing Invitations
Step Five: Review Pending Users
Use the Users area to review pending, active, suspended, or unlicensed users. Resend or cancel invitations when those actions are available, and update assignments when the user’s responsibilities change.
| Deployment differences: User administration labels and available fields can differ between Public Cloud, Private Cloud, and on-premises deployments. |