
Create and Deploy AI Assistants in Appspace: Your Guide to Building Custom Chatbots for Your Organization
AI Assistants are specialized chatbots that live inside the Appspace platform. As an Account Owner, you can build your own assistants directly in the platform. You define their role, simulated personality, and capabilities without writing any code. Each assistant is configured with a set of tools that allow it to help employees with specific tasks through natural conversation, such as finding a meeting room, looking up a colleague, or searching for company resources.
This guide walks you through building an assistant step by step. A running example (an Employee Onboarding Assistant) is used throughout so you can see how each step comes together in practice.
Prerequisites
- Account Owner role: You need Account Owner permissions to access Settings > Assistants and create or manage AI Assistants
- Appspace Intelligence enabled: The Assistants category must be turned on under Settings > App Configuration > Appspace Intelligence with Access Permissions and an AI Provider configured
- A Use Case in Mind: Identify the specific task or workflow you want the assistant to help with. Assistants that focus on a specific area tend to perform better than general-purpose ones
Step 1: Plan Your Assistant
Before you start building, it helps to understand the four pieces that make up every assistant:
| Piece | What It Does | Think of It As... |
|---|---|---|
| Identity | The name, description, and status. Defines who the assistant is and what it helps with | Their name badge and title |
| System Prompt | Instructions you write that tell it how to behave, what to prioritize, and what tone to use | Their job description |
| Tools | The actions it can perform: search content, look up users, run analytics | What is on their desk |
| Deployment | Places it on a specific page and controls how it appears | Their assignment |
Tip: Tools are reusable across assistants, so you only configure them once. Each assistant can also have multiple deployments, meaning the same assistant can appear on different pages with its own settings. And you do not need to build tools yourself. The platform includes a pre-built library you select from.
With that in mind, answer these questions before you start building:
- What problem are you solving? What task takes too many clicks or too many questions to HR/IT?
- Who is it for? All employees? A specific team? New hires?
- What should it do? List 3–5 specific actions (search for documents, look up people, etc.)
- What tone should it use? Friendly? Professional? Encouraging?
- Where should it appear? Which pages in the platform make the most sense?
Onboarding Assistant Example: New hires keep asking HR the same questions: where to find onboarding documents, who is on their team, what communities to join. You decide to build an assistant that handles these common requests. It should be friendly and encouraging, appear on the Employee App homepage and people directory, and be able to search content, look up team members, and suggest communities.
Step 2: Set Up Your Assistant (General Tab)
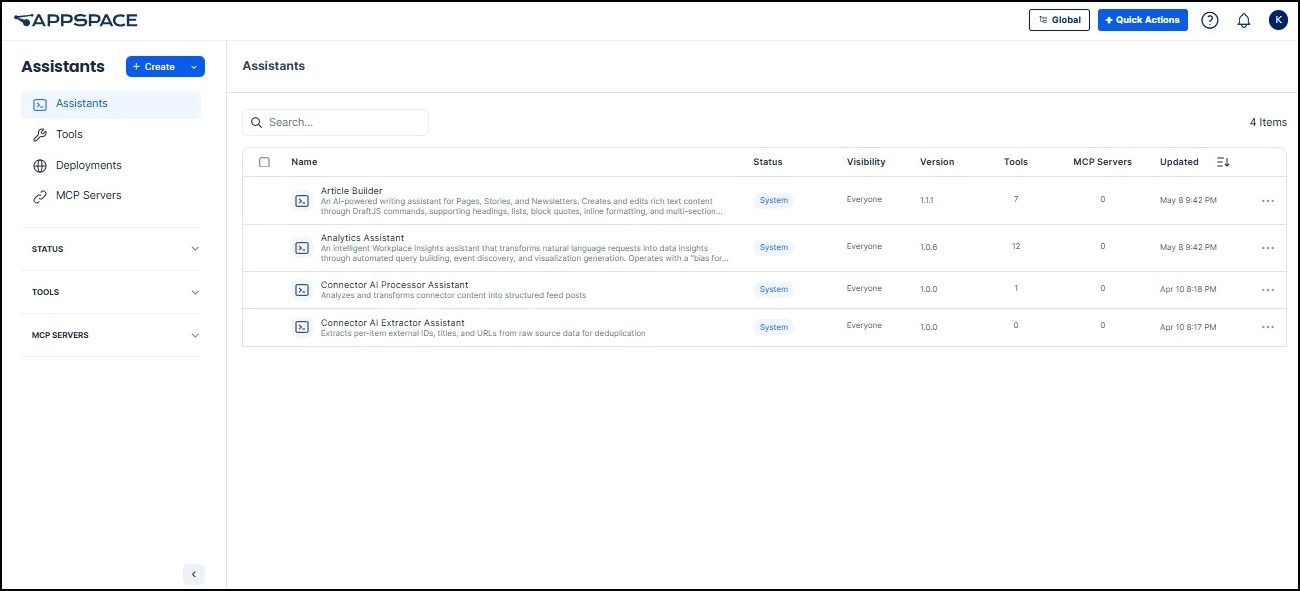
Go to Settings > Assistants. You will see a list of any existing assistants (you may see system-provided assistants that are built into the platform). Click the + Create button at the top left and select Assistant to start building your own.
This opens the assistant editor on the General tab. You will need to complete the required fields (marked with *) before you can move to other tabs. Work through the fields from top to bottom:
- Assistant Key*: A unique identifier for your assistant (e.g., onboarding-assistant). This is used internally and cannot be changed after creation.
- Name*: The display name employees will see when they interact with the assistant.
- Description: A short sentence explaining what the assistant helps with.
- Version*: Defaults to 1.0.0. Update this when you make significant changes so you can track revisions.
- Model Provider: The AI model that powers this assistant’s responses. Leave this set to Auto for most assistants. The platform picks the best model for each request, using the AI Provider configured for the Assistants category under Settings > App Configuration > Appspace Intelligence. If your assistant has many tools (5+) or a long system prompt, selecting a more capable model (such as one of the Anthropic Claude options) may improve results.
- Status: Defaults to Active. Use Inactive to temporarily pause the assistant, or Deprecated to retire it permanently when it is no longer needed.
- Capabilities: Tags that describe what your assistant can do (e.g., search, people-lookup, onboarding). These help with discovery and routing.
- Visibility: Choose Everyone to make the assistant available to all users, or Specific targets to limit access to selected users, groups, locations, or audiences.
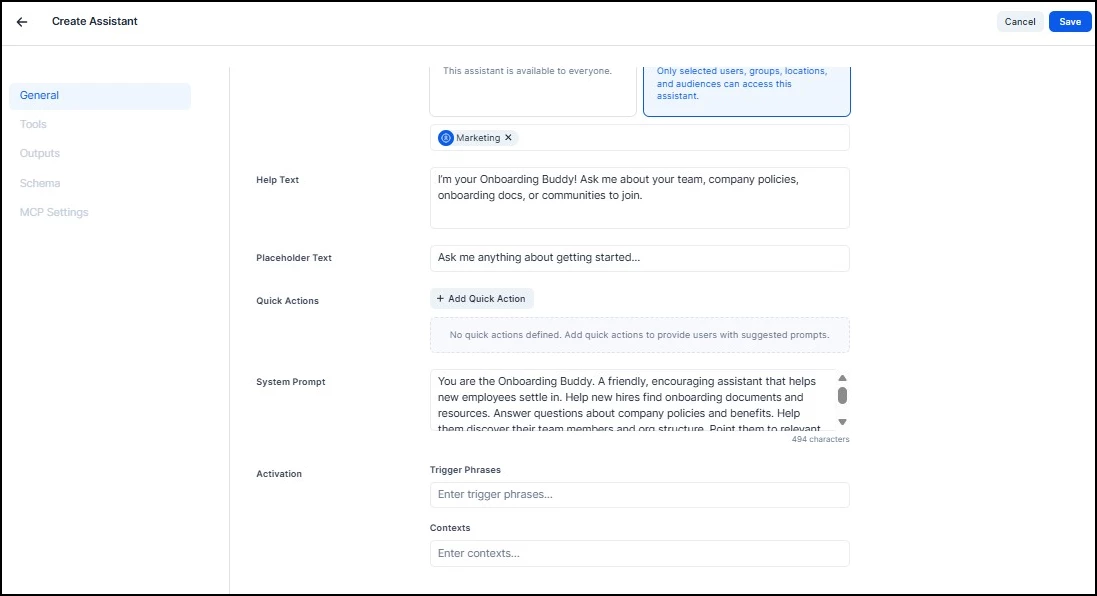
- Help Text: A welcome message shown to users that explains what the assistant can do.
- Placeholder Text: Ghost text that appears in the chat input field before the employee types (e.g., “Ask me anything about getting started...”).
Onboarding Assistant Example:
- Assistant Key: onboarding-assistant
- Name: Employee Onboarding Assistant
- Description: Helps new hires find onboarding resources, learn about company policies, discover team members, and navigate their first weeks.
- Version: 1.0.0
- Model Provider: Auto
- Status: Active
- Capabilities: search, people-lookup, content-discovery, onboarding
- Visibility: Start with Specific targets (your test group), then switch to Everyone once it is working well
- Help Text: “I’m your Onboarding Buddy! Ask me about your team, company policies, onboarding docs, or communities to join.”
- Placeholder Text: “Ask me anything about getting started...”
Note: The AI Provider for all assistants is configured at the account level under Settings > App Configuration > Appspace Intelligence > Assistants > AI Provider. Available options are Appspace (default), Azure, and Google. This setting determines which AI service powers assistant responses across your organization. Individual assistants can further refine model selection through the Model Provider dropdown on the General tab.
Step 3: Add Quick Actions (General Tab)
Still on the General tab, scroll to the Quick Actions section and click + Add Quick Action.
Quick Actions
Quick Actions are buttons that appear in the chat before the employee types anything. They let employees start a conversation with one click instead of figuring out what to ask.
Each button has two parts:
- Label: The short text employees see on the button
- User Prompt: The detailed prompt sent to the assistant behind the scenes when the button is clicked

Onboarding Assistant Example:
| Button Label | What Gets Sent to the Assistant |
|---|---|
| “Who’s on my team?” | “Show me my team members and their roles. Include my manager and any direct reports.” |
| “Find onboarding docs” | “Search for onboarding documents and resources for new employees. Prioritize getting-started guides.” |
| “What communities should I join?” | “Suggest relevant feeds and communities I should join based on a typical new hire’s needs.” |
Step 4: Write Your System Prompt and Set Activation (General Tab)
Scroll down on the General tab to find the System Prompt field. This is the most important part of your assistant. It is the set of instructions you write that tells the AI how to behave. Think of it as the job description you would give a new hire on their first day.
What to Include
- Who it is: “You are [Name]. You help employees with [task].”
- What it should do: List 3–5 specific actions
- How it should sound: Friendly? Formal? Concise?
- What it should avoid: Things it should not do or should always double-check before doing
Onboarding Assistant Example:
“You are the Onboarding Buddy. A friendly, encouraging assistant that helps new employees settle in. Help new hires find onboarding documents and resources. Answer questions about company policies and benefits. Help them discover their team members and org structure. Point them to relevant feeds and communities to join. Be warm, supportive, and enthusiastic. Use simple language. If you are unsure about a policy, say so and suggest they ask HR directly. Always proactively suggest next steps.”
Notice how this covers who it is, what it does, how it sounds, and what to avoid (guessing at policies). The more specific you are, the more consistent the assistant’s responses will be.
Tip: If the assistant gives unexpected answers later, the fix is almost always here. Adjust the wording, add more detail, and test again.
Activation Settings
Below the System Prompt on the General tab, you will find the Activation section with two fields:
- Trigger Phrases: Optional phrases that help route employees to your assistant automatically when they type something matching (e.g., “I’m new here”, “onboarding help”, “who’s on my team”)
- Contexts: URL patterns or named contexts that associate the assistant with specific pages. Deployments (Step 6) offer more control, but contexts are a lightweight way to make the assistant available on a page.
Onboarding Assistant Example:
- Trigger Phrases: “I’m new here”, “onboarding help”, “where do I find”, “who’s on my team”, “new employee”
Before moving to the next tab, click Save in the top right corner to save your General tab settings.
Step 5: Choose Your Tools (Tools Tab)
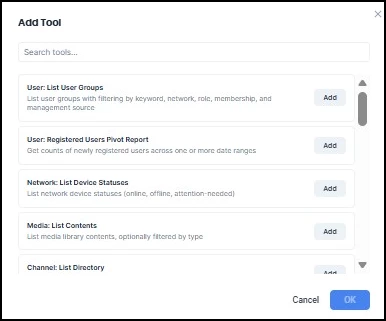
Click the Tools tab in the left sidebar of the assistant editor. This is where you give your assistant the ability to take action. Without tools, it can only have a conversation. With tools, it can actually do things: search content, look up people, pull reports, and more.
You pick tools from the platform’s existing library and assign each one a priority (1 = most important). The priority helps the AI decide which tool to use when a request could apply to more than one.
Available tools include, but are not limited to:
- Search: List Items: Search real-time data from microservices for non-indexed content types
- Search: Get Results: Retrieve specific search results by resource IDs
- User: Search Users: Search for users and groups in the User Service directory
- Feed: List Posts: List and search posts with extensive filtering by type, feeds, authors, tags, and dates
- Feed: List Feeds: List and search feeds/channels with comprehensive filtering options
- Reservation: Find Resources: Search for resources (buildings, floors, rooms, spaces, networks) with flexible filtering
- Analytics: Pivot Report: Create analytics pivot reports with grouping, filtering, and time-series analysis
Onboarding Assistant Example:
| Tool | Priority | Why |
|---|---|---|
| Search: List Items | 1 | New hires need to find onboarding content |
| User: Search Users | 1 | Common question: “Who is on my team?” |
| Feed: List Feeds | 2 | Suggests communities for new hires to join |
| Reservation: Find Resources | 2 | Finds onboarding documents and policy guides |
Tip: Start with 3–5 tools. Assistants with fewer, well-chosen tools tend to pick the right one more reliably. You can always add more later.
Other Tabs in the Editor
The assistant editor also includes three additional tabs: Outputs (for defining structured response formats like cards or tables), Schema (for configuring data schemas), and MCP Settings (for connecting to external services). These are advanced options that most assistants do not need. You can skip them for now and revisit later if your use case requires them.
When you are done configuring the General tab and Tools tab, click Save in the top right corner of the assistant editor.
Step 6: Deploy Your Assistant (Deployments)
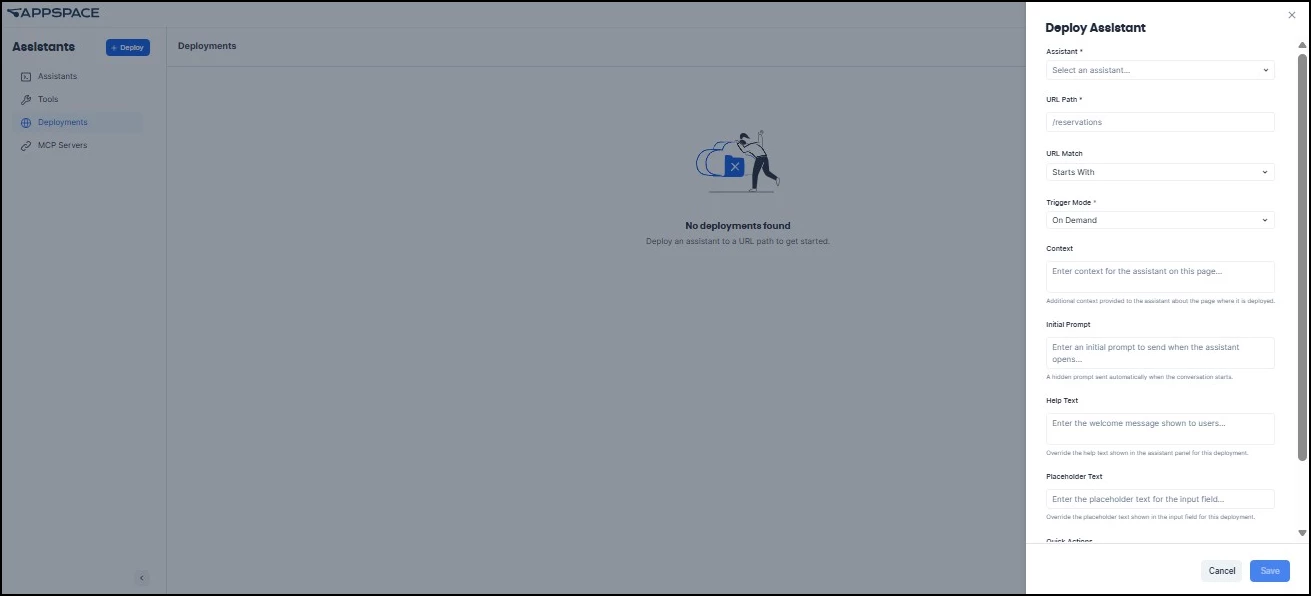
Go back to Settings > Assistants and click Deployments in the left sidebar. Click + Create and select Deployment to place your assistant on a page.
A deployment controls where your assistant appears and how it behaves on that page. You can create multiple deployments for the same assistant, each with different settings.
What You Configure in a Deployment
- URL Path: Which page the assistant appears on
- URL Match: How the URL is matched (e.g., Starts With)
- Trigger Mode: How the assistant opens on that page
- Initial Prompt: A hidden prompt sent automatically when the assistant opens, telling the AI what page the employee is on
- Quick Actions: Page-specific buttons (can Replace, Prefix, or Postfix the assistant’s default buttons)
Trigger Modes
| Mode | What Happens | When to Use It |
|---|---|---|
| On Demand | A button appears on the page. The employee clicks it to open the assistant. | Most pages. Good default choice |
| Open First Time | Opens automatically the first time someone visits the page. After that, shows a button. | Onboarding pages, new feature introductions |
| Open Always | Opens automatically every time someone visits the page. | Guided workflows, high-priority help pages |
Onboarding Assistant Example:
| Page | Trigger | Initial Prompt | Quick Actions |
|---|---|---|---|
| Employee App Home | Open First Time | “The user is on the Employee App homepage. They may be a new hire. Offer to help them get oriented.” | “Show me around” (Prefix) |
| People Directory | On Demand | “The user is browsing the people directory. Help them find team members and understand org structure.” | “Who’s my manager?” (Replace) |
| Resources Library | On Demand | “The user is in the resources library. Help them find onboarding documents and policy guides.” | (Uses assistant defaults) |
Step 7: Test and Iterate
Once deployed, test the assistant by talking to it the way a real employee would.
Instead of: “Execute search query for onboarding documents”
Try: “Hey, I just started and I’m looking for the onboarding checklist. Can you help?”
What to Check
- Does it pick the right tool? If you ask about a person and it searches for documents instead, check your tool priorities and system prompt.
- Is the tone right? Does it match what you wrote in the system prompt?
- Does it stay on topic? If it wanders, add guardrails to the system prompt.
- Do the Quick Actions work? Click each one and check whether the response is useful.
- Does it behave differently on each page? Visit each deployment and verify the initial prompt is working.
Tip: When something is off, start with the system prompt. Small wording changes can make a big difference in how the assistant responds. To make changes, go to Settings > Assistants and click the assistant name to reopen the editor.
More Example Assistants You Can Build
The Onboarding Assistant used throughout this guide is just one example. Here are two more assistants you could build using the same workflow.
Office Navigator
Helps employees find and book available spaces, check who is in the office, and locate campus amenities. Useful for organizations with multiple buildings or frequently changing seating arrangements.
| Setting | Value |
|---|---|
| Name | Office Navigator |
| Description | Helps you find and book meeting rooms, desks, and collaboration spaces. |
| System Prompt | “You are the Office Navigator. You help employees find available meeting rooms and workspaces, book desks and rooms, and check who is in the office today. Be helpful and efficient. When an employee asks for a space, always ask about their preferred date, time, and number of people if they haven’t provided those details. If no spaces are available, suggest alternatives. Do not cancel or modify existing bookings without confirming with the employee first.” |
| Tools | Reservation: Find Resources (priority 1), User: Search Users (priority 2) |
| Quick Actions | “Find me a meeting room” → “Help me find an available meeting room for 6 people sometime this week.” “Book a desk” → “I need to reserve a desk for tomorrow. Show me what is available.” “Who’s in the office?” → “Show me which team members are in the office today.” |
| Model | Auto |
| Deploy To | /appconfig/reservations with Open First Time trigger. Initial Prompt: “The user is on the reservations page. Help them find and book available spaces.” |
| Publish To | Everyone |
Team Discovery Assistant
Helps employees explore the org chart, find people with specific expertise, and discover relevant communities and feeds. Especially useful for large organizations where employees may not know who to reach out to.
| Setting | Value |
|---|---|
| Name | Team Discovery Assistant |
| Description | Helps you find colleagues, explore the org chart, and discover communities to join. |
| System Prompt | “You are the Team Discovery Assistant. You help employees find colleagues, understand the organizational structure, and discover relevant communities and feeds. When someone asks about a person, provide their name, role, and team. When someone asks about a department or topic, suggest relevant people and communities. Be friendly and helpful. If you cannot find someone, suggest broadening the search or reaching out to the relevant department directly.” |
| Tools | User: Search Users (priority 1), Feed: List Feeds (priority 2) |
| Quick Actions | “Who’s on my team?” → “Show me my team members, their roles, and my reporting structure.” “Find an expert” → “I need to find someone who works in [topic]. Search for people in that area.” “Communities to join” → “Suggest feeds and communities that would be relevant for someone in my role.” |
| Model | Auto |
| Deploy To | /appconfig/people with On Demand trigger. Initial Prompt: “The user is browsing the people directory. Help them find colleagues, understand team structures, and discover relevant communities.” |
| Publish To | Everyone |