
This document is a guideline to set up the permissions for the Google Calendar (GCal) integration passport service account in the GCAL admin portal.
Before starting, please ensure you have access to your Google admin portal at https://admin.google.com/.
Ensure you have all setups completed for the following sections.
Prerequisites
In the Google admin portal, go to directory > users on the left menu panel, and navigate to the user that you are going to use as the passport service account within the Appspace-GCal integration.
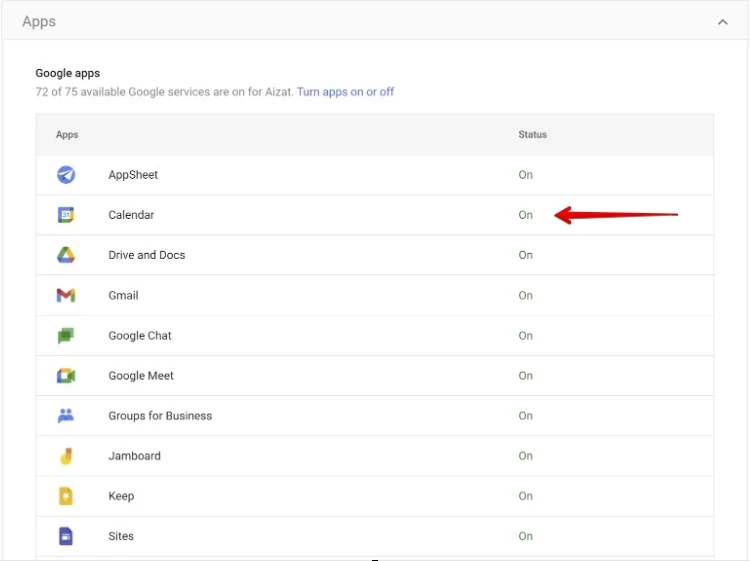
In the user page, select the group panel with apps; it will bring you to the apps page. Confirm that the calendar row is on.
Step-by-step guide
Grant requires permission
If the user has been assigned a super admin role, the following steps are not required.
If they are not using the super admin role, please perform the following steps to grant the necessary permissions.
- Create new role: To grant the required permissions to the passport service account, GCAL admin portal requires you to create a new role and set up the permissions that the role should have.
- In the admin portal, on the left panel, go to account > admin roles.
- Select create new role
- Provide a name and description.
- Select continue.
- Under select privileges, check the following privileges:
- Under the admin console privileges section:
- Organizational Units > Read
- Users > Read
- Services > Contacts > Contacts Settings Message > Delegates Read
- Services > Calendar > All Settings > View Settings
- Services > Calendar > All Settings > Buildings And Resources
- Under the admin console privileges section:
- Under the admin API privileges section:
- Organizational Units > Read
- Users > Read
- Groups > Read
- Ensure you have all the above privileges enabled.
- Select continue.
- Select create new role.
- In the admin portal, on the left panel, go to account > admin roles.
- Assign the new role to the user: After creating the new role, the passport service account needs to be assigned in order to grant the privileges/permissions to the user.
- In the admin portal, on the left panel, go to directory > users.
- Navigate to the user that you are going to use as the passport service account with the Appspace-GCal integration.
- Select the admin roles and privileges section.
- Select the pencil button in the top-right corner under the roles section.
- Enable the new role that you created in the previous step
- Select save.
- On the same page, under the privileges section, you will see the user has the same privileges as the role.

- Share room and resource calendars to the service account: By default, after assigning the role to the passport service account, the passport service account might or might not be able to access the room calendar, depending on the company policy or room setting.
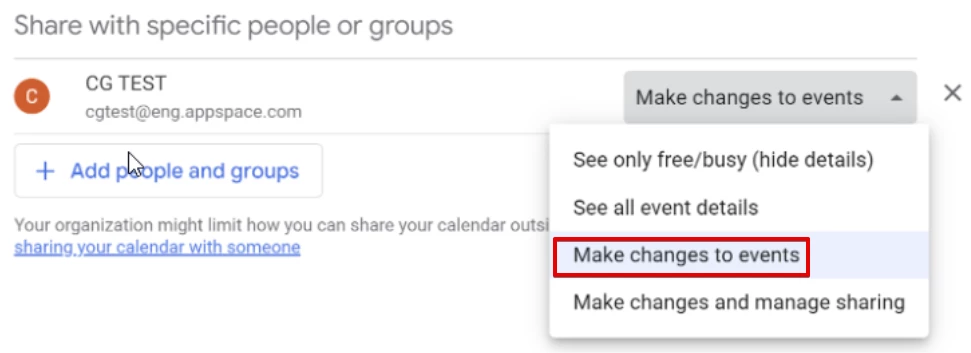
The permission to create/edit/delete events in the room
In order to have Appspace space reservation reserve/change the events of the room after importing the rooms to Appspace, you will need to share the room access to the passport service account with the “Make changes to events” option.
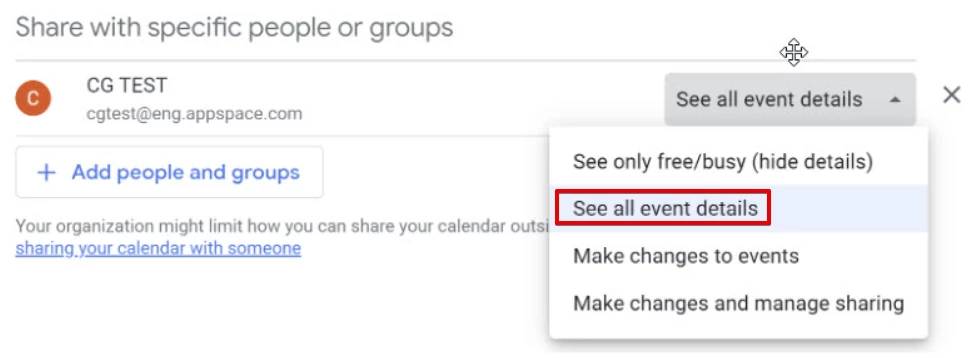
Read event access only
In order to have Appspace space reservation read the events of the room, ensure that the room is shared to the passport service account with the see all event details option.
Note: If you would like to enable the Book On Behalf feature from Appspace, your GCal administrator should ensure that the service account has read and write access to the user calendar.
- For example: a user, James, is trying to book a room and the reservation is failing. One thing to check is if the GCal admin or service account has access to James's calendar as well as the resource calendar. This is what allows the service account to book on behalf of the user making the reservation.