

The Schedule Viewer introduces a new view within the Appspace reservation booking experience that allows users to see invitees' calendars in real time. Similar to the calendar interface of Microsoft Outlook and Google Calendar, it helps organizers quickly identify common availability across all participants and select the best time slot and space accordingly. This ensures a seamless, efficient experience for coordinating meetings without leaving the Appspace platform, with the following features:
- Displays resource and invitees’ availability side-by-side in a timeline or grid layout, in a mobile responsive view.
- Real-time integration with connected calendar systems (e.g., Microsoft 365 or Google Workspace) to display resource and attendee availability.
Feature Availability
This Schedule Viewer is available for the following sections:
- Employee View > Reservation
- Employee View > Reservation > Approval
- Employee View > Places
- Employee View > Places > View Maps
- Employee View > Concierge > Reservation
- Employee View > Concierge > Approval
- Console > Reservation
Prerequisites
Refer to the Prerequisites section in the articles for the following views:
- For the Employee View, refer to the Reserve a Workspace, Desk, or Room – Employees article.
- For the Console, refer to the Reserve Workspace & Building Pass in Console - Administrators article.
The Schedule Viewer
When the Schedule Viewer is displayed, you will see a calendar grid made up of event blocks, which represent scheduled reservations. side-by-side timeline view / grid of all invitees (including visitors), allowing you to visually view available time within the resource and its attendees, as well as occupied time blocks.
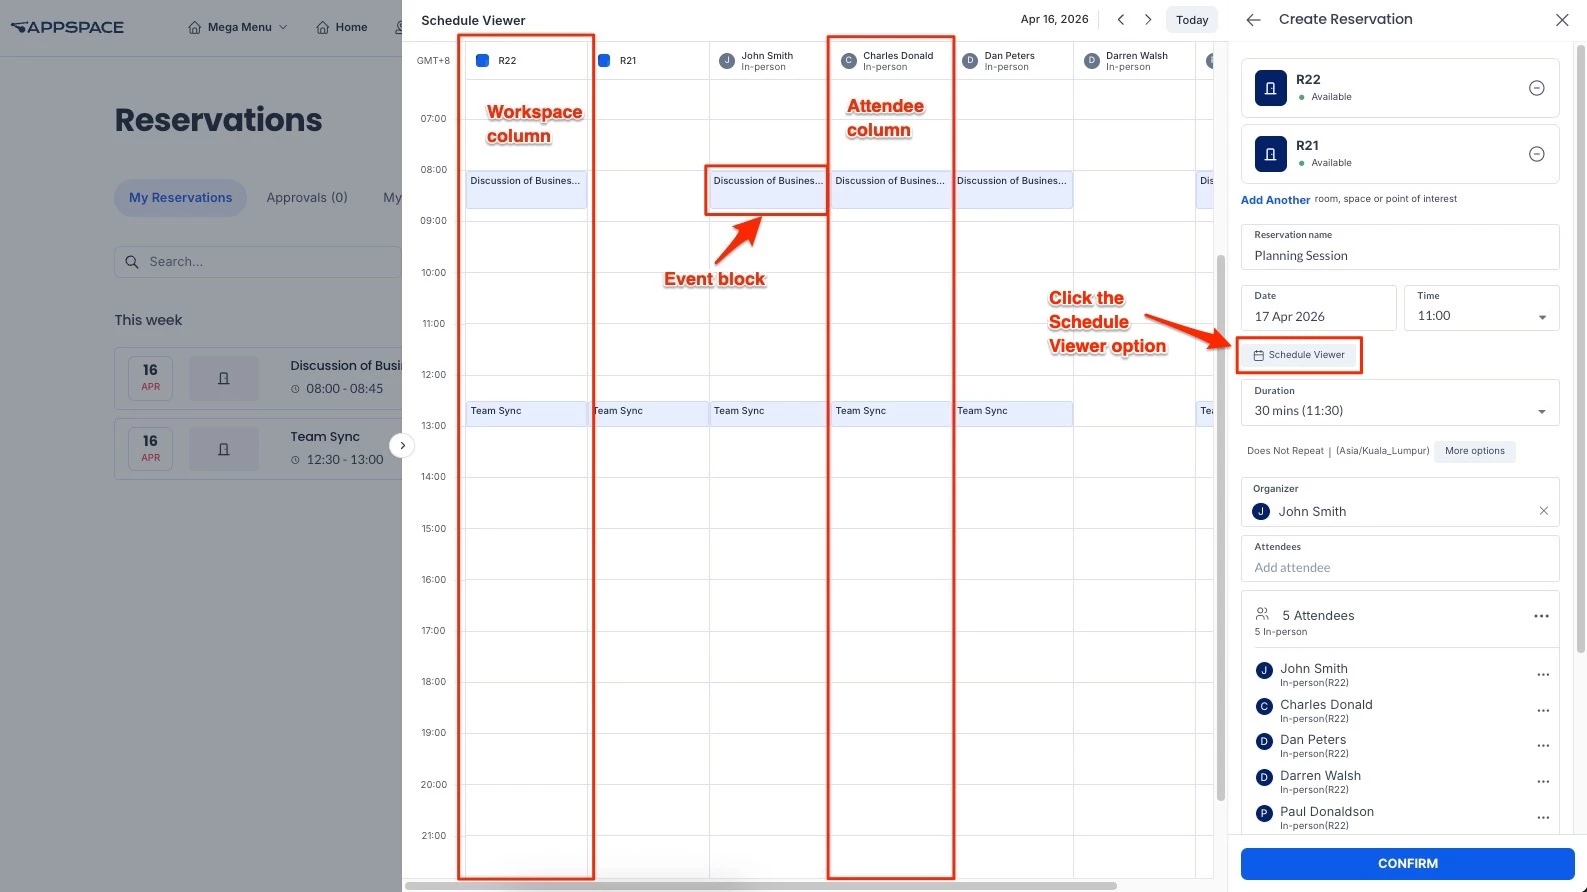
- Scheduled reservations for the resource are displayed as blocks with the Title of each event. For the purposes of this article it is called an event block.
- The first column displays the timezone of the host (e.g GMT 8+).
- Each added attendee’s and visitor’s calendar is displayed with a column, with profile image/icon and meeting attendance (in person, virtual).
- The red line represents the current time of day.
- Reservations created in calendar providers (Microsoft Outlook, Appspace Outlook Add-in, or Google Calendar) are indicated with an icon on the event block.
The event block in the calendar grid is automatically resized based on the following inputs:
- Date
- Time
- Duration (or Start Date and Time and End Date and Time)
- Time zone
You can also edit the reservation by resizing or dragging the event block within the calendar grid to adjust its duration and time. Doing so will automatically update the information in the corresponding Date, Time and Duration fields.
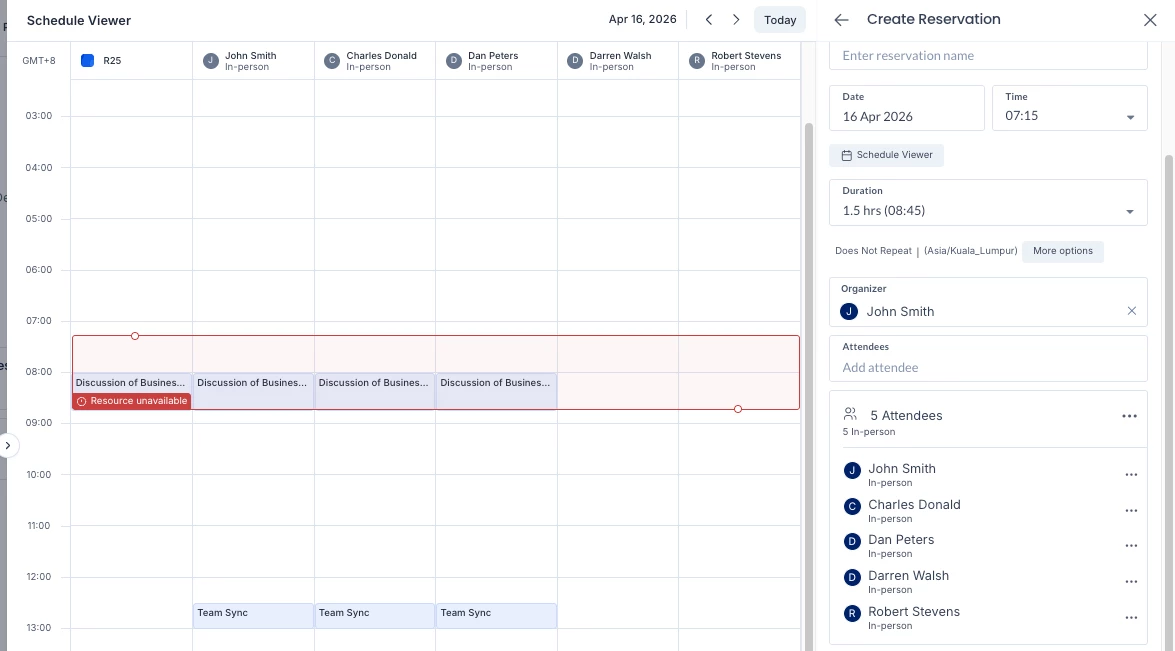
- The event block is red when the resource is unavailable or has a restriction.
- The event block is blue when the resource is available, even if attendees are unavailable.
- If a resource is unavailable during the selected date and time, the Resource unavailable text is displayed in the event block within the calendar grid.
Opening and Using the Schedule Viewer in the Employee View
Follow the steps below to access and use the Scheduling Assistant during a reservation through the Employee View:
- Log in to the Employee View with your Appspace Premium User credentials.
- Create a reservation. Refer to the steps in the Reserve a Workspace, Desk, or Room – Employees article to create a reservation in the Employee View.
- After selecting a workspace resource for the reservation, select the date, time, and duration, and invite attendees.
- Click the Schedule Viewer option to expand a side-by-side timeline view / grid displaying the information you have input.
- The Scheduling Assistant view is displayed in a calendar grid format.
- Make any other adjustments to the reservation and click CONFIRM to create the reservation.
Opening and Using the Schedule Viewer in the Console View
Follow the steps below to access and use the Scheduling Assistant during a reservation through the Employee View:
- Log in to the Appspace console.
- Click Reservations from the ☰ Appspace menu, and click the Reservations tab.
- Create a reservation. Refer to steps for the reservation of a Resource Workspace in the Reserve Workspace & Building Pass in Console - Administrators article.
- After selecting a workspace resource for the reservation, select the date, time, and duration, and invite attendees.
- Click the Schedule Viewer option to expand a side-by-side timeline view / grid displaying the information you have input.
- The Scheduling Assistant view is displayed in a calendar grid format.
- Make any other adjustments to the reservation and click CONFIRM to create the reservation.
Modify a Reservation in Schedule Viewer
Follow the steps below to adjust a reservation using the calendar grid:
- Locate the event block in the Scheduling Assistant view.
- Perform the following to adjust the date, time, and duration of the reservation:
- Drag the event block to a new time slot.
- Resize the event block to adjust the duration.
- Event block colors indicate resource availability:
- Blue – Resource is available.
- Red – Resource is unavailable or restricted.
-
If the resource is unavailable for the selected time, Resource unavailable is displayed within the event block.
- Confirm that the updated values are reflected in the reservation details.
- Make any other adjustments to the reservation and click CONFIRM.