This article is part of a series of articles to help administrators configure the reservation system. Please see the main article for links to all related articles.
You may configure permissions of a resource to restrict the reservation of the resource to only certain users or user groups. This ensures that only authorized users can reserve the resource in the Appspace Employee App.
Follow the instructions below to configure permissions for your resource:
In Reservations, click the Resources tab, and select a specific resource, or location to configure the permission.
To configure permissions on a specific resource, click the resource name from the All Resources listing page.
To configure permissions on a location (all resources within the location will inherit the constraint rule), click the ellipsis of the selected location from the location tree in the side panel, and click Edit.
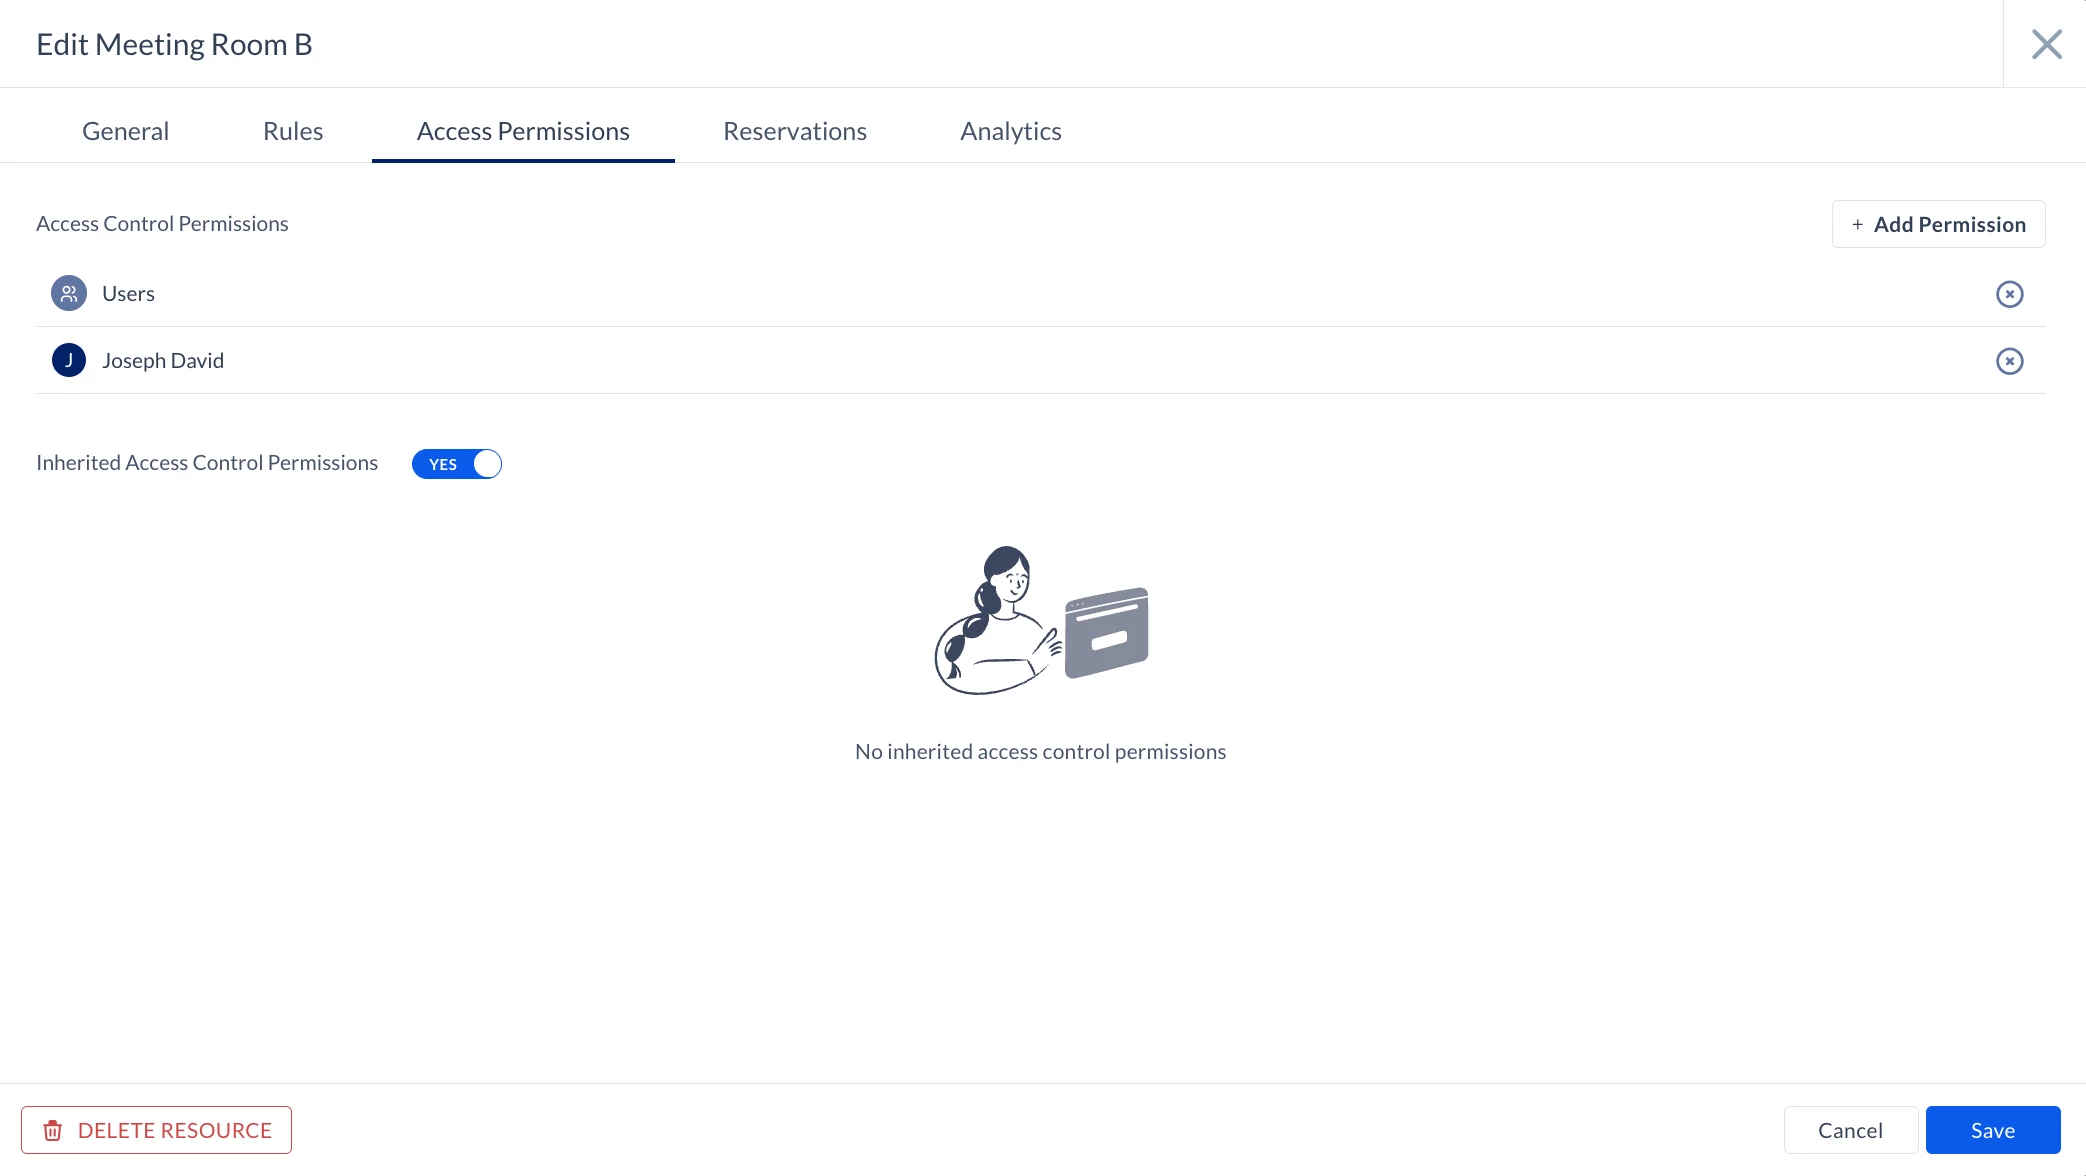
In the Edit resource window, click the Access Permissions tab to configure the resource permissions or view inherited permissions.
Click +Add Permissions and select the desired users or user groups to provide them with access to reserve this resource.
Click Save.
You may disable inherited permissions by sliding the Inherited Access Control Permissions slider to NO for this resource.
Note
Disabling Inherited Permissions on a location, floor, or zone does not impact resources within the location, floor, or zone. The resources within these places will still have the Inherited Permission toggled ON by default.
Click SAVE.
The resource can now only be reserved by the selected users or user groups in the Appspace Employee App.
Once you have made any reservation, you may proceed to the View Resource Reservations section below.
You may also proceed to configure the global settings for your reservations. Proceed to the Configure Reservation Public/Private View (Sensitivity) section below.
Configure Resource and Location Management
(New) You may configure permissions for a location (campus, buildings, or floors) or resource (rooms, workspaces) to restrict the administration of the resource to certain users or user groups. This ensures that only authorized location administrators can manage the resource in the Admin Console.
Follow the instructions below to configure permissions for your resource:
Important
To use this feature, ensure that the Enforce sub-location management rights option is enabled in the General tab when creating or by editing the resource.
In Reservations, click the Resources tab, and select a specific resource or location to configure the permission.
To configure permissions on a specific resource, click the resource name from the All Resources listing page.
To configure permissions on a location (all resources within the location will inherit the constraint rule), click the ellipsis of the selected location from the location tree in the side panel, and click Edit.
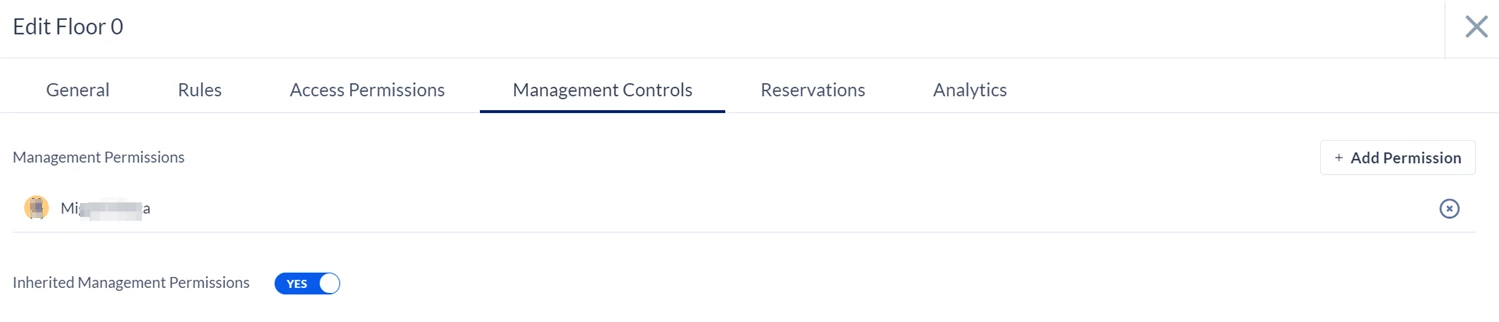
In the Edit resource window, click the Management Controls tab to configure the resource permissions or view inherited permissions.
Click +Add Permissions and select the desired location admins or user groups to provide them with access to reserve this resource.
Click Save.
You may disable inherited permissions by sliding the Inherited Access Control Permissions slider to NO for this resource.
Note
Disabling Inherited Permissions on a location, floor, or zone does not impact resources within the location, floor, or zone. The resources within these places will still have the Inherited Permission toggled ON by default.
Click SAVE.
The resource or location can now only be managed by the selected location admins or user groups in the Admin Console.
Once you have made any reservation, refer to the View Resource Reservations section below.
You may also proceed to configure the global settings for your reservations. Proceed to the Configure Reservation Public/Private View (Sensitivity) section below.
Configure Scheduled Maintenance and Smart Relocations
(New) You can schedule maintenance for a resource (like a room, space, or point of interest), or even an entire floor of a building, and specify a start and end date and time. During the specified period, the resource will be unavailable for reservations.
(New) When you select a floor for scheduled maintenance, all resources within that floor are automatically set to the same maintenance schedule.
To help manage the impact on existing reservations, Smart Relocations provides automated tools that allow the organizer to perform either one of the following actions:
Remove the affected resource (s) from reservations – Existing bookings that fall within the scheduled maintenance period will be updated to exclude the resource (s). Applying selected for scheduled maintenance, all resources within the floor will be affected. Organizers are notified of the change, and the affected reservations either proceed without the resource or are flagged as conflicted for manual follow-up.
This option is unavailable for resources from an external calendar provider, such as Outlook for Microsoft 365 or Google Calendar.
Auto-suggest resource replacements – The system automatically locates and assigns a suitable available resource within the same building as a replacement, ensuring meeting continuity with minimal disruption to users.
Meeting organizers and concierge users can manage their respective reservations when a scheduled maintenance arises.
Follow the instructions below to schedule the maintenance of a resource and use the Smart Relocations feature:
In Reservations, click the Resources tab.
Select either a resource or a floor for the scheduled maintenance:
Select a resource - Select a specific resource from the All Resources list, or select a building and floor from the left bar to filter the resources.
Select a floor - From the left bar, select a building, then the floor and click the ellipsis (...). Select Edit.
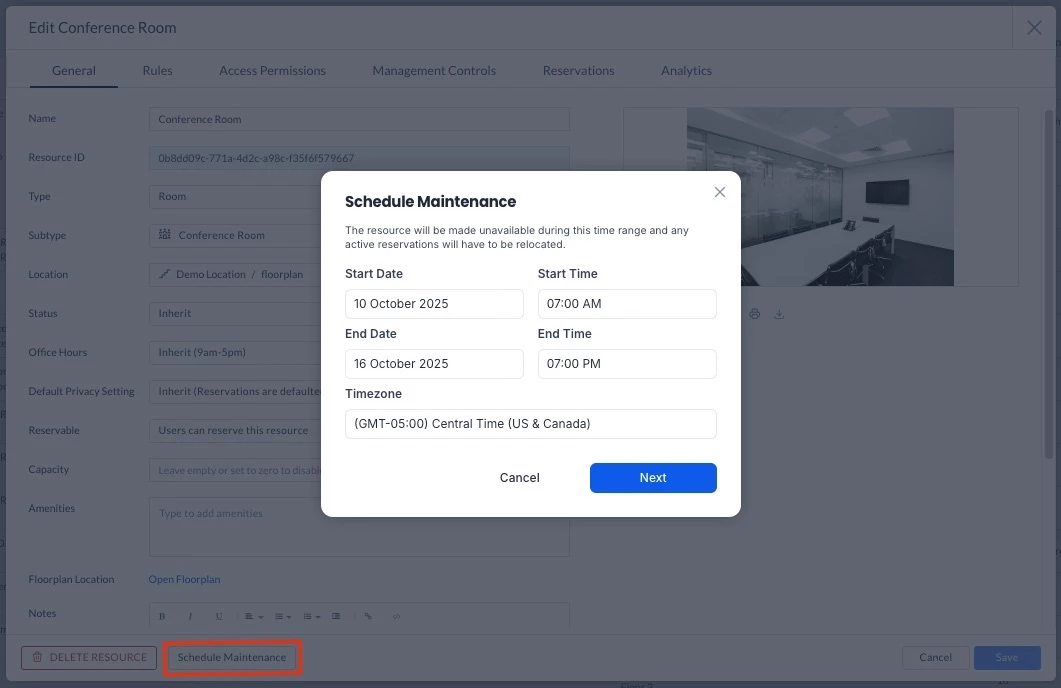
On the Edit resource or floor window, click the Scheduled Management button.
Set the period for the scheduled maintenance by clicking the Start Date field and selecting from the calendar, selecting the Start Time from the drop-down list, and the End Date and End Time. Select a different Time Zone if the affected location is different from the current setting.
Click Next. This will result in the following:
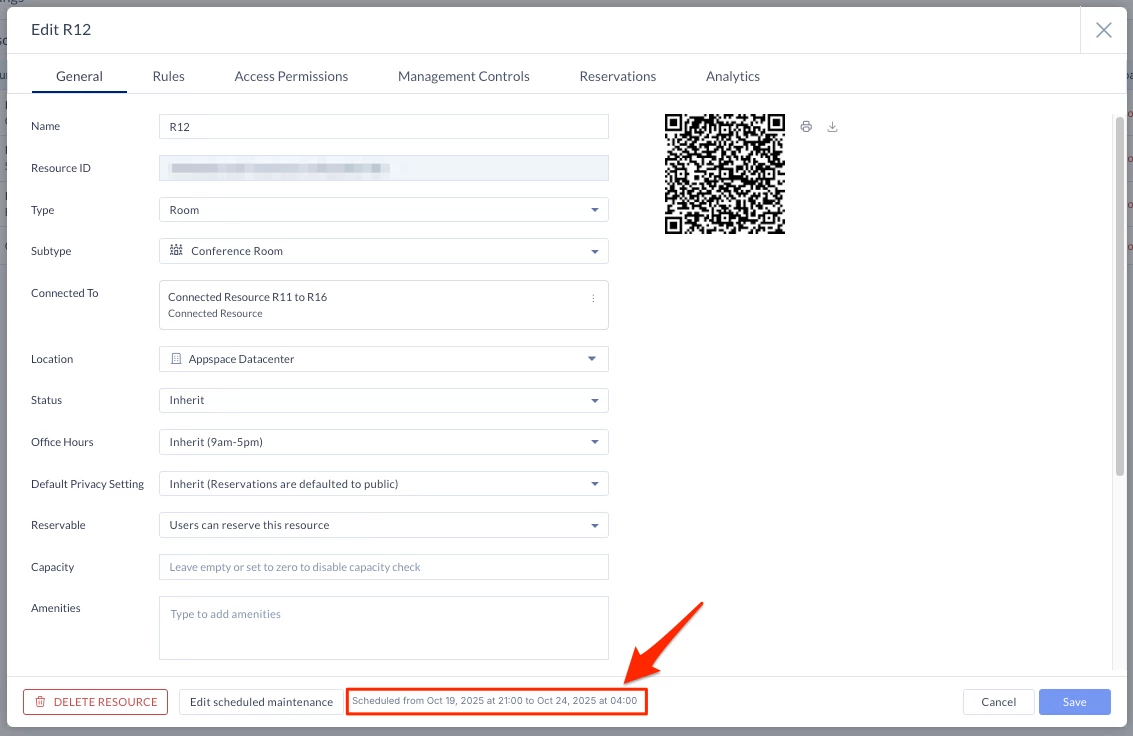
The resource will be set as unavailable and cannot be selected when making a reservation.
A note on the scheduled maintenance will be displayed at the base of the resource.
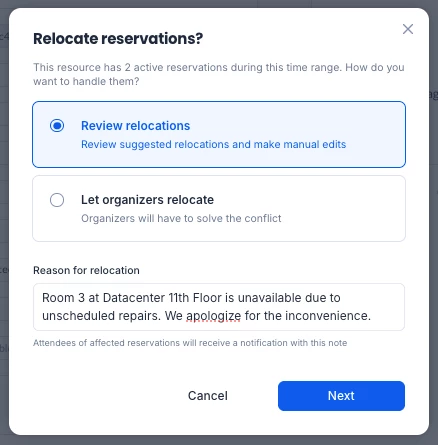
If there are existing reservations that are affected by the scheduled maintenance, the following prompt will be displayed, allowing you to select one of the following options:
Review relocations – This option lets you review and automatically relocate reservations affected by the maintained resource, using the smart relocations feature. After the changes are applied, organizers will be notified of the updated reservation details.
Select this option and click on Next to view the list of affected reservations.
To automatically resolve all conflicts at once by applying the suggested resources, click Next.
Note
If a conflict cannot be resolved (because no alternative resources are available), click the No alternative resource available button to edit the reservation. In the Edit Reservation pane, you can change the date/time of the reservation or remove the affected resource from the reservation. Alternatively, you can cancel the Review relocations action and use the Let organizers relocate option instead.
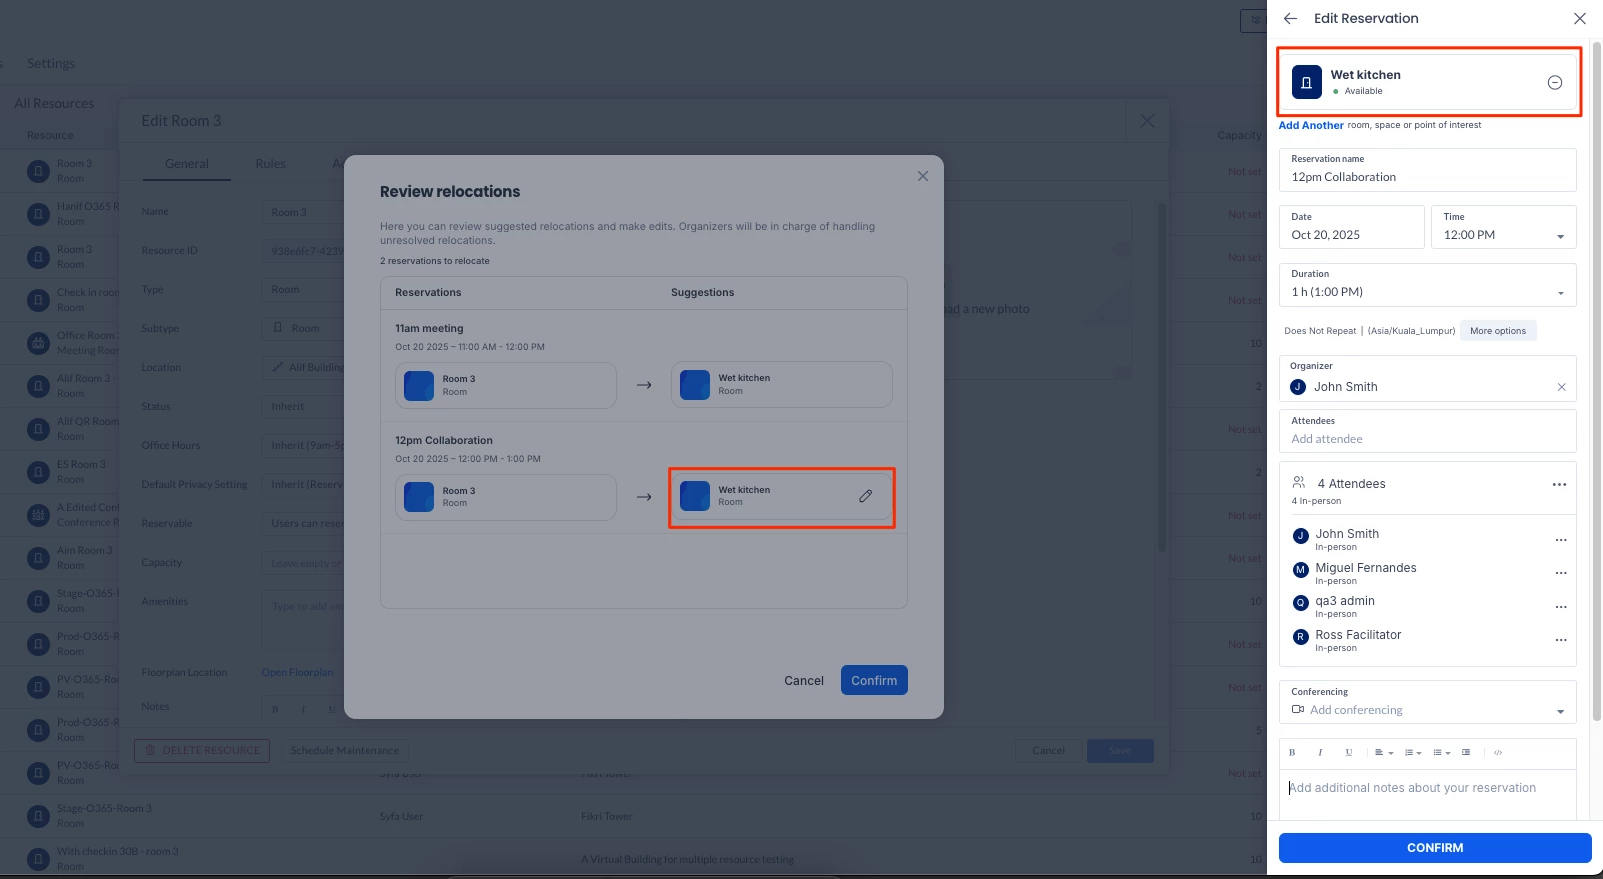
Alternatively, to resolve conflicts individually:
For each conflict, click the Pen icon on the suggested resource to apply it as the replacement in the Edit Reservation pane. If you prefer not to use the suggested option, remove it and manually select a different resource instead.
If no alternative resource is available, refer to the note above.
Click Confirm on the Edit Reservation pane.
Proceed to the next conflict if required. Once all reservation conflicts are resolved, the Review relocations window will close automatically.
Otherwise proceed to Step 6.
Organizers of the affected reservations will receive notifications (e.g. via email, messaging, or in the Employee view) of the relocation.
Let organizers relocate – organizers of each reservation will receive a notification that their reservation has a conflict and have to resolve the conflict themselves.
Select this option and click on Next.
Enter a Reason for Relocation to provide a custom note (e.g., explaining that the resource is scheduled for repairs during a certain period). This note will be visible to organizers and concierges when viewing the affected resource in the Edit Reservation pane.
Click Confirm.
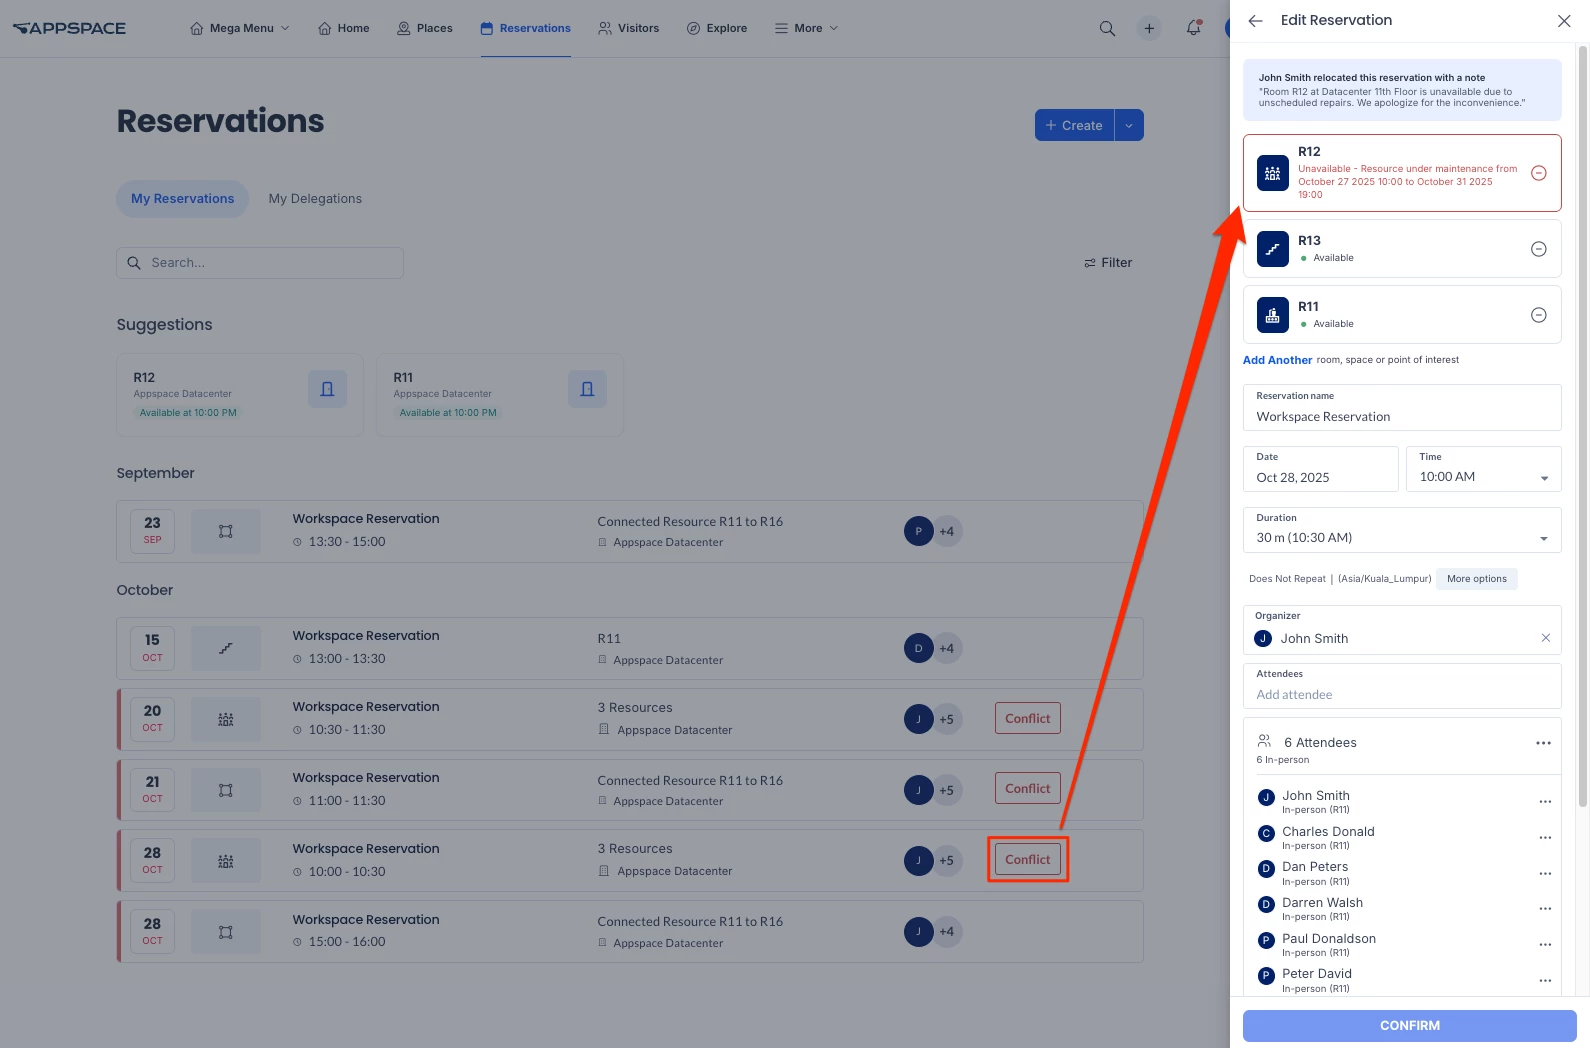
Once confirmed, organizers of the affected reservations will receive an email (or other notification) that their reservation is in conflict and must be resolved. In the Reservations list, the reservation will be flagged with the Conflict icon. When the organizer edits the reservation (via Admin View or Employee Experience), the scheduled maintenance details will be shown in the Edit Reservation pane.
Note
The notification email received will be that of a standard conflict in the reservation. It is only when the organizer edits the reservation that the information of the scheduled maintenance is displayed.
To edit or cancel a scheduled maintenance, select the resource, click on Edit Scheduled maintenance and perform the following:
Edit the Start date and Time and End date/Time, and the Time Zone.
Click Cancel maintenance to remove the scheduled maintenance. This will restore the availability of the resource for reservations during the maintenance period.
View Resource Reservations
To view all the reservations that have been made for this selected resource, do the following:
Click a resource name in the Resources tab on the Reservations dashboard.
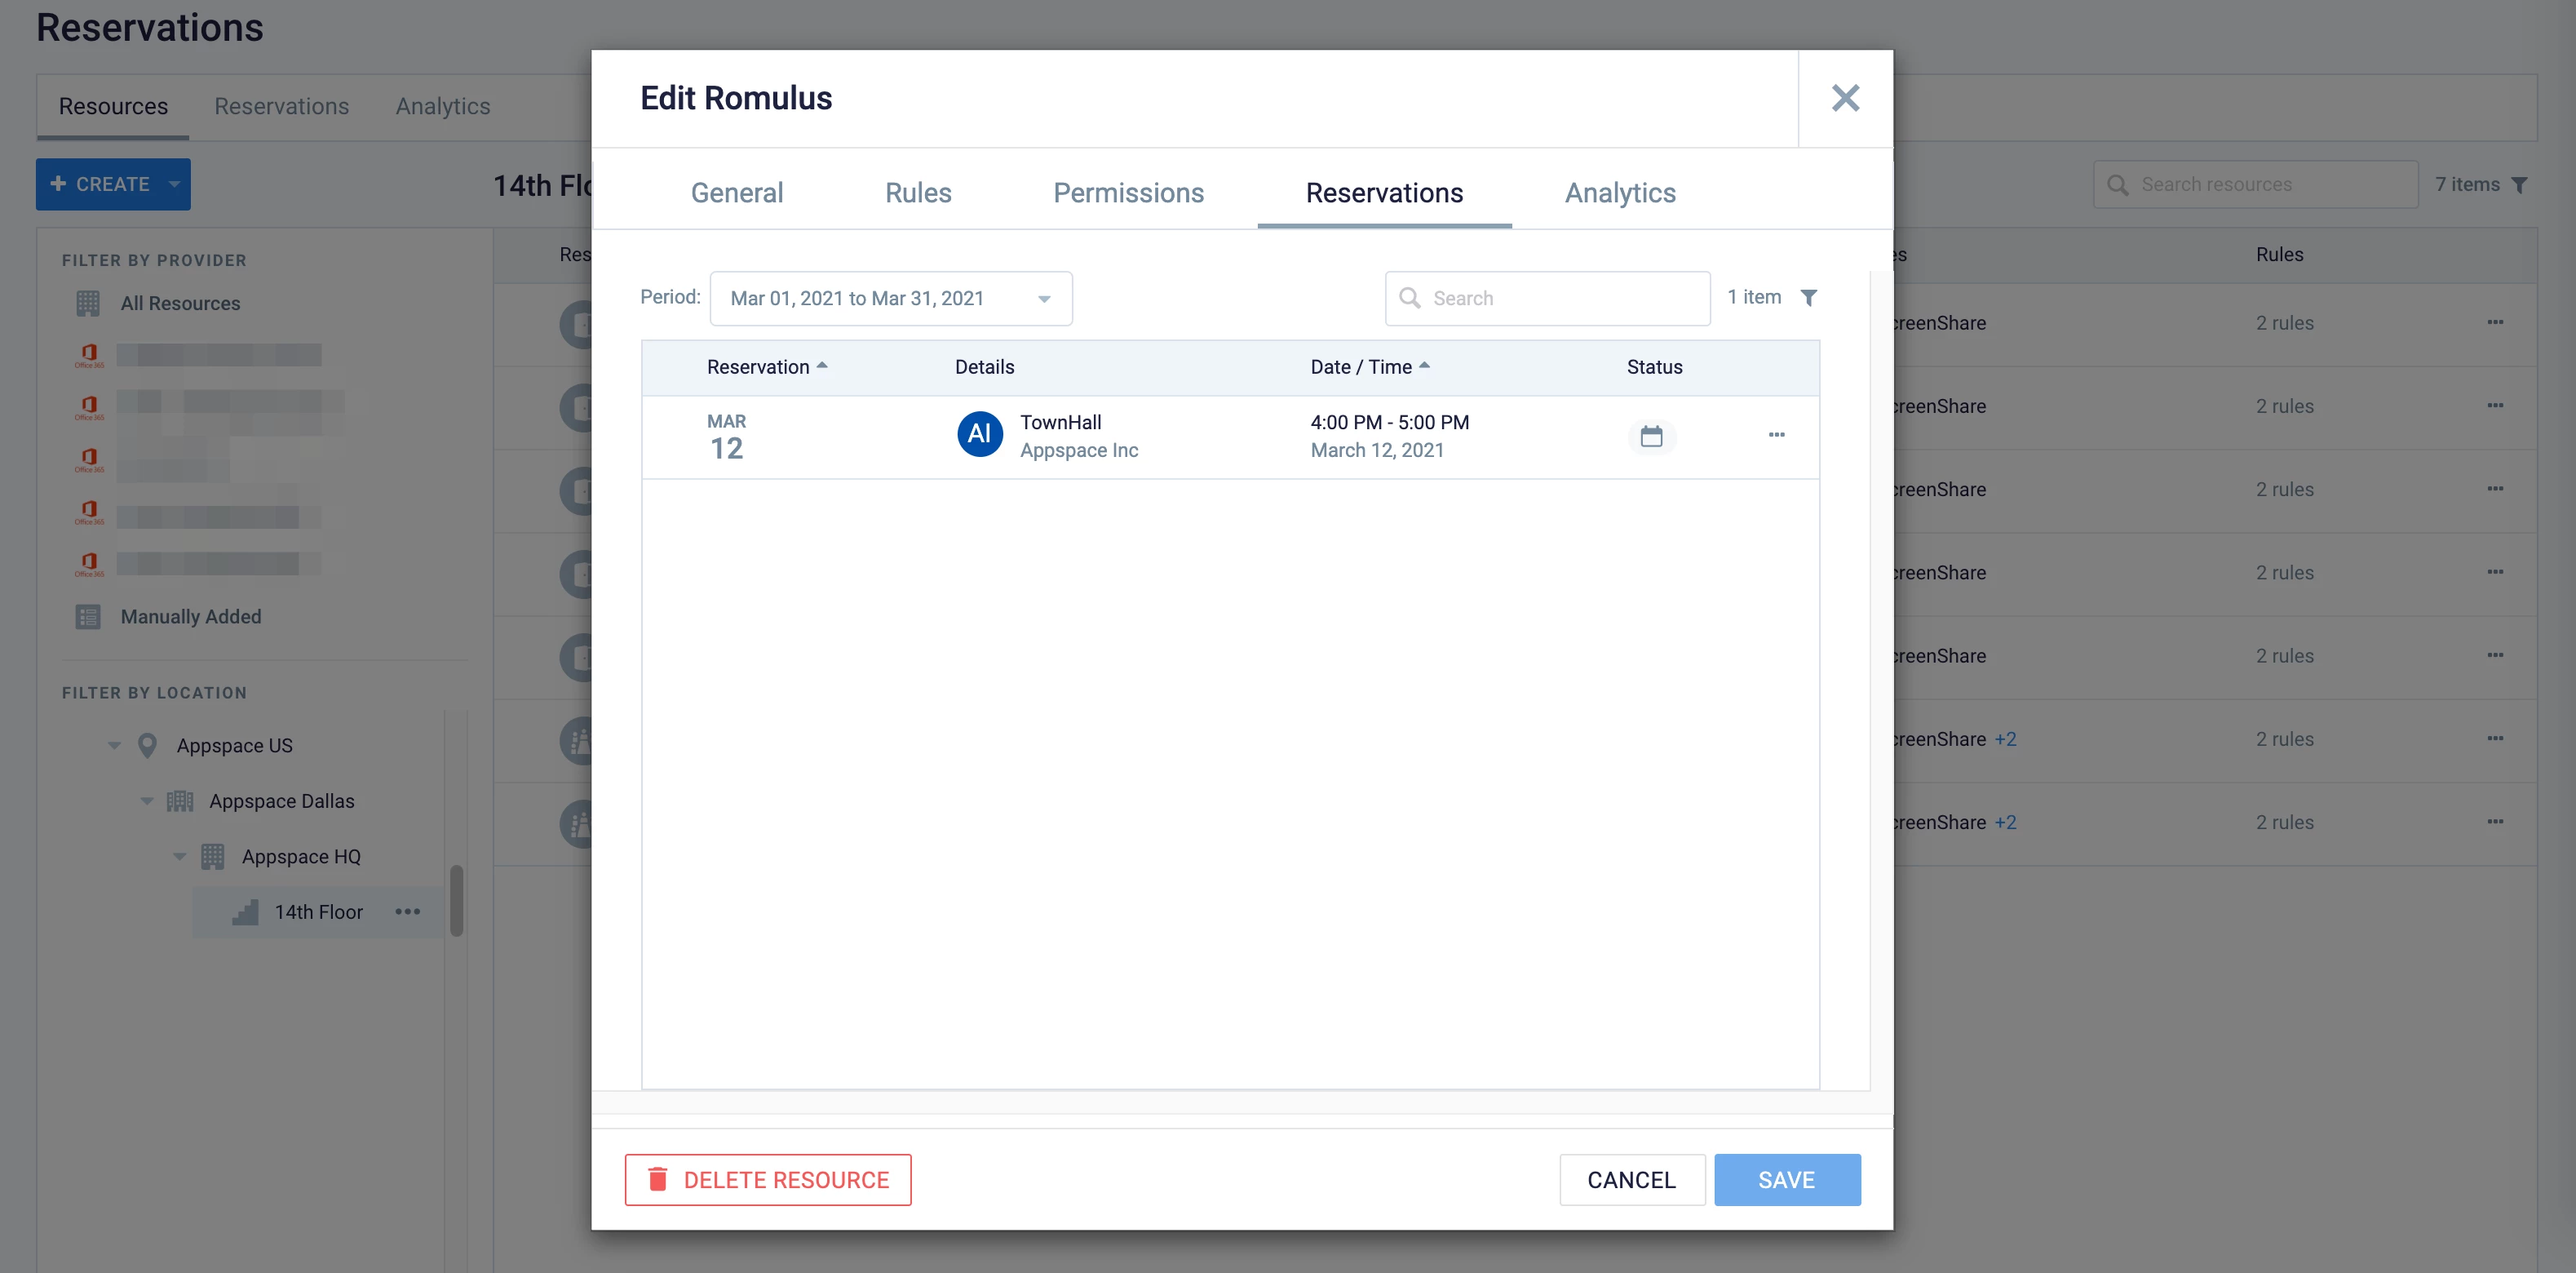
In the Edit resource window, click the Reservations tab.
You may view all reservations for the resource based on the default Period, which can be changed from the drop-down calendar.
You may search for a specific reservation by entering a keyword in the Search field, or by clicking the Filter icon to filter reservations by the user.
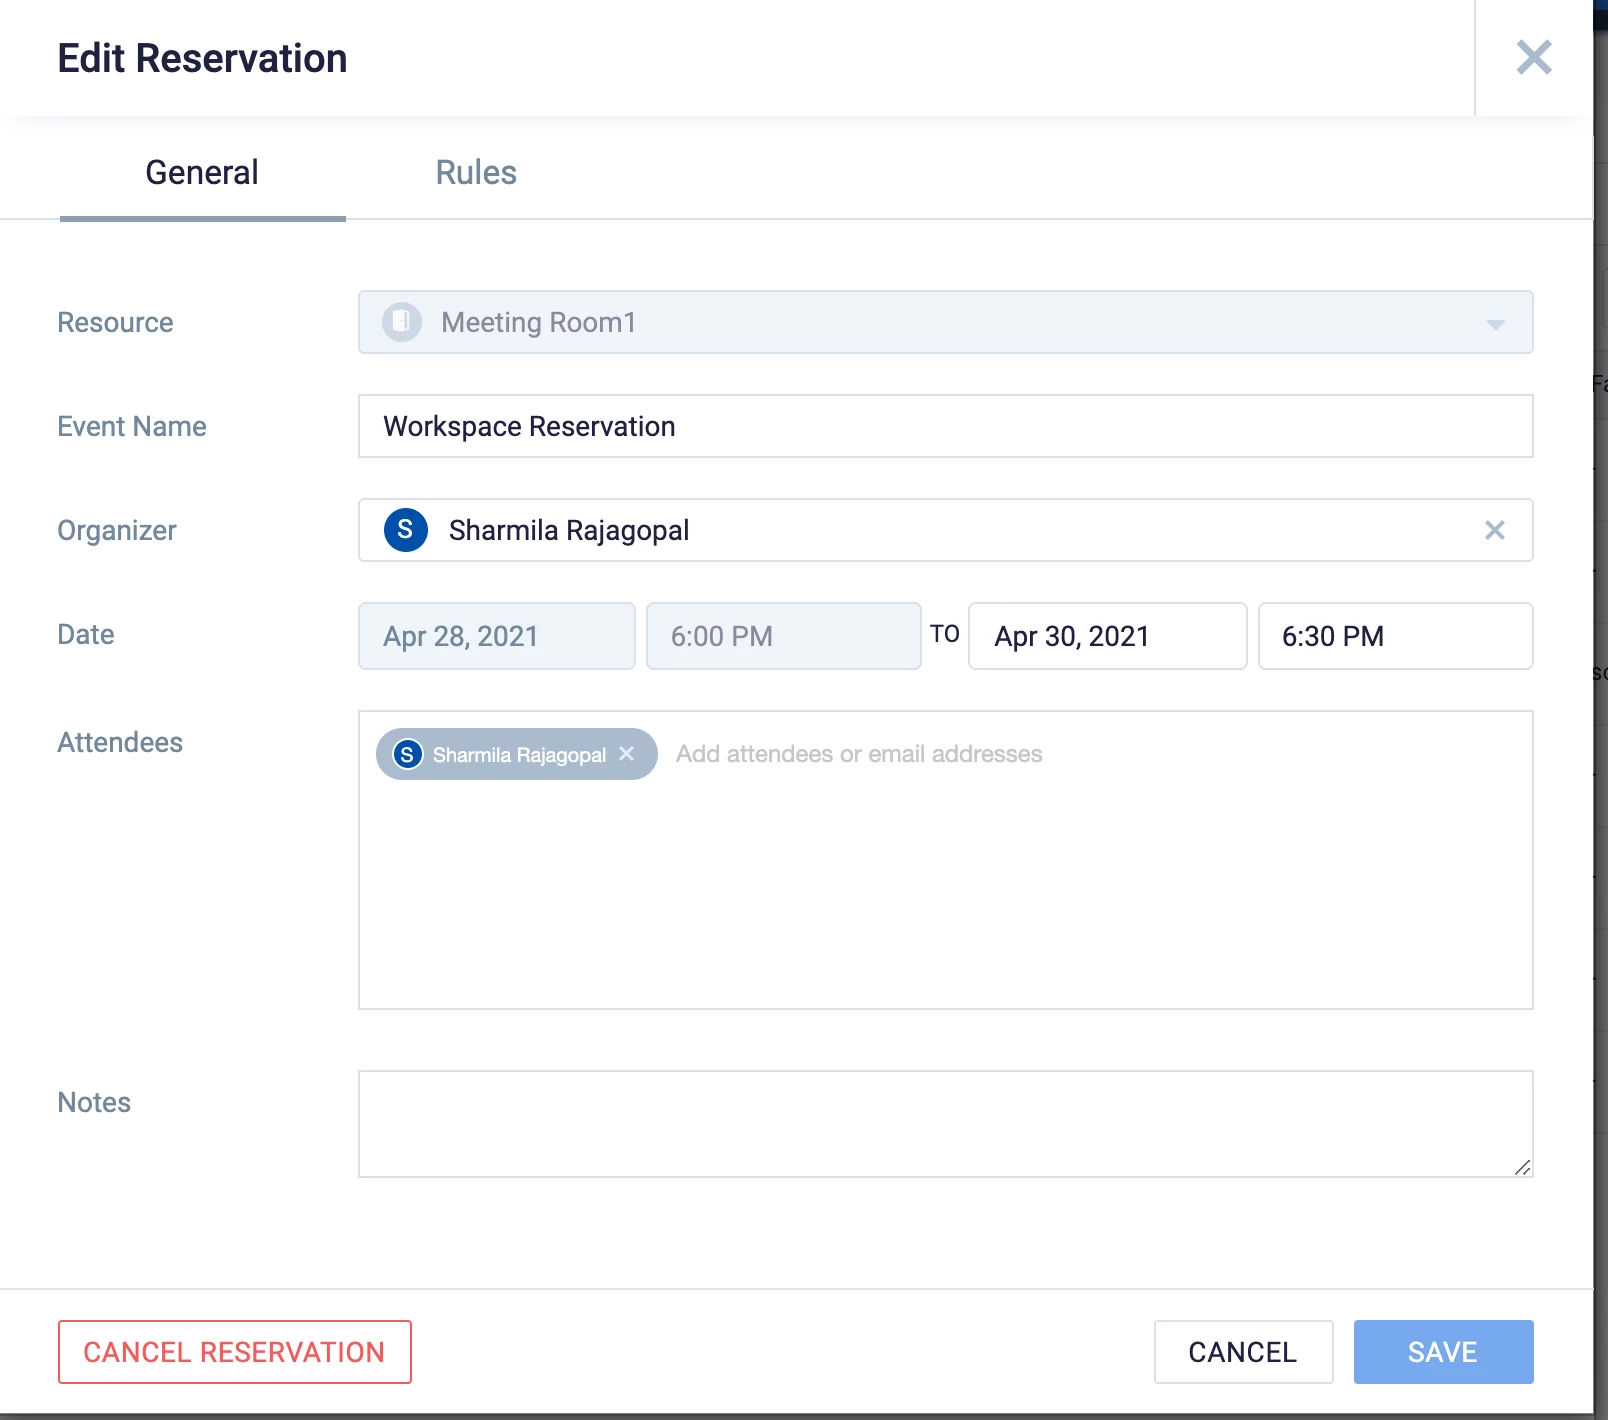
To directly edit any reservation, click the ellipsis next to the reservation, and click Edit.
In the Edit Reservation window, you may adjust reservation dates, view the rules, or cancel the reservation.
Once done, click SAVE.
Manage Multiple Resources
Resources can be managed by directly clicking the resource, or selecting multiple resources to edit in bulk.
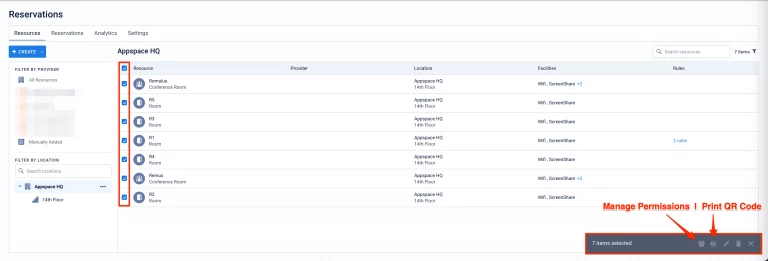
On the Resources dashboard, select multiple resources.
The bulk edit toolbar is displayed at the bottom of the screen.
Click any desired icon to perform one of the following actions:
Manage Permissions – Manage the permissions for the selected resources.
In the Access Control Permissions field, enter the User or User Groups that would be given access to the selected resources.
Click SAVE to make the changes to all the selected resources.
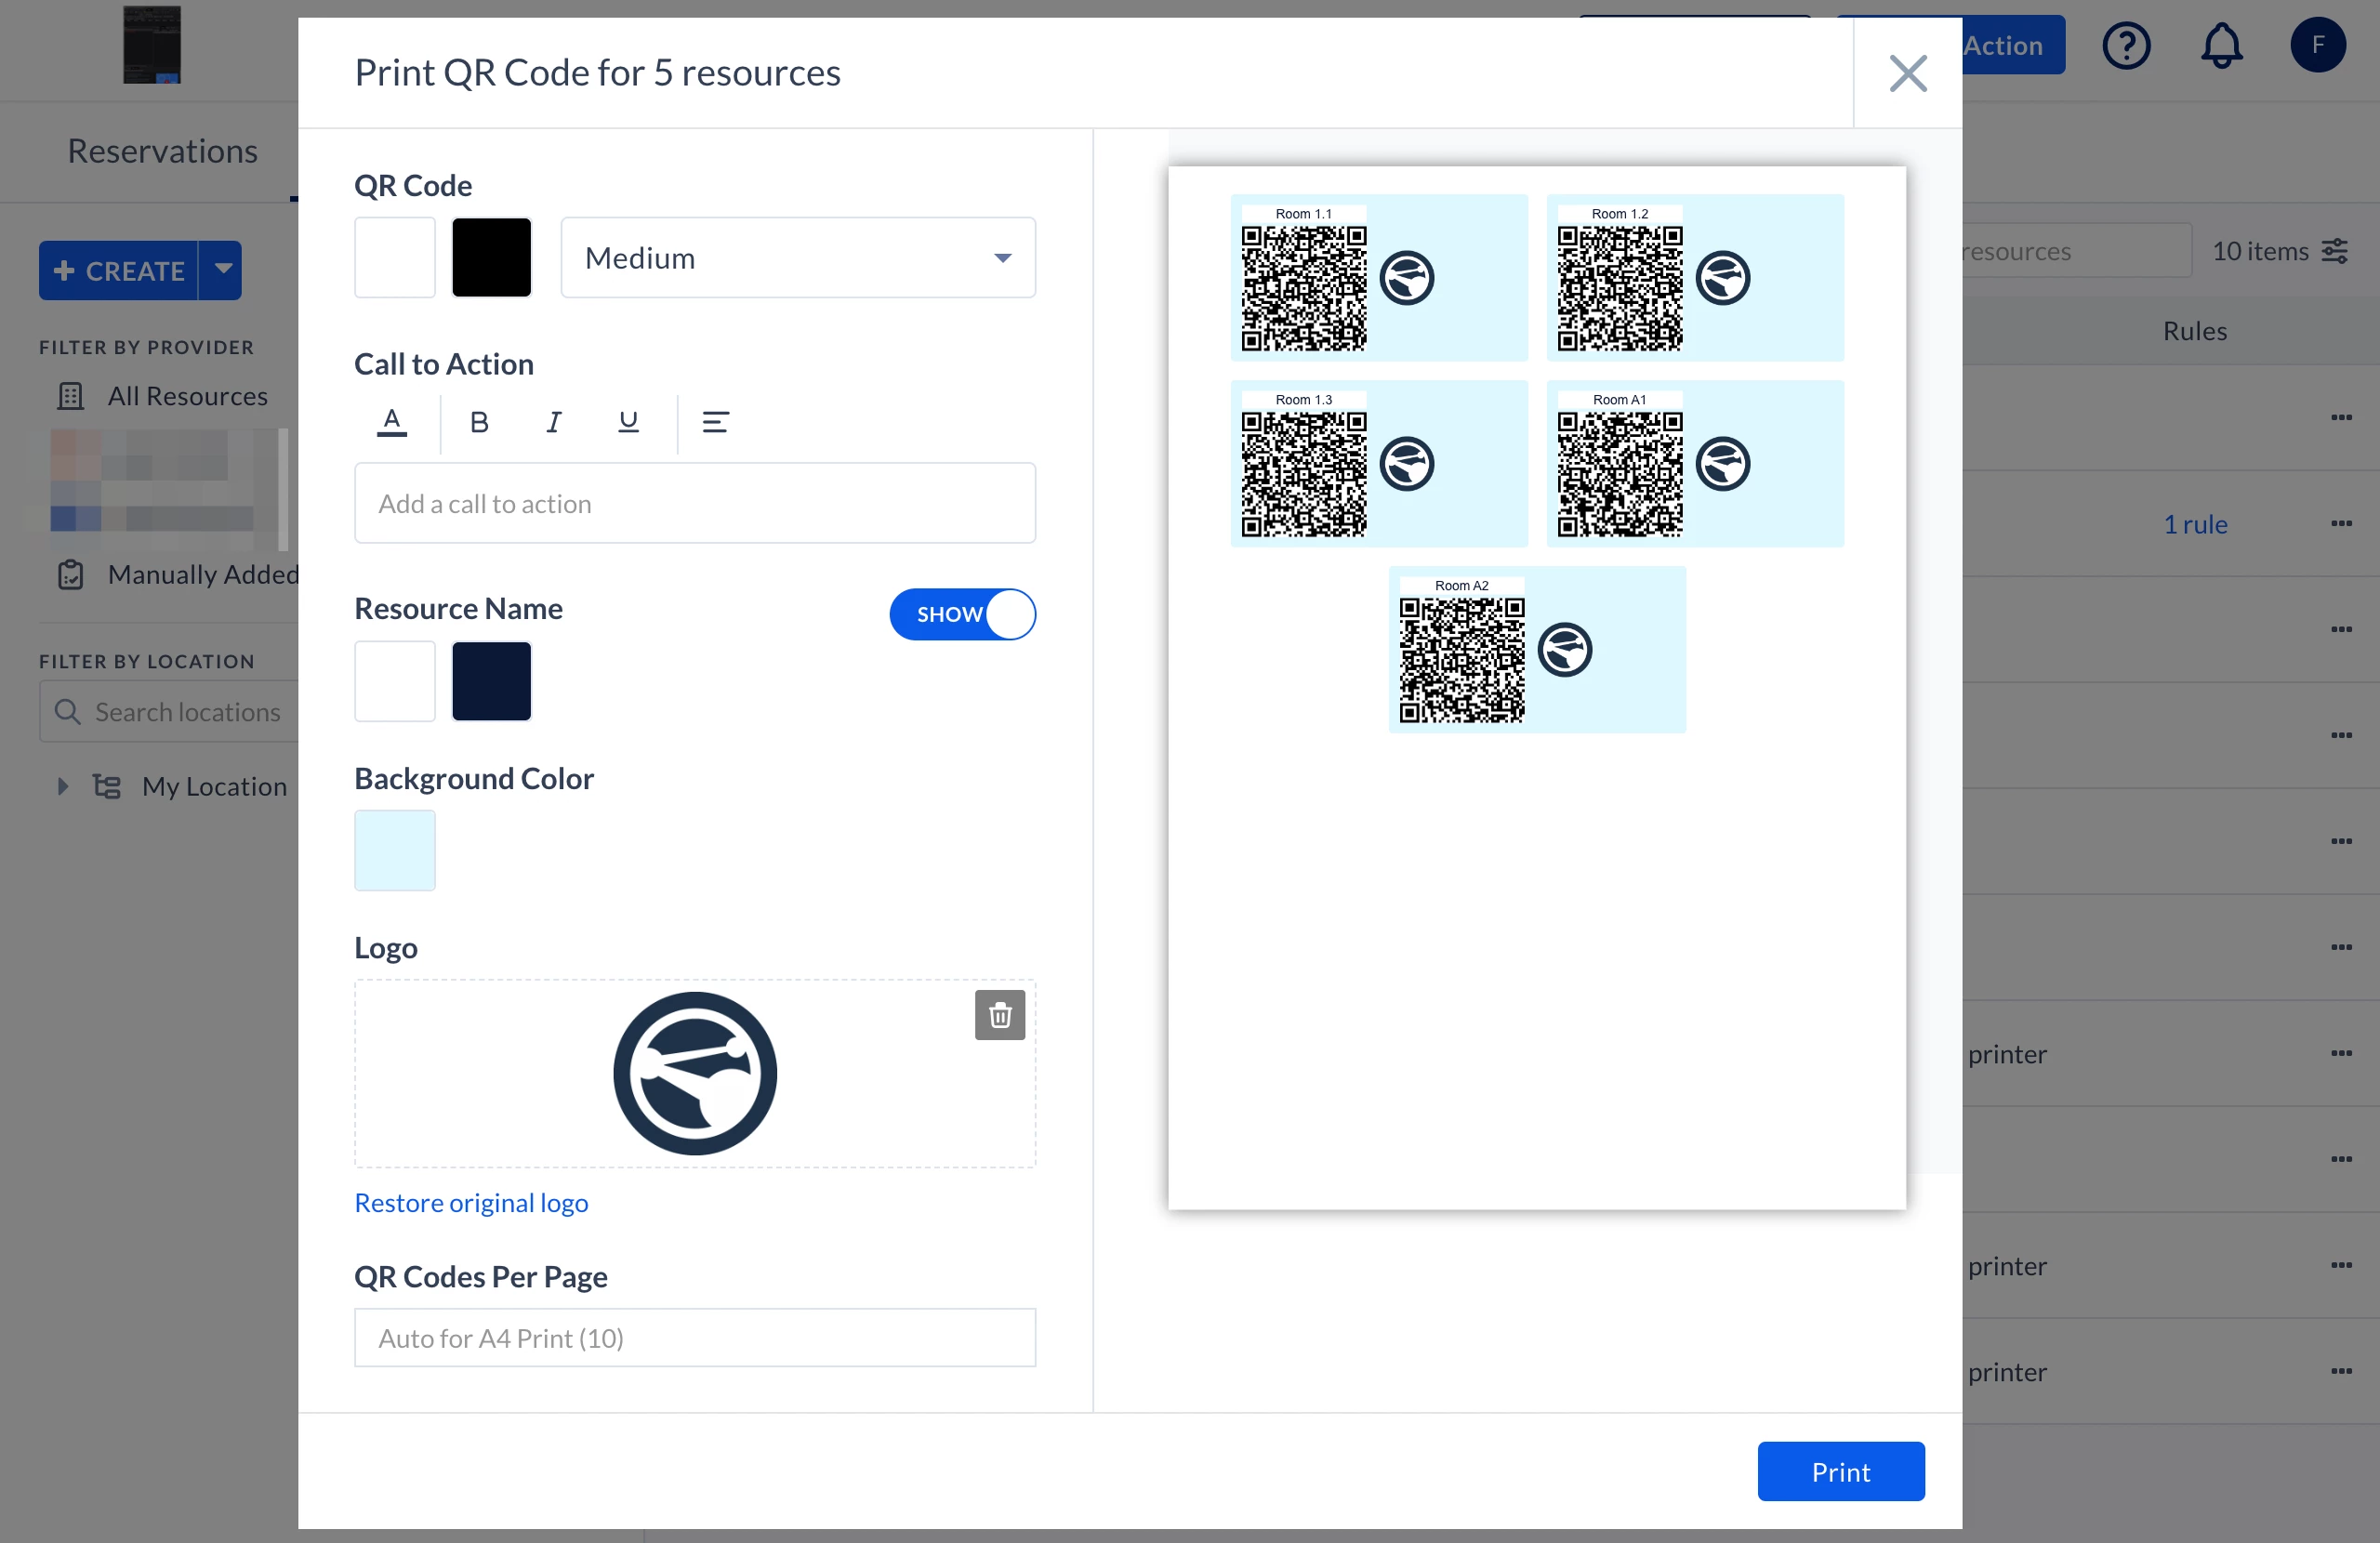
Print QR Code – Print the QR Codes for the selected resources. You may also perform the following customizations:
QR Code – Select the QR code foreground and background color, and select the size from the drop-down menu.
Call to Action Text – Select the text color and formatting, and enter the desired call to action text.
Resource Name – Select the text color and background color for the resource name, or disable showing the resource name via the SHOW toggle option.
Background Color – Select the background color for the resource sections on the page.
Logo – Upload the logo to be displayed next to each QR code for the resources on the page.
QR Codes Per Page – Select a number of QR codes to print per page. Defaults at 12 per page for A4 paper size.
Edit – Bulk manage the selected resources.
Proceed to make the following changes to the selected resources:
Type – Select the type of the resources.
Subtype – Select the subtype of the resources.
Location – Select the location of the resources.
Status – Select the status of the resources.
Reservable – Select if the resources are reservable.
Capacity – Enter the capacity of the resource.
Amenities – Enter all amenities available in the resources.
Click SAVE to make changes to all the selected resources.
Delete – Delete the selected resources.
Add Reservable Resources to a Floorplan
Prerequisites
The following objects should be created before you begin adding reservable spaces:
Locations
Buildings
Floor Plans
Additional Floor Layers (optional)
Add Reservable Resource
Follow the instructions below to add resources to a floor plan:
Click Locations from the ☰ Appspace menu.
Select and click the floor plan you wish to configure. New- If multiple floor layers are available, select the layer that you wish to configure under Floor Layers.
Click the Resources icon, and select the “not mapped” resource.
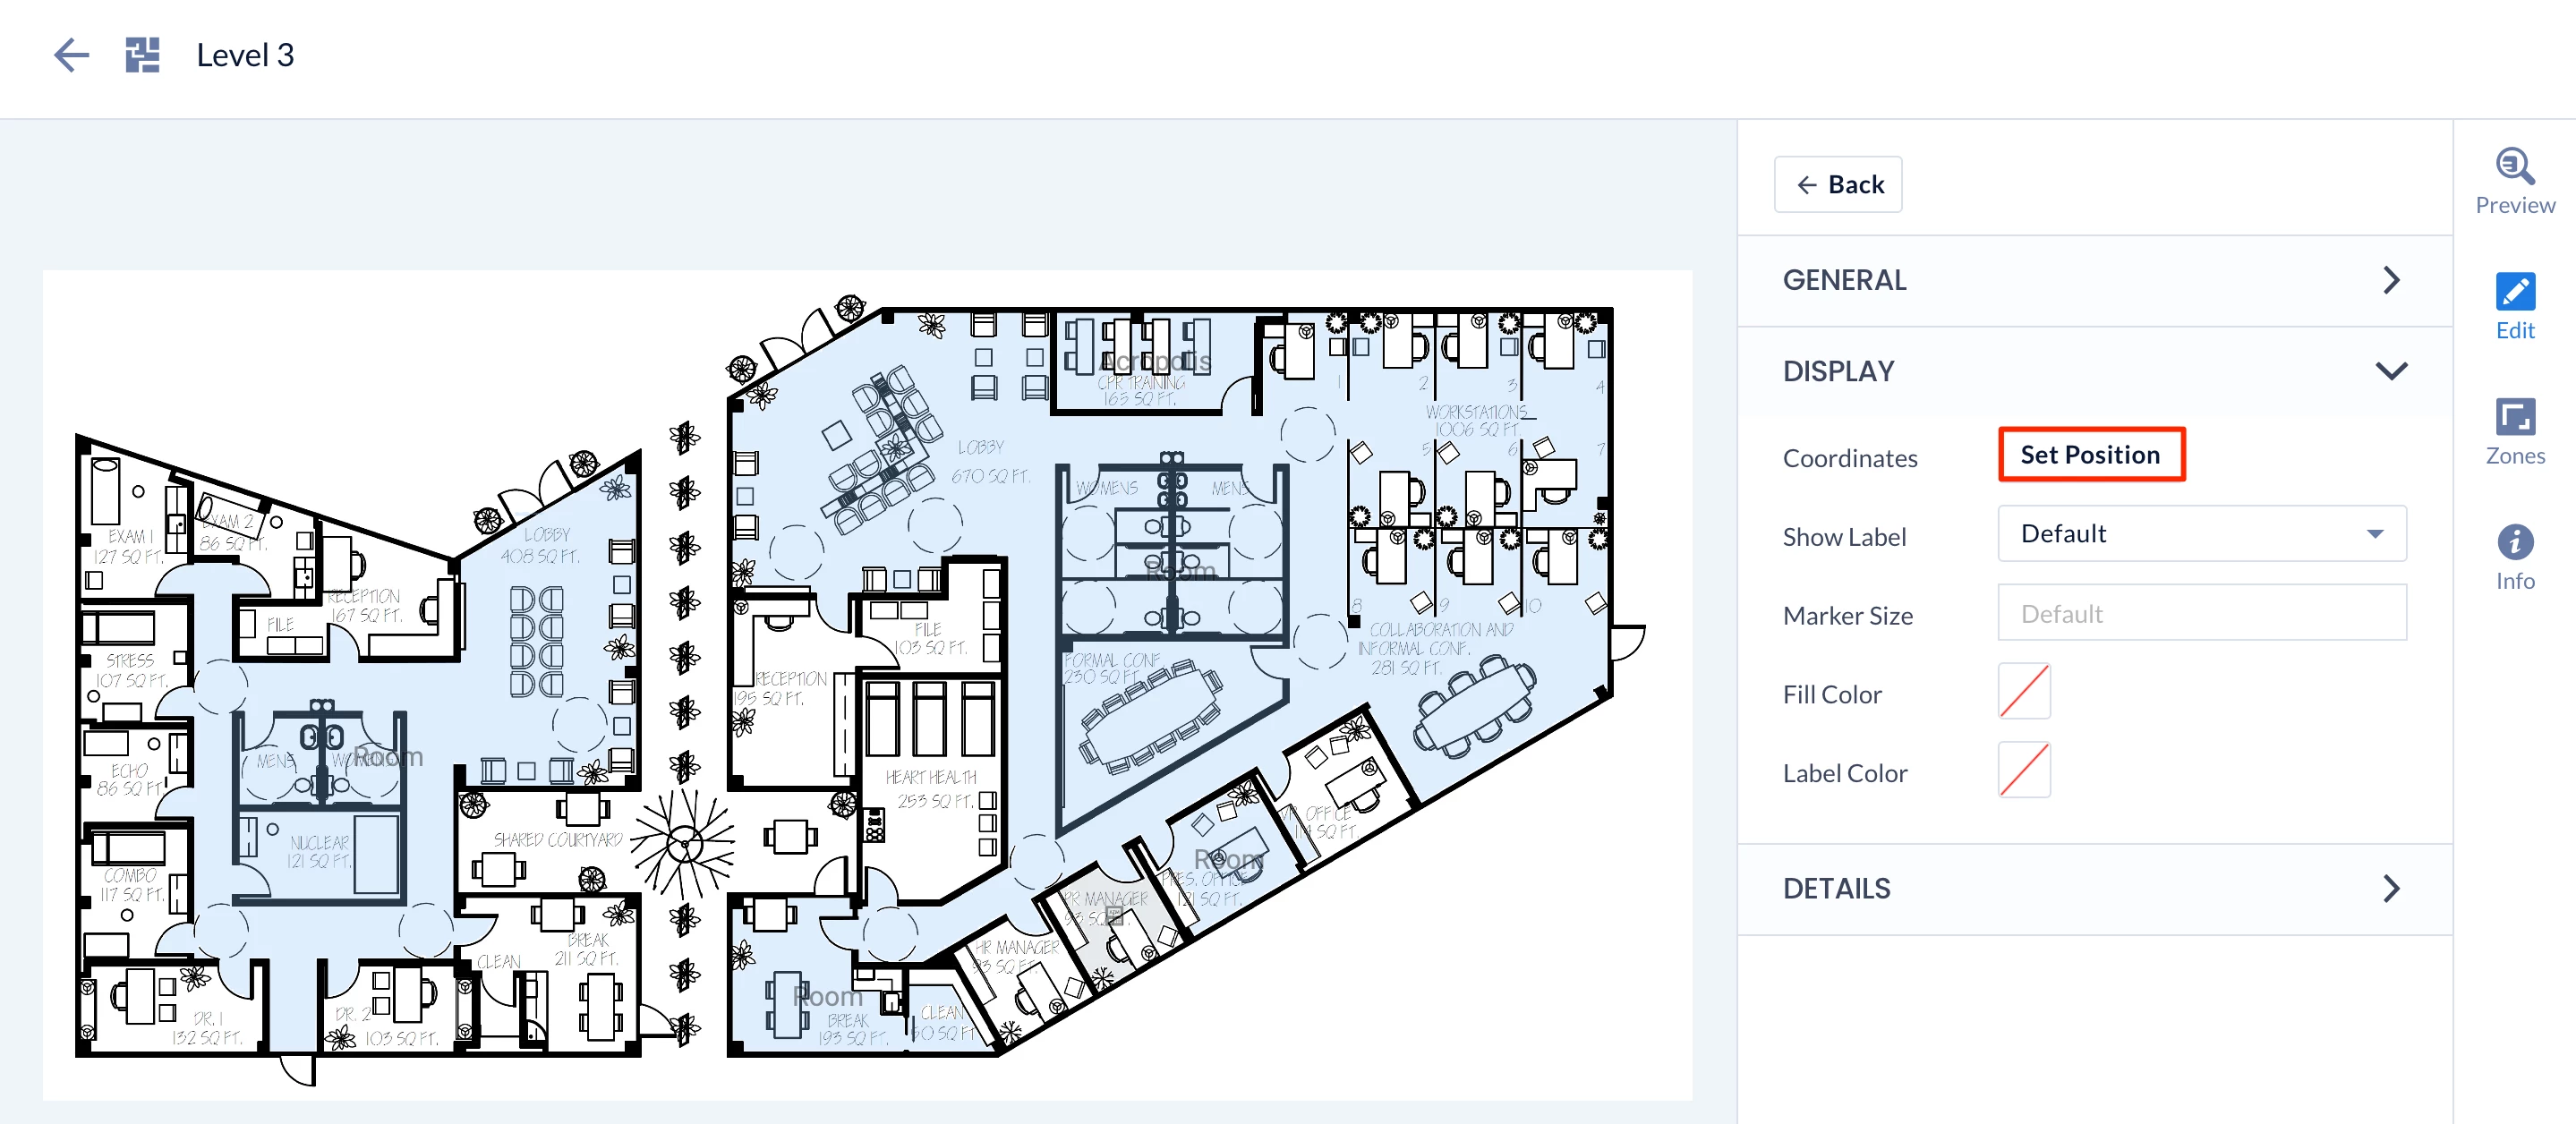
Click the Set Position button, and select one of the map tracing options:
AUTO TRACE – Automatically traces the borders of the room. This is the preferred method when the space on your floor plan has clearly defined borders on all sides.
Polygon – Manually trace the borders of the room using your mouse pointer. This is useful when the space on your floor plan does not have clearly defined borders or the border has large openings in it.
Marker – Manually highlights a location with an icon. This is useful when identifying points of interest within your floor plan.
Click on a room or space on the floor plan to complete the position on the floor plan.
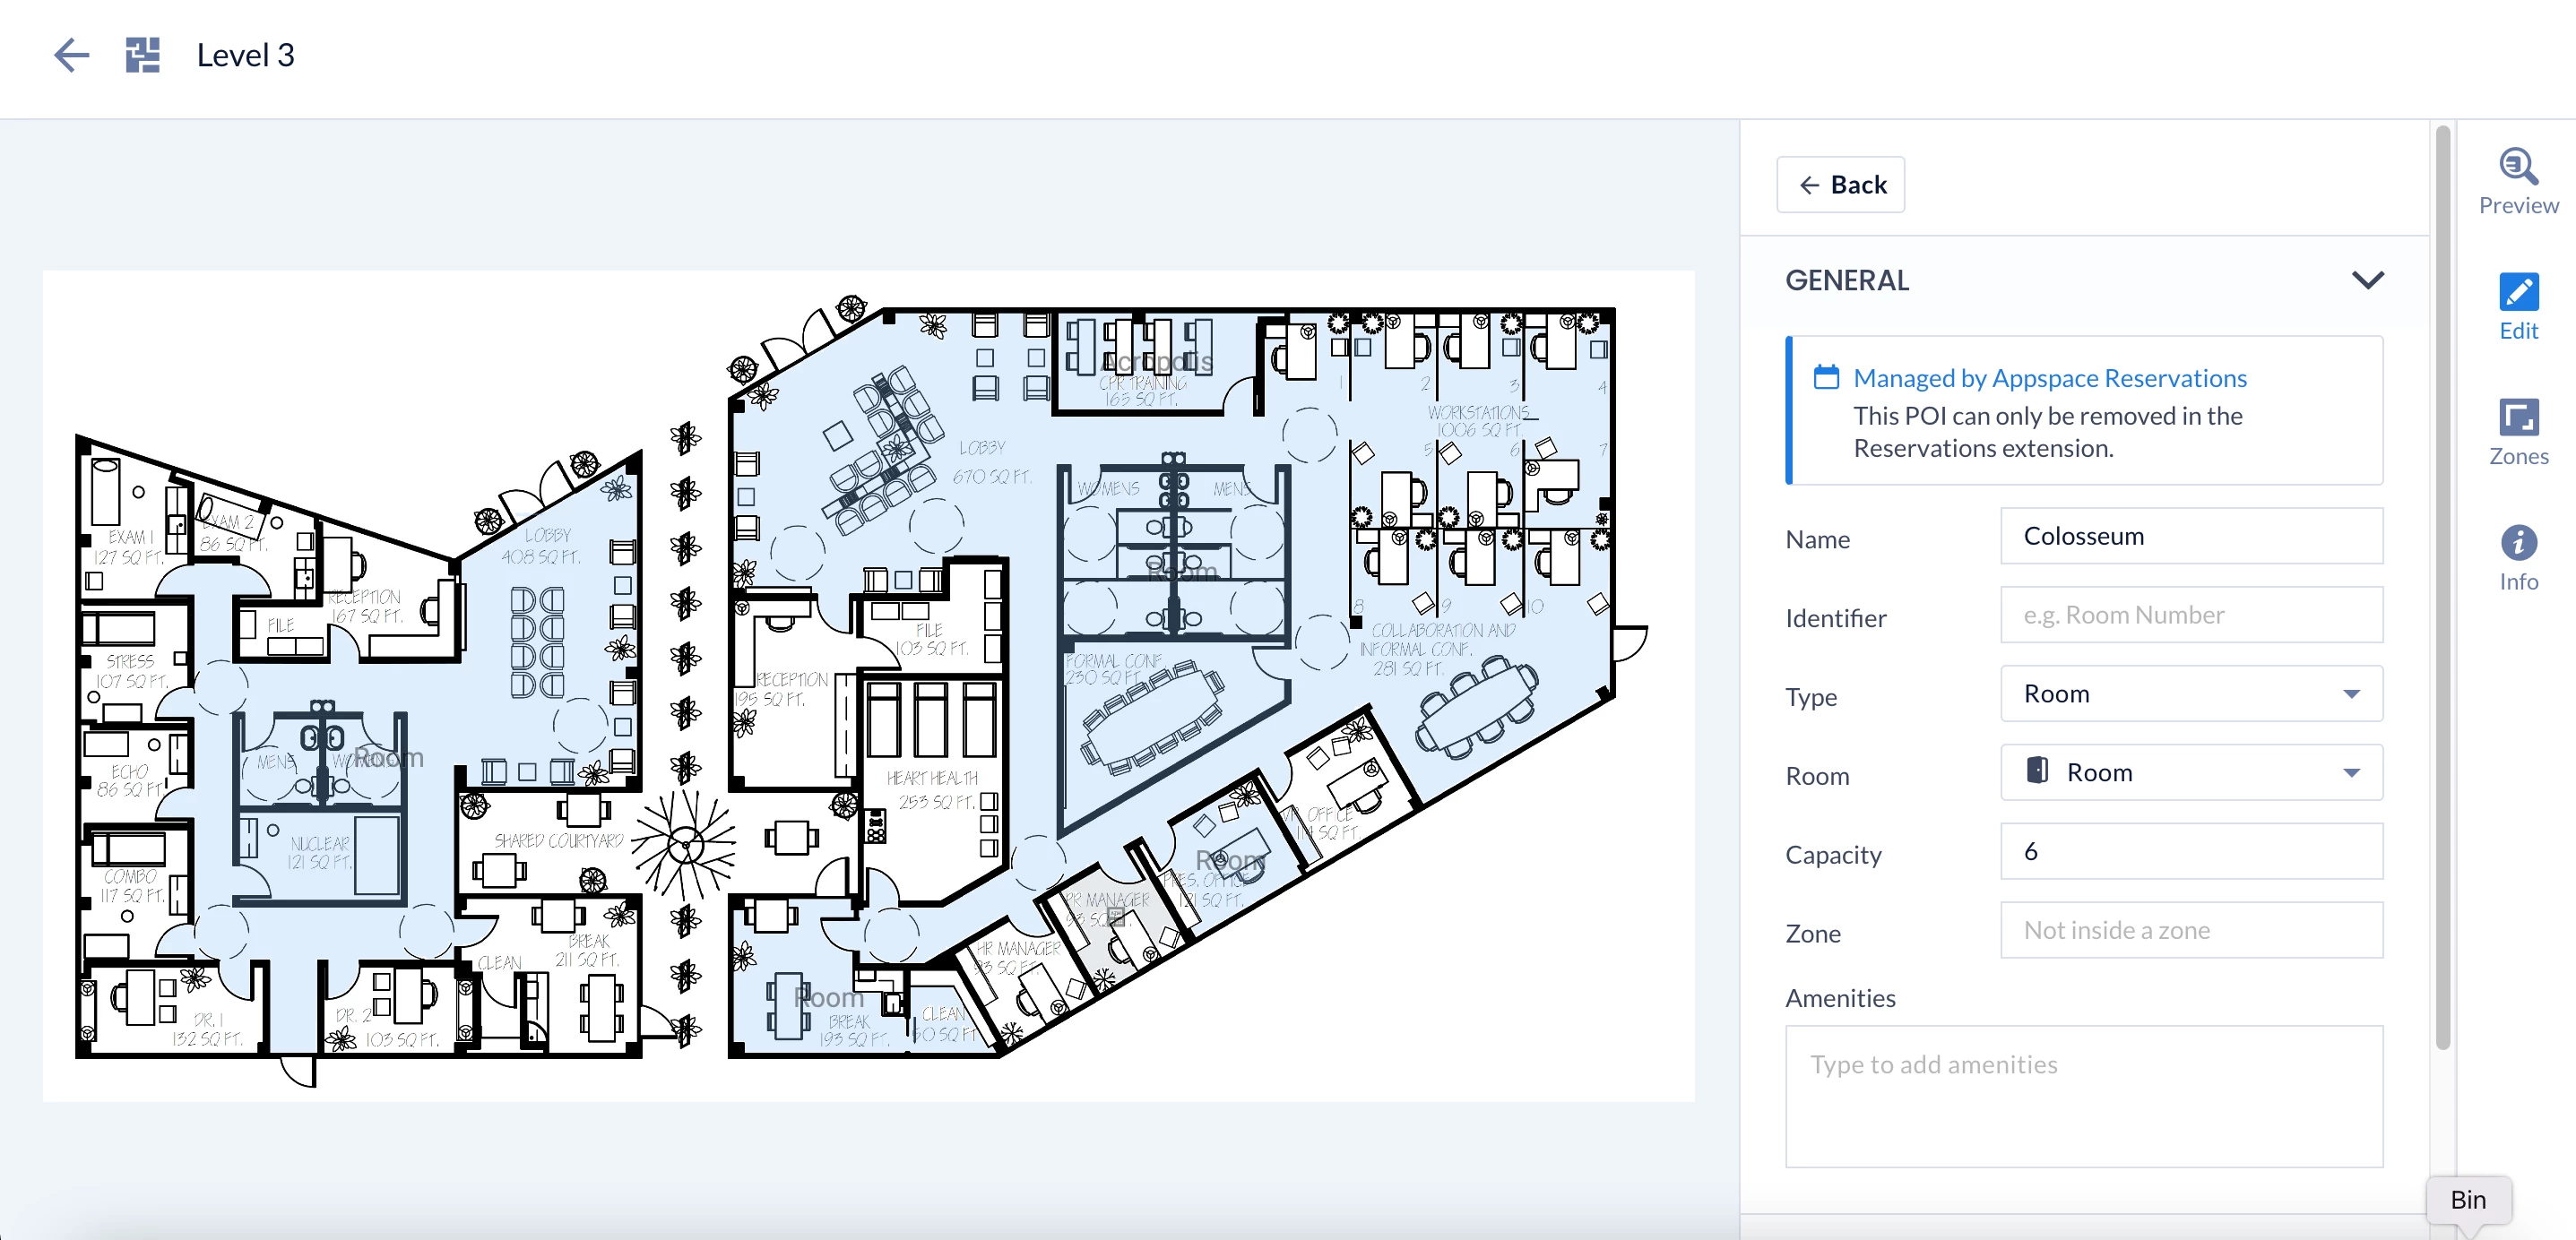
Once set, proceed to configure the following attributes of the reservable resource:
Name – Enter the name of the room or point of interest, if not auto-filled by the calendar resource.
Identifier – Enter the room number or specific location of the area.
Type – Select the type of mapping.
Room – To define rooms in the floor plan, such as offices, conference rooms, auditoriums, etc.
Space – To define spaces in the floor plan, such as training areas, social areas, huddle spaces, etc.
Point of Interest – To define points of interest in the floor plan, such as sanitization stations, elevators, bathrooms, etc.
Reservable – Slide the slider to “YES” to enable reservation in the Employee App. If enabled, users may see the resource on the map but not reserve it. This feature is deactivated by default for external providers. -New
Amenities – Add the amenities available in the room.
Coordinates – Enter the coordinates of the room to the floor plan.
Photo – Add a photo of the room.
Click SAVE.
Manage Floor Plan Resources
Follow the instructions below to bulk manage the rooms, spaces, or points of interest on a floor plan:
Click Locations from the ☰ Appspace menu.
Select the floor plan you wish to manage, and click the Resources icon. New- If multiple floor layers are available, select the layer that you wish to configure under Floor Layers.
Check the rooms, spaces, or points of interest that you wish to manage.
Click the ellipsis, and select one of the following actions:
Change Type/Amenities – Change the type, sub-type, or amenities of the rooms, spaces, and points of interest.
Link to Appspace Reservations – Links all the selected rooms, spaces, and points of interest to this Reservations module.
Delete – Delete the selected rooms, spaces, and points of interest.
Click Save.
Enable Building Pass
The Building Pass feature allows organizations to monitor and limit the number of users who can access the building in a single day, week, or month. Building passes are automatically applied for users who make a reservation on a resource, however, the building pass can also be applied on its own and used only for visitor registration.