



Enable Multiple Views on Your Maps: A Guide to Multi-Layer Floor Plans
Multi-layer floor plans let administrators provide more than one map representation for a floor, such as a standard plan, accessibility view, emergency view, or alternate visual layout. Employees can switch between enabled layers in the Employee App when the feature and layer are configured for their environment.
Key Benefits
This article provides the following benefits:
- Multiple map perspectives: Offer different floor-plan views for distinct navigation or accessibility needs.
- Location-specific control: Enable and configure only the layers needed for each building or floor.
- Improved employee navigation: Make mapped resources and points of interest available in the appropriate Employee App view.
What This Guide Covers
This guide covers the following topics:
- Preparing resources and maps
- Creating and enabling map layers
- Uploading a plan for each layer
- Mapping resources and zones
- Testing layers in the Employee App
Prerequisites
Before you begin, confirm the following requirements:
- Administrative access: You need a Platform license and an Account Owner or authorized Location Admin role.
- Location and floor plan: The building and floor must already exist.
- Mapped content: Resources, zones, and points of interest must be created and mapped for each layer that employees need to use.
- Feature availability: Multi-layer floor plans and Employee App layer selection must be enabled for your environment.
Preparing Map Layers
Step One: Define the Layer Set
Identify the purpose of each layer and use clear names, such as Standard, Accessibility, Emergency, or Isometric. Avoid creating layers that do not provide a distinct employee benefit.
Step Two: Enable Layers in Theme or Map Settings
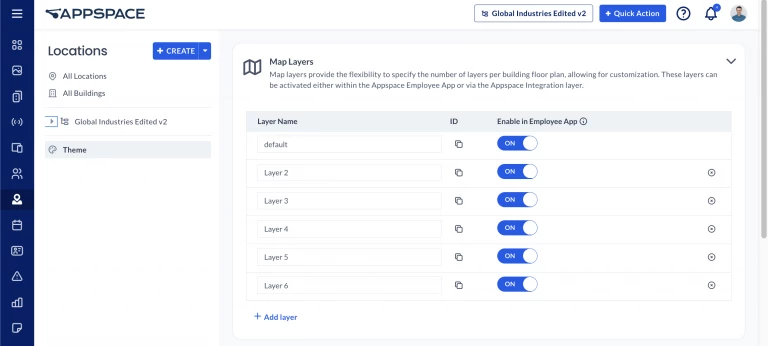
1. Open the Employee Experience theme or map-layer configuration for the applicable scope.
2. Expand Map Layers.
3. Select Add Layer.
4. Enter a clear layer name.
5. Turn on Enable in Employee App, or the equivalent current toggle, for layers employees should be able to select.
6. Save the configuration.
Adding Floor Plans to Layers
Step Three: Open the Floor
1. Open Locations.
2. Select the building and floor.
3. Open the floor-plan configuration.
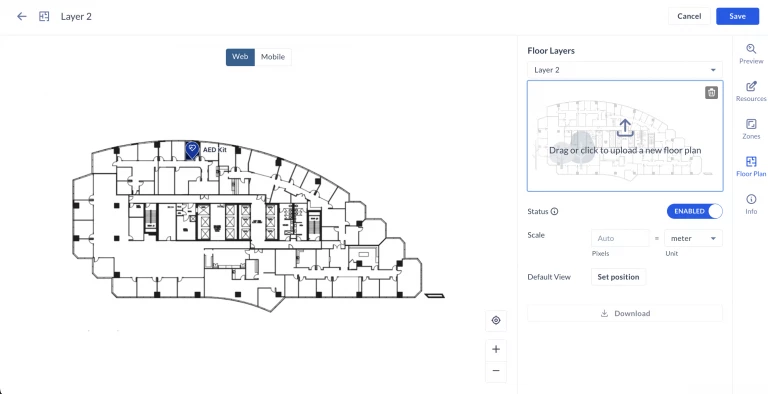
4. Choose the layer to configure.
Step Four: Upload and Configure the Plan
1. Upload the correct floor-plan image for the layer.
2. Save the floor plan.
3. Enable the floor layer for employee use.
4. Open the map editor.
5. Map the required rooms, desks, spaces, zones, and points of interest.
6. Save and publish the map configuration as required.
Testing and Maintenance
Step Five: Validate Each Layer
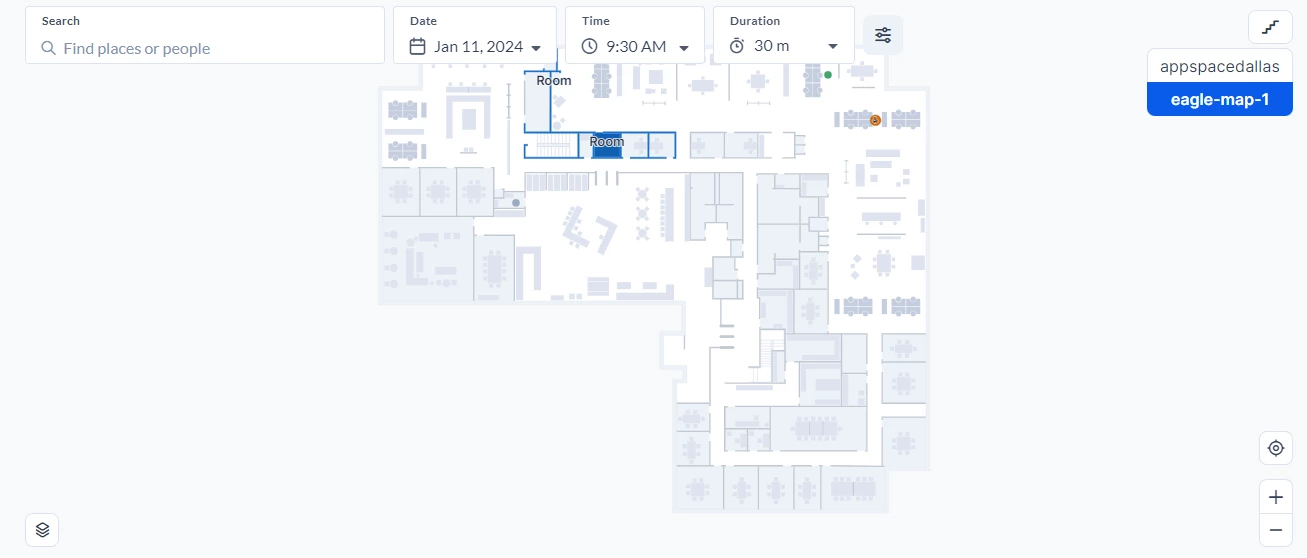
1. Open Places or Map View in the Employee App.
2. Select each enabled layer.
3. Confirm that resources and points of interest appear in the correct positions.
4. Verify that reservable resources open the expected details and booking actions.
5. Test on the supported web and mobile experiences used by your organization.
| Resource dependency: A layer may not be useful or visible to employees until the required resources and map objects are assigned to it. |
Step Six: Keep Layers Synchronized
When rooms, desks, or points of interest move, update every affected layer so employees receive consistent information.